9338E1
Page 1
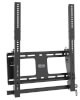
....tripplite.com PROTECT YOUR INVESTMENT! Owner's Manual Portrait Flat-Panel Tilt Wall Mount (with Security) Model: DWTPSC4555M CAUTION: DO NOT EXCEED MAXIMUM LISTED WEIGHT CAPACITY. Register your product for quicker service and ultimate peace of mind. www.tripplite.com/warranty 1111 W. 35th Street, Chicago, IL 60609 USA • www.tripplite.com/support Copyright © 2018 Tripp Lite. You could also win an...
....tripplite.com PROTECT YOUR INVESTMENT! Owner's Manual Portrait Flat-Panel Tilt Wall Mount (with Security) Model: DWTPSC4555M CAUTION: DO NOT EXCEED MAXIMUM LISTED WEIGHT CAPACITY. Register your product for quicker service and ultimate peace of mind. www.tripplite.com/warranty 1111 W. 35th Street, Chicago, IL 60609 USA • www.tripplite.com/support Copyright © 2018 Tripp Lite. You could also win an...
9338E1
Page 2
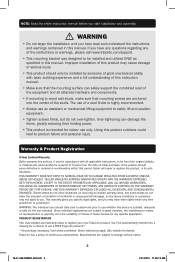
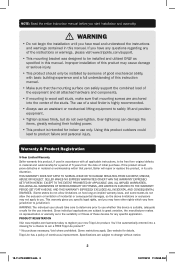
.... Using this device is intended for a chance to product failure and personal injury. You'll be free from the date of the equipment and all applicable instructions, to register your new Tripp Lite product. See website for any of the instructions or warnings, please visit www.tripplite.com/support. • This mounting bracket was designed to be installed by...
.... Using this device is intended for a chance to product failure and personal injury. You'll be free from the date of the equipment and all applicable instructions, to register your new Tripp Lite product. See website for any of the instructions or warnings, please visit www.tripplite.com/support. • This mounting bracket was designed to be installed by...
9338E1
Page 3
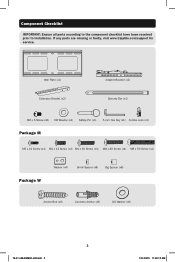
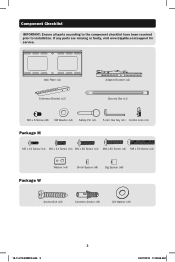
If any parts are missing or faulty, visit www.tripplite.com/support for service. Wall Plate (x1) Extension Bracket (x2) Adapter Bracket (x2) Security Bar (x1) M6 x 6 Screw (x8) D8 Washer (x2) Safety Pin (x1) 5 mm Hex Key (x1) Combo Lock (x1) Package M M5 x 14 Screw (x4) M6 x 14 Screw (x4) M6 x 30 Screw (x4) M8 x 30 Screw (x4) M8 x 50 Screw (x4...
If any parts are missing or faulty, visit www.tripplite.com/support for service. Wall Plate (x1) Extension Bracket (x2) Adapter Bracket (x2) Security Bar (x1) M6 x 6 Screw (x8) D8 Washer (x2) Safety Pin (x1) 5 mm Hex Key (x1) Combo Lock (x1) Package M M5 x 14 Screw (x4) M6 x 14 Screw (x4) M6 x 30 Screw (x4) M8 x 30 Screw (x4) M8 x 50 Screw (x4...
9338E1
Page 4
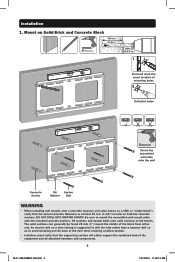
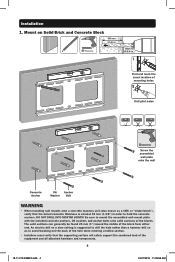
...! Be sure to mount the assembled wall-mount plate with the included concrete anchors, D6 washers and anchor bolts onto solid sections of the block from either end. Installation 1. Mount on a slow setting is suggested to drill the hole rather than a hammer drill so as a CMU or "cinder block"), verify that the supporting surface will safely support the combined load...
...! Be sure to mount the assembled wall-mount plate with the included concrete anchors, D6 washers and anchor bolts onto solid sections of the block from either end. Installation 1. Mount on a slow setting is suggested to drill the hole rather than a hammer drill so as a CMU or "cinder block"), verify that the supporting surface will safely support the combined load...

9338E1
Page 5
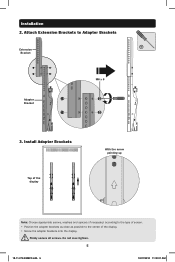
Installation 2. Firmly secure all screws. Install Adapter Brackets Top of the display With the arrow pointing up Note: Choose appropriate screws, washers and spacers (if necessary) according to the type of the display. • Screw the adapter brackets onto the display. Attach Extension Brackets to the center of screen. • Position the adapter brackets as close as possible to Adapter Brackets Extension Bracket Adapter Bracket M6 x 6 3. Do not over-tighten. 5 19-01-428-9338E1-EN.indd 5 1/31/2019 11:26:16 AM
Installation 2. Firmly secure all screws. Install Adapter Brackets Top of the display With the arrow pointing up Note: Choose appropriate screws, washers and spacers (if necessary) according to the type of the display. • Screw the adapter brackets onto the display. Attach Extension Brackets to the center of screen. • Position the adapter brackets as close as possible to Adapter Brackets Extension Bracket Adapter Bracket M6 x 6 3. Do not over-tighten. 5 19-01-428-9338E1-EN.indd 5 1/31/2019 11:26:16 AM
9338E1
Page 6
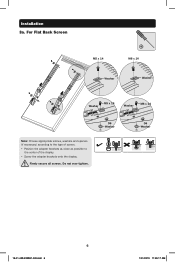
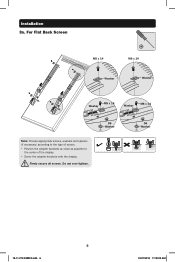
For Flat Back Screen M5 x 14 M6 x 14 Washer Washer M5 x 14 Washer Washer M6 x 14 Note: Choose appropriate screws, washers and spacers (if necessary) according to the type of screen. • Position the adapter brackets as close as possible to the center of the display. • Screw the adapter brackets onto the display. D6 Washer D6 Washer 6 19-01-428-9338E1-EN.indd 6 1/31/2019 11:26:17 AM Do not over-tighten. Installation 3a. Firmly secure all screws.
For Flat Back Screen M5 x 14 M6 x 14 Washer Washer M5 x 14 Washer Washer M6 x 14 Note: Choose appropriate screws, washers and spacers (if necessary) according to the type of screen. • Position the adapter brackets as close as possible to the center of the display. • Screw the adapter brackets onto the display. D6 Washer D6 Washer 6 19-01-428-9338E1-EN.indd 6 1/31/2019 11:26:17 AM Do not over-tighten. Installation 3a. Firmly secure all screws.
9338E1
Page 7
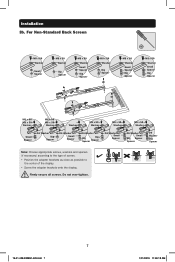
Do not over-tighten. 7 19-01-428-9338E1-EN.indd 7 1/31/2019 11:26:18 AM Installation 3b. Firmly secure all screws. For Non-Standard Back Screen M8 x 50 Washer Small Spacer M8 x 50 Washer Big Spacer M8 x 50 Washer Small Spacer Big Spacer M8 x 50 Washer ... Spacer D6 Washer Big Big Spacer Spacer D6 Washer Small Spacer D6 Washer Small Big Spacer Spacer D6 Washer Big Spacer Note: Choose appropriate screws, washers and spacers (if necessary) according to the type of screen. • Position the adapter brackets as close as possible to the center of the display. •...
Do not over-tighten. 7 19-01-428-9338E1-EN.indd 7 1/31/2019 11:26:18 AM Installation 3b. Firmly secure all screws. For Non-Standard Back Screen M8 x 50 Washer Small Spacer M8 x 50 Washer Big Spacer M8 x 50 Washer Small Spacer Big Spacer M8 x 50 Washer ... Spacer D6 Washer Big Big Spacer Spacer D6 Washer Small Spacer D6 Washer Small Big Spacer Spacer D6 Washer Big Spacer Note: Choose appropriate screws, washers and spacers (if necessary) according to the type of screen. • Position the adapter brackets as close as possible to the center of the display. •...
9338E1
Page 8
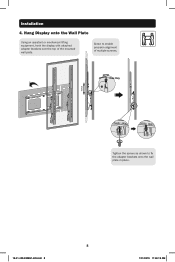
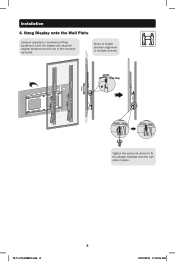
Hang Display onto the Wall Plate Using an assistant or mechanical lifting equipment, hook the display with attached adapter brackets over the top of multiple screens. Screw to fix the adapter brackets onto the wall plate in place. 8 19-01-428-9338E1-EN.indd 8 1/31/2019 11:26:19 AM Installation 4. Hex Key Tighten the screws as shown to enable precision alignment of the mounted wall plate.
Hang Display onto the Wall Plate Using an assistant or mechanical lifting equipment, hook the display with attached adapter brackets over the top of multiple screens. Screw to fix the adapter brackets onto the wall plate in place. 8 19-01-428-9338E1-EN.indd 8 1/31/2019 11:26:19 AM Installation 4. Hex Key Tighten the screws as shown to enable precision alignment of the mounted wall plate.
9338E1
Page 9
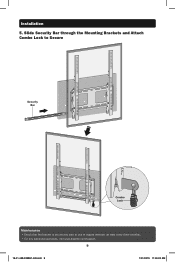
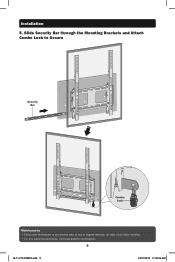
Installation 5. Slide Security Bar through the Mounting Brackets and Attach Combo Lock to Secure Security Bar Combo Lock Maintenance • Check that the bracket is secure and safe to use at regular intervals (at least every three months). • For any additional questions, visit www.tripplite.com/support. 9 19-01-428-9338E1-EN.indd 9 1/31/2019 11:26:20 AM
Installation 5. Slide Security Bar through the Mounting Brackets and Attach Combo Lock to Secure Security Bar Combo Lock Maintenance • Check that the bracket is secure and safe to use at regular intervals (at least every three months). • For any additional questions, visit www.tripplite.com/support. 9 19-01-428-9338E1-EN.indd 9 1/31/2019 11:26:20 AM

Manuel d utilisation du DWTPSC4555M multilingue
Page 1
... win an ISOBAR6ULTRA surge protector-a $100 value! Owner's Manual Portrait Flat-Panel Tilt Wall Mount (with Security) Model: DWTPSC4555M CAUTION: DO NOT EXCEED MAXIMUM LISTED WEIGHT CAPACITY. www.tripplite.com/warranty 1111 W. 35th Street, Chicago, IL 60609 USA • www.tripplite.com/support Copyright © 2019 Tripp Lite. Register your product for quicker service and ultimate peace of mind. All rights reserved...
... win an ISOBAR6ULTRA surge protector-a $100 value! Owner's Manual Portrait Flat-Panel Tilt Wall Mount (with Security) Model: DWTPSC4555M CAUTION: DO NOT EXCEED MAXIMUM LISTED WEIGHT CAPACITY. www.tripplite.com/warranty 1111 W. 35th Street, Chicago, IL 60609 USA • www.tripplite.com/support Copyright © 2019 Tripp Lite. Register your product for quicker service and ultimate peace of mind. All rights reserved...
Manuel d utilisation du DWTPSC4555M multilingue
Page 2
... within that mounting screws are anchored into a drawing for any of the instructions or warnings, please visit www.tripplite.com/support. • This mounting bracket was designed to be installed and utilized ONLY as to win a FREE Tripp Lite product!* * No purchase necessary. WARNING: The individual user should only be installed by someone of this instruction manual. • Make sure that the mounting surface can...
... within that mounting screws are anchored into a drawing for any of the instructions or warnings, please visit www.tripplite.com/support. • This mounting bracket was designed to be installed and utilized ONLY as to win a FREE Tripp Lite product!* * No purchase necessary. WARNING: The individual user should only be installed by someone of this instruction manual. • Make sure that the mounting surface can...
Manuel d utilisation du DWTPSC4555M multilingue
Page 3
If any parts are missing or faulty, visit www.tripplite.com/support for service. Wall Plate (x1) Extension Bracket (x2) Adapter Bracket (x2) Security Bar (x1) M6 x 6 Screw (x8) D8 Washer (x2) Safety Pin (x1) 5 mm Hex Key (x1) Combo Lock (x1) Package M M5 x 14 Screw (x4) M6 x 14 Screw (x4) M6 x 30 Screw (x4) M8 x 30 Screw (x4) M8 x 50 Screw (x4...
If any parts are missing or faulty, visit www.tripplite.com/support for service. Wall Plate (x1) Extension Bracket (x2) Adapter Bracket (x2) Security Bar (x1) M6 x 6 Screw (x8) D8 Washer (x2) Safety Pin (x1) 5 mm Hex Key (x1) Combo Lock (x1) Package M M5 x 14 Screw (x4) M6 x 14 Screw (x4) M6 x 30 Screw (x4) M8 x 30 Screw (x4) M8 x 50 Screw (x4...
Manuel d utilisation du DWTPSC4555M multilingue
Page 4
...Find and mark the exact location of mounting holes Drill pilot holes Screw the assembled wall plate onto the wall Concrete Anchor D6 Anchor Washer Bolt WARNING • When installing wall mounts onto a concrete masonry unit (also known... as a CMU or "cinder block"), verify that the actual concrete thickness is suggested to drill the hole rather than a hammer drill so as to avoid breaking out the back of the hole when entering a hollow section. • Installers must verify that the supporting surface...
...Find and mark the exact location of mounting holes Drill pilot holes Screw the assembled wall plate onto the wall Concrete Anchor D6 Anchor Washer Bolt WARNING • When installing wall mounts onto a concrete masonry unit (also known... as a CMU or "cinder block"), verify that the actual concrete thickness is suggested to drill the hole rather than a hammer drill so as to avoid breaking out the back of the hole when entering a hollow section. • Installers must verify that the supporting surface...
Manuel d utilisation du DWTPSC4555M multilingue
Page 5
Install Adapter Brackets Top of the display With the arrow pointing up Note: Choose appropriate screws, washers and spacers (if necessary) according to the type of screen. • Position the adapter brackets as close as possible to Adapter Brackets Extension Bracket Adapter Bracket M6 x 6 3. Firmly secure all screws. Installation 2. Attach Extension Brackets to the center of the display. • Screw the adapter brackets onto the display. Do not over-tighten. 5 18-11-272-9338F3.indb 5 12/27/2018 11:30:01 AM
Install Adapter Brackets Top of the display With the arrow pointing up Note: Choose appropriate screws, washers and spacers (if necessary) according to the type of screen. • Position the adapter brackets as close as possible to Adapter Brackets Extension Bracket Adapter Bracket M6 x 6 3. Firmly secure all screws. Installation 2. Attach Extension Brackets to the center of the display. • Screw the adapter brackets onto the display. Do not over-tighten. 5 18-11-272-9338F3.indb 5 12/27/2018 11:30:01 AM
Manuel d utilisation du DWTPSC4555M multilingue
Page 6
For Flat Back Screen M5 x 14 M6 x 14 Washer Washer M5 x 14 Washer Washer M6 x 14 Note: Choose appropriate screws, washers and spacers (if necessary) according to the type of screen. • Position the adapter brackets as close as possible to the center of the display. • Screw the adapter brackets onto the display. Firmly secure all screws. D6 Washer D6 Washer 6 18-11-272-9338F3.indb 6 12/27/2018 11:30:02 AM Installation 3a. Do not over-tighten.
For Flat Back Screen M5 x 14 M6 x 14 Washer Washer M5 x 14 Washer Washer M6 x 14 Note: Choose appropriate screws, washers and spacers (if necessary) according to the type of screen. • Position the adapter brackets as close as possible to the center of the display. • Screw the adapter brackets onto the display. Firmly secure all screws. D6 Washer D6 Washer 6 18-11-272-9338F3.indb 6 12/27/2018 11:30:02 AM Installation 3a. Do not over-tighten.

Manuel d utilisation du DWTPSC4555M multilingue
Page 7
... Small Spacer D6 Washer Small Big Spacer Spacer D6 Washer Big Spacer Note: Choose appropriate screws, washers and spacers (if necessary) according to the type of screen. • Position the adapter brackets as close as possible to the center of the display. • Screw the adapter brackets onto the display. Firmly secure all screws. Installation 3b.
... Small Spacer D6 Washer Small Big Spacer Spacer D6 Washer Big Spacer Note: Choose appropriate screws, washers and spacers (if necessary) according to the type of screen. • Position the adapter brackets as close as possible to the center of the display. • Screw the adapter brackets onto the display. Firmly secure all screws. Installation 3b.
Manuel d utilisation du DWTPSC4555M multilingue
Page 8
Installation 4. Screw to fix the adapter brackets onto the wall plate in place. 8 18-11-272-9338F3.indb 8 12/27/2018 11:30:04 AM Hex Key Tighten the screws as shown to enable precision alignment of the mounted wall plate. Hang Display onto the Wall Plate Using an assistant or mechanical lifting equipment, hook the display with attached adapter brackets over the top of multiple screens.
Installation 4. Screw to fix the adapter brackets onto the wall plate in place. 8 18-11-272-9338F3.indb 8 12/27/2018 11:30:04 AM Hex Key Tighten the screws as shown to enable precision alignment of the mounted wall plate. Hang Display onto the Wall Plate Using an assistant or mechanical lifting equipment, hook the display with attached adapter brackets over the top of multiple screens.
Manuel d utilisation du DWTPSC4555M multilingue
Page 9
Slide Security Bar through the Mounting Brackets and Attach Combo Lock to Secure Security Bar Combo Lock Maintenance • Check that the bracket is secure and safe to use at regular intervals (at least every three months). • For any additional questions, visit www.tripplite.com/support. 9 18-11-272-9338F3.indb 9 12/27/2018 11:30:05 AM Installation 5.
Slide Security Bar through the Mounting Brackets and Attach Combo Lock to Secure Security Bar Combo Lock Maintenance • Check that the bracket is secure and safe to use at regular intervals (at least every three months). • For any additional questions, visit www.tripplite.com/support. 9 18-11-272-9338F3.indb 9 12/27/2018 11:30:05 AM Installation 5.