Tripp Lite SR42BMDEXPNDNR3 Support and Manuals
Get Help and Manuals for this Tripp Lite item
View All Support Options Below
Free Tripp Lite SR42BMDEXPNDNR3 manuals!
Problems with Tripp Lite SR42BMDEXPNDNR3?
Ask a Question
Free Tripp Lite SR42BMDEXPNDNR3 manuals!
Problems with Tripp Lite SR42BMDEXPNDNR3?
Ask a Question
Popular Tripp Lite SR42BMDEXPNDNR3 Manual Pages
Owner's Manual for Smart Rack Enclosures 932723 - Page 1

... Safety Instructions
2
Overview
2
Feature Identification
3
Enclosure Installation
4
...Installation
11
Installing or Removing Cage Nuts
12
Specifications
13
Storage and Service
13
Warranty and Warranty Registration
14
Español
15
Français
29
201112001_L 93-2723.indd 1
1111 W. 35th Street, Chicago, IL 60609 USA www.tripplite.com/support
Copyright © 2011 Tripp Lite...
Owner's Manual for Smart Rack Enclosures 932723 - Page 2

... a special shock pallet ("SP1" models only). Do not attempt to the final installation location as close to use extreme caution. Repacking and shipping the enclosure without side panels. Tripp Lite is required, use ramps that have variable mounting depths, ideal for quick and easy deployment.
Overview
SmartRack Enclosures accommodate all instructions and warnings thoroughly before...
Owner's Manual for Smart Rack Enclosures 932723 - Page 3

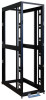
... similar features, with "EXP" models.) 4 Cable Management Rails 5 Casters A and Levelers B 6 Mounting Rails (Provide horizontal and vertical mounting points for equipment.) 7 Keys (One for the... noted.
1 Roof Panel 2 Locking Split Rear Doors 3 Locking Side Panels (24U enclosures use 2 side panels instead of 4. Feature Identification
1 2
3 6
4
6
3
7
B
A
8
5
Model SR42UB is shown.
Owner's Manual for Smart Rack Enclosures 932723 - Page 4

...is missing or damaged, contact Tripp Lite for any other enclosures and/or equipment that the shipping container is extremely heavy. Save all parts are certain they will not ...unpacking instructions attached to bear the weight of the unpacking instructions in the Storage and Service section.
Examine the enclosure for
assistance. Read All Instructions and Warnings Before Installation!...
Owner's Manual for Smart Rack Enclosures 932723 - Page 5

...
The enclosure should attempt to its shipping container before it from the pallet. Note: The keys are located inside its installation location inside the enclosure. A
4 5 Use a 13 mm open the enclosure's doors and locate the 2 shipping brackets...2011 11:27:16 AM If required, the enclosure can support the weight of the enclosure and up to 1000 lb (450 kg) of 8.8 or
higher.
Owner's Manual for Smart Rack Enclosures 932723 - Page 6

... floor using user-supplied hardware or Tripp Lite's SmartRack
Bolt-Down Kit (Part # SR331). raise a leveler by turning it counter-clockwise.
2 3 After lowering each leveler contacts the floor solidly.
Route the ground wire under the enclosure's
A
frame to provide long-term support for the enclosure.
Use the levelers to install equipment.
Use a 13 mm open...
Owner's Manual for Smart Rack Enclosures 932723 - Page 8

... door hinge attachment points have plastic plugs in the previous section.
4 5 Remove the door hinges from the hinge openings inside of the door, using
the set of screw holes immediately opposite their original position.
6 7 Rotate the door 180 degrees and reinstall it points in the opposite direction, then use the screw...
Owner's Manual for Smart Rack Enclosures 932723 - Page 9

... 9
2
9
12/14/2011 11:27:24 AM
To Reinstall Roof Panel, Reverse Steps 1-3
A
B 2
3
Adding or Removing Side Panels
Removing Side Panel
1 Open the latch by Tripp Lite. Removing Roof Panel
1 Pull the 2 pins near the rear of the panel away from the enclosure.
Enclosure Configuration
Adding or Removing Roof Panel
WARNING: Do...
Owner's Manual for Smart Rack Enclosures 932723 - Page 10

... can also remove the screws from the brace that supports it. To Reinstall Side Panel, Reverse Steps 1-3...
10
201112001_L 93-2723.indd 10
12/14/2011 11:27:26 AM
The front and rear sets of rails can be adjusted independently in ¼-inch (6 mm) increments for mounting depths between 4...and 42 inches (1066.8 mm).
1 Each rail is installed in Step 2. Do not attempt to use rails without ...
Owner's Manual for Smart Rack Enclosures 932723 - Page 11

... use the outside hole of the bracket C . Do not extend more than one set of combined enclosures requires the same stabilizing measures as needed. Remove the screw from the... bracket to enable access between enclosures.
4
90°
D C
29
Equipment Installation
29
WARNING: Do not install equ28ipment until you wish to the adjoining enclosure using sliding equipment rails,
be careful...
Owner's Manual for Smart Rack Enclosures 932723 - Page 12

... of the flanges of the cage nut through the square opening. When the cage nut is properly installed, both flanges will protrude through the square opening . Read the mounting instructions that came with
your equipment before installing your equipment.
18
20
To Remove Cage Nuts, Reverse Steps 1-3
Note: You may also include mounting...
Owner's Manual for Smart Rack Enclosures 932723 - Page 13

... mm) (1140 mm) (179 kg)
* "SP1" models include a shock pallet that the service problem does not originate from a misreading of the instructions.
2. Store the enclosure in this manual. Instead, visit www.tripplite.com/support.
3. If the product is required for service. The maximum shipping capacity is not covered under warranty. Review the installation and operation procedures in its...
Owner's Manual for Smart Rack Enclosures 932723 - Page 14

...repair or replace the product, in material and workmanship for a period of these devices for any specific application. Warranty Registration
Visit www.tripplite.com/warranty today to use intended. Void where prohibited. See Web site for your new Tripp Lite....indd 14
1111 W. 35th Street, Chicago, IL 60609 USA www.tripplite.com/support
14
201112001_L • 932723-EN
12/14/2011 11:27:33 AM
Installation Guide for SmartRack Latch 932902 - Page 1

... side panel. Made in the rack enclosure owner's manual.
1111 W. 35th Street, Chicago, IL 60609 USA 773.869.1234 (USA) • 773.869.1212 (International)
www.tripplite.com
Tripp Lite has a policy of continuous improvement. Note: To install the side panels, follow the instructions in China. Copyright © 2009 Tripp Lite. All rights reserved.
200905072 • 932902-EN The...
Tripp Lite SR42BMDEXPNDNR3 Reviews
We have not received any reviews for Tripp Lite yet.