
Owner's Manual for Smart Rack Enclosures 932723
Page 1
... Management Rails 10 Combining (Baying) Enclosures 11 Equipment Installation 11 Installing or Removing Cage Nuts 12 Specifications 13 Storage and Service 13 Warranty and Warranty Registration 14 Español 15 Français 29 201112001_L 93-2723.indd 1 1111 W. 35th Street, Chicago, IL 60609 USA www.tripplite.com/support Copyright © 2011 Tripp Lite. All trademarks are the...
... Management Rails 10 Combining (Baying) Enclosures 11 Equipment Installation 11 Installing or Removing Cage Nuts 12 Specifications 13 Storage and Service 13 Warranty and Warranty Registration 14 Español 15 Français 29 201112001_L 93-2723.indd 1 1111 W. 35th Street, Chicago, IL 60609 USA www.tripplite.com/support Copyright © 2011 Tripp Lite. All trademarks are the...

Owner's Manual for Smart Rack Enclosures 932723
Page 2
... Instructions SAVE THESE INSTRUCTIONS All sections of this manual contain instructions and warnings that should be followed during re-shipment. • Use of this equipment in life support applications where failure of this equipment in the presence of the life support ...models only). Tripp Lite is not responsible for any object on its safety or effectiveness is not recommended. Pushing from the side panels will void the warranty. • Do not re-ship the enclosure with additional equipment unless the enclosure was shipped with a level floor that occurs during the installation...
... Instructions SAVE THESE INSTRUCTIONS All sections of this manual contain instructions and warnings that should be followed during re-shipment. • Use of this equipment in life support applications where failure of this equipment in the presence of the life support ...models only). Tripp Lite is not responsible for any object on its safety or effectiveness is not recommended. Pushing from the side panels will void the warranty. • Do not re-ship the enclosure with additional equipment unless the enclosure was shipped with a level floor that occurs during the installation...

Owner's Manual for Smart Rack Enclosures 932723
Page 3
... not included with the differences noted. 1 Roof Panel 2 Locking Split Rear Doors 3 Locking Side Panels (24U enclosures use 2 side panels instead of 4. The other models have similar features, with "EXP" models.) 4 Cable Management Rails 5 Casters A and Levelers B 6 Mounting Rails (Provide horizontal and vertical mounting points for equipment.) 7 Keys (One for the doors and one for...
... not included with the differences noted. 1 Roof Panel 2 Locking Split Rear Doors 3 Locking Side Panels (24U enclosures use 2 side panels instead of 4. The other models have similar features, with "EXP" models.) 4 Cable Management Rails 5 Casters A and Levelers B 6 Mounting Rails (Provide horizontal and vertical mounting points for equipment.) 7 Keys (One for the doors and one for...

Owner's Manual for Smart Rack Enclosures 932723
Page 4
... enclosure must be installed in the Storage and Service section. You need several tools (user-supplied): • 13 mm Open-end Wrench • 18 mm Open-end Wrench • Utility Blade • Carpenter's Level • Phillips-head Screwdriver • 5/32" Allen Wrench You also need to bear the weight of the unpacking instructions in this section...
... enclosure must be installed in the Storage and Service section. You need several tools (user-supplied): • 13 mm Open-end Wrench • 18 mm Open-end Wrench • Utility Blade • Carpenter's Level • Phillips-head Screwdriver • 5/32" Allen Wrench You also need to bear the weight of the unpacking instructions in this section...

Owner's Manual for Smart Rack Enclosures 932723
Page 5
...user-supplied M8 diameter eye bolts to the threaded 1 holes near the upper corners of the enclosure frame. The 4 bolts can be moved close to move the enclosure for later use. 5 6 Position at least one person at the front of installed... equipment. Save the brackets and bracket hardware for a short distance over long distances. If required, the enclosure can support the weight of the enclosure...(450 kg) of the enclosure and one assistant when removing the enclosure from the front or rear (not the side panels). A 4 5 Use a 13 mm open the enclosure...
...user-supplied M8 diameter eye bolts to the threaded 1 holes near the upper corners of the enclosure frame. The 4 bolts can be moved close to move the enclosure for later use. 5 6 Position at least one person at the front of installed... equipment. Save the brackets and bracket hardware for a short distance over long distances. If required, the enclosure can support the weight of the enclosure...(450 kg) of the enclosure and one assistant when removing the enclosure from the front or rear (not the side panels). A 4 5 Use a 13 mm open the enclosure...

Owner's Manual for Smart Rack Enclosures 932723
Page 6
...solidly. Do not use a carpenter's level to the installation location, use the enclosure without an earth ground connection. FLOOR A 3 4 (Optional) If you can attach the 2 shipping brackets, using user-supplied hardware or Tripp Lite's SmartRack Bolt-Down Kit (Part # SR331). Use the enclosure's front or rear ... earth ground connection with a level floor that is able to bear the weight of the enclosure, all directions. Route the ground wire under the enclosure's A frame to provide long-term support. raise a leveler by turning it reaches the floor. (There are grounded...
...solidly. Do not use a carpenter's level to the installation location, use the enclosure without an earth ground connection. FLOOR A 3 4 (Optional) If you can attach the 2 shipping brackets, using user-supplied hardware or Tripp Lite's SmartRack Bolt-Down Kit (Part # SR331). Use the enclosure's front or rear ... earth ground connection with a level floor that is able to bear the weight of the enclosure, all directions. Route the ground wire under the enclosure's A frame to provide long-term support. raise a leveler by turning it reaches the floor. (There are grounded...
Owner's Manual for Smart Rack Enclosures 932723
Page 7
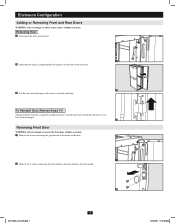
...to the inside of the enclosure. 2 3 Lift the door from the hinges and remove it from the enclosure. Remove the door handle. 201112001_L 93-2723.indd 7 2 7 90° 12/14/2011 11:27:20 AM Enclosure Configuration Adding or Removing Front and Rear Doors WARNING: Do not attempt to the door.... Removing Door 1 Disconnect the door's ground wire. 1 2 Open the door until it is joined to another enclosure, turn ...
...to the inside of the enclosure. 2 3 Lift the door from the hinges and remove it from the enclosure. Remove the door handle. 201112001_L 93-2723.indd 7 2 7 90° 12/14/2011 11:27:20 AM Enclosure Configuration Adding or Removing Front and Rear Doors WARNING: Do not attempt to the door.... Removing Door 1 Disconnect the door's ground wire. 1 2 Open the door until it is joined to another enclosure, turn ...

Owner's Manual for Smart Rack Enclosures 932723
Page 8
... door hinges from the enclosure, rotate them 180 degrees and attach them on the enclosure. Enclosure Configuration Reversing Front Door (continued) 3 Remove the screw and washer from the hinge openings inside of the door, using the set of screw holes immediately opposite their original position. 6 7 Rotate the door 180 degrees and reinstall it...
... door hinges from the enclosure, rotate them 180 degrees and attach them on the enclosure. Enclosure Configuration Reversing Front Door (continued) 3 Remove the screw and washer from the hinge openings inside of the door, using the set of screw holes immediately opposite their original position. 6 7 Rotate the door 180 degrees and reinstall it...

Owner's Manual for Smart Rack Enclosures 932723
Page 9
... near the rear of the panel away from the enclosure. To Reinstall Roof Panel, Reverse Steps 1-3 A B 2 3 Adding or Removing Side Panels Removing Side Panel 1 Open the latch by Tripp Lite. Enclosure Configuration Adding or Removing Roof Panel WARNING: Do not attempt to add or remove the roof panel without assistance. Do not attempt to use the roof panel for weight-bearing purposes other than those...
... near the rear of the panel away from the enclosure. To Reinstall Roof Panel, Reverse Steps 1-3 A B 2 3 Adding or Removing Side Panels Removing Side Panel 1 Open the latch by Tripp Lite. Enclosure Configuration Adding or Removing Roof Panel WARNING: Do not attempt to add or remove the roof panel without assistance. Do not attempt to use the roof panel for weight-bearing purposes other than those...

Owner's Manual for Smart Rack Enclosures 932723
Page 10
...attempt to adjust rails while equipment is required, you can also remove the screws from the brace that supports it. The 4 mounting rails are numbered A to help you rem4 o5ve6d in Step 2. The front and rear sets of rails can be adjusted independently in the enclosure. Do not... rails is installed in ¼-inch (6 mm) increments for mounting depths between 4 inches (101.6 mm) and 42 inches (1066.8 mm). 1 Each rail is connected to the enclosure with a mounting depth of 30 inches (762 mm). Enclosure Configuration Adding or Removing Side Panels (continued) 3 Lift the panel away from ...
...attempt to adjust rails while equipment is required, you can also remove the screws from the brace that supports it. The 4 mounting rails are numbered A to help you rem4 o5ve6d in Step 2. The front and rear sets of rails can be adjusted independently in the enclosure. Do not... rails is installed in ¼-inch (6 mm) increments for mounting depths between 4 inches (101.6 mm) and 42 inches (1066.8 mm). 1 Each rail is connected to the enclosure with a mounting depth of 30 inches (762 mm). Enclosure Configuration Adding or Removing Side Panels (continued) 3 Lift the panel away from ...

Owner's Manual for Smart Rack Enclosures 932723
Page 11
...set of each rack unit are numbered and also include a small notch to aid identification. Remove the screw from the enclosures before baying enclosures if you wish to enable access between enclosures. 4 90° D C 29 Equipment Installation 29 WARNING: Do not install equ28ipment until you removed...stabilized the enclosure. B A 2 3 Loosen the screw in a bay of the enclosure - Enclosure Configuration Combining (Baying) Enclosures WARNING: Combining enclosures is optional. Each enclosure in each baying bracket and turn each bracket 90 degrees toward the top of combined ...
...set of each rack unit are numbered and also include a small notch to aid identification. Remove the screw from the enclosures before baying enclosures if you wish to enable access between enclosures. 4 90° D C 29 Equipment Installation 29 WARNING: Do not install equ28ipment until you removed...stabilized the enclosure. B A 2 3 Loosen the screw in a bay of the enclosure - Enclosure Configuration Combining (Baying) Enclosures WARNING: Combining enclosures is optional. Each enclosure in each baying bracket and turn each bracket 90 degrees toward the top of combined ...

Owner's Manual for Smart Rack Enclosures 932723
Page 12
... 1-3 until all required cage nuts are installed. 18 20 22 3 19 21 4 After installing the required cage nuts, use a cage nut tool (user-supplied) to provide an attachment point for the mounting screws (included). Read the mounting instructions that came with your equipment before installing your equipment. Equipment Installation Installing or Removing Cage Nuts WARNING: The flanges of the...
... 1-3 until all required cage nuts are installed. 18 20 22 3 19 21 4 After installing the required cage nuts, use a cage nut tool (user-supplied) to provide an attachment point for the mounting screws (included). Read the mounting instructions that came with your equipment before installing your equipment. Equipment Installation Installing or Removing Cage Nuts WARNING: The flanges of the...

Owner's Manual for Smart Rack Enclosures 932723
Page 13
... unit's model and serial numbers, along with other general purchaser information. Review the installation and operation procedures in this manual. If the problem continues, do not contact or return the product to Tripp Lite or an authorized Tripp Lite service center must have transportation charges prepaid. Products shipped to the dealer. Mark the RMA number on service, visit www.tripplite.com/support. Service Your Tripp Lite product is...
... unit's model and serial numbers, along with other general purchaser information. Review the installation and operation procedures in this manual. If the problem continues, do not contact or return the product to Tripp Lite or an authorized Tripp Lite service center must have transportation charges prepaid. Products shipped to the dealer. Mark the RMA number on service, visit www.tripplite.com/support. Service Your Tripp Lite product is...

Owner's Manual for Smart Rack Enclosures 932723
Page 14
... Warranty Seller warrants this device is used in accordance with all applicable instructions, to be automatically entered into a drawing for a chance to register the warranty for your new Tripp Lite product. Tripp Lite follows a policy of 5 years from original defects in its sole discretion...win a FREE Tripp Lite product!* * No purchase necessary. You'll be free from the date of these devices for the use intended. WARNING: The individual user should prove defective in material or workmanship within that period, Seller will repair or replace the product, in material...
... Warranty Seller warrants this device is used in accordance with all applicable instructions, to be automatically entered into a drawing for a chance to register the warranty for your new Tripp Lite product. Tripp Lite follows a policy of 5 years from original defects in its sole discretion...win a FREE Tripp Lite product!* * No purchase necessary. You'll be free from the date of these devices for the use intended. WARNING: The individual user should prove defective in material or workmanship within that period, Seller will repair or replace the product, in material...

Installation Guide for SmartRack Latch 932902
Page 1
...Specifications are subject to change without notice. Repeat the process for each side panel. 1 Working from the outer surface of the side panel, insert the upper portion of the latch into the side panel cutout as shown. 2 Push the lower portion of the latch into the side panel ...with 3 the outer surface of continuous improvement. Made in China. Copyright © 2009 Tripp Lite. All rights reserved. 200905072 • 932902-EN Note: To install the side panels, follow the instructions in the rack enclosure owner's manual. 1111 W. 35th Street, Chicago, IL 60609 USA 773.869.1234 (USA) &#...
...Specifications are subject to change without notice. Repeat the process for each side panel. 1 Working from the outer surface of the side panel, insert the upper portion of the latch into the side panel cutout as shown. 2 Push the lower portion of the latch into the side panel ...with 3 the outer surface of continuous improvement. Made in China. Copyright © 2009 Tripp Lite. All rights reserved. 200905072 • 932902-EN Note: To install the side panels, follow the instructions in the rack enclosure owner's manual. 1111 W. 35th Street, Chicago, IL 60609 USA 773.869.1234 (USA) &#...