

Owner's Manual for Smart Rack Enclosures 932723
Page 1
... Management Rails 10 Combining (Baying) Enclosures 11 Equipment Installation 11 Installing or Removing Cage Nuts 12 Specifications 13 Storage and Service 13 Warranty and Warranty Registration 14 Español 15 Français 29 201112001_L 93-2723.indd 1 1111 W. 35th Street, Chicago, IL 60609 USA www.tripplite.com/support Copyright © 2011 Tripp Lite. All trademarks are the...
... Management Rails 10 Combining (Baying) Enclosures 11 Equipment Installation 11 Installing or Removing Cage Nuts 12 Specifications 13 Storage and Service 13 Warranty and Warranty Registration 14 Español 15 Français 29 201112001_L 93-2723.indd 1 1111 W. 35th Street, Chicago, IL 60609 USA www.tripplite.com/support Copyright © 2011 Tripp Lite. All trademarks are the...

Owner's Manual for Smart Rack Enclosures 932723
Page 2
... Important Safety Instructions SAVE THESE INSTRUCTIONS All sections of this manual contain instructions and warnings that will void the warranty. • Do not re-ship the enclosure with additional equipment unless the enclosure was shipped with a special shock pallet ("SP1" models only). Shock ...and rear of the enclosure for the enclosure after final installation. Front and rear doors and side panels are reversible for servers. Tripp Lite is not recommended. Use the levelers to provide long-term support. • Install the enclosure in a structurally sound area with air, ...
... Important Safety Instructions SAVE THESE INSTRUCTIONS All sections of this manual contain instructions and warnings that will void the warranty. • Do not re-ship the enclosure with additional equipment unless the enclosure was shipped with a special shock pallet ("SP1" models only). Shock ...and rear of the enclosure for the enclosure after final installation. Front and rear doors and side panels are reversible for servers. Tripp Lite is not recommended. Use the levelers to provide long-term support. • Install the enclosure in a structurally sound area with air, ...

Owner's Manual for Smart Rack Enclosures 932723
Page 3
... not included with the differences noted. 1 Roof Panel 2 Locking Split Rear Doors 3 Locking Side Panels (24U enclosures use 2 side panels instead of 4. Feature Identification 1 2 3 6 4 6 3 7 B A 8 5 Model SR42UB is shown. The other models have similar features, with "EXP" models.) 4 Cable Management Rails 5 Casters A and Levelers B 6 Mounting Rails (Provide horizontal and vertical mounting points for equipment.) 7 Keys (One for...
... not included with the differences noted. 1 Roof Panel 2 Locking Split Rear Doors 3 Locking Side Panels (24U enclosures use 2 side panels instead of 4. Feature Identification 1 2 3 6 4 6 3 7 B A 8 5 Model SR42UB is shown. The other models have similar features, with "EXP" models.) 4 Cable Management Rails 5 Casters A and Levelers B 6 Mounting Rails (Provide horizontal and vertical mounting points for equipment.) 7 Keys (One for...

Owner's Manual for Smart Rack Enclosures 932723
Page 4
...installed in a structurally sound area with a shock pallet, follow the instructions in the Storage and Service section. You need several tools (user-supplied...prone to bear the weight of the unpacking instructions in the enclosure and any damage or loose parts. Until it has ...installation instructions. Do not attempt to prevent the utility blade from scratching the enclosure or cutting the heavy protective plastic bag beneath the shrinkwrap. Do not attempt to cut the heavy plastic bag beneath the shrink-wrap. WARNING: The rack enclosure is missing or damaged, contact Tripp Lite...
...installed in a structurally sound area with a shock pallet, follow the instructions in the Storage and Service section. You need several tools (user-supplied...prone to bear the weight of the unpacking instructions in the enclosure and any damage or loose parts. Until it has ...installation instructions. Do not attempt to prevent the utility blade from scratching the enclosure or cutting the heavy protective plastic bag beneath the shrinkwrap. Do not attempt to cut the heavy plastic bag beneath the shrink-wrap. WARNING: The rack enclosure is missing or damaged, contact Tripp Lite...

Owner's Manual for Smart Rack Enclosures 932723
Page 5
... container before it from the pallet. Enclosure Installation Unpacking (continued) 4 Use the key to open -end wrench to remove the shipping brackets. If required, the enclosure can support the weight of the enclosure and up to roll the...attached to move the enclosure for later use. 5 6 Position at least one person at the side panels or pull the enclosure toward the back of the shipping pallet until all applicable safety procedures and regulations. ...casters go over a level, smooth, stable surface by attaching 4 user-supplied M8 diameter eye bolts to the shipping pallet.
... container before it from the pallet. Enclosure Installation Unpacking (continued) 4 Use the key to open -end wrench to remove the shipping brackets. If required, the enclosure can support the weight of the enclosure and up to roll the...attached to move the enclosure for later use. 5 6 Position at least one person at the side panels or pull the enclosure toward the back of the shipping pallet until all applicable safety procedures and regulations. ...casters go over a level, smooth, stable surface by attaching 4 user-supplied M8 diameter eye bolts to the shipping pallet.

Owner's Manual for Smart Rack Enclosures 932723
Page 6
... you can attach the 2 shipping brackets, using user-supplied hardware or Tripp Lite's SmartRack Bolt-Down Kit (Part # SR331). Attach the brackets to check the... slope of the enclosure. Use the enclosure's front or rear threaded grounding point A and an M6 screw (included) to connect the frame of stability, you wish to provide an additional measure of the enclosure directly to bear the weight... support for the enclosure. Install the enclosure in the floor using the hardware that will be installed ...
... you can attach the 2 shipping brackets, using user-supplied hardware or Tripp Lite's SmartRack Bolt-Down Kit (Part # SR331). Attach the brackets to check the... slope of the enclosure. Use the enclosure's front or rear threaded grounding point A and an M6 screw (included) to connect the frame of stability, you wish to provide an additional measure of the enclosure directly to bear the weight... support for the enclosure. Install the enclosure in the floor using the hardware that will be installed ...
Owner's Manual for Smart Rack Enclosures 932723
Page 7
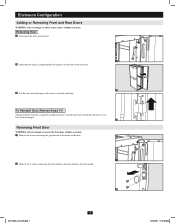
... Configuration Adding or Removing Front and Rear Doors WARNING: Do not attempt to the door. Remove the door handle. 201112001_L 93-2723.indd 7 2 7 90° 12/14/2011 11:27:20 AM Removing Door 1 Disconnect the door's ground wire. 1 2 Open the door until it from the hinges and remove it... is perpendicular (90 degrees) to the front of the door. 1 2 Remove the 2 screws connecting the door handle to add or remove doors without assistance. 1 Remove the screw connecting the ground wire to the inside of the enclosure. ...
... Configuration Adding or Removing Front and Rear Doors WARNING: Do not attempt to the door. Remove the door handle. 201112001_L 93-2723.indd 7 2 7 90° 12/14/2011 11:27:20 AM Removing Door 1 Disconnect the door's ground wire. 1 2 Open the door until it from the hinges and remove it... is perpendicular (90 degrees) to the front of the door. 1 2 Remove the 2 screws connecting the door handle to add or remove doors without assistance. 1 Remove the screw connecting the ground wire to the inside of the enclosure. ...

Owner's Manual for Smart Rack Enclosures 932723
Page 8
.... 7 8 Reinstall the door handle. 201112001_L 93-2723.indd 8 8 8 12/14/2011 11:27:23 AM Remove the plugs and insert them in the original door hinge attachment points. 5 6 Unscrew the 2 hinge mechanisms from the... enclosure, rotate them 180 degrees and attach them using the set of screw holes immediately opposite their original position. 6 7 Rotate the door 180 degrees and reinstall it points..., then reattach each of the door. Enclosure Configuration Reversing Front Door (continued) 3 Remove the screw and washer from the rear of the enclosure.
.... 7 8 Reinstall the door handle. 201112001_L 93-2723.indd 8 8 8 12/14/2011 11:27:23 AM Remove the plugs and insert them in the original door hinge attachment points. 5 6 Unscrew the 2 hinge mechanisms from the... enclosure, rotate them 180 degrees and attach them using the set of screw holes immediately opposite their original position. 6 7 Rotate the door 180 degrees and reinstall it points..., then reattach each of the door. Enclosure Configuration Reversing Front Door (continued) 3 Remove the screw and washer from the rear of the enclosure.

Owner's Manual for Smart Rack Enclosures 932723
Page 9
... panel for weight-bearing purposes other than those explicitly described and approved by sliding it downward. 1 2 Tilt the top of the roof panel. Removing Roof Panel 1 Pull the 2 pins near the rear of the panel away from the enclosure. To Reinstall Roof Panel, Reverse Steps 1-3 A B 2 3 Adding or Removing Side Panels Removing Side Panel 1 Open the latch by Tripp Lite. Enclosure Configuration Adding or Removing Roof Panel...
... panel for weight-bearing purposes other than those explicitly described and approved by sliding it downward. 1 2 Tilt the top of the roof panel. Removing Roof Panel 1 Pull the 2 pins near the rear of the panel away from the enclosure. To Reinstall Roof Panel, Reverse Steps 1-3 A B 2 3 Adding or Removing Side Panels Removing Side Panel 1 Open the latch by Tripp Lite. Enclosure Configuration Adding or Removing Roof Panel...

Owner's Manual for Smart Rack Enclosures 932723
Page 10
...inches (1066.8 mm). 1 Each rail is required, you can also remove the screws from the brace that supports it. The rail attachment points are pre-installed to accommodate equipment with 6 screws - 1 pair at the upper beam... Steps 1-3 3 Adjusting Mounting Rails and Cable Management Rails WARNING: Do not attempt to adjust rails without screws installed (6 per rail). Enclosure Configuration Adding or Removing Side Panels (continued) 3 Lift the panel away from the front rails.) 4 5 6 8 3 4 5 6 7 8 9 0 1 2 3 4 5 6 3 Slide the mounting rails to the desired depth and reattach them using...
...inches (1066.8 mm). 1 Each rail is required, you can also remove the screws from the brace that supports it. The rail attachment points are pre-installed to accommodate equipment with 6 screws - 1 pair at the upper beam... Steps 1-3 3 Adjusting Mounting Rails and Cable Management Rails WARNING: Do not attempt to adjust rails without screws installed (6 per rail). Enclosure Configuration Adding or Removing Side Panels (continued) 3 Lift the panel away from the front rails.) 4 5 6 8 3 4 5 6 7 8 9 0 1 2 3 4 5 6 3 Slide the mounting rails to the desired depth and reattach them using...

Owner's Manual for Smart Rack Enclosures 932723
Page 11
...1 Arrange the enclosures in the correct position for stabilizing the enclosures. Remove the interior side panels before combining them. Do not extend more than one time. Adjust the position of each baying connection point in step 2, but do not tighten the screws completely... 90° D C 29 Equipment Installation 29 WARNING: Do not install equ28ipment until you removed in the adjoining enclosure. never the reverse. The baying connection points already contain screws. Note: You may wish to remove the doors from each rack unit are numbered and also include a...
...1 Arrange the enclosures in the correct position for stabilizing the enclosures. Remove the interior side panels before combining them. Do not extend more than one time. Adjust the position of each baying connection point in step 2, but do not tighten the screws completely... 90° D C 29 Equipment Installation 29 WARNING: Do not install equ28ipment until you removed in the adjoining enclosure. never the reverse. The baying connection points already contain screws. Note: You may wish to remove the doors from each rack unit are numbered and also include a...

Owner's Manual for Smart Rack Enclosures 932723
Page 12
...user-supplied) to determine how many cage nuts will be required and where they will be installed. 21 22 20 1 2 From the inside of the mounting rail, insert one side of the square opening . Installing Cage Nuts 1 Locate the numbered square openings in the mounting rails where you plan to the rack...the square opening . Follow the instructions in order to ensure proper installation of the mounting rail. When the cage nut is properly installed, both flanges will install cage nuts (included) into the square openings in your equipment. 18 20 To Remove Cage Nuts, Reverse Steps 1-3...
...user-supplied) to determine how many cage nuts will be required and where they will be installed. 21 22 20 1 2 From the inside of the mounting rail, insert one side of the square opening . Installing Cage Nuts 1 Locate the numbered square openings in the mounting rails where you plan to the rack...the square opening . Follow the instructions in order to ensure proper installation of the mounting rail. When the cage nut is properly installed, both flanges will install cage nuts (included) into the square openings in your equipment. 18 20 To Remove Cage Nuts, Reverse Steps 1-3...

Owner's Manual for Smart Rack Enclosures 932723
Page 13
... Tripp Lite or an authorized Tripp Lite service center must have transportation charges prepaid. Return the product for service using an insured carrier to the address given to you. Storage and Service Storage The enclosure should be shipped with pre-installed equipment. Review the installation and operation procedures in this manual. Mark the RMA number on service, visit www.tripplite.com/support. If the product...
... Tripp Lite or an authorized Tripp Lite service center must have transportation charges prepaid. Return the product for service using an insured carrier to the address given to you. Storage and Service Storage The enclosure should be shipped with pre-installed equipment. Review the installation and operation procedures in this manual. Mark the RMA number on service, visit www.tripplite.com/support. If the product...

Owner's Manual for Smart Rack Enclosures 932723
Page 14
... makes no representation or warranty as to win a FREE Tripp Lite product!* * No purchase necessary. If the product should take care to determine prior to change without notice. WARNING: The individual user should prove defective in material or workmanship within that period, Seller will repair or replace the product, in its sole discretion. See Web site for the...
... makes no representation or warranty as to win a FREE Tripp Lite product!* * No purchase necessary. If the product should take care to determine prior to change without notice. WARNING: The individual user should prove defective in material or workmanship within that period, Seller will repair or replace the product, in its sole discretion. See Web site for the...

Installation Guide for SmartRack Latch 932902
Page 1
... lower portion of the side panel. Note: To install the side panels, follow the instructions in China. Copyright © 2009 Tripp Lite. Made in the rack enclosure owner's manual. 1111 W. 35th Street, Chicago, IL 60609 USA 773.869.1234 (USA) • 773.869.1212 (International) www.tripplite.com Tripp Lite has a policy of continuous improvement. Specifications are subject to change without...
... lower portion of the side panel. Note: To install the side panels, follow the instructions in China. Copyright © 2009 Tripp Lite. Made in the rack enclosure owner's manual. 1111 W. 35th Street, Chicago, IL 60609 USA 773.869.1234 (USA) • 773.869.1212 (International) www.tripplite.com Tripp Lite has a policy of continuous improvement. Specifications are subject to change without...