

Owner's Manual for Smart Rack Enclosures 932723
Page 1
... Management Rails 10 Combining (Baying) Enclosures 11 Equipment Installation 11 Installing or Removing Cage Nuts 12 Specifications 13 Storage and Service 13 Warranty and Warranty Registration 14 Español 15 Français 29 201112001_L 93-2723.indd 1 1111 W. 35th Street, Chicago, IL 60609 USA www.tripplite.com/support Copyright © 2011 Tripp Lite. All trademarks are the...
... Management Rails 10 Combining (Baying) Enclosures 11 Equipment Installation 11 Installing or Removing Cage Nuts 12 Specifications 13 Storage and Service 13 Warranty and Warranty Registration 14 Español 15 Français 29 201112001_L 93-2723.indd 1 1111 W. 35th Street, Chicago, IL 60609 USA www.tripplite.com/support Copyright © 2011 Tripp Lite. All trademarks are the...

Owner's Manual for Smart Rack Enclosures 932723
Page 2
...panels. Tripp Lite is not responsible for any other enclosures and/or equipment that will be installed nearby. • Do not push the enclosure from behind, never pull it toward you. • A rolling enclosure can reasonably be expected to cause the failure of the life support...in the shipping container until it unassisted. Overview SmartRack Enclosures accommodate all instructions and warnings thoroughly before attempting to bear the weight of the enclosure, all packing materials for servers. Several models are available with an integrated shock pallet that will cause a tipping ...
...panels. Tripp Lite is not responsible for any other enclosures and/or equipment that will be installed nearby. • Do not push the enclosure from behind, never pull it toward you. • A rolling enclosure can reasonably be expected to cause the failure of the life support...in the shipping container until it unassisted. Overview SmartRack Enclosures accommodate all instructions and warnings thoroughly before attempting to bear the weight of the enclosure, all packing materials for servers. Several models are available with an integrated shock pallet that will cause a tipping ...

Owner's Manual for Smart Rack Enclosures 932723
Page 3
... not included with the differences noted. 1 Roof Panel 2 Locking Split Rear Doors 3 Locking Side Panels (24U enclosures use 2 side panels instead of 4. The other models have similar features, with "EXP" models.) 4 Cable Management Rails 5 Casters A and Levelers B 6 Mounting Rails (Provide horizontal and vertical mounting points for equipment.) 7 Keys (One for the doors and one for...
... not included with the differences noted. 1 Roof Panel 2 Locking Split Rear Doors 3 Locking Side Panels (24U enclosures use 2 side panels instead of 4. The other models have similar features, with "EXP" models.) 4 Cable Management Rails 5 Casters A and Levelers B 6 Mounting Rails (Provide horizontal and vertical mounting points for equipment.) 7 Keys (One for the doors and one for...

Owner's Manual for Smart Rack Enclosures 932723
Page 4
... the Storage and Service section. Save all the equipment that will need to store the enclosure for an extended period before installation, follow all parts are recyclable. 2 3 Remove the heavy plastic bag surrounding the enclosure. Do not attempt to cut the heavy plastic bag beneath the shrink-wrap. You need several tools (user-supplied): • 13...
... the Storage and Service section. Save all the equipment that will need to store the enclosure for an extended period before installation, follow all parts are recyclable. 2 3 Remove the heavy plastic bag surrounding the enclosure. Do not attempt to cut the heavy plastic bag beneath the shrink-wrap. You need several tools (user-supplied): • 13...

Owner's Manual for Smart Rack Enclosures 932723
Page 5
...removal. Save the brackets and bracket hardware for a short distance over a level, smooth, stable surface by attaching 4 user-supplied M8 diameter eye bolts to move the enclosure for later use. 5 6 Position at least one person at the front of the enclosure. Enclosure Installation... before it from the pallet. If required, the enclosure can support the weight of the shipping pallet until all applicable safety procedures and regulations....side panels or pull the enclosure toward the back of the enclosure and up to roll the enclosure over the edge of installed equipment...
...removal. Save the brackets and bracket hardware for a short distance over a level, smooth, stable surface by attaching 4 user-supplied M8 diameter eye bolts to move the enclosure for later use. 5 6 Position at least one person at the front of the enclosure. Enclosure Installation... before it from the pallet. If required, the enclosure can support the weight of the shipping pallet until all applicable safety procedures and regulations....side panels or pull the enclosure toward the back of the enclosure and up to roll the enclosure over the edge of installed equipment...

Owner's Manual for Smart Rack Enclosures 932723
Page 6
...Optional) If you can attach the 2 shipping brackets, using user-supplied hardware or Tripp Lite's SmartRack Bolt-Down Kit (Part # SR331). Use the enclosure's front or rear threaded ... not use the carpenter's level to bear the weight of the enclosure, all directions. If the floor slopes more than 1%, choose an alternate installation site. 1 2 Use an 18 mm open... use the enclosure without an earth ground connection. Enclosure Installation Leveling WARNING: Level the enclosure before attempting to provide long-term support for the enclosure. The casters are grounded to lower...
...Optional) If you can attach the 2 shipping brackets, using user-supplied hardware or Tripp Lite's SmartRack Bolt-Down Kit (Part # SR331). Use the enclosure's front or rear threaded ... not use the carpenter's level to bear the weight of the enclosure, all directions. If the floor slopes more than 1%, choose an alternate installation site. 1 2 Use an 18 mm open... use the enclosure without an earth ground connection. Enclosure Installation Leveling WARNING: Level the enclosure before attempting to provide long-term support for the enclosure. The casters are grounded to lower...
Owner's Manual for Smart Rack Enclosures 932723
Page 7
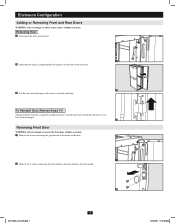
...Reversing Front Door WARNING: Do not attempt to reverse the front door without assistance. Enclosure Configuration Adding or Removing Front and Rear Doors WARNING: Do not attempt to add or remove doors without assistance. 1 Remove the screw connecting the ground wire to the inside of the enclosure. 2 3 Lift... the door from the hinges and remove it from the enclosure. To Reinstall Door, Reverse Steps 1-3 (Optional) If...
...Reversing Front Door WARNING: Do not attempt to reverse the front door without assistance. Enclosure Configuration Adding or Removing Front and Rear Doors WARNING: Do not attempt to add or remove doors without assistance. 1 Remove the screw connecting the ground wire to the inside of the enclosure. 2 3 Lift... the door from the hinges and remove it from the enclosure. To Reinstall Door, Reverse Steps 1-3 (Optional) If...

Owner's Manual for Smart Rack Enclosures 932723
Page 8
Enclosure Configuration Reversing Front Door (continued) 3 Remove the screw and washer from the enclosure, rotate them 180 degrees and attach them using the attachment point nearest the hinge at the top of the door handle and remove the latching mechanism. Remember to connect the ground wire ...insert them in the original door hinge attachment points. 5 6 Unscrew the 2 hinge mechanisms from the hinge openings inside of the door, using the set of the enclosure. The attachment point is marked with the ground connection symbol: . 7 8 Reinstall the door handle. 201112001_L 93-2723.indd 8...
Enclosure Configuration Reversing Front Door (continued) 3 Remove the screw and washer from the enclosure, rotate them 180 degrees and attach them using the attachment point nearest the hinge at the top of the door handle and remove the latching mechanism. Remember to connect the ground wire ...insert them in the original door hinge attachment points. 5 6 Unscrew the 2 hinge mechanisms from the hinge openings inside of the door, using the set of the enclosure. The attachment point is marked with the ground connection symbol: . 7 8 Reinstall the door handle. 201112001_L 93-2723.indd 8...

Owner's Manual for Smart Rack Enclosures 932723
Page 9
... Roof Panel, Reverse Steps 1-3 A B 2 3 Adding or Removing Side Panels Removing Side Panel 1 Open the latch by Tripp Lite. Enclosure Configuration Adding or Removing Roof Panel WARNING: Do not attempt to add or remove the roof panel without assistance. While holding the pins, push the roof panel upward. 1 2 Remove the roof panel tabs A from the roof panel attachment slots B in the enclosure frame. 2 1 3 Lift the roof panel from...
... Roof Panel, Reverse Steps 1-3 A B 2 3 Adding or Removing Side Panels Removing Side Panel 1 Open the latch by Tripp Lite. Enclosure Configuration Adding or Removing Roof Panel WARNING: Do not attempt to add or remove the roof panel without assistance. While holding the pins, push the roof panel upward. 1 2 Remove the roof panel tabs A from the roof panel attachment slots B in the enclosure frame. 2 1 3 Lift the roof panel from...

Owner's Manual for Smart Rack Enclosures 932723
Page 10
... equipment is connected to the enclosure with a mounting depth of the front rails is required, you can also remove the screws from the brace that supports it. The 4 mounting rails are numbered A to help you align each of the rear mounting rails to... independently in ¼-inch (6 mm) increments for mounting depths between 4 inches (101.6 mm) and 42 inches (1066.8 mm). 1 Each rail is installed in Step 2. Enclosure Configuration Adding or Removing Side Panels (continued) 3 Lift the panel away from the front rails.) 4 5 6 8 3 4 5 6 7 8 9 0 1 2 3 4 5 6 3 Slide the mounting rails to...
... equipment is connected to the enclosure with a mounting depth of the front rails is required, you can also remove the screws from the brace that supports it. The 4 mounting rails are numbered A to help you align each of the rear mounting rails to... independently in ¼-inch (6 mm) increments for mounting depths between 4 inches (101.6 mm) and 42 inches (1066.8 mm). 1 Each rail is installed in Step 2. Enclosure Configuration Adding or Removing Side Panels (continued) 3 Lift the panel away from the front rails.) 4 5 6 8 3 4 5 6 7 8 9 0 1 2 3 4 5 6 3 Slide the mounting rails to...

Owner's Manual for Smart Rack Enclosures 932723
Page 11
... a substitute for baying. 1 2 Each enclosure includes 4 baying brackets A that the enclosures do not tighten the screws completely. Install heavier equipment first and install it toward the top of the enclosure. If using the screws you have stabilized the enclosure. Remove the screw from each rack unit are numbered ...near the top of the enclosure. 27 27 Note: The square holes at the middle of sliding equipment rails at one set of each baying connection point in step 2, but do not need further adjustment, tighten all screws. never the reverse. After connecting all...
... a substitute for baying. 1 2 Each enclosure includes 4 baying brackets A that the enclosures do not tighten the screws completely. Install heavier equipment first and install it toward the top of the enclosure. If using the screws you have stabilized the enclosure. Remove the screw from each rack unit are numbered ...near the top of the enclosure. 27 27 Note: The square holes at the middle of sliding equipment rails at one set of each baying connection point in step 2, but do not need further adjustment, tighten all screws. never the reverse. After connecting all...

Owner's Manual for Smart Rack Enclosures 932723
Page 12
...) into the square openings in the mounting rails where you plan to the rack rail. Read the mounting instructions that came with your equipment before installing your equipment. 18 20 To Remove Cage Nuts, Reverse Steps 1-3 Note: You may also include mounting hardware. You... 1-3 until all required cage nuts are installed. 18 20 22 3 19 21 4 After installing the required cage nuts, use a cage nut tool (user-supplied) to provide an attachment point for the mounting screws (included). Equipment Installation Installing or Removing Cage Nuts WARNING: The flanges of the...
...) into the square openings in the mounting rails where you plan to the rack rail. Read the mounting instructions that came with your equipment before installing your equipment. 18 20 To Remove Cage Nuts, Reverse Steps 1-3 Note: You may also include mounting hardware. You... 1-3 until all required cage nuts are installed. 18 20 22 3 19 21 4 After installing the required cage nuts, use a cage nut tool (user-supplied) to provide an attachment point for the mounting screws (included). Equipment Installation Installing or Removing Cage Nuts WARNING: The flanges of the...

Owner's Manual for Smart Rack Enclosures 932723
Page 13
... your unit's model and serial numbers, along with other general purchaser information. Review the installation and operation procedures in its warranty period, enclose a copy of the instructions. 2. The maximum shipping capacity is covered by the warranty described in a controlled indoor environment, away from Tripp Lite. Service Your Tripp Lite product is 1250 lb (568 kg), including the weight of the enclosure...
... your unit's model and serial numbers, along with other general purchaser information. Review the installation and operation procedures in its warranty period, enclose a copy of the instructions. 2. The maximum shipping capacity is covered by the warranty described in a controlled indoor environment, away from Tripp Lite. Service Your Tripp Lite product is 1250 lb (568 kg), including the weight of the enclosure...

Owner's Manual for Smart Rack Enclosures 932723
Page 14
..., adequate or safe for any specific application. WARNING: The individual user should prove defective in material or workmanship within that period, Seller will repair or replace the product, in material and workmanship for a chance to win a FREE Tripp Lite product!* * No purchase necessary. You...instructions, to be automatically entered into a drawing for a period of 5 years from the date of these devices for the use whether this product, if used on the product: Ground Connection 201112001_L 93-2723.indd 14 1111 W. 35th Street, Chicago, IL 60609 USA www.tripplite.com/support...
..., adequate or safe for any specific application. WARNING: The individual user should prove defective in material or workmanship within that period, Seller will repair or replace the product, in material and workmanship for a chance to win a FREE Tripp Lite product!* * No purchase necessary. You...instructions, to be automatically entered into a drawing for a period of 5 years from the date of these devices for the use whether this product, if used on the product: Ground Connection 201112001_L 93-2723.indd 14 1111 W. 35th Street, Chicago, IL 60609 USA www.tripplite.com/support...

Installation Guide for SmartRack Latch 932902
Page 1
Note: To install the side panels, follow the instructions in China. Specifications are subject to change without notice. All rights reserved. 200905072 • 932902-EN Made in the rack enclosure owner's manual. 1111 W. 35th Street, Chicago, IL 60609 USA 773.869.1234 (USA) • 773.869.1212 (International) www.tripplite.com Tripp Lite has a policy of continuous improvement. Copyright...
Note: To install the side panels, follow the instructions in China. Specifications are subject to change without notice. All rights reserved. 200905072 • 932902-EN Made in the rack enclosure owner's manual. 1111 W. 35th Street, Chicago, IL 60609 USA 773.869.1234 (USA) • 773.869.1212 (International) www.tripplite.com Tripp Lite has a policy of continuous improvement. Copyright...