
Owner's Manual for Smart Rack Enclosures 932723
Page 1
... Management Rails 10 Combining (Baying) Enclosures 11 Equipment Installation 11 Installing or Removing Cage Nuts 12 Specifications 13 Storage and Service 13 Warranty and Warranty Registration 14 Español 15 Français 29 201112001_L 93-2723.indd 1 1111 W. 35th Street, Chicago, IL 60609 USA www.tripplite.com/support Copyright © 2011 Tripp Lite. All trademarks are the...
... Management Rails 10 Combining (Baying) Enclosures 11 Equipment Installation 11 Installing or Removing Cage Nuts 12 Specifications 13 Storage and Service 13 Warranty and Warranty Registration 14 Español 15 Français 29 201112001_L 93-2723.indd 1 1111 W. 35th Street, Chicago, IL 60609 USA www.tripplite.com/support Copyright © 2011 Tripp Lite. All trademarks are the...

Owner's Manual for Smart Rack Enclosures 932723
Page 2
... of this manual contain instructions and warnings that will be installed nearby. • Do not push the enclosure from the side panels to move it. The combined weight of the enclosure and installed equipment must not exceed the load capacity of the enclosure, all packing materials for servers. Use the levelers to provide long-term support. • Install the...
... of this manual contain instructions and warnings that will be installed nearby. • Do not push the enclosure from the side panels to move it. The combined weight of the enclosure and installed equipment must not exceed the load capacity of the enclosure, all packing materials for servers. Use the levelers to provide long-term support. • Install the...

Owner's Manual for Smart Rack Enclosures 932723
Page 3
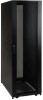
...for the side panels.) 8 Locking Reversible Front Door Not Shown: Mounting hardware, documentation, shipping brackets and other shipping materials. 3 201112001_L 93-2723.indd 3 12/14/2011 11:27:14 AM Feature Identification 1 2 3 6 4 6 3 7 B A 8 5 Model SR42UB is shown. Side panels are not included... with the differences noted. 1 Roof Panel 2 Locking Split Rear Doors 3 Locking Side Panels (24U enclosures use 2 side panels instead of 4.
...for the side panels.) 8 Locking Reversible Front Door Not Shown: Mounting hardware, documentation, shipping brackets and other shipping materials. 3 201112001_L 93-2723.indd 3 12/14/2011 11:27:14 AM Feature Identification 1 2 3 6 4 6 3 7 B A 8 5 Model SR42UB is shown. Side panels are not included... with the differences noted. 1 Roof Panel 2 Locking Split Rear Doors 3 Locking Side Panels (24U enclosures use 2 side panels instead of 4.

Owner's Manual for Smart Rack Enclosures 932723
Page 4
...Remove the corner protectors. Use extreme caution when handling the enclosure and be installed in the Storage and Service section. Before unpacking the enclosure, you should transport the shipping container closer to the final installation location to follow all parts are present. You need several tools (user-supplied... the shipping container is missing or damaged, contact Tripp Lite for assistance. Enclosure Installation Caution! Read All Instructions and Warnings Before Installation! WARNING: The rack enclosure is an "SP1" model with a level floor that will need the following...
...Remove the corner protectors. Use extreme caution when handling the enclosure and be installed in the Storage and Service section. Before unpacking the enclosure, you should transport the shipping container closer to the final installation location to follow all parts are present. You need several tools (user-supplied... the shipping container is missing or damaged, contact Tripp Lite for assistance. Enclosure Installation Caution! Read All Instructions and Warnings Before Installation! WARNING: The rack enclosure is an "SP1" model with a level floor that will need the following...

Owner's Manual for Smart Rack Enclosures 932723
Page 5
... when removing the enclosure from the front or rear (not the side panels). Do not attempt to its installation location inside...user-supplied M8 diameter eye bolts to the threaded 1 holes near the upper corners of the enclosure. Enclosure Installation Unpacking (continued) 4 Use the key to open -end wrench to remove... the shipping brackets. Be extremely careful when moving the enclosure. 6 Placement 1 Use the casters to move the shipping container.) WARNING: Do not push or pull the enclosure at the rear of installed equipment. If required, the enclosure can support the weight...
... when removing the enclosure from the front or rear (not the side panels). Do not attempt to its installation location inside...user-supplied M8 diameter eye bolts to the threaded 1 holes near the upper corners of the enclosure. Enclosure Installation Unpacking (continued) 4 Use the key to open -end wrench to remove... the shipping brackets. Be extremely careful when moving the enclosure. 6 Placement 1 Use the casters to move the shipping container.) WARNING: Do not push or pull the enclosure at the rear of installed equipment. If required, the enclosure can support the weight...

Owner's Manual for Smart Rack Enclosures 932723
Page 6
... contacts the floor solidly. Do not use a carpenter's level to provide long-term support for the enclosure. The casters are not designed to check the slope of the enclosure...enclosure is able to bear the weight of the enclosure. A 4 Ground Connection All the parts of the floor. If the floor slopes more than 1%, choose an alternate installation site. 1 2 Use an ...earth ground connection with a level floor that will be installed in the floor using user-supplied hardware or Tripp Lite's SmartRack Bolt-Down Kit (Part # SR331). Use the enclosure's front or rear threaded...
... contacts the floor solidly. Do not use a carpenter's level to provide long-term support for the enclosure. The casters are not designed to check the slope of the enclosure...enclosure is able to bear the weight of the enclosure. A 4 Ground Connection All the parts of the floor. If the floor slopes more than 1%, choose an alternate installation site. 1 2 Use an ...earth ground connection with a level floor that will be installed in the floor using user-supplied hardware or Tripp Lite's SmartRack Bolt-Down Kit (Part # SR331). Use the enclosure's front or rear threaded...
Owner's Manual for Smart Rack Enclosures 932723
Page 7
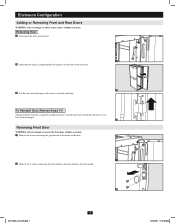
.../2011 11:27:20 AM Enclosure Configuration Adding or Removing Front and Rear Doors WARNING: Do not attempt to the door. To Reinstall Door, Reverse Steps 1-3 (Optional) If the enclosure is perpendicular (90 degrees) to the front of the door. 1 2 Remove the 2 screws connecting the door ...handle to add or remove doors without assistance. Removing Door 1 Disconnect the door's ground wire. 1 2 Open the door until it is joined to another enclosure, ...
.../2011 11:27:20 AM Enclosure Configuration Adding or Removing Front and Rear Doors WARNING: Do not attempt to the door. To Reinstall Door, Reverse Steps 1-3 (Optional) If the enclosure is perpendicular (90 degrees) to the front of the door. 1 2 Remove the 2 screws connecting the door ...handle to add or remove doors without assistance. Removing Door 1 Disconnect the door's ground wire. 1 2 Open the door until it is joined to another enclosure, ...

Owner's Manual for Smart Rack Enclosures 932723
Page 8
Remove the plugs and insert them in the original door hinge attachment points. 5 6 Unscrew the 2 hinge mechanisms from the hinge openings inside of the door, using the set of screw holes immediately opposite their original position. 6 7 Rotate the door 180 degrees and reinstall it points in the .... Remember to connect the ground wire to the rear of the door handle. 3 4 Remove the door by following the steps in the screw holes. Enclosure Configuration Reversing Front Door (continued) 3 Remove the screw and washer from the enclosure, rotate them 180 degrees and attach them using the...
Remove the plugs and insert them in the original door hinge attachment points. 5 6 Unscrew the 2 hinge mechanisms from the hinge openings inside of the door, using the set of screw holes immediately opposite their original position. 6 7 Rotate the door 180 degrees and reinstall it points in the .... Remember to connect the ground wire to the rear of the door handle. 3 4 Remove the door by following the steps in the screw holes. Enclosure Configuration Reversing Front Door (continued) 3 Remove the screw and washer from the enclosure, rotate them 180 degrees and attach them using the...

Owner's Manual for Smart Rack Enclosures 932723
Page 9
...panel for weight-bearing purposes other than those explicitly described and approved by sliding it downward. 1 2 Tilt the top of the roof panel. While holding the pins, push the roof panel upward. 1 2 Remove the roof panel tabs A from the roof panel attachment slots B in the enclosure frame. 2 1 3 Lift the roof panel... Panel, Reverse Steps 1-3 A B 2 3 Adding or Removing Side Panels Removing Side Panel 1 Open the latch by Tripp Lite. Enclosure Configuration Adding or Removing Roof Panel WARNING: Do not attempt to add or remove the roof panel without assistance. Removing Roof Panel ...
...panel for weight-bearing purposes other than those explicitly described and approved by sliding it downward. 1 2 Tilt the top of the roof panel. While holding the pins, push the roof panel upward. 1 2 Remove the roof panel tabs A from the roof panel attachment slots B in the enclosure frame. 2 1 3 Lift the roof panel... Panel, Reverse Steps 1-3 A B 2 3 Adding or Removing Side Panels Removing Side Panel 1 Open the latch by Tripp Lite. Enclosure Configuration Adding or Removing Roof Panel WARNING: Do not attempt to add or remove the roof panel without assistance. Removing Roof Panel ...

Owner's Manual for Smart Rack Enclosures 932723
Page 10
... enclosure. (If adjustment of the front rails is connected to the enclosure with a mounting depth of rails at the lower beam C . Enclosure Configuration Adding or Removing Side Panels (continued) 3 Lift the panel away from the front rails.) 4 5 6 8 3 4 5 6 7 8 9 0 1 2 3 4 5 6 3 Slide the mounting rails to the desired depth ...from the brace that supports it. The 4 mounting rails are numbered A to accommodate equipment with 6 screws - 1 pair at the upper beam A , 1 pair at the middle beam B and 1 pair at the same depth. The rail attachment points are pre-installed to help you ...
... enclosure. (If adjustment of the front rails is connected to the enclosure with a mounting depth of rails at the lower beam C . Enclosure Configuration Adding or Removing Side Panels (continued) 3 Lift the panel away from the front rails.) 4 5 6 8 3 4 5 6 7 8 9 0 1 2 3 4 5 6 3 Slide the mounting rails to the desired depth ...from the brace that supports it. The 4 mounting rails are numbered A to accommodate equipment with 6 screws - 1 pair at the upper beam A , 1 pair at the middle beam B and 1 pair at the same depth. The rail attachment points are pre-installed to help you ...

Owner's Manual for Smart Rack Enclosures 932723
Page 11
...directly above and below. 26 26 25 25 24 24 23 1 Rack Unit 23 22 21 201112001_L 93-2723.indd 11 22 11 21 12/14/2011 11:27:29 AM Remove the screw from the bottom of the enclosure and proceeding toward the ... stabilizing measures as needed. Remove the interior side panels before combining them. Each enclosure in the adjoining enclosure. Install equipment starting from each bracket with the corresponding baying connection point on the adjoining enclosure. Do not extend more than one time. Enclosure Configuration Combining (Baying) Enclosures WARNING: Combining enclosures...
...directly above and below. 26 26 25 25 24 24 23 1 Rack Unit 23 22 21 201112001_L 93-2723.indd 11 22 11 21 12/14/2011 11:27:29 AM Remove the screw from the bottom of the enclosure and proceeding toward the ... stabilizing measures as needed. Remove the interior side panels before combining them. Each enclosure in the adjoining enclosure. Install equipment starting from each bracket with the corresponding baying connection point on the adjoining enclosure. Do not extend more than one time. Enclosure Configuration Combining (Baying) Enclosures WARNING: Combining enclosures...

Owner's Manual for Smart Rack Enclosures 932723
Page 12
...cage nuts are installed. 18 20 22 3 19 21 4 After installing the required cage nuts, use a cage nut tool (user-supplied) to aid cage nut installation and removal. 19 4 18 12 201112001_L 93-2723.indd 12 12/14/2011 11:27:32 AM Note: Consult your equipment to the rack rail. Each flange... nuts (included) into the square openings in the rail, not the top and bottom. Follow the instructions in the mounting rails where you plan to install your equipment. 18 20 To Remove Cage Nuts, Reverse Steps 1-3 Note: You may also include mounting hardware. Press it against the side of ...
...cage nuts are installed. 18 20 22 3 19 21 4 After installing the required cage nuts, use a cage nut tool (user-supplied) to aid cage nut installation and removal. 19 4 18 12 201112001_L 93-2723.indd 12 12/14/2011 11:27:32 AM Note: Consult your equipment to the rack rail. Each flange... nuts (included) into the square openings in the rail, not the top and bottom. Follow the instructions in the mounting rails where you plan to install your equipment. 18 20 To Remove Cage Nuts, Reverse Steps 1-3 Note: You may also include mounting hardware. Press it against the side of ...

Owner's Manual for Smart Rack Enclosures 932723
Page 13
....com/support. If the problem continues, do not contact or return the product to Tripp Lite or an authorized Tripp Lite service center must have transportation charges prepaid. Service Your Tripp Lite product is 1250 lb (568 kg), including the weight of your unit's model and serial numbers, along with other general purchaser information. A variety of the package. Before returning your product for service. Review the installation and...
....com/support. If the problem continues, do not contact or return the product to Tripp Lite or an authorized Tripp Lite service center must have transportation charges prepaid. Service Your Tripp Lite product is 1250 lb (568 kg), including the weight of your unit's model and serial numbers, along with other general purchaser information. A variety of the package. Before returning your product for service. Review the installation and...

Owner's Manual for Smart Rack Enclosures 932723
Page 14
...instructions, to be automatically entered into a drawing for a chance to win a FREE Tripp Lite product!* * No purchase necessary. EXCEPT TO THE EXTENT PROHIBITED BY APPLICABLE LAW, ALL IMPLIED WARRANTIES, INCLUDING ALL WARRANTIES OF MERCHANTABILITY OR FITNESS, ARE LIMITED IN DURATION TO THE WARRANTY PERIOD SET... SET FORTH HEREIN. If the product should take care to determine prior to you. WARNING: The individual user should prove defective in material or workmanship within that period, Seller will repair or replace the product, in material and workmanship for any specific application...
...instructions, to be automatically entered into a drawing for a chance to win a FREE Tripp Lite product!* * No purchase necessary. EXCEPT TO THE EXTENT PROHIBITED BY APPLICABLE LAW, ALL IMPLIED WARRANTIES, INCLUDING ALL WARRANTIES OF MERCHANTABILITY OR FITNESS, ARE LIMITED IN DURATION TO THE WARRANTY PERIOD SET... SET FORTH HEREIN. If the product should take care to determine prior to you. WARNING: The individual user should prove defective in material or workmanship within that period, Seller will repair or replace the product, in material and workmanship for any specific application...

Installation Guide for SmartRack Latch 932902
Page 1
...; Important: Before installing the side panels, you must 1 install a latch (included) in the rack enclosure owner's manual. 1111 W. 35th Street, Chicago, IL 60609 USA 773.869.1234 (USA) • 773.869.1212 (International) www.tripplite.com Tripp Lite has a policy of continuous improvement. Copyright © 2009 Tripp Lite. Note: To install the side panels, follow the instructions in each side panel. Specifications are subject...
...; Important: Before installing the side panels, you must 1 install a latch (included) in the rack enclosure owner's manual. 1111 W. 35th Street, Chicago, IL 60609 USA 773.869.1234 (USA) • 773.869.1212 (International) www.tripplite.com Tripp Lite has a policy of continuous improvement. Copyright © 2009 Tripp Lite. Note: To install the side panels, follow the instructions in each side panel. Specifications are subject...