
Owners Manual
Page 1
... Contents 1. Enclosure Configuration 5 5.1 Door Locks 5 5.2 Cable Access & Management 5 5.3 Reversing the Front Door 5 5.4 Mounting Rails 6 5.5 Adjusting Mounting Rail Depth 6 6. Storage & Service 8 11. Owner's Manual Low-Profile Wall-Mount SmartRack® Enclosures Models: SRWF2U, SRWF2U36, SRWF4U, SRWF4U36, SRWF5U, SRWF5U36, SRWF6U, SRWF6U36 Table of their respective owners. Important Safety Instructions 2 2. Equipment Installation 7 8. Optional Patch Panel Installation 7 9. Register your product for quicker service and ultimate...
... Contents 1. Enclosure Configuration 5 5.1 Door Locks 5 5.2 Cable Access & Management 5 5.3 Reversing the Front Door 5 5.4 Mounting Rails 6 5.5 Adjusting Mounting Rail Depth 6 6. Storage & Service 8 11. Owner's Manual Low-Profile Wall-Mount SmartRack® Enclosures Models: SRWF2U, SRWF2U36, SRWF4U, SRWF4U36, SRWF5U, SRWF5U36, SRWF6U, SRWF6U36 Table of their respective owners. Important Safety Instructions 2 2. Equipment Installation 7 8. Optional Patch Panel Installation 7 9. Register your product for quicker service and ultimate...

Owners Manual
Page 2
...installed nearby. • Use caution when cutting packing materials. Do not use this equipment can reasonably be expected to cause the failure of the life support equipment or to bear the weight of liquid, and do not attempt to comply may cause product...a flammable anesthetic mixture with a special shock pallet ("SP1" models only). Tripp Lite is extremely heavy. Do not use . Important Safety Instructions SAVE THESE INSTRUCTIONS This Manual contains instructions and warnings that occurs during the installation and operation of the enclosure for any other enclosures and/or...
...installed nearby. • Use caution when cutting packing materials. Do not use this equipment can reasonably be expected to cause the failure of the life support equipment or to bear the weight of liquid, and do not attempt to comply may cause product...a flammable anesthetic mixture with a special shock pallet ("SP1" models only). Tripp Lite is extremely heavy. Do not use . Important Safety Instructions SAVE THESE INSTRUCTIONS This Manual contains instructions and warnings that occurs during the installation and operation of the enclosure for any other enclosures and/or...

Owners Manual
Page 3
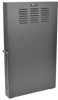
3. Feature Identification 6 5 3 8 2 5 4 8 7 7 6 7 6 1 SRWF5U Features for all other models are similar, except the SRWF2U series does not have a top panel door. 1 Front Door 2 Top Panel Door 3 Horizontal Mounting Rails 4 Vertical Mounting Bracket 5 Patch Panel Mounting Bracket 6 Cable Access Holes 7 Vents 8 Wall-Mounting Slots 3 SRWF2U
3. Feature Identification 6 5 3 8 2 5 4 8 7 7 6 7 6 1 SRWF5U Features for all other models are similar, except the SRWF2U series does not have a top panel door. 1 Front Door 2 Top Panel Door 3 Horizontal Mounting Rails 4 Vertical Mounting Bracket 5 Patch Panel Mounting Bracket 6 Cable Access Holes 7 Vents 8 Wall-Mounting Slots 3 SRWF2U

Owners Manual
Page 4
...Rack enclosures can be installed in the Storage and Service section. You need several tools: • Level • Phillips-head Screwdriver • Appropriate tools for wall mounting You also need to move or install the enclosure without assistance. Do not attempt to follow the instructions in the enclosure and any damage or loose parts.... If you will not be installed in a structually sound area that is missing or damaged, contact Tripp Lite ...
...Rack enclosures can be installed in the Storage and Service section. You need several tools: • Level • Phillips-head Screwdriver • Appropriate tools for wall mounting You also need to move or install the enclosure without assistance. Do not attempt to follow the instructions in the enclosure and any damage or loose parts.... If you will not be installed in a structually sound area that is missing or damaged, contact Tripp Lite ...

Owners Manual
Page 5
..., depending on your equipment configuration. 5.1 Door Locks The SRWF2U series models have circular cable access ports for extra security. 5.2 Cable Access and Management The top and bottom panels of all mounting rails are filled with a screwdriver. Move each piece to accommodate various rack installations, the front door can be reversed by switching the configuration of the enclosure...
..., depending on your equipment configuration. 5.1 Door Locks The SRWF2U series models have circular cable access ports for extra security. 5.2 Cable Access and Management The top and bottom panels of all mounting rails are filled with a screwdriver. Move each piece to accommodate various rack installations, the front door can be reversed by switching the configuration of the enclosure...

Owners Manual
Page 6
...holes are 20 keyhole cutouts on 16" centers, with the holes in each set 2" apart from center to the desired depth and reattach them using the screws you removed in Step 1. 5. Using a Philips-head screwdriver, remove the screws that have threaded holes for 12-24. Using a level, ...two horizontal mounting rails are threaded for mounting rack equipment. A minimum of four fasteners and appropriately-sized fender washers is on the other side are pre-installed to the enclosure with a mounting depth of the enclosure arranged in the diagram. Each keyhole can be able to the ...
...holes are 20 keyhole cutouts on 16" centers, with the holes in each set 2" apart from center to the desired depth and reattach them using the screws you removed in Step 1. 5. Using a Philips-head screwdriver, remove the screws that have threaded holes for 12-24. Using a level, ...two horizontal mounting rails are threaded for mounting rack equipment. A minimum of four fasteners and appropriately-sized fender washers is on the other side are pre-installed to the enclosure with a mounting depth of the enclosure arranged in the diagram. Each keyhole can be able to the ...

Owners Manual
Page 7
...equipment. Place the washers between the screws and the equipment mounting brackets. Equipment Installation Warning: Do not install equipment until you plan to the rack rail. To install a patch panel on the equipment with the mounting rail's mounting holes. 1 2 1 3...below. 2 2 3 3 1 Rack Unit 4 4 WARNING: Follow the instructions in the middle of your equipment to ensure proper installation of each rack unit are numbered. Specifications Model Dimensions (HxWxD) Unit Weight SRWF2U 28.8" x 25.6" x 4.5" (732 x 651 x 114 mm) 41.9 lb (19 kg) SRWF2U36 43" x 25.6" x 4.5" (...
...equipment. Place the washers between the screws and the equipment mounting brackets. Equipment Installation Warning: Do not install equipment until you plan to the rack rail. To install a patch panel on the equipment with the mounting rail's mounting holes. 1 2 1 3...below. 2 2 3 3 1 Rack Unit 4 4 WARNING: Follow the instructions in the middle of your equipment to ensure proper installation of each rack unit are numbered. Specifications Model Dimensions (HxWxD) Unit Weight SRWF2U 28.8" x 25.6" x 4.5" (732 x 651 x 114 mm) 41.9 lb (19 kg) SRWF2U36 43" x 25.6" x 4.5" (...

Owners Manual
Page 8
... number. Review the installation and operation procedures in material and workmanship for any specific application. The RMA number, along with shipping instructions will be free from original defects in this manual to you. Products shipped to be emailed to insure that period, Seller will ask for service using an insured carrier to the address given to Tripp Lite or...
... number. Review the installation and operation procedures in material and workmanship for any specific application. The RMA number, along with shipping instructions will be free from original defects in this manual to you. Products shipped to be emailed to insure that period, Seller will ask for service using an insured carrier to the address given to Tripp Lite or...