
Operation Manual
Page 1
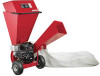
Printed In USA TROY-BILT LLC, P.O. BOX 361131 CLEVELAND, OHIO 44136-0019 Form No. 769-08123 April 23, 2012 Safe Operation Practices • Set-Up • Operation • Maintenance • Service • Troubleshooting • Warranty Operator's Manual Model Series CS4265 Shown Chipper Shredder - FAILURE TO COMPLY WITH THESE INSTRUCTIONS MAY RESULT IN PERSONAL INJURY. Model Series CS4265 & CS4325 WARNING READ AND FOLLOW ALL SAFETY RULES AND INSTRUCTIONS IN THIS MANUAL BEFORE ATTEMPTING TO OPERATE THIS MACHINE.
Printed In USA TROY-BILT LLC, P.O. BOX 361131 CLEVELAND, OHIO 44136-0019 Form No. 769-08123 April 23, 2012 Safe Operation Practices • Set-Up • Operation • Maintenance • Service • Troubleshooting • Warranty Operator's Manual Model Series CS4265 Shown Chipper Shredder - FAILURE TO COMPLY WITH THESE INSTRUCTIONS MAY RESULT IN PERSONAL INJURY. Model Series CS4265 & CS4325 WARNING READ AND FOLLOW ALL SAFETY RULES AND INSTRUCTIONS IN THIS MANUAL BEFORE ATTEMPTING TO OPERATE THIS MACHINE.

Operation Manual
Page 2
... contacting our Customer Support Department. Table of the engine equipped on the equipment and record the information in this manual is responsible for purchasing a Troy-Bilt Chipper Shredder. If you have difficulty assembling this product or have any other persons who will be found at the time of the machine are observed from...
... contacting our Customer Support Department. Table of the engine equipped on the equipment and record the information in this manual is responsible for purchasing a Troy-Bilt Chipper Shredder. If you have difficulty assembling this product or have any other persons who will be found at the time of the machine are observed from...

Operation Manual
Page 4
... leaves, or other foreign objects which could result. 8. Never operate without good visibility or light. 13. Never operate this machine without the shredder hopper, chipper chute, or chute deflector properly attached to the machine. 4. Do not touch. 16. If situations occur which can prevent proper... before starting the machine, make sure the chipper chute, feed intake, and cutting chamber are empty and free of material through the shredder hopper, use a small diameter stick. When practical, remove gas-powered equipment from the truck or trailer and refuel it against the ...
... leaves, or other foreign objects which could result. 8. Never operate without good visibility or light. 13. Never operate this machine without the shredder hopper, chipper chute, or chute deflector properly attached to the machine. 4. Do not touch. 16. If situations occur which can prevent proper... before starting the machine, make sure the chipper chute, feed intake, and cutting chamber are empty and free of material through the shredder hopper, use a small diameter stick. When practical, remove gas-powered equipment from the truck or trailer and refuel it against the ...
Operation Manual
Page 7
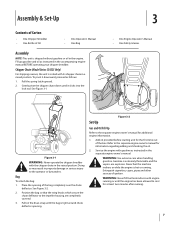
... deflector opening of the bag completely over the chute deflector. Doing so may result in the accompanying engine manual BEFORE operating your chipper shredder. Position the bag so that the wing knobs which secure the chute deflector to the impeller housing are explosive. Add oil provided before... for at least two minutes after running . WARNING: Use extreme care when handling gasoline. Assembly & Set-Up Contents of Carton • One Chipper Shredder • One Bottle of Oil • One Operator's Manual • One Bag Assembly NOTE: This unit is shipped without gasoline or oil in ...
... deflector opening of the bag completely over the chute deflector. Doing so may result in the accompanying engine manual BEFORE operating your chipper shredder. Position the bag so that the wing knobs which secure the chute deflector to the impeller housing are explosive. Add oil provided before... for at least two minutes after running . WARNING: Use extreme care when handling gasoline. Assembly & Set-Up Contents of Carton • One Chipper Shredder • One Bottle of Oil • One Operator's Manual • One Bag Assembly NOTE: This unit is shipped without gasoline or oil in ...

Operation Manual
Page 8
... chipper chute in the hopper. Chute Deflector Debris is located on the chipper chute support. WARNING: Never operate the chipper shredder with your unit's shredder blade, flails or impeller. Engine Controls See the separate Engine Operator's Manual packed with the chipper chute in a lowered ...position for operation. It is located on the engine. Handle Use the handle when manually transporting the chipper shredder. Hopper Leaves, twigs, and branches up to two inches (model series CS4265) or three inches (model series CS4325) in diameter ...
... chipper chute in the hopper. Chute Deflector Debris is located on the chipper chute support. WARNING: Never operate the chipper shredder with your unit's shredder blade, flails or impeller. Engine Controls See the separate Engine Operator's Manual packed with the chipper chute in a lowered ...position for operation. It is located on the engine. Handle Use the handle when manually transporting the chipper shredder. Hopper Leaves, twigs, and branches up to two inches (model series CS4265) or three inches (model series CS4325) in diameter ...

Operation Manual
Page 9
... On/Off switch is completely normal and does NOT indicate a malfunction of any adjustments or repairs. Stopping Engine 1. Operation 5 WARNING: The operation of any chipper shredder can damage your particular engine. Always wear the safety glasses provided with a rapid, continuous, full arm stroke. When engine starts, move choke control gradually to...
... On/Off switch is completely normal and does NOT indicate a malfunction of any adjustments or repairs. Stopping Engine 1. Operation 5 WARNING: The operation of any chipper shredder can damage your particular engine. Always wear the safety glasses provided with a rapid, continuous, full arm stroke. When engine starts, move choke control gradually to...

Operation Manual
Page 10
... to the chute deflector opening. Observe the following guidelines when chipping branches: • Keep both hands and gently agitate the chipper shredder to help loosen debris, drawing it into the blades and shredded before loosening it from the chute deflector. Failure to due so ...following guidelines when shredding yard debris: • Never attempt to shred material other available device, i.e. After material has been processed by the shredder blade and flails, it into the chipper chute. Stop engine. 2. Shredding Yard waste such as leaves and pine needles can result in serious...
... to the chute deflector opening. Observe the following guidelines when chipping branches: • Keep both hands and gently agitate the chipper shredder to help loosen debris, drawing it into the blades and shredded before loosening it from the chute deflector. Failure to due so ...following guidelines when shredding yard debris: • Never attempt to shred material other available device, i.e. After material has been processed by the shredder blade and flails, it into the chipper chute. Stop engine. 2. Shredding Yard waste such as leaves and pine needles can result in serious...

Operation Manual
Page 11
... carefully. • Check engine oil level before , cleaning, lubricating, or performing any maintenance. • The warranty on this chipper shredder does not cover items that have been subjected to dry thoroughly in the separate engine manual. • Clean or replace air cleaner every... engine manual for engine lubrication instructions. Remove all fasteners and make sure these are tight. Equipment Care • Clean the chipper shredder thoroughly after each use as instructed in shade. • If the reduction chamber becomes clogged, remove and clean as instructed here....
... carefully. • Check engine oil level before , cleaning, lubricating, or performing any maintenance. • The warranty on this chipper shredder does not cover items that have been subjected to dry thoroughly in the separate engine manual. • Clean or replace air cleaner every... engine manual for engine lubrication instructions. Remove all fasteners and make sure these are tight. Equipment Care • Clean the chipper shredder thoroughly after each use as instructed in shade. • If the reduction chamber becomes clogged, remove and clean as instructed here....

Operation Manual
Page 12
...: The muffler and surrounding area will be pivoted upward so that the spark plug wire is cleaned, pivot the shredder screen downward and re-secure with debris, the shredder screen can clean the surrounding area. See Figure 6-1B. Pull on either side of the chute deflector and pivot.... See Figure 6-1. Wear leather work gloves 4. Remove clevis pin. If attached, remove debris bag. To do so, proceed as follows: 1. chipper shredder has come to the chute deflector, if desired. 2. Clean the surrounding area by scraping away debris. Confirm that you can be hot if the engine...
...: The muffler and surrounding area will be pivoted upward so that the spark plug wire is cleaned, pivot the shredder screen downward and re-secure with debris, the shredder screen can clean the surrounding area. See Figure 6-1B. Pull on either side of the chute deflector and pivot.... See Figure 6-1. Wear leather work gloves 4. Remove clevis pin. If attached, remove debris bag. To do so, proceed as follows: 1. chipper shredder has come to the chute deflector, if desired. 2. Clean the surrounding area by scraping away debris. Confirm that you can be hot if the engine...

Operation Manual
Page 13
...which secure it to the impeller housing. Stop engine, disconnect spark plug, and make certain the chipper shredder has come to a complete stop . 2. Retain the hardware. C B A Model Series CS 4325 Shown Figure 7-1 4. Rotate the impeller by hand until one of the impeller. Remove the blade by... WARNING: The impeller's chipper blades are reassembled with the hardware removed earlier or sharpen. Retain the hardware. 3. Pivot the shredder screen upward as instructed under the heading Cleaning the Reduction Chamber. 3. NOTE: Make certain blades are sharp. Pivot the...
...which secure it to the impeller housing. Stop engine, disconnect spark plug, and make certain the chipper shredder has come to a complete stop . 2. Retain the hardware. C B A Model Series CS 4325 Shown Figure 7-1 4. Rotate the impeller by hand until one of the impeller. Remove the blade by... WARNING: The impeller's chipper blades are reassembled with the hardware removed earlier or sharpen. Retain the hardware. 3. Pivot the shredder screen upward as instructed under the heading Cleaning the Reduction Chamber. 3. NOTE: Make certain blades are sharp. Pivot the...

Operation Manual
Page 14
... each cutting edge receives an equal amount of engine and equipment. NOTE: Use a 3/16" hex key (Allen) wrench on the outside of the shredder blade and a 1/2" box (or socket) wrench on the inside of grind as a guide. Hold the Allen wrench stationary and rotate the box (...or socket) wrench to engine manual for reuse, follow the original angle of the shredder blade. Follow lubrication recommendations. Using a light oil or silicone, coat the equipment, especially any springs, bearings, and cables. Remove all debris for ...
... each cutting edge receives an equal amount of engine and equipment. NOTE: Use a 3/16" hex key (Allen) wrench on the outside of the shredder blade and a 1/2" box (or socket) wrench on the inside of grind as a guide. Hold the Allen wrench stationary and rotate the box (...or socket) wrench to engine manual for reuse, follow the original angle of the shredder blade. Follow lubrication recommendations. Using a light oil or silicone, coat the equipment, especially any springs, bearings, and cables. Remove all debris for ...

Operation Manual
Page 16
Replacement Parts Component 9 Part Number and Description 942-04050 Shredder Blade 942-0544B Chipper Blade 719-04308 Flail Blade (3 total) 634-04627 10 x 4.0 Pneumatic Wheel with Bearings Phone (800) 828-5500 to order replacement parts or a complete Parts Manual (have your full model number and serial number ready). Parts Manual downloads are also available free of charge at www.troybilt.com. 16
Replacement Parts Component 9 Part Number and Description 942-04050 Shredder Blade 942-0544B Chipper Blade 719-04308 Flail Blade (3 total) 634-04627 10 x 4.0 Pneumatic Wheel with Bearings Phone (800) 828-5500 to order replacement parts or a complete Parts Manual (have your full model number and serial number ready). Parts Manual downloads are also available free of charge at www.troybilt.com. 16