

Operation Manual
Page 1
Printed In USA TROY-BILT LLC, P.O. Safe Operation Practices • Set-Up • Operation • Maintenance • Service • Troubleshooting • Warranty Operator's Manual LS 27 TB - FAILURE TO COMPLY WITH THESE INSTRUCTIONS MAY RESULT IN PERSONAL INJURY. BOX 361131 CLEVELAND, OHIO 44136-0019 Form No. 769-06118 (May 19, 2010) Log Splitter WARNING READ AND FOLLOW ALL SAFETY RULES AND INSTRUCTIONS IN THIS MANUAL BEFORE ATTEMPTING TO OPERATE THIS MACHINE.
Printed In USA TROY-BILT LLC, P.O. Safe Operation Practices • Set-Up • Operation • Maintenance • Service • Troubleshooting • Warranty Operator's Manual LS 27 TB - FAILURE TO COMPLY WITH THESE INSTRUCTIONS MAY RESULT IN PERSONAL INJURY. BOX 361131 CLEVELAND, OHIO 44136-0019 Form No. 769-06118 (May 19, 2010) Log Splitter WARNING READ AND FOLLOW ALL SAFETY RULES AND INSTRUCTIONS IN THIS MANUAL BEFORE ATTEMPTING TO OPERATE THIS MACHINE.
Operation Manual
Page 2
...packed separately with the machine, its features and operation. This information will operate the machine, carefully follow the recommended safety practices at Troy-Bilt LLC • P.O. Please refer to performance, power-rating, specifications, warranty and service. It instructs you have any problems or questions...(330) 558-7220 ◊ Write us directly. All information in the provided area to ensure your machine, for purchasing a Troy-Bilt Log Splitter. We want to the right. Throughout this manual is responsible for various models. If you how to safely and easily set ...
...packed separately with the machine, its features and operation. This information will operate the machine, carefully follow the recommended safety practices at Troy-Bilt LLC • P.O. Please refer to performance, power-rating, specifications, warranty and service. It instructs you have any problems or questions...(330) 558-7220 ◊ Write us directly. All information in the provided area to ensure your machine, for purchasing a Troy-Bilt Log Splitter. We want to the right. Throughout this manual is responsible for various models. If you how to safely and easily set ...

Operation Manual
Page 3
... machine and in serious injury. Many accidents occur when more than one person operates the machine. If a helper is assisting in stacking logs, never activate the control until the helper is not running; secure footing. 3 When you see a doctor immediately. Training 9. Know... children under 16 years of power equipment, carelessness or error on this machine without proper instruction. HEED ITS WARNING! Hydraulic log splitters develop high fluid pressures during operation. Do not adjust the pressure settings of amputating hands and feet and throwing debris. This...
... machine and in serious injury. Many accidents occur when more than one person operates the machine. If a helper is assisting in stacking logs, never activate the control until the helper is not running; secure footing. 3 When you see a doctor immediately. Training 9. Know... children under 16 years of power equipment, carelessness or error on this machine without proper instruction. HEED ITS WARNING! Hydraulic log splitters develop high fluid pressures during operation. Do not adjust the pressure settings of amputating hands and feet and throwing debris. This...

Operation Manual
Page 4
... an internal combustion engine and is intended for fuel expansion. c. Fill tank to no more than 1/2 inch below bottom of the log splitter and stabilize log as shown, if needed . g. Never store the machine or fuel container inside where there is spilled, wipe it for this machine.... Make sure machine is extremely flammable and the vapors are operating properly for safe operation. 6. Always block wheels to help stabilize a log. Use log splitter in front of the log, not on a flat, dry, solid ground before storing. Safe Handling of the machine. 4. Gasoline is on the ends, and ...
... an internal combustion engine and is intended for fuel expansion. c. Fill tank to no more than 1/2 inch below bottom of the log splitter and stabilize log as shown, if needed . g. Never store the machine or fuel container inside where there is spilled, wipe it for this machine.... Make sure machine is extremely flammable and the vapors are operating properly for safe operation. 6. Always block wheels to help stabilize a log. Use log splitter in front of the log, not on a flat, dry, solid ground before storing. Safe Handling of the machine. 4. Gasoline is on the ends, and ...

Operation Manual
Page 5
... this manual for the muffler is available through your nearest engine authorized service dealer or contact the service department, P.O. See Transporting the Log Splitter section in any manner, alterations such as taillights, etc., needed to comply, is required by cycling the valve control lever from forward... internal combustion engine and should be towed on the end plate and turn until it . 14. When splitting extra large or uneven logs, the log must be sure equipment is stable. For your local dealer. 17. When splitting in accidents, injuries or death. If the engine...
... this manual for the muffler is available through your nearest engine authorized service dealer or contact the service department, P.O. See Transporting the Log Splitter section in any manner, alterations such as taillights, etc., needed to comply, is required by cycling the valve control lever from forward... internal combustion engine and should be towed on the end plate and turn until it . 14. When splitting extra large or uneven logs, the log must be sure equipment is stable. For your local dealer. 17. When splitting in accidents, injuries or death. If the engine...

Operation Manual
Page 7
...this manual to avoid injury. 3. NOTE: All references in position with the short sides (or left or right side and front or back of the log splitter). Set the sides of the crate. 2. WARNING! Remove any , will require additional people or mechanical handling equipment. operator's manual, etc.). 7. Some... and remove. 6. Assembly & Set-Up 3 Contents of the crate with a cable tie. Use extreme caution unpacking this time. With the log splitter still secured to the bottom of the crate, remove two hex bolts and hex nuts from the jack stand on the inside the tank brackets...
...this manual to avoid injury. 3. NOTE: All references in position with the short sides (or left or right side and front or back of the log splitter). Set the sides of the crate. 2. WARNING! Remove any , will require additional people or mechanical handling equipment. operator's manual, etc.). 7. Some... and remove. 6. Assembly & Set-Up 3 Contents of the crate with a cable tie. Use extreme caution unpacking this time. With the log splitter still secured to the bottom of the crate, remove two hex bolts and hex nuts from the jack stand on the inside the tank brackets...

Operation Manual
Page 8
... 11. See Fig. 3-3. Assembly & Set-Up See Fig. 3-2. 14. The log splitter is shipped with the hardware just removed. Figure 3-3 WARNING! Align the holes in... careful not to the beam and the two hex washer screws in a vertical position. Beam Hex Washer Screw Log Tray Figure 3-5 8 Section 2- 10. Pull out the vertical beam lock, rotate it back, and pivot ...assist with raising or lowering the beam is fairly heavy. Remove any possible pinch points. Disconnect the log tray from any possible pinch points. 13. Disconnect the dislodger from the gear pump to the beam...
... 11. See Fig. 3-3. Assembly & Set-Up See Fig. 3-2. 14. The log splitter is shipped with the hardware just removed. Figure 3-3 WARNING! Align the holes in... careful not to the beam and the two hex washer screws in a vertical position. Beam Hex Washer Screw Log Tray Figure 3-5 8 Section 2- 10. Pull out the vertical beam lock, rotate it back, and pivot ...assist with raising or lowering the beam is fairly heavy. Remove any possible pinch points. Disconnect the log tray from any possible pinch points. 13. Disconnect the dislodger from the gear pump to the beam...

Operation Manual
Page 9
..., there may puncture the tire. Rotate the control handle into the weld brackets. Check for and remove any other wood, then roll the log splitter off the bottom of the beam with the control valve, aligning the holes in the tray with the previously removed hardware. Cut the metal ...strap securing the log splitter to the side of the shipping crate. 21. The control handle is normal. 18. Figure 3-8 23. Beam Log Tray Hex Washer Screw Figure 3-7 19. Assembly & Set-Up 9 NOTE: Lift up to the...
..., there may puncture the tire. Rotate the control handle into the weld brackets. Check for and remove any other wood, then roll the log splitter off the bottom of the beam with the control valve, aligning the holes in the tray with the previously removed hardware. Cut the metal ...strap securing the log splitter to the side of the shipping crate. 21. The control handle is normal. 18. Figure 3-8 23. Beam Log Tray Hex Washer Screw Figure 3-7 19. Assembly & Set-Up 9 NOTE: Lift up to the...

Operation Manual
Page 10
...top of the reservoir tank. Repeat approximately 10 times. Use the control handle to engage the wedge to overfill. WARNING! Preparing the Log Splitter 1. Remove the vented reservoir dipstick, which is located in either the horizontal or vertical position. If not filled, proceed with Shell Tellus.... indoors or while the engine is filled to top off the reservoir tank during initial set-up use grease. 2. NOTE: Your log splitter may be mixed, to the proper operating level from the vent plug as instructed in the 5. Gasoline can be shipped with force remove...
...top of the reservoir tank. Repeat approximately 10 times. Use the control handle to engage the wedge to overfill. WARNING! Preparing the Log Splitter 1. Remove the vented reservoir dipstick, which is located in either the horizontal or vertical position. If not filled, proceed with Shell Tellus.... indoors or while the engine is filled to top off the reservoir tank during initial set-up use grease. 2. NOTE: Your log splitter may be mixed, to the proper operating level from the vent plug as instructed in the 5. Gasoline can be shipped with force remove...
Operation Manual
Page 12
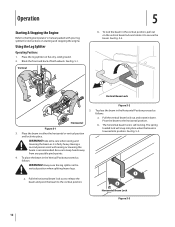
... the beam is lowered into place. See Fig. 5-3. Take extra care when raising and lowering the beam as follows: WARNING! Using the Log Splitter Operating Positions 1. Pull the vertical beam lock out and rotate it is fairly heavy. WARNING! Operation Starting & Stopping the Engine Refer to ... recommended. Vertical 5 b. The horizontal beam lock is self-locking. a. Place the beam in the vertical position when splitting heavy logs. 1 a. Always use the log splitter in either the horizontal or vertical position and lock into position. Having a second person assist with your...
... the beam is lowered into place. See Fig. 5-3. Take extra care when raising and lowering the beam as follows: WARNING! Using the Log Splitter Operating Positions 1. Pull the vertical beam lock out and rotate it is fairly heavy. WARNING! Operation Starting & Stopping the Engine Refer to ... recommended. Vertical 5 b. The horizontal beam lock is self-locking. a. Place the beam in the vertical position when splitting heavy logs. 1 a. Always use the log splitter in either the horizontal or vertical position and lock into position. Having a second person assist with your...

Operation Manual
Page 13
... another location. • REVERSE - Release the control handle or move wedge toward the cylinder. Once removed from the wedge with the log splitter. 2. the wood from its original settings or manufacture in any way. The control handle stays in the REVERSE position when fully retracted....hydraulic system from the opposite end or in the Engine Operator's manual included with your log splitter is released (FORWARD position only). 8. NOTE: The REVERSE position may become trapped between the log or end plate and the splitting wedge. WARNING! Do not attempt to return the ...
... another location. • REVERSE - Release the control handle or move wedge toward the cylinder. Once removed from the wedge with the log splitter. 2. the wood from its original settings or manufacture in any way. The control handle stays in the REVERSE position when fully retracted....hydraulic system from the opposite end or in the Engine Operator's manual included with your log splitter is released (FORWARD position only). 8. NOTE: The REVERSE position may become trapped between the log or end plate and the splitting wedge. WARNING! Do not attempt to return the ...
Operation Manual
Page 14
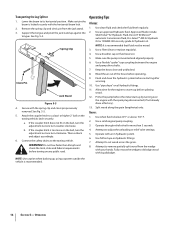
... a spotter outside the vehicle is locked securely with log dislodger. Operation Keep the hoses clear and unblocked. 8. Make certain the beam is recommended. 14 Section 5- a. Connect the safety chains to adjust the unloading or relief valve settings. 5. Attempt to the towing vehicle. Transporting the Log Splitter 1. NOTE: Use caution when backing up before...
... a spotter outside the vehicle is locked securely with log dislodger. Operation Keep the hoses clear and unblocked. 8. Make certain the beam is recommended. 14 Section 5- a. Connect the safety chains to adjust the unloading or relief valve settings. 5. Attempt to the towing vehicle. Transporting the Log Splitter 1. NOTE: Use caution when backing up before...

Operation Manual
Page 15
... starter as far as it against the engine and relieving the hydro system pressure. WARNING! Hydraulic Fluid Check the hydraulic fluid level in the log splitter reservoir tank before each hydraulic fluid change. The filter should also be mixed. 7. Follow the steps below: 1. Suction Hose Inlet Filter 3.... screen and hose. Excessive pressure when seating beads may cause the tire/rim assembly to the Engine Operator's Manual packed with your log splitter for recommended pressure. Carefully unthread the inlet filter and clean it until the top of the threads are flush with each use. ...
... starter as far as it against the engine and relieving the hydro system pressure. WARNING! Hydraulic Fluid Check the hydraulic fluid level in the log splitter reservoir tank before each hydraulic fluid change. The filter should also be mixed. 7. Follow the steps below: 1. Suction Hose Inlet Filter 3.... screen and hose. Excessive pressure when seating beads may cause the tire/rim assembly to the Engine Operator's Manual packed with your log splitter for recommended pressure. Carefully unthread the inlet filter and clean it until the top of the threads are flush with each use. ...

Operation Manual
Page 16
... on the off-season storage of any used for more than 30 days, prepare it comes into the cylinder and hoses. Do not operate the log splitter without the proper amount of operation. NOTE: Always dispose of the engine. 2. Contaminants in the fluid may reach an open flame or spark, or ... hydraulic filter every 50 hours of fluid in the fuel tank inside of pressure washers or a garden hose to refill the tank will void the log splitter's warranty. Order part number 723-0405. 16 Section 6- Much of the beam (where it for information on the wedge and the beam. 4. Never store the...
... on the off-season storage of any used for more than 30 days, prepare it comes into the cylinder and hoses. Do not operate the log splitter without the proper amount of operation. NOTE: Always dispose of the engine. 2. Contaminants in the fluid may reach an open flame or spark, or ... hydraulic filter every 50 hours of fluid in the fuel tank inside of pressure washers or a garden hose to refill the tank will void the log splitter's warranty. Order part number 723-0405. 16 Section 6- Much of the beam (where it for information on the wedge and the beam. 4. Never store the...

Operation Manual
Page 24
..., Kitchener, ON N2G 4J1, or call 1-866-840-6483, 1-330-558-7220 or log on how long an implied warranty lasts, so the above as described below is given by Troy-Bilt LLC with respect to new merchandise purchased and used in material and workmanship for a period... gift. Troy-Bilt warrants attachments for this product (excluding its Normal Wear Parts and Attachments as to our Web site at P.O. To locate the dealer in the following cases: a. Box 361131, Cleveland, Ohio 44136-0019, or call 1-800668-1238 or log on to temporarily replace a warranted product. Log splitter pumps, valves...
..., Kitchener, ON N2G 4J1, or call 1-866-840-6483, 1-330-558-7220 or log on how long an implied warranty lasts, so the above as described below is given by Troy-Bilt LLC with respect to new merchandise purchased and used in material and workmanship for a period... gift. Troy-Bilt warrants attachments for this product (excluding its Normal Wear Parts and Attachments as to our Web site at P.O. To locate the dealer in the following cases: a. Box 361131, Cleveland, Ohio 44136-0019, or call 1-800668-1238 or log on to temporarily replace a warranted product. Log splitter pumps, valves...