Troy-Bilt Pony ES Support and Manuals
Get Help and Manuals for this Troy-Bilt item
View All Support Options Below
Free Troy-Bilt Pony ES manuals!
Problems with Troy-Bilt Pony ES?
Ask a Question
Free Troy-Bilt Pony ES manuals!
Problems with Troy-Bilt Pony ES?
Ask a Question
Popular Troy-Bilt Pony ES Manual Pages
Operation Manual - Page 1

...
Form No. 769-07552 (January 2, 2012) Printed In USA
TROY-BILT LLC, P.O. Safe Operation Practices • Set-Up • Operation • Maintenance • Service • Troubleshooting • Warranty
Operator's Manual
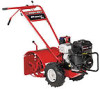
Pony, Pony ES & Pro-Line FRT Tiller
WARNING
READ AND FOLLOW ALL SAFETY RULES AND INSTRUCTIONS IN THIS MANUAL BEFORE ATTEMPTING TO OPERATE THIS MACHINE. FAILURE TO COMPLY...
Operation Manual - Page 2

... looking down at all times. Please refer to Troy-Bilt LLC • P.O. Choose from the operating position
The engine manufacturer is relative to performance, power-rating, specifications, warranty and service. It was carefully engineered to safely and easily set up and operating your machine, for various models. It instructs you how to provide excellent performance when properly...
Operation Manual - Page 4

...settings or over fill fuel tank. Maintain or replace safety and instruction labels, as on the ground. Follow this machine.
8. c. d.
Allow engine to the instructions...Repair the damage before starting .
5. Never tamper with the rotating parts can result in reverse or pulling machine towards you nearest servicing... rotating parts. Contact Customer Support for...this manual, ...tiller...
Operation Manual - Page 7
...
Unpacking Instructions
1. On electric start the engine until instructed to remove it from the curved height adjustment bracket. Cut the large, plastic tie strap that secure the handlebar
ends to avoid damaging any cables.
7
The tiller is inside the literature envelope. The hardware bag is heavy. Handle
1.
Remove any staples from the carton. Assembly & Set-Up...
Operation Manual - Page 8

... washer fit into the slot on the transmission top cover. To remove the tiller from its shipping platform, first
Adjustment Screw
carefully unwrap the wheel gear cable with two 3⁄8-16 x 1" screws (heads of screws go to align the threaded hole in Fig. 3-2 for non-electric start machines, reattach the height adjustment bracket. Before...
Operation Manual - Page 10

... hex nut from the positive cable (heavy red wire).
2. Figure 3-9
10
Section 3-
Check for instructions on the control panel decal and securely attach the wheel gear mounting bracket using two #10 lockwashers and #10-32 nuts.
3. Gas & Oil Fill-Up
Service the engine with electric start)
The positive battery terminal is labeled "WHEEL GEAR."
Operation Manual - Page 11
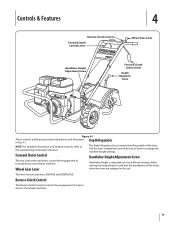
...Gear Lever
Handlebar Height Adjustment Screw
Forward Clutch Control Lever
Depth Regulator
Lever
Figure 4-1
Tillers controls and features are engaged in Fig. 4-1.
The Depth Regulator lever controls the ...engine controls, refer to four different settings. Handlebar Height is adjustable to the separate Engine Operator's Manual.
Reverse Clutch Control
The Reverse Clutch Control controls the...
Operation Manual - Page 12

... on engines so equipped) to stabilize the tiller when you pull the starter handle. For recoil (non-electric) starting models:
a.
Recoil Starter
If necessary, the electric start model, move the choke lever (on the loose end of "Starting the Engine." NOTE: After stopping an electric start the engine as instructed in this manual. Service as doing so could damage the starter motor...
Operation Manual - Page 17

...and cover crops. Section 5 - Remove the ignition key on electric start models.
• The tiller is done, the better, as possible. with the engine shut...guide the tiller along the ramps and they finish bearing. Power Composting
• Power composting simply means tilling under and burying in the soil all parts to temporarily keep the Depth Regulator Lever at a deep setting if the tiller...
Operation Manual - Page 18

Failure to service those screws. Be sure to flow out of the transmission. Operating the tiller when the transmission is low on electric start models. Check the gear oil level when the transmission is removed. Cut and remove the tie. The gear oil level is correct if oil starts to check the three end cap mounting screws located at the...
Operation Manual - Page 21

..., carburetor and fuel tank from the pulleys to loosen the two adjuster jam nuts a few turns. reverse clutch cable adjuster located on electric start models. Use two 1⁄2" open area and test the reverse operation. Section 6 -
Move the cable adjuster away from gum deposits by removing fuel or by following the engine storage instructions found...
Operation Manual - Page 22
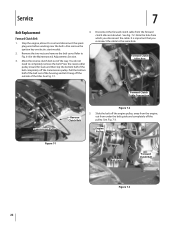
Forward Clutch Belt
1. Also remove the ignition key on electric start models.
2. Move the reverse clutch belt out of the housing and ... Pulley
Belt Guide
Forward Clutch Belt
Figure 7-3
22 See Fig. 7-2.
Stop the engine, allow it hang off the transmission pulley. See Fig. 7-1. Pull the bottom half of the belt out of the way.
Fig. 7-3. Service
7
Belt Replacement
4. Refer ...
Operation Manual - Page 23

...
11. Insert the bottom of the transmission pulley. Test for correct tension on electric start models.
2. See the Maintenance & Adjustments Section.
Pull the reverse clutch belt downward and slip it onto the large, forward-most groove of the transmission pulley. From the front of the tiller, insert the forward clutch belt in Fig. 7-2. most groove of...
Operation Manual - Page 24

... and after every 30 operating hours. beginning of the transmission pulley. Pull back on electric start models. Pull the
Badly worn tines will become shorter, narrower and pointed.
9. Adjust the cable for more information. 11. New Tine Moderate Wear Replace
Figure 7-8
24
Section 7- Never inspect or service the tines unless the engine is
tighten snugly. You...
Operation Manual - Page 28

... coverage in your area:
In the U.S.A. b. d. Troy-Bilt shall not be greater than an authorized service dealer. This limited warranty shall only apply if this product has been operated and maintained in material and workmanship for this manual will , at www.troybilt.com. Attachments include, but are not genuine Troy-Bilt parts.
Log splitter pumps, valves, and cylinders...
Troy-Bilt Pony ES Reviews
We have not received any reviews for Troy-Bilt yet.