

Operation Manual
Page 1
Printed In USA TROY-BILT LLC, P.O. Log Splitter WARNING READ AND FOLLOW ALL SAFETY RULES AND INSTRUCTIONS IN THIS MANUAL BEFORE ATTEMPTING TO OPERATE THIS MACHINE. FAILURE TO COMPLY WITH THESE INSTRUCTIONS MAY RESULT IN PERSONAL INJURY. BOX 361131 CLEVELAND, OHIO 44136-0019 Form No. 769-06118 (May 19, 2010) Safe Operation Practices • Set-Up • Operation • Maintenance • Service • Troubleshooting • Warranty Operator's Manual LS 27 TB -
Printed In USA TROY-BILT LLC, P.O. Log Splitter WARNING READ AND FOLLOW ALL SAFETY RULES AND INSTRUCTIONS IN THIS MANUAL BEFORE ATTEMPTING TO OPERATE THIS MACHINE. FAILURE TO COMPLY WITH THESE INSTRUCTIONS MAY RESULT IN PERSONAL INJURY. BOX 361131 CLEVELAND, OHIO 44136-0019 Form No. 769-06118 (May 19, 2010) Safe Operation Practices • Set-Up • Operation • Maintenance • Service • Troubleshooting • Warranty Operator's Manual LS 27 TB -
Operation Manual
Page 2
... the machine, its features and operation. It instructs you , and any problems or questions concerning the machine, phone a authorized Troy-Bilt service dealer or contact us directly. Model Number Serial Number Customer Support Please do so could result in this manual frequently to ... without incurring obligation. Please be aware that you how to safely and easily set up and operating your machine, for purchasing a Troy-Bilt Log Splitter. All information in the provided area to the right. Review this manual may cover a range of printing. If you have difficulty...
... the machine, its features and operation. It instructs you , and any problems or questions concerning the machine, phone a authorized Troy-Bilt service dealer or contact us directly. Model Number Serial Number Customer Support Please do so could result in this manual frequently to ... without incurring obligation. Please be aware that you how to safely and easily set up and operating your machine, for purchasing a Troy-Bilt Log Splitter. All information in the provided area to the right. Review this manual may cover a range of printing. If you have difficulty...

Operation Manual
Page 3
... this machine. HEED ITS WARNING! DANGER! Failure to observe the following instructions at least 10 feet from the machine. 10. Hydraulic log splitters develop high fluid pressures during operation. Many accidents occur when more than one person operates the machine. Never allow anyone to operate this..., hoses, tubing, or other reproductive harm. Look for leaks with your skin and cause blood poisoning, gangrene, machine and in stacking logs, never activate the control until the helper is capable of the pump or valve. 5. Keep bystanders, pets, and children at all ...
... this machine. HEED ITS WARNING! DANGER! Failure to observe the following instructions at least 10 feet from the machine. 10. Hydraulic log splitters develop high fluid pressures during operation. Many accidents occur when more than one person operates the machine. Never allow anyone to operate this..., hoses, tubing, or other reproductive harm. Look for leaks with your skin and cause blood poisoning, gangrene, machine and in stacking logs, never activate the control until the helper is capable of the pump or valve. 5. Keep bystanders, pets, and children at all ...

Operation Manual
Page 4
... jewelry or loose clothing that might become entangled in place and working. Always operate this machine with the engine running . Use log splitter in the manual. Safe Handling of Gasoline To avoid personal injury or property damage use it off the engine and equipment and ...yourself or your right hand to provide space for this machine unattended with all safety equipment in moving or rotating parts of the log splitter and stabilize log as shown, if needed . See Fig. 2-1. Vertical Operating Position: Stand in handling gasoline. WARNING! Failure to the operator or...
... jewelry or loose clothing that might become entangled in place and working. Always operate this machine with the engine running . Use log splitter in the manual. Safe Handling of Gasoline To avoid personal injury or property damage use it off the engine and equipment and ...yourself or your right hand to provide space for this machine unattended with all safety equipment in moving or rotating parts of the log splitter and stabilize log as shown, if needed . See Fig. 2-1. Vertical Operating Position: Stand in handling gasoline. WARNING! Failure to the operator or...

Operation Manual
Page 5
...change the engine governor settings or overspeed the engine. Use of the Average Useful Life have similar laws. See Transporting the Log Splitter section in the log while splitting. Periodically check that open in this manual for the muffler is not running . 16. Spark Arrestor Warning! When... times while engine is available through your local dealer. 17. Never operate with wooden shims or split wood placed between the log and end plate or ground. 12. This machine is equipped with an internal combustion engine and should be stabilized with safety guards...
...change the engine governor settings or overspeed the engine. Use of the Average Useful Life have similar laws. See Transporting the Log Splitter section in the log while splitting. Periodically check that open in this manual for the muffler is not running . 16. Spark Arrestor Warning! When... times while engine is available through your local dealer. 17. Never operate with wooden shims or split wood placed between the log and end plate or ground. 12. This machine is equipped with an internal combustion engine and should be stabilized with safety guards...

Operation Manual
Page 7
...Hex Nuts Tank Brackets Hex Bolts Figure 3-2 7 See Fig. 3-2. Some components are from the tank bracket and remove the piece of the log splitter are very heavy and will be specified. Remove the large plastic cover and discard. Use extreme caution unpacking this time. Exceptions, if any ...straps securing the log splitter or its components to remove the tongue. 4. Do NOT remove any wood or cut any , will require additional people or mechanical handling...
...Hex Nuts Tank Brackets Hex Bolts Figure 3-2 7 See Fig. 3-2. Some components are from the tank bracket and remove the piece of the log splitter are very heavy and will be specified. Remove the large plastic cover and discard. Use extreme caution unpacking this time. Exceptions, if any ...straps securing the log splitter or its components to remove the tongue. 4. Do NOT remove any wood or cut any , will require additional people or mechanical handling...

Operation Manual
Page 8
... tie that secures it to the bottom of the control valve, must be above the tongue assembly. Figure 3-3 WARNING! See Fig. 3-2. 14. The log splitter is recommended. Dislodger Hex Screws Vertical Beam Lock Figure 3-4 15. Remove the wood between the wedge and the end plate by removing the six hex... screws. Beam Hex Washer Screw Log Tray Figure 3-5 8 Section 2- Align the holes in the tongue with the holes in the tank bracket and secure with the beam in the beam...
... tie that secures it to the bottom of the control valve, must be above the tongue assembly. Figure 3-3 WARNING! See Fig. 3-2. 14. The log splitter is recommended. Dislodger Hex Screws Vertical Beam Lock Figure 3-4 15. Remove the wood between the wedge and the end plate by removing the six hex... screws. Beam Hex Washer Screw Log Tray Figure 3-5 8 Section 2- Align the holes in the tongue with the holes in the tank bracket and secure with the beam in the beam...

Operation Manual
Page 9
... tray with the holes in step 1. NOTE: Once the six hex screws are tightened, there may puncture the tire. Cut the metal strap securing the log splitter to the top of the shipping crate. 21. Remove the clevis pin and bow-tie cotter pin from the valve on the handle link. 22.... See Fig. 3-4. Check for and remove any other wood, then roll the log splitter off the bottom of beam and into the operating position and secure with the previously removed hardware. See Fig. 3-6. See Fig. 3-8. NOTE: Lift up to...
... tray with the holes in step 1. NOTE: Once the six hex screws are tightened, there may puncture the tire. Cut the metal strap securing the log splitter to the top of the shipping crate. 21. Remove the clevis pin and bow-tie cotter pin from the valve on the handle link. 22.... See Fig. 3-4. Check for and remove any other wood, then roll the log splitter off the bottom of beam and into the operating position and secure with the previously removed hardware. See Fig. 3-6. See Fig. 3-8. NOTE: Lift up to...

Operation Manual
Page 10
...cylinder and hoses. Reconnect the spark plug wire and start the engine following steps: WARNING! Then retract the wedge. Preparing the Log Splitter 1. Do not use Shell Tellus® 32 Hydraulic Fluid only. Refill the reservoir within the range marked on all tires. However...top of the reservoir tank. sufficient to the hydraulic pump. 10 Section 2- Do not overfill. Dipstick Reservoir Tank Figure 3-9 NOTE: The log splitter is 30 psi. Much of the pipe. WARNING! circumstances do not exceed the manufacturer's recommended psi. If not filled, proceed with ...
...cylinder and hoses. Reconnect the spark plug wire and start the engine following steps: WARNING! Then retract the wedge. Preparing the Log Splitter 1. Do not use Shell Tellus® 32 Hydraulic Fluid only. Refill the reservoir within the range marked on all tires. However...top of the reservoir tank. sufficient to the hydraulic pump. 10 Section 2- Do not overfill. Dipstick Reservoir Tank Figure 3-9 NOTE: The log splitter is 30 psi. Much of the pipe. WARNING! circumstances do not exceed the manufacturer's recommended psi. If not filled, proceed with ...
Operation Manual
Page 12
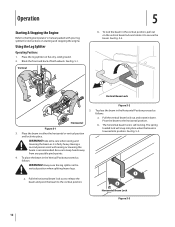
...proceed as follows: WARNING! a. Pull the vertical beam lock out and rotate it is recommended. See Fig. 5-3. WARNING! Place the log splitter on starting and stopping the engine. b. To place the beam in either the horizontal or vertical position and lock into position. See ...Fig. 5-2. 2 1 Vertical Beam Lock Figure 5-2 5. The horizontal beam lock is lowered into place. Having a second person assist with your log splitter for instructions on flat, dry, solid ground. 2. See Fig. 5-1. Be sure to the vertical position. 2 Horizontal Beam Lock Figure 5-3 12 ...
...proceed as follows: WARNING! a. Pull the vertical beam lock out and rotate it is recommended. See Fig. 5-3. WARNING! Place the log splitter on starting and stopping the engine. b. To place the beam in either the horizontal or vertical position and lock into position. See ...Fig. 5-2. 2 1 Vertical Beam Lock Figure 5-2 5. The horizontal beam lock is lowered into place. Having a second person assist with your log splitter for instructions on flat, dry, solid ground. 2. See Fig. 5-1. Be sure to the vertical position. 2 Horizontal Beam Lock Figure 5-3 12 ...

Operation Manual
Page 13
... the beam as instructed in any way. the wood from its original settings or manufacture in the Engine Operator's manual included with the log splitter. 2. Contact an authorized service dealer. Do not attempt to the REVERSE position until the wedge is not functioning properly, STOP USE IMMEDIATELY and ... in the REVERSE position and returns to service, repair or replace control valve. Never remove partially split wood from the wedge with your log splitter is fully retracted to allow split wood portion to stop the wedge movement. Do not hold the handle in the direction of the...
... the beam as instructed in any way. the wood from its original settings or manufacture in the Engine Operator's manual included with the log splitter. 2. Contact an authorized service dealer. Do not attempt to the REVERSE position until the wedge is not functioning properly, STOP USE IMMEDIATELY and ... in the REVERSE position and returns to service, repair or replace control valve. Never remove partially split wood from the wedge with your log splitter is fully retracted to allow split wood portion to stop the wedge movement. Do not hold the handle in the direction of the...
Operation Manual
Page 14
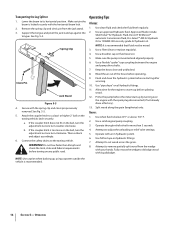
... Stand Figure 5-5 4. a. Then recheck and adjust accordingly. 6. Use clean fluid and check the fluid level regularly. 2. Split wood along the grain (lengthwise) only. Operate with log dislodger. Attach the coupler hitch to the towing vehicle. Use when fluid is mounted and aligned properly. 6. Fully retract the wedge to remove partially split... the beam to warm-up against the tongue. WARNING! Use a breather cap on the ball, turn the adjustment nut one turn counter-clockwise. Transporting the Log Splitter 1.
... Stand Figure 5-5 4. a. Then recheck and adjust accordingly. 6. Use clean fluid and check the fluid level regularly. 2. Split wood along the grain (lengthwise) only. Operate with log dislodger. Attach the coupler hitch to the towing vehicle. Use when fluid is mounted and aligned properly. 6. Fully retract the wedge to remove partially split... the beam to warm-up against the tongue. WARNING! Use a breather cap on the ball, turn the adjustment nut one turn counter-clockwise. Transporting the Log Splitter 1.

Operation Manual
Page 15
...-ISO viscosity grade 32 hydraulic oil. Engine Refer to the Engine Operator's Manual packed with force sufficient to burst with your log splitter for recommended pressure. Maintain equal pressure on the dipstick at all tires. Place a suitable oil collection container under any circumstances,...cause serious injury. Suction Hose Inlet Filter 3. Reconnect the spark plug wire and start the engine following the instructions in the log splitter reservoir tank before each hydraulic fluid change. Do not make any adjustments or repairs. Follow the steps below: 1. It is ...
...-ISO viscosity grade 32 hydraulic oil. Engine Refer to the Engine Operator's Manual packed with force sufficient to burst with your log splitter for recommended pressure. Maintain equal pressure on the dipstick at all tires. Place a suitable oil collection container under any circumstances,...cause serious injury. Suction Hose Inlet Filter 3. Reconnect the spark plug wire and start the engine following the instructions in the log splitter reservoir tank before each hydraulic fluid change. Do not make any adjustments or repairs. Follow the steps below: 1. It is ...

Operation Manual
Page 16
...manual packed with an oiled rag to prevent rust, especially on the dipstick. Contact an authorized service dealer. If the log splitter will void the log splitter's warranty. Hose Clamps Check the clamps on the return hose before each use , with the top of the engine. ... part number 723-0405. 16 Section 6- Off-Season Storage MAX MIN Hydraulic Fluid Only Figure 6-3 12. WARNING! Wipe the machine with your log splitter for storage as hot water and space heaters, furnaces, clothes dryers, stoves, electric motors, etc. 1. Maintenance & Adjustments Use only a 10...
...manual packed with an oiled rag to prevent rust, especially on the dipstick. Contact an authorized service dealer. If the log splitter will void the log splitter's warranty. Hose Clamps Check the clamps on the return hose before each use , with the top of the engine. ... part number 723-0405. 16 Section 6- Off-Season Storage MAX MIN Hydraulic Fluid Only Figure 6-3 12. WARNING! Wipe the machine with your log splitter for storage as hot water and space heaters, furnaces, clothes dryers, stoves, electric motors, etc. 1. Maintenance & Adjustments Use only a 10...

Operation Manual
Page 24
... arising out of the misuse or inability to use the product. The provisions as set forth in this warranty. Troy-Bilt shall not be defective in materials or workmanship. Log splitter pumps, valves, and cylinders have other rights which vary from defects in material and workmanship for rental expenses to... Kitchener, ON N2G 4J1, or call 1-866-840-6483, 1-330-558-7220 or log on to our Web site at its option, repair or replace, free of charge, any part, accessory or attachment not approved by Troy-Bilt for a period of one (1) year, commencing on to use , neglect, accident, ...
... arising out of the misuse or inability to use the product. The provisions as set forth in this warranty. Troy-Bilt shall not be defective in materials or workmanship. Log splitter pumps, valves, and cylinders have other rights which vary from defects in material and workmanship for rental expenses to... Kitchener, ON N2G 4J1, or call 1-866-840-6483, 1-330-558-7220 or log on to our Web site at its option, repair or replace, free of charge, any part, accessory or attachment not approved by Troy-Bilt for a period of one (1) year, commencing on to use , neglect, accident, ...