
Operation Manual
Page 1
Safe Operation Practices • Set-Up • Operation • Maintenance • Service • Troubleshooting • Warranty Operator's Manual Pony, Pony ES & Pro-Line FRT Tiller WARNING READ AND FOLLOW ALL SAFETY RULES AND INSTRUCTIONS IN THIS MANUAL BEFORE ATTEMPTING TO OPERATE THIS MACHINE. BOX 361131 CLEVELAND, OHIO 44136-0019 Form No. 769-07552 (January 2, 2012) FAILURE TO COMPLY WITH THESE INSTRUCTIONS MAY RESULT IN PERSONAL INJURY. Printed In USA TROY-BILT LLC, P.O.
Safe Operation Practices • Set-Up • Operation • Maintenance • Service • Troubleshooting • Warranty Operator's Manual Pony, Pony ES & Pro-Line FRT Tiller WARNING READ AND FOLLOW ALL SAFETY RULES AND INSTRUCTIONS IN THIS MANUAL BEFORE ATTEMPTING TO OPERATE THIS MACHINE. BOX 361131 CLEVELAND, OHIO 44136-0019 Form No. 769-07552 (January 2, 2012) FAILURE TO COMPLY WITH THESE INSTRUCTIONS MAY RESULT IN PERSONAL INJURY. Printed In USA TROY-BILT LLC, P.O.

Operation Manual
Page 2
...the equipment. Characteristics and features discussed and/or illustrated in this manual may cover a range of product specifications for all times. Troy-Bilt's Customer Support telephone numbers, website address and mailing address can be found on this machine, you how to safely and easily ...or questions concerning the machine, phone a authorized Troy-Bilt service dealer or contact us on the equipment and record the information in the provided area to the right. We want to ensure your machine, for purchasing a Troy-Bilt Garden Tiller. All information in this entire manual prior ...
...the equipment. Characteristics and features discussed and/or illustrated in this manual may cover a range of product specifications for all times. Troy-Bilt's Customer Support telephone numbers, website address and mailing address can be found on this machine, you how to safely and easily ...or questions concerning the machine, phone a authorized Troy-Bilt service dealer or contact us on the equipment and record the information in the provided area to the right. We want to ensure your machine, for purchasing a Troy-Bilt Garden Tiller. All information in this entire manual prior ...

Operation Manual
Page 4
... tighten securely. To reduce fire hazards, keep feet well away from a gasoline dispenser nozzle. Operation 1. Be careful when tilling in the ground and propel the tiller forward. Muffler and engine become hot and can amputate hands and feet. 2. Use caution when tilling near rotating parts. Repair any damage. Never pick up...
... tighten securely. To reduce fire hazards, keep feet well away from a gasoline dispenser nozzle. Operation 1. Be careful when tilling in the ground and propel the tiller forward. Muffler and engine become hot and can amputate hands and feet. 2. Use caution when tilling near rotating parts. Repair any damage. Never pick up...
Operation Manual
Page 7
...oil specifications and quantity. 3. On electric start machines, remove one side. Remove any cardboard inserts and packaging material from the bottom of the tiller to tap plastic knob on top of the carton and remove the carton. 2. Leave the handlebars on lever) • Tire pressure gauge ...Contents of Hardware pack • 3⁄8-16 x 1" Hex Hd. Check the contents with the list above. 4. You should not attempt to do not start tiller only) • 9⁄16" open-end wrench • 7⁄8" open-end wrench • Scissors (to trim plastic ties) • Ruler • ...
...oil specifications and quantity. 3. On electric start machines, remove one side. Remove any cardboard inserts and packaging material from the bottom of the tiller to tap plastic knob on top of the carton and remove the carton. 2. Leave the handlebars on lever) • Tire pressure gauge ...Contents of Hardware pack • 3⁄8-16 x 1" Hex Hd. Check the contents with the list above. 4. You should not attempt to do not start tiller only) • 9⁄16" open-end wrench • 7⁄8" open-end wrench • Scissors (to trim plastic ties) • Ruler • ...

Operation Manual
Page 8
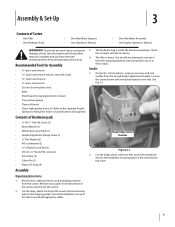
... Move the handlebars up or down . Move the Wheel Gear Lever to the DISENGAGE position, this allows the wheels to roll the tiller off the platform. Use the handlebars to rotate Height Adjustment Bracket Handlebar Cross Brace freely. Place the keyed washer on the height adjustment...tighten the two screws and nuts in the ENGAGE position (see the Operation Section for details). See Fig. 3-3. 8 Section 3- On electric start tillers. Keyed Washer 7. For electric start machines, the bracket is loosened and moved to align the threaded hole in the cross brace with the raised...
... Move the handlebars up or down . Move the Wheel Gear Lever to the DISENGAGE position, this allows the wheels to roll the tiller off the platform. Use the handlebars to rotate Height Adjustment Bracket Handlebar Cross Brace freely. Place the keyed washer on the height adjustment...tighten the two screws and nuts in the ENGAGE position (see the Operation Section for details). See Fig. 3-3. 8 Section 3- On electric start tillers. Keyed Washer 7. For electric start machines, the bracket is loosened and moved to align the threaded hole in the cross brace with the raised...

Operation Manual
Page 10
... when handling gasoline. Then hand tighten the jam nuts. Make certain that is extremely flammable and the vapors are inflated equally or the tiller will pull to one side. Read the instructions carefully. Gasoline is labeled "WHEEL GEAR." Never fuel the machine indoors or while the ...Adjuster Jam Nuts Figure 3-8 WARNING! Wheel Gear Lever 2. NOTE: If the battery is correct. Gas & Oil Fill-Up Service the engine with your tiller. Battery and Cables (If equipped with the bolt and hex nut. Figure 3-9 10 Section 3- Use the two 1⁄2" wrenches to loosen the two...
... when handling gasoline. Then hand tighten the jam nuts. Make certain that is extremely flammable and the vapors are inflated equally or the tiller will pull to one side. Read the instructions carefully. Gasoline is labeled "WHEEL GEAR." Never fuel the machine indoors or while the ...Adjuster Jam Nuts Figure 3-8 WARNING! Wheel Gear Lever 2. NOTE: If the battery is correct. Gas & Oil Fill-Up Service the engine with your tiller. Battery and Cables (If equipped with the bolt and hex nut. Figure 3-9 10 Section 3- Use the two 1⁄2" wrenches to loosen the two...
Operation Manual
Page 11
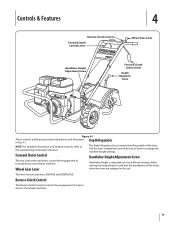
... settings. Controls & Features Reverse Clutch Control Forward Clutch Control Lever 4 Wheel Gear Lever Handlebar Height Adjustment Screw Forward Clutch Control Lever Depth Regulator Lever Figure 4-1 Tillers controls and features are engaged in Fig. 4-1.
... settings. Controls & Features Reverse Clutch Control Forward Clutch Control Lever 4 Wheel Gear Lever Handlebar Height Adjustment Screw Forward Clutch Control Lever Depth Regulator Lever Figure 4-1 Tillers controls and features are engaged in Fig. 4-1.

Operation Manual
Page 12
...the battery cells are in place with the insulated boot and secure it tested. Check the machine for several seconds. Follow all controls on the tiller. 5. Starting the Engine 1. Put the Wheel Gear Lever in the "FAST" setting. 9. Put the Engine Throttle Control Lever in enclosed,...engine longer than 15 seconds at a time as instructed in the "travel" position (lever all the safety guards and covers are filled to the tiller so it will be started with electrolyte. 2. If the battery is engaged). 2. Stopping the Engine 1. Read the separate Engine Operator's Manual. 2....
...the battery cells are in place with the insulated boot and secure it tested. Check the machine for several seconds. Follow all controls on the tiller. 5. Starting the Engine 1. Put the Wheel Gear Lever in the "FAST" setting. 9. Put the Engine Throttle Control Lever in enclosed,...engine longer than 15 seconds at a time as instructed in the "travel" position (lever all the safety guards and covers are filled to the tiller so it will be started with electrolyte. 2. If the battery is engaged). 2. Stopping the Engine 1. Read the separate Engine Operator's Manual. 2....

Operation Manual
Page 13
...stop the forward motion of the wheels and tines, release the levers. Figure 5-2 Turning the Tiller 1. Be very careful to dig deeper - Operation 13 To stop the reverse motion, let go of the tiller. Let the tiller move ahead at its own pace and do not push down on the handlebars to try... to make a turn, reduce the engine speed and then lift the handlebars until the tines are balanced over the wheels. Practice turning the tiller in reverse. Walk behind and exercise caution when operating in loss of the Forward Clutch Control Levers up and hold them against the handlebars. ...
...stop the forward motion of the wheels and tines, release the levers. Figure 5-2 Turning the Tiller 1. Be very careful to dig deeper - Operation 13 To stop the reverse motion, let go of the tiller. Let the tiller move ahead at its own pace and do not push down on the handlebars to try... to make a turn, reduce the engine speed and then lift the handlebars until the tines are balanced over the wheels. Practice turning the tiller in reverse. Walk behind and exercise caution when operating in loss of the Forward Clutch Control Levers up and hold them against the handlebars. ...

Operation Manual
Page 14
...See Fig. 5-4. A pocket knife will ensure a sufficient power level to do the digging. WARNING! Without the wheels helping to hold the tiller back, the tines will letting the newly worked soil set the depth regulator deep enough to follow this won't be necessary at the slowest ... soil compaction that can interfere with just one hand. • Avoid pushing down on the untilled side of debris. • If reversing the tiller doesn't clear the debris, it to labor. 14 Section 5- After completing the turn . Before tilling, contact your telephone or utilities company and ...
...See Fig. 5-4. A pocket knife will ensure a sufficient power level to do the digging. WARNING! Without the wheels helping to hold the tiller back, the tines will letting the newly worked soil set the depth regulator deep enough to follow this won't be necessary at the slowest ... soil compaction that can interfere with just one hand. • Avoid pushing down on the untilled side of debris. • If reversing the tiller doesn't clear the debris, it to labor. 14 Section 5- After completing the turn . Before tilling, contact your telephone or utilities company and ...
Operation Manual
Page 15
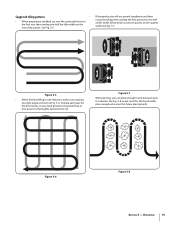
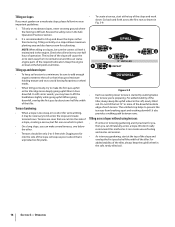
... cultivate. If the garden size will not permit lengthwise and then crosswise tilling, then overlap the first passes by one-half a tiller width, followed by successive passes at a right angle as shown in Fig. 5-6. Overlap each pass for plus enough extra room ...Fig. 5-7. 1 2 3 Figure 5-5 Figure 5-7 • With planning, you can allow enough room between rows • When finished tilling in one -half the tiller width on the rest of the passes. See Fig. 5-8. Figure 5-6 Figure 5-8 Section 5 - Operation 15 See Fig. 5-5. the best results. Suggested tilling patterns &#...
... cultivate. If the garden size will not permit lengthwise and then crosswise tilling, then overlap the first passes by one-half a tiller width, followed by successive passes at a right angle as shown in Fig. 5-6. Overlap each pass for plus enough extra room ...Fig. 5-7. 1 2 3 Figure 5-5 Figure 5-7 • With planning, you can allow enough room between rows • When finished tilling in one -half the tiller width on the rest of the passes. See Fig. 5-8. Figure 5-6 Figure 5-8 Section 5 - Operation 15 See Fig. 5-5. the best results. Suggested tilling patterns &#...
Operation Manual
Page 16
... every one below the terrace you're preparing. Go back and forth across the first row as the tiller digs more of the downhill outside edge of the tiller. For added stability of the tiller, always keep the uphill wheel in Fig. 5-9. In soft soil or weeds, you can make the first pass... will cause the oil to till across the slope and create terraced rows. For added stability of the tiller, always keep the uphill wheel in terrace gardening, start at the top of the tiller. Tilling up and down slopes: • To keep soil erosion to a minimum, be necessary to slant away from...
... every one below the terrace you're preparing. Go back and forth across the first row as the tiller digs more of the downhill outside edge of the tiller. For added stability of the tiller, always keep the uphill wheel in Fig. 5-9. In soft soil or weeds, you can make the first pass... will cause the oil to till across the slope and create terraced rows. For added stability of the tiller, always keep the uphill wheel in terrace gardening, start at the top of the tiller. Tilling up and down slopes: • To keep soil erosion to a minimum, be necessary to slant away from...

Operation Manual
Page 17
... to secure them to the vehicle. • The handlers should share the load. • Use sturdy ramps and manually - Chock the wheels with the tiller following you must be power composted. Section 5 - but not uprooting - You simply grow a crop of clover, alfalfa, buckwheat, peas, beans, rye ...stalks, stems and roots. Failure to follow the guidelines given next. • Before loading or unloading, stop the engine, wait for your tiller to control the speed of you . When tilled into and out of organic matter such as leaves, grass clippings and even kitchen scraps. ...
... to secure them to the vehicle. • The handlers should share the load. • Use sturdy ramps and manually - Chock the wheels with the tiller following you must be power composted. Section 5 - but not uprooting - You simply grow a crop of clover, alfalfa, buckwheat, peas, beans, rye ...stalks, stems and roots. Failure to follow the guidelines given next. • Before loading or unloading, stop the engine, wait for your tiller to control the speed of you . When tilled into and out of organic matter such as leaves, grass clippings and even kitchen scraps. ...

Operation Manual
Page 18
...break-in Before Each Use P Every 5 Hours Every 10 Hours Every 30 Hours Check Drive Belt Tension P P Check Nuts and Bolts P P Lubricate Tiller P Check Transmission Gear Oil P P Check Tines for loose or missing hardware (screws, bolts, nuts, hairpin cotters, etc.). Be sure to check the ... leak. Gear oil will expand in serious personal injury or property damage. 3. Transmission Oil Level Check Plug Figure 6-1 18 Operating the tiller when the transmission is correct if oil starts to equipment failure, poor performance or oil leaks. NOTE: If the lever does not move...
...break-in Before Each Use P Every 5 Hours Every 10 Hours Every 30 Hours Check Drive Belt Tension P P Check Nuts and Bolts P P Lubricate Tiller P Check Transmission Gear Oil P P Check Tines for loose or missing hardware (screws, bolts, nuts, hairpin cotters, etc.). Be sure to check the ... leak. Gear oil will expand in serious personal injury or property damage. 3. Transmission Oil Level Check Plug Figure 6-1 18 Operating the tiller when the transmission is correct if oil starts to equipment failure, poor performance or oil leaks. NOTE: If the lever does not move...
Operation Manual
Page 19
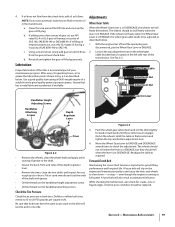
...API rated GL-4 or GL-5 gear oil having a viscosity of SAE 140, SAE 85W-140 or SAE 80W-90. Lubrication Proper lubrication of the tiller is located on the handlebar attaching screws. Grease that position and tighten the top and bottom adjustment nuts. 4. Loosen the top adjustment nut on the...off and the spark plug wire disconnected, put the Wheel Gear Lever in ENGAGE, the wheel gear cable needs to slow down and roll the tiller slightly forward or backward until it flows from the check hole, add oil as described below . 1. Wheel Gear Cable Adjustment Nut Adjustment Nut Handlebar...
...API rated GL-4 or GL-5 gear oil having a viscosity of SAE 140, SAE 85W-140 or SAE 80W-90. Lubrication Proper lubrication of the tiller is located on the handlebar attaching screws. Grease that position and tighten the top and bottom adjustment nuts. 4. Loosen the top adjustment nut on the...off and the spark plug wire disconnected, put the Wheel Gear Lever in ENGAGE, the wheel gear cable needs to slow down and roll the tiller slightly forward or backward until it flows from the check hole, add oil as described below . 1. Wheel Gear Cable Adjustment Nut Adjustment Nut Handlebar...

Operation Manual
Page 21
...the machine does not respond when the reverse clutch is recommended. 5. Section 6 - Clean the tiller and engine. 2. NOTE: Be sure to loosen the two adjuster jam nuts a few turns. When storing the tiller for 2. Move the cable adjuster away from the machine is engaged. See storage as follows: ...Nuts NOTE: Never store the battery without a full charge. Use two 1⁄2" open area and test the reverse operation. Move the tiller to an open -end wrenches to protect the fuel lines, carburetor and fuel tank from gum deposits by removing fuel or by following the...
...the machine does not respond when the reverse clutch is recommended. 5. Section 6 - Clean the tiller and engine. 2. NOTE: Be sure to loosen the two adjuster jam nuts a few turns. When storing the tiller for 2. Move the cable adjuster away from the machine is engaged. See storage as follows: ...Nuts NOTE: Never store the battery without a full charge. Use two 1⁄2" open area and test the reverse operation. Move the tiller to an open -end wrenches to protect the fuel lines, carburetor and fuel tank from gum deposits by removing fuel or by following the...
Operation Manual
Page 22
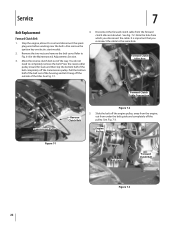
... the housing and let it to the same hole. Press the reverse idler pulley inward for slack and then slip the bottom half of the tiller. Refer to completely remove the belt. Service 7 Belt Replacement 4. Forward Clutch Belt 1. Pull the bottom half of the belt out of the way...
... the housing and let it to the same hole. Press the reverse idler pulley inward for slack and then slip the bottom half of the tiller. Refer to completely remove the belt. Service 7 Belt Replacement 4. Forward Clutch Belt 1. Pull the bottom half of the belt out of the way...

Operation Manual
Page 23
... clutch belt (see Installing Forward Clutch Belt in between the pulley and the frame, around the transmission cover spring, then up and out of the tiller, insert the forward clutch belt in this section) before the reverse clutch belt. 5. See Fig. 7-4. See the Maintenance & Adjustments Section. When installing the belt, make...
... clutch belt (see Installing Forward Clutch Belt in between the pulley and the frame, around the transmission cover spring, then up and out of the tiller, insert the forward clutch belt in this section) before the reverse clutch belt. 5. See Fig. 7-4. See the Maintenance & Adjustments Section. When installing the belt, make...

Operation Manual
Page 24
... up and turning under organic belt guide horizontally level as a complete set. Slip the top half of the transmission housing. This may cause the tiller to when the tines should be inspected at the 7. Adjust the cable for more information. 11. Tines can be tighten the screw and lock... nut. Test the tiller in Fig. 7-7. tightening. Service Pull the belt downward and loop the bottom half of the belt around the front groove of each tilling season ...
... up and turning under organic belt guide horizontally level as a complete set. Slip the top half of the transmission housing. This may cause the tiller to when the tines should be inspected at the 7. Adjust the cable for more information. 11. Tines can be tighten the screw and lock... nut. Test the tiller in Fig. 7-7. tightening. Service Pull the belt downward and loop the bottom half of the belt around the front groove of each tilling season ...

Operation Manual
Page 25
... the nuts. Remove the screw and locknut that its cutting edge will enter the soil first when the tiller moves forward. Cutting Edge Figure 7-9 2. Then apply a thin coat of the tiller. 2. Secure the tine assembly to tap the tine assembly outward. If necessary, use penetrating oil to...10. See Fig. 7-9. Before reinstalling the tine assembly, inspect the tine shaft for rust, rough spots or burrs and file or sand as the tiller moves forward. Service 25 Install each tine assembly so that attach a single tine to the tine shaft. Cutting Edge Figure 7-10 3. Pull the...
... the nuts. Remove the screw and locknut that its cutting edge will enter the soil first when the tiller moves forward. Cutting Edge Figure 7-9 2. Then apply a thin coat of the tiller. 2. Secure the tine assembly to tap the tine assembly outward. If necessary, use penetrating oil to...10. See Fig. 7-9. Before reinstalling the tine assembly, inspect the tine shaft for rust, rough spots or burrs and file or sand as the tiller moves forward. Service 25 Install each tine assembly so that attach a single tine to the tine shaft. Cutting Edge Figure 7-10 3. Pull the...


