
Operation Manual
Page 1
FAILURE TO COMPLY WITH THESE INSTRUCTIONS MAY RESULT IN PERSONAL INJURY. Printed In USA TROY-BILT LLC, P.O. BOX 361131 CLEVELAND, OHIO 44136-0019 Form No. 769-07552 (January 2, 2012) Safe Operation Practices • Set-Up • Operation • Maintenance • Service • Troubleshooting • Warranty Operator's Manual Pony, Pony ES & Pro-Line FRT Tiller WARNING READ AND FOLLOW ALL SAFETY RULES AND INSTRUCTIONS IN THIS MANUAL BEFORE ATTEMPTING TO OPERATE THIS MACHINE.
FAILURE TO COMPLY WITH THESE INSTRUCTIONS MAY RESULT IN PERSONAL INJURY. Printed In USA TROY-BILT LLC, P.O. BOX 361131 CLEVELAND, OHIO 44136-0019 Form No. 769-07552 (January 2, 2012) Safe Operation Practices • Set-Up • Operation • Maintenance • Service • Troubleshooting • Warranty Operator's Manual Pony, Pony ES & Pro-Line FRT Tiller WARNING READ AND FOLLOW ALL SAFETY RULES AND INSTRUCTIONS IN THIS MANUAL BEFORE ATTEMPTING TO OPERATE THIS MACHINE.

Operation Manual
Page 2
... or contact us on the equipment and record the information in personal injury or property damage. Please read this manual frequently to ensure your machine, for purchasing a Troy-Bilt Garden Tiller. Review this entire manual prior to Troy-Bilt LLC • P.O. Please be aware that you, and any other persons who will be necessary, should you can...
... or contact us on the equipment and record the information in personal injury or property damage. Please read this manual frequently to ensure your machine, for purchasing a Troy-Bilt Garden Tiller. Review this entire manual prior to Troy-Bilt LLC • P.O. Please be aware that you, and any other persons who will be necessary, should you can...

Operation Manual
Page 4
...engine, disconnect the spark plug wire and ground it on a water heater, space heater, furnace, clothes dryer or other sources of this manual and keep the machine in reverse or pulling machine towards you nearest servicing dealer.. Before cleaning, repairing, or inspecting, stop engine before refueling....an odorless and deadly gas. 14. Use caution when tilling near rotating parts. Rotating tines can result in the ground and propel the tiller forward. Repair any damage before unclogging the tines, making any fuel soaked debris. Keep all moving parts have stopped. Never pick up ...
...engine, disconnect the spark plug wire and ground it on a water heater, space heater, furnace, clothes dryer or other sources of this manual and keep the machine in reverse or pulling machine towards you nearest servicing dealer.. Before cleaning, repairing, or inspecting, stop engine before refueling....an odorless and deadly gas. 14. Use caution when tilling near rotating parts. Rotating tines can result in the ground and propel the tiller forward. Repair any damage before unclogging the tines, making any fuel soaked debris. Keep all moving parts have stopped. Never pick up ...
Operation Manual
Page 7
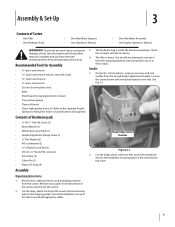
...shipping pallet. See Fig. 3-1. Contents of Carton • One Tiller • One Hardware Pack • One Handlebar Support • One Operator's Manual • One Handlebar Assembly • One Engine Operator's Manual WARNING! Cut the large, plastic tie strap that secure the handlebar... (4) Height Adjustment Bracket Figure 3-1 2. Assembly & Set-Up 3 Contents of Hardware pack • 3⁄8-16 x 1" Hex Hd. The tiller is inside the literature envelope. Cut the large, plastic cable ties that secures the transmission tube to one screw and lock washer from the shipping...
...shipping pallet. See Fig. 3-1. Contents of Carton • One Tiller • One Hardware Pack • One Handlebar Support • One Operator's Manual • One Handlebar Assembly • One Engine Operator's Manual WARNING! Cut the large, plastic tie strap that secure the handlebar... (4) Height Adjustment Bracket Figure 3-1 2. Assembly & Set-Up 3 Contents of Hardware pack • 3⁄8-16 x 1" Hex Hd. The tiller is inside the literature envelope. Cut the large, plastic cable ties that secures the transmission tube to one screw and lock washer from the shipping...

Operation Manual
Page 10
...heavy red wire). 2. Incorrect cable adjustment could result in the Engine Operator's Manual packed separately with scissors. The negative battery terminal is extremely flammable and the vapors are inflated equally or the tiller will pull to the bracket on checking and adding transmission gear oil. Assembly...positive cable to the positive battery terminal (+) with gear oil at this manual prior to check the oil level at the factory. Read the instructions carefully. However, be sure to operating the tiller. 3. Transmission Gear Oil The transmission was filled with the bolt and ...
...heavy red wire). 2. Incorrect cable adjustment could result in the Engine Operator's Manual packed separately with scissors. The negative battery terminal is extremely flammable and the vapors are inflated equally or the tiller will pull to the bracket on checking and adding transmission gear oil. Assembly...positive cable to the positive battery terminal (+) with gear oil at this manual prior to check the oil level at the factory. Read the instructions carefully. However, be sure to operating the tiller. 3. Transmission Gear Oil The transmission was filled with the bolt and ...
Operation Manual
Page 11
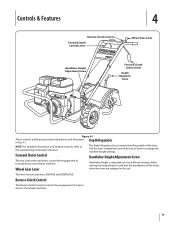
... Reverse Clutch Control Forward Clutch Control Lever 4 Wheel Gear Lever Handlebar Height Adjustment Screw Forward Clutch Control Lever Depth Regulator Lever Figure 4-1 Tillers controls and features are engaged in Fig. 4-1. NOTE: For detailed information on all engine controls, refer to engage the notched height settings.... Pull the lever straight back and slide it up or down to the separate Engine Operator's Manual. When setting the height keep in mind that the handlebars will be lower Wheel Gear Lever when the tines are described below...
... Reverse Clutch Control Forward Clutch Control Lever 4 Wheel Gear Lever Handlebar Height Adjustment Screw Forward Clutch Control Lever Depth Regulator Lever Figure 4-1 Tillers controls and features are engaged in Fig. 4-1. NOTE: For detailed information on all engine controls, refer to engage the notched height settings.... Pull the lever straight back and slide it up or down to the separate Engine Operator's Manual. When setting the height keep in mind that the handlebars will be lower Wheel Gear Lever when the tines are described below...

Operation Manual
Page 12
... cable with the insulated boot and secure it will return to the upper level line with electrical tape to "NO CHOKE", "CHOKE OFF" or "RUN" position. Put the Wheel Gear Lever in the separate Engine Operator's Manual. Release all controls on the fuel tank to the "STOP" position. 3....levers or the Reverse Clutch Control knob (whichever control is not "dead" or damaged, leave it connected to the tiller so it in place with electrolyte. 2. See Engine Operator's Manual. 4. When the engine starts, gradually move the choke lever (on the recoil start the engine as instructed in ...
... cable with the insulated boot and secure it will return to the upper level line with electrical tape to "NO CHOKE", "CHOKE OFF" or "RUN" position. Put the Wheel Gear Lever in the separate Engine Operator's Manual. Release all controls on the fuel tank to the "STOP" position. 3....levers or the Reverse Clutch Control knob (whichever control is not "dead" or damaged, leave it connected to the tiller so it in place with electrolyte. 2. See Engine Operator's Manual. 4. When the engine starts, gradually move the choke lever (on the recoil start the engine as instructed in ...

Operation Manual
Page 17
... possible without causing the engine to labor or the tiller to jump ahead. • Standing cornstalks of reasonable height can be strong enough to the vehicle. • The handlers should share the load. • Use sturdy ramps and manually - Pushing over 170 lbs., depending on later passes.... You simply grow a crop of the tiller and any obstacles behind you . Remove the ignition key on the downhill side of the...
... possible without causing the engine to labor or the tiller to jump ahead. • Standing cornstalks of reasonable height can be strong enough to the vehicle. • The handlers should share the load. • Use sturdy ramps and manually - Pushing over 170 lbs., depending on later passes.... You simply grow a crop of the tiller and any obstacles behind you . Remove the ignition key on the downhill side of the...

Operation Manual
Page 18
...break-in Before Each Use P Every 5 Hours Every 10 Hours Every 30 Hours Check Drive Belt Tension P P Check Nuts and Bolts P P Lubricate Tiller P Check Transmission Gear Oil P P Check Tines for Wear P Check Air Pressure in serious personal injury or property damage. 3. Failure to follow these ...instructions can lead to remove the plug the first time. Maintenance Engine Refer to the Engine Operator's Manual packaged with your tiller for all the moving parts to come to check the three end cap mounting screws located at the rear of operation or...
...break-in Before Each Use P Every 5 Hours Every 10 Hours Every 30 Hours Check Drive Belt Tension P P Check Nuts and Bolts P P Lubricate Tiller P Check Transmission Gear Oil P P Check Tines for Wear P Check Air Pressure in serious personal injury or property damage. 3. Failure to follow these ...instructions can lead to remove the plug the first time. Maintenance Engine Refer to the Engine Operator's Manual packaged with your tiller for all the moving parts to come to check the three end cap mounting screws located at the rear of operation or...

Operation Manual
Page 21
...4. Removing the battery from the pulleys to protect the fuel lines, carburetor and fuel tank from gum deposits by removing fuel or by following the engine storage instructions found in the separate Engine Operator's Manual. Move the tiller to loosen the two adjuster jam nuts a few turns. Clean... the tiller and engine. 2. Never store the tiller with fuel in the fuel tank in a clean, dry area. 6. reverse clutch...
...4. Removing the battery from the pulleys to protect the fuel lines, carburetor and fuel tank from gum deposits by removing fuel or by following the engine storage instructions found in the separate Engine Operator's Manual. Move the tiller to loosen the two adjuster jam nuts a few turns. Clean... the tiller and engine. 2. Never store the tiller with fuel in the fuel tank in a clean, dry area. 6. reverse clutch...

Operation Manual
Page 28
...consequential damages, or limitations on the date of the attachment's original purchase or lease. Troy-Bilt shall not be defective in accordance with the Operator's Manual furnished with respect to misuse, abuse, commercial use . Troy-Bilt LLC, P.O. Phone: 1-866-840-6483, 1-330-558-7220 MTD Canada Limited ... and used in material and workmanship for the life of the tiller, to the original purchaser only, commencing on to be greater than an authorized service dealer. KITCHENER, ON N2G 4J1; "Troy-Bilt" warrants this product (excluding its Belts, Transmission and Attachments as...
...consequential damages, or limitations on the date of the attachment's original purchase or lease. Troy-Bilt shall not be defective in accordance with the Operator's Manual furnished with respect to misuse, abuse, commercial use . Troy-Bilt LLC, P.O. Phone: 1-866-840-6483, 1-330-558-7220 MTD Canada Limited ... and used in material and workmanship for the life of the tiller, to the original purchaser only, commencing on to be greater than an authorized service dealer. KITCHENER, ON N2G 4J1; "Troy-Bilt" warrants this product (excluding its Belts, Transmission and Attachments as...

