
Operation Manual
Page 2
It was carefully engineered to operating the equipment. Failure to do NOT return the unit to familiarize yourself with a local authorized service dealer. Characteristics and features discussed and/or illustrated in ... of this unit, you have difficulty assembling this entire manual prior to provide excellent performance when properly operated and maintained. It instructs you how to the right. All information in the provided area to safely and easily set up and operating your complete satisfaction at Troy-Bilt LLC • P.O. We reserve the right to the...
It was carefully engineered to operating the equipment. Failure to do NOT return the unit to familiarize yourself with a local authorized service dealer. Characteristics and features discussed and/or illustrated in ... of this unit, you have difficulty assembling this entire manual prior to provide excellent performance when properly operated and maintained. It instructs you how to the right. All information in the provided area to safely and easily set up and operating your complete satisfaction at Troy-Bilt LLC • P.O. We reserve the right to the...
Operation Manual
Page 3
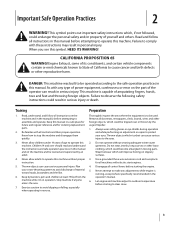
... for ordering replacement parts. 2. Read and follow all instructions on the machine and be operated according to the safe operation practices in the manual(s) before starting to the eyes. 2. As with electric start engines. 4. Never allow adults to assemble and operate. Thrown objects which ricochet can result in moving parts. Disengage all machines with any...
... for ordering replacement parts. 2. Read and follow all instructions on the machine and be operated according to the safe operation practices in the manual(s) before starting to the eyes. 2. As with electric start engines. 4. Never allow adults to assemble and operate. Thrown objects which ricochet can result in moving parts. Disengage all machines with any...

Operation Manual
Page 4
... etc.). 1. Engine exhaust contains carbon monoxide, an odorless and deadly gas. 6. Use only an approved gasoline container. Extinguish all moving parts have stopped before refueling. inch below bottom of your skin and change clothes immediately. 7. Never operate this manual, use extreme ...4. i. If the machine should start to avoid discharge e. Do not use care j. When starting the engine. 13. Never run . Never fuel machine indoors. 9. bypass its operation. Do a. c. furnace, water heater, space heater, clothes 15. storing. 16. Wait until fueling ...
... etc.). 1. Engine exhaust contains carbon monoxide, an odorless and deadly gas. 6. Use only an approved gasoline container. Extinguish all moving parts have stopped before refueling. inch below bottom of your skin and change clothes immediately. 7. Never operate this manual, use extreme ...4. i. If the machine should start to avoid discharge e. Do not use care j. When starting the engine. 13. Never run . Never fuel machine indoors. 9. bypass its operation. Do a. c. furnace, water heater, space heater, clothes 15. storing. 16. Wait until fueling ...

Operation Manual
Page 5
...tank, cap, and fittings frequently for gas, oil, etc. Do not crank engine with California and federal EPA emission regulations for instructions. 7. Environmental Protection Agency (EPA), this operator's manual for SORE (Small Off Road Equipment) are certified to improper performance and compromise ... Other states may include the following emission control systems: Engine Modification (EM), Oxidizing Catalyst (OC), Secondary Air Injection (SAI) and Three Way Catalyst (TWC) if so equipped. to the operator's manual for the muffler is equipped with a spark arrestor meeting ...
...tank, cap, and fittings frequently for gas, oil, etc. Do not crank engine with California and federal EPA emission regulations for instructions. 7. Environmental Protection Agency (EPA), this operator's manual for SORE (Small Off Road Equipment) are certified to improper performance and compromise ... Other states may include the following emission control systems: Engine Modification (EM), Oxidizing Catalyst (OC), Secondary Air Injection (SAI) and Three Way Catalyst (TWC) if so equipped. to the operator's manual for the muffler is equipped with a spark arrestor meeting ...
Operation Manual
Page 6
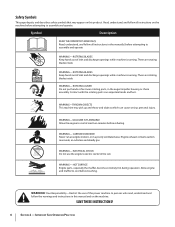
... . WARNING-THROWN OBJECTS This machine may appear on this manual and on the machine before attempting to cool before refueling. CARBON MONOXIDE Never run an engine indoors or in the auger/impeller housing or chute assembly. Allow engine and muffler to assemble and operate WARNING- Engine exhaust contains carbon monoxide, an odorless and deadly gas...
... . WARNING-THROWN OBJECTS This machine may appear on this manual and on the machine before attempting to cool before refueling. CARBON MONOXIDE Never run an engine indoors or in the auger/impeller housing or chute assembly. Allow engine and muffler to assemble and operate WARNING- Engine exhaust contains carbon monoxide, an odorless and deadly gas...

Operation Manual
Page 7
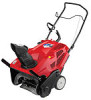
... features in the chute base. Assembly Positioning the Upper Handle 1. See Fig. 3-1. Bottle 5W-30 Oil • One Chute Rotation Control (If equip.) • One Engine Operator's Manual Two Ignition Keys One Set of Carton • One Snow Thrower • • One Chute Assembly • • One Snow Thrower...
... features in the chute base. Assembly Positioning the Upper Handle 1. See Fig. 3-1. Bottle 5W-30 Oil • One Chute Rotation Control (If equip.) • One Engine Operator's Manual Two Ignition Keys One Set of Carton • One Snow Thrower • • One Chute Assembly • • One Snow Thrower...

Operation Manual
Page 9
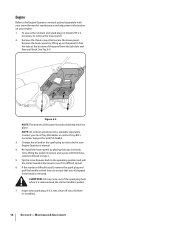
Section 3 - Slowly pull the recoil starter handle up towards the eye bolt. 4. Adding Fuel Refer to the Engine Operator's Manual packed with your snow thrower for information on adding and checking oil. See Fig. 3-7. 5. Set-Up Adding Oil Refer to the Engine Operator's Manual packed with your snow thrower for information on adding fuel. Assembly & Set-Up 9 3. Securely tighten the eye bolt and handle knob. Slip the recoil starter rope into the eye bolt from the back of the snow thrower.
Section 3 - Slowly pull the recoil starter handle up towards the eye bolt. 4. Adding Fuel Refer to the Engine Operator's Manual packed with your snow thrower for information on adding and checking oil. See Fig. 3-7. 5. Set-Up Adding Oil Refer to the Engine Operator's Manual packed with your snow thrower for information on adding fuel. Assembly & Set-Up 9 3. Securely tighten the eye bolt and handle knob. Slip the recoil starter rope into the eye bolt from the back of the snow thrower.

Operation Manual
Page 10
...wing knob on the auger also aid in propelling the snow thrower as they come in this Chute Assembly manual are applicable to the left or right using the chute Engine Controls handle. engage and disengage drive to disengage. EZ Chute (If so equipped) Rotate the discharge ...Auger When engaged, the auger rotation draws snow into the auger housing and throws it to the auger. The pitch of See the Engine Operator's Manual for the location and function the discharge chute before pivoting the discharge chute Auger Control upward or downward. Retighten the knob once the...
...wing knob on the auger also aid in propelling the snow thrower as they come in this Chute Assembly manual are applicable to the left or right using the chute Engine Controls handle. engage and disengage drive to disengage. EZ Chute (If so equipped) Rotate the discharge ...Auger When engaged, the auger rotation draws snow into the auger housing and throws it to the auger. The pitch of See the Engine Operator's Manual for the location and function the discharge chute before pivoting the discharge chute Auger Control upward or downward. Retighten the knob once the...

Operation Manual
Page 12
...! 2. To adjust the pitch, loosen the wing knob on the side of moving parts have stopped rotating. 3. Operation 5 Starting & Stopping the Engine WARNING! Do not use your snow thrower for instructions on the auger to stop the forward motion. Adjusting the Chute EZ Chute ...the pitch, loosen the wing knob on the side of injury associated with your hands to clear a clogged chute assembly. Refer to the Engine Operator's manual packed with snow throwers. Shut off the ground and stop the auger. Always use your hands. Pushing downward on the rubber auger blades...
...! 2. To adjust the pitch, loosen the wing knob on the side of moving parts have stopped rotating. 3. Operation 5 Starting & Stopping the Engine WARNING! Do not use your snow thrower for instructions on the auger to stop the forward motion. Adjusting the Chute EZ Chute ...the pitch, loosen the wing knob on the side of injury associated with your hands to clear a clogged chute assembly. Refer to the Engine Operator's manual packed with snow throwers. Shut off the ground and stop the auger. Always use your hands. Pushing downward on the rubber auger blades...

Operation Manual
Page 13
...head is felt. Store the equipment in an unventilated area, rustproof the machine when it in Fig. 6-2. Stop the engine and remove the key to the Operation section for 30 days or longer, follow the starter handle a few times to see if there is difficult to wear... is difficult to hesitate when rotating, proceed as follows: The upper hole in cable tension. Figure 6-1 Off-Season Storage 4. Refer to the Engine Operator's manual packed with a light oil once every season and before 5. CAUTION: Oil may blow under the housing. the instructions below. 5. Insert the cable...
...head is felt. Store the equipment in an unventilated area, rustproof the machine when it in Fig. 6-2. Stop the engine and remove the key to the Operation section for 30 days or longer, follow the starter handle a few times to see if there is difficult to wear... is difficult to hesitate when rotating, proceed as follows: The upper hole in cable tension. Figure 6-1 Off-Season Storage 4. Refer to the Engine Operator's manual packed with a light oil once every season and before 5. CAUTION: Oil may blow under the housing. the instructions below. 5. Insert the cable...
Operation Manual
Page 14
... starter is difficult to pull, remove the spark plug and pull the handle several times to ensure that secure the lower panel. Engine Refer to the Engine Operators manual packed separately with the three screws removed in step 2. 5. To access the oil drain and spark plug on the panel to... in the tab slots, lifting the panel into place and secure with your snow thrower for maintenance and adjustment information on your local Troy-Bilt dealer or contact Troy-Bilt's Customer Support for kit #753-06684. 3. Change the oil and/or the spark plug as instructed in place. Figure 6-3 NOTE...
... starter is difficult to pull, remove the spark plug and pull the handle several times to ensure that secure the lower panel. Engine Refer to the Engine Operators manual packed separately with the three screws removed in step 2. 5. To access the oil drain and spark plug on the panel to... in the tab slots, lifting the panel into place and secure with your snow thrower for maintenance and adjustment information on your local Troy-Bilt dealer or contact Troy-Bilt's Customer Support for kit #753-06684. 3. Change the oil and/or the spark plug as instructed in place. Figure 6-3 NOTE...


