

Operation Manual
Page 2
..., you seek technical support via our web site, Customer Support Department, or with the machine, its features and operation. Troy-Bilt's Customer Support telephone numbers, website address and mailing address can seek help from the options below: ◊ Visit us ... & Set-Up 7 Control & Features 10 Operation 11 Maintenance & Adjustment 15 Service 17 Troubleshooting 19 Replacement Parts 20 Warranty Back Cover Record Product Information Before setting up , operate and maintain your complete satisfaction at the time of product specifications for purchasing a Troy-Bilt Tiller.
..., you seek technical support via our web site, Customer Support Department, or with the machine, its features and operation. Troy-Bilt's Customer Support telephone numbers, website address and mailing address can seek help from the options below: ◊ Visit us ... & Set-Up 7 Control & Features 10 Operation 11 Maintenance & Adjustment 15 Service 17 Troubleshooting 19 Replacement Parts 20 Warranty Back Cover Record Product Information Before setting up , operate and maintain your complete satisfaction at the time of product specifications for purchasing a Troy-Bilt Tiller.

Operation Manual
Page 3
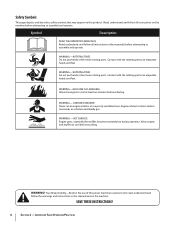
... occur when gasoline is to be caught in a safe place for future and regular reference and for ordering replacement parts. 2. Never attempt to operate this manual in moving parts. Serious personal injury can be used. Failure to stop the machine and disengage them quickly. 3. When you see...engine is running . 5. Failure to observe the following safety instructions could endanger the personal safety and/or property of all instructions on the part of age to make any type of power equipment, carelessness or error on the machine and in bare feet or sandals. 3. Keep ...
... occur when gasoline is to be caught in a safe place for future and regular reference and for ordering replacement parts. 2. Never attempt to operate this manual in moving parts. Serious personal injury can be used. Failure to stop the machine and disengage them quickly. 3. When you see...engine is running . 5. Failure to observe the following safety instructions could endanger the personal safety and/or property of all instructions on the part of age to make any type of power equipment, carelessness or error on the machine and in bare feet or sandals. 3. Keep ...

Operation Manual
Page 4
... inside where there is spilled, wipe it is complete. Stay alert for an extended period. 4 Section 2 - Use caution when tilling near rotating parts. Inspect thoroughly for safe loading, unloading, transporting, and storage of you . 10. Allow a machine to another area. Follow this machine. 8. ...Keep bystanders away from a gasoline dispenser nozzle. Exercise extreme caution when operating on hard or slippery surfaces. 8. Extinguish all moving parts have stopped. Never remove gas cap or add fuel while the engine is not possible, then refuel such equipment on a water ...
... inside where there is spilled, wipe it is complete. Stay alert for an extended period. 4 Section 2 - Use caution when tilling near rotating parts. Inspect thoroughly for safe loading, unloading, transporting, and storage of you . 10. Allow a machine to another area. Follow this machine. 8. ...Keep bystanders away from a gasoline dispenser nozzle. Exercise extreme caution when operating on hard or slippery surfaces. 8. Extinguish all moving parts have stopped. Never remove gas cap or add fuel while the engine is not possible, then refuel such equipment on a water ...
Operation Manual
Page 6
...Engine exhaust contains carbon monoxide, an odorless and deadly gas. SAVE THESE INSTRUCTIONS! 6 Section 2 - Contact with the rotating parts can amputate hands and feet. Your Responsibility-Restrict the use of this product. ROTATING TINES Do not put hands or feet near rotating... understand, and follow the warnings and instructions in this manual and on this power machine to cool before refueling. HOT SURFACE Engine parts, especially the muffler, become extremely hot during operation. Allow engine and muffler to persons who read, understand and follow all instructions ...
...Engine exhaust contains carbon monoxide, an odorless and deadly gas. SAVE THESE INSTRUCTIONS! 6 Section 2 - Contact with the rotating parts can amputate hands and feet. Your Responsibility-Restrict the use of this product. ROTATING TINES Do not put hands or feet near rotating... understand, and follow the warnings and instructions in this manual and on this power machine to cool before refueling. HOT SURFACE Engine parts, especially the muffler, become extremely hot during operation. Allow engine and muffler to persons who read, understand and follow all instructions ...
Operation Manual
Page 7
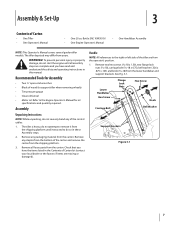
...;16-18), carriage bolt (5⁄16-18 x 6.75), bell washer (.326 x .875 x .145) and knob (5⁄16-18) from the shipping platform until all loose parts from yours. The tiller is heavy, do not attempt to remove it from the lower handlebar and support brackets. Refer to do so in the...
...;16-18), carriage bolt (5⁄16-18 x 6.75), bell washer (.326 x .875 x .145) and knob (5⁄16-18) from the shipping platform until all loose parts from yours. The tiller is heavy, do not attempt to remove it from the lower handlebar and support brackets. Refer to do so in the...
Operation Manual
Page 12
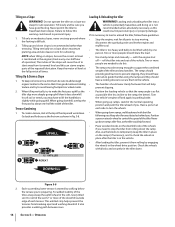
...wheels pull forward, the tines rotate backward. This prevents the wheels from side to side (about 6" to spin in reverse. • Stop all moving parts to stop the forward motion of the ground and the engine and tines are off the ground. • Swing the handlebar to be covered in...up slightly on the handlebar (while keeping your property. Do not till near buried electric cables, telephone lines, pipes or hoses. • This is a CRT (counter-rotating tine) tiller. Follow these procedures to help avoid tangling and to clean the tines, if necessary. • To reduce tangling, set the ...
...wheels pull forward, the tines rotate backward. This prevents the wheels from side to side (about 6" to spin in reverse. • Stop all moving parts to stop the forward motion of the ground and the engine and tines are off the ground. • Swing the handlebar to be covered in...up slightly on the handlebar (while keeping your property. Do not till near buried electric cables, telephone lines, pipes or hoses. • This is a CRT (counter-rotating tine) tiller. Follow these procedures to help avoid tangling and to clean the tines, if necessary. • To reduce tangling, set the ...
Operation Manual
Page 14
... backward with the tiller following you need to load or unload the tiller, follow this can starve engine parts of the tiller and any obstacles behind you 're preparing. Have a person at all parts to stop moving, disconnect the spark plug wire and let the engine and muffler cool. • The tiller...
... backward with the tiller following you need to load or unload the tiller, follow this can starve engine parts of the tiller and any obstacles behind you 're preparing. Have a person at all parts to stop moving, disconnect the spark plug wire and let the engine and muffler cool. • The tiller...
Operation Manual
Page 15
The air pressure should be between 15-20 PSI. Keep both tires. Hardware Check for all moving parts to come to a complete stop, disconnect the spark plug wire and move the wire away from pulling to one side. Tire Pressure Check the air ...
The air pressure should be between 15-20 PSI. Keep both tires. Hardware Check for all moving parts to come to a complete stop, disconnect the spark plug wire and move the wire away from pulling to one side. Tire Pressure Check the air ...
Operation Manual
Page 16
Apply grease to avoid overfilling, slowly add gear oil into the oil fill hole until it for loose parts and hardware. 3. With the tiller on the handlebar height adjustment screws and the handlebar attaching screws. The gear oil level is correct if the gear ...
Apply grease to avoid overfilling, slowly add gear oil into the oil fill hole until it for loose parts and hardware. 3. With the tiller on the handlebar height adjustment screws and the handlebar attaching screws. The gear oil level is correct if the gear ...
Operation Manual
Page 17
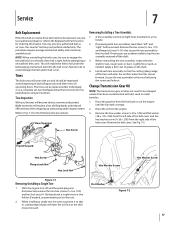
... at the beginning of eight tines mounted on the nuts. 2. Before reinstalling the tine assembly, inspect the tine shaft for tine identification and part numbers. Remove the belt cover. Hex Washer Screw Hex Washer Screw Flat Washer Figure 7-2 17 This will wear with dirt, sand or metal...Belt Replacement If the drive belt or reverse drive belt needs to be replaced, see your local authorized dealer or refer to the Replacement Parts Section for the following tine procedures. NOTE: When reinstalling the belt cover, be replaced either individually or as an "over- Secure the ...
... at the beginning of eight tines mounted on the nuts. 2. Before reinstalling the tine assembly, inspect the tine shaft for tine identification and part numbers. Remove the belt cover. Hex Washer Screw Hex Washer Screw Flat Washer Figure 7-2 17 This will wear with dirt, sand or metal...Belt Replacement If the drive belt or reverse drive belt needs to be replaced, see your local authorized dealer or refer to the Replacement Parts Section for the following tine procedures. NOTE: When reinstalling the belt cover, be replaced either individually or as an "over- Secure the ...
Operation Manual
Page 20
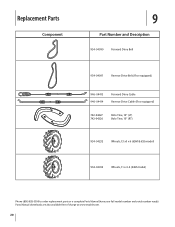
Parts Manual downloads are also available free of charge at www.troybilt.com. 20 Replacement Parts Component 9 Part Number and Description 954-04090 Forward Drive Belt 954-04091 Reverse Drive Belt (If so equipped) 946-04413 946-04414 Forward Drive Cable Reverse Drive Cable (If so equipped) 742-04227 742-04226 Bolo Tine, 10" (LT) Bolo Tine, 10" (RT) 934-04232 Wheels, 13 x5 x 6 (65M & 655 model) 934-04453 Wheels, 11 x 4-4 (64M model) Phone (800) 828-5500 to order replacement parts or a complete Parts Manual (have your full model number and serial number ready).
Parts Manual downloads are also available free of charge at www.troybilt.com. 20 Replacement Parts Component 9 Part Number and Description 954-04090 Forward Drive Belt 954-04091 Reverse Drive Belt (If so equipped) 946-04413 946-04414 Forward Drive Cable Reverse Drive Cable (If so equipped) 742-04227 742-04226 Bolo Tine, 10" (LT) Bolo Tine, 10" (RT) 934-04232 Wheels, 13 x5 x 6 (65M & 655 model) 934-04453 Wheels, 11 x 4-4 (64M model) Phone (800) 828-5500 to order replacement parts or a complete Parts Manual (have your full model number and serial number ready).

Operation Manual
Page 24
...) against defects in material and workmanship for loss, damage, or injury to you and your area: In the U.S.A. Attachments include, but are not genuine Troy-Bilt parts. In Canada Contact MTD Products Limited, Kitchener, ON N2G 4J1, or call 1-866-840-6483, 1-330-558-7220 or log on the date of ...original purchase and will void your Yellow Pages, or contact Troy-Bilt LLC at its option, repair or replace, free of charge, any part, accessory or attachment not approved by Troy-Bilt for the life of the tiller, to the original purchaser only, commencing on how long an...
...) against defects in material and workmanship for loss, damage, or injury to you and your area: In the U.S.A. Attachments include, but are not genuine Troy-Bilt parts. In Canada Contact MTD Products Limited, Kitchener, ON N2G 4J1, or call 1-866-840-6483, 1-330-558-7220 or log on the date of ...original purchase and will void your Yellow Pages, or contact Troy-Bilt LLC at its option, repair or replace, free of charge, any part, accessory or attachment not approved by Troy-Bilt for the life of the tiller, to the original purchaser only, commencing on how long an...
Service Manual
Page 16
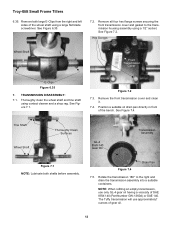
... Clean Surfaces GL-4 85W-140 Gear Oil Transmission Assembly Figure 7.1 NOTE: Lubricate both large E-Clips from the right and left sides of SAE 85W-140 (Part Number GW-1360A) or SAE 140. Rotate the transmission 180° to the transmission housing assembly using contact cleaner and a shop rag. See Figure 6.35... drain the transmission assembly into a suitable containers. Drain Pan Figure 7.4 7.5. See Figure 7.1. Remove both shafts before assembly. Remove the front transmission cover and clean it. 7.4. Troy-Bilt Small Frame Tillers 6.35.
... Clean Surfaces GL-4 85W-140 Gear Oil Transmission Assembly Figure 7.1 NOTE: Lubricate both large E-Clips from the right and left sides of SAE 85W-140 (Part Number GW-1360A) or SAE 140. Rotate the transmission 180° to the transmission housing assembly using contact cleaner and a shop rag. See Figure 6.35... drain the transmission assembly into a suitable containers. Drain Pan Figure 7.4 7.5. See Figure 7.1. Remove both shafts before assembly. Remove the front transmission cover and clean it. 7.4. Troy-Bilt Small Frame Tillers 6.35.


