Operation Manual
Page 1
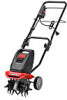
... 11 Specifications 11 Warranty Information 12 DO NOT RETURN THIS UNIT TO THE RETAILER. PROOF OF PURCHASE WILL BE REQUIRED FOR WARRANTY SERVICE. Operator's Manual Electric Garden Cultivator TB154E SAVE THESE INSTRUCTIONS TABLE OF CONTENTS Service Information 1 Rules for later use only identical replacement parts.
... 11 Specifications 11 Warranty Information 12 DO NOT RETURN THIS UNIT TO THE RETAILER. PROOF OF PURCHASE WILL BE REQUIRED FOR WARRANTY SERVICE. Operator's Manual Electric Garden Cultivator TB154E SAVE THESE INSTRUCTIONS TABLE OF CONTENTS Service Information 1 Rules for later use only identical replacement parts.
Operation Manual
Page 2
...SJTW-A, or SJTOW-A. • Extension Cord-Make sure your cultivator will draw. CAUTION: Signals a MODERATE hazard. WARNING: When using electric gardening appliances, basic safety precautions should always be trained and supervised by themselves eliminate any bystanders. Keep this machine. PREPARATION • ... hazard. Failure to others . Remove all controls and their explanations, deserve your attention to ensure the safety of electric shock use only UL Listed extension cord suitable for proper accident prevention measures. To reduce the likelihood of disconnection of...
...SJTW-A, or SJTOW-A. • Extension Cord-Make sure your cultivator will draw. CAUTION: Signals a MODERATE hazard. WARNING: When using electric gardening appliances, basic safety precautions should always be trained and supervised by themselves eliminate any bystanders. Keep this machine. PREPARATION • ... hazard. Failure to others . Remove all controls and their explanations, deserve your attention to ensure the safety of electric shock use only UL Listed extension cord suitable for proper accident prevention measures. To reduce the likelihood of disconnection of...
Operation Manual
Page 3
... for the cultivator. The green (or green and yellow) wire conductor in the rain. • Do not operate cultivator on motor and electrical connections • Maintain or replace safety and instruction labels, as a properly grounded outlet box. • Use only three-wire outdoor extension ... noise or vibration, stop before starting and operating. • Stop the motor, disconnect the power cord to prevent accidental starting . Use of electric shock to do a better job and with safety devices. Don't overreach. Stop machine if anyone enters the area. • Be careful when...
... for the cultivator. The green (or green and yellow) wire conductor in the rain. • Do not operate cultivator on motor and electrical connections • Maintain or replace safety and instruction labels, as a properly grounded outlet box. • Use only three-wire outdoor extension ... noise or vibration, stop before starting and operating. • Stop the motor, disconnect the power cord to prevent accidental starting . Use of electric shock to do a better job and with safety devices. Don't overreach. Stop machine if anyone enters the area. • Be careful when...
Operation Manual
Page 6
... in the lower bars and insert the bolts through those holes. 3. ASSEMBLY INSTRUCTIONS ASSEMBLING THE HANDLEBARS WARNING: To prevent serious personal injury, A do not connect electric extension cord to pinch the switch cable when positioning the handlebars. 6. NOTE: Do not over-tighten the knobs. 5. NOTE: Take care not to unit until...
... in the lower bars and insert the bolts through those holes. 3. ASSEMBLY INSTRUCTIONS ASSEMBLING THE HANDLEBARS WARNING: To prevent serious personal injury, A do not connect electric extension cord to pinch the switch cable when positioning the handlebars. 6. NOTE: Do not over-tighten the knobs. 5. NOTE: Take care not to unit until...
Operation Manual
Page 8
Connecting to an Electrical Power Source NOTE: Connect your Troy-Bilt Parts and Repair Center to arrange for the electric motor time to reset (Fig. 6, no . 1). Plug your extension cord into any convenient (indoor or outdoor) 120-volt, 60-cycle AC grounded... NOTE: The cultivator's motor will not remain in contact with an overload protection switch to prevent overheating damage to plugging your extension cord into an electrical outlet. 1. Release the bail. 2. If the overload protection switch pops out shortly after resetting: 1. NOTE: To avoid tripping circuit breakers, select ...
Connecting to an Electrical Power Source NOTE: Connect your Troy-Bilt Parts and Repair Center to arrange for the electric motor time to reset (Fig. 6, no . 1). Plug your extension cord into any convenient (indoor or outdoor) 120-volt, 60-cycle AC grounded... NOTE: The cultivator's motor will not remain in contact with an overload protection switch to prevent overheating damage to plugging your extension cord into an electrical outlet. 1. Release the bail. 2. If the overload protection switch pops out shortly after resetting: 1. NOTE: To avoid tripping circuit breakers, select ...
Operation Manual
Page 10
... tine has a convex side. Make sure the unit is off of Convex Sides Fig. 9 10 Always service and repair a cool unit. Slide on motor and electrical connections. WARNING: Cultivator tines are sharp. Tine Removal and Replacement 1. NOTE: It may also be necessary to wash any maintenance or repairs. 4. It may be...
... tine has a convex side. Make sure the unit is off of Convex Sides Fig. 9 10 Always service and repair a cool unit. Slide on motor and electrical connections. WARNING: Cultivator tines are sharp. Tine Removal and Replacement 1. NOTE: It may also be necessary to wash any maintenance or repairs. 4. It may be...

Operation Manual
Page 11
... outlet receptacle on one end and a 110V outlet on the latest product information available at the time of printing. SPECIFICATIONS* Motor Type AC 120 Volts Electric Operating RPM up to make changes at 1-800-828-5500 (U.S.) or 1-800-668-1238 (Canada). Follow starting instructions NOTE: For repairs beyond the minor adjustments...
... outlet receptacle on one end and a 110V outlet on the latest product information available at the time of printing. SPECIFICATIONS* Motor Type AC 120 Volts Electric Operating RPM up to make changes at 1-800-828-5500 (U.S.) or 1-800-668-1238 (Canada). Follow starting instructions NOTE: For repairs beyond the minor adjustments...


