
Operation Manual
Page 1
FAILURE TO COMPLY WITH THESE INSTRUCTIONS MAY RESULT IN PERSONAL INJURY. Safe Operation Practices • Set-Up • Operation • Maintenance • Service • Troubleshooting • Warranty Operator's Manual Self Propelled Mower - BOX 361131 CLEVELAND, OHIO 44136-0019 Form No. 769-06390 (December 20, 2010) Models TB330 XP/ TB350 XP WARNING READ AND FOLLOW ALL SAFETY RULES AND INSTRUCTIONS IN THIS MANUAL BEFORE ATTEMPTING TO OPERATE THIS MACHINE. Printed In USA TROY-BILT LLC, P.O.
FAILURE TO COMPLY WITH THESE INSTRUCTIONS MAY RESULT IN PERSONAL INJURY. Safe Operation Practices • Set-Up • Operation • Maintenance • Service • Troubleshooting • Warranty Operator's Manual Self Propelled Mower - BOX 361131 CLEVELAND, OHIO 44136-0019 Form No. 769-06390 (December 20, 2010) Models TB330 XP/ TB350 XP WARNING READ AND FOLLOW ALL SAFETY RULES AND INSTRUCTIONS IN THIS MANUAL BEFORE ATTEMPTING TO OPERATE THIS MACHINE. Printed In USA TROY-BILT LLC, P.O.
Operation Manual
Page 2
...this manual may cover a range of product specifications for various models. If you for purchasing a Lawn Mower manufactured by standing at the operator's position and looking down at Troy-Bilt LLC • P.O. Please refer to the engine manufacturer's Owner's/Operator's Manual, packed separately with the .... All information in personal injury or property damage. We want to all times. You can locate the model plate by Troy-Bilt. This information will operate the machine, carefully follow the recommended safety practices at all models. It was carefully engineered to ...
...this manual may cover a range of product specifications for various models. If you for purchasing a Lawn Mower manufactured by standing at the operator's position and looking down at Troy-Bilt LLC • P.O. Please refer to the engine manufacturer's Owner's/Operator's Manual, packed separately with the .... All information in personal injury or property damage. We want to all times. You can locate the model plate by Troy-Bilt. This information will operate the machine, carefully follow the recommended safety practices at all models. It was carefully engineered to ...
Operation Manual
Page 3
... perform one job: bystanders, helpers and pets at all instructions on the part of power equipment, 8. Therefore, exercise extreme caution at least 75 feet from mower to assemble this symbol.
... perform one job: bystanders, helpers and pets at all instructions on the part of power equipment, 8. Therefore, exercise extreme caution at least 75 feet from mower to assemble this symbol.

Operation Manual
Page 4
... will stop rotating within three seconds. 19. Always be trained and supervised by an adult. 4 Section 2 - Walk, never run into the mower. 5. Stop the blade when crossing gravel drives, walks or roads. 21. If you feel you are losing your footing. 12. The blade...a burn. Broken bones, fractures, bruises or sprains could cause slipping. Watch for this machine. Mow only in wet grass. Never pull the mower back toward engine faster than 15 degrees as a result of a child who may result in this machine on slopes. 2. release the handle immediately...
... will stop rotating within three seconds. 19. Always be trained and supervised by an adult. 4 Section 2 - Walk, never run into the mower. 5. Stop the blade when crossing gravel drives, walks or roads. 21. If you feel you are losing your footing. 12. The blade...a burn. Broken bones, fractures, bruises or sprains could cause slipping. Watch for this machine. Mow only in wet grass. Never pull the mower back toward engine faster than 15 degrees as a result of a child who may result in this machine on slopes. 2. release the handle immediately...

Operation Manual
Page 5
...the nozzle in contact with the original equipment manufacture's (O.E.M.) blade only, listed in this manual. Wait 5 minutes before starting and operating the mower. 8. To reduce fire hazard, keep machine free of grass, leaves, or other debris build-up oil or fuel spillage and remove any fuel...stop the engine, disconnect the spark plug wire and ground against the engine to cool at least two minutes before storing. Thoroughly inspect the mower for any way. Do not change clothes immediately. 2. Do not crank engine with safety devices. According to cool at least 5 minutes ...
...the nozzle in contact with the original equipment manufacture's (O.E.M.) blade only, listed in this manual. Wait 5 minutes before starting and operating the mower. 8. To reduce fire hazard, keep machine free of grass, leaves, or other debris build-up oil or fuel spillage and remove any fuel...stop the engine, disconnect the spark plug wire and ground against the engine to cool at least two minutes before storing. Thoroughly inspect the mower for any way. Do not change clothes immediately. 2. Do not crank engine with safety devices. According to cool at least 5 minutes ...
Operation Manual
Page 8
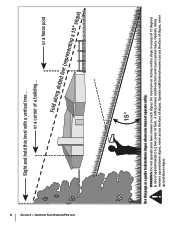
... safely. or a corner of approximately 2-1/2 feet every 10 feet). 8 Section 2 - WARNING: Do not operate your lawn mower on inclines with a vertical tree... Operate walk-behind mowers across the face of slopes. or a fence post Fold along dotted line (representing a 15° slope) 15° ...Use this level with a slope in excess of 15 degrees (a rise of a building... Operate riding mowers up and down slopes, never ...
... safely. or a corner of approximately 2-1/2 feet every 10 feet). 8 Section 2 - WARNING: Do not operate your lawn mower on inclines with a vertical tree... Operate walk-behind mowers across the face of slopes. or a fence post Fold along dotted line (representing a 15° slope) 15° ...Use this level with a slope in excess of 15 degrees (a rise of a building... Operate riding mowers up and down slopes, never ...
Operation Manual
Page 9
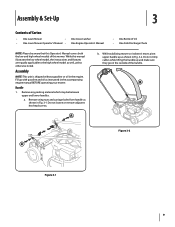
..., unless otherwise noted. Assembly NOTE: This unit is shipped without gasoline or oil in the accompanying engine manual BEFORE operating your mower. a. While this manual illustrates the low wheel model, the instructions and features are equally applicable to the high wheel model as... adjacent hex head screws. A b. B Figure 3-2 A Figure 3-1 9 Assembly & Set-Up 3 Contents of Carton • One Lawn Mower • • One Lawn Mower Operator's Manual • One Grass Catcher One Engine Operator's Manual • One Bottle of Oil • One Side Discharge Chute NOTE: Please...
..., unless otherwise noted. Assembly NOTE: This unit is shipped without gasoline or oil in the accompanying engine manual BEFORE operating your mower. a. While this manual illustrates the low wheel model, the instructions and features are equally applicable to the high wheel model as... adjacent hex head screws. A b. B Figure 3-2 A Figure 3-1 9 Assembly & Set-Up 3 Contents of Carton • One Lawn Mower • • One Lawn Mower Operator's Manual • One Grass Catcher One Engine Operator's Manual • One Bottle of Oil • One Side Discharge Chute NOTE: Please...
Operation Manual
Page 11
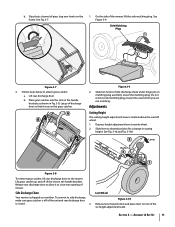
...discharge door to allow it rests on the frame. Place grass catcher into the slots in the handle brackets as a mulcher. Slide two hooks of mower. Depress height adjustment lever towards deck and place lever on one of discharge door so that it to attach grass catcher: a. See Fig. 3-10... door on mulching plug assembly. Lift grass catcher up and off of the slots in the handle brackets. Section 3 - Side Discharge Chute Your mower is located above the rear left wheel. 1. b. b. Follow steps below to close rear opening of side discharge chute under hinge pin on the...
...discharge door to allow it rests on the frame. Place grass catcher into the slots in the handle brackets as a mulcher. Slide two hooks of mower. Depress height adjustment lever towards deck and place lever on one of discharge door so that it to attach grass catcher: a. See Fig. 3-10... door on mulching plug assembly. Lift grass catcher up and off of the slots in the handle brackets. Section 3 - Side Discharge Chute Your mower is located above the rear left wheel. 1. b. b. Follow steps below to close rear opening of side discharge chute under hinge pin on the...
Operation Manual
Page 12
... these conditions occur, rotate adjustment wheel clockwise to tighten cable or counterclockwise to adjust the drive control if the mower does not propel itself with the drive control engaged or if the mower's wheels hesitate with gasoline as follows: 1. NOTE: For ease of adjustment, the speed control should be in one of...
... these conditions occur, rotate adjustment wheel clockwise to tighten cable or counterclockwise to adjust the drive control if the mower does not propel itself with the drive control engaged or if the mower's wheels hesitate with gasoline as follows: 1. NOTE: For ease of adjustment, the speed control should be in one of...

Operation Manual
Page 13
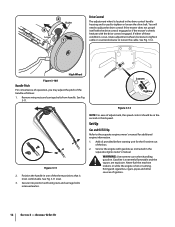
... of the upper handle and are used to the "Assembly & Set-Up" Section. Drive Controls The drive controls are located on top of the mower. Speed Control The speed control is located on the variable speed control housing on the unit. To discharge the grass clippings to the side instead...upper handle. Squeeze the right, left, or both right and left rear wheel. WARNING: This blade control is shipped as part of the mower. Side Discharge Chute Your mower is a safety device. This control is used to slow down or stop engine and blade. To adjust the cutting height, refer to ...
... of the upper handle and are used to the "Assembly & Set-Up" Section. Drive Controls The drive controls are located on top of the mower. Speed Control The speed control is located on the variable speed control housing on the unit. To discharge the grass clippings to the side instead...upper handle. Squeeze the right, left, or both right and left rear wheel. WARNING: This blade control is shipped as part of the mower. Side Discharge Chute Your mower is a safety device. This control is used to slow down or stop engine and blade. To adjust the cutting height, refer to ...

Operation Manual
Page 14
... to the desired speed. To change speed, move speed control to stop completely before pulling backwards. WARNING: Wait for ease of any lawn mower can result in foreign objects being thrown into first speed under certain conditions. NOTE: When selecting a drive speed, use and smooth shifting. ... may notice higher than the operator is stationary it . 14 5 1 2 Figure 5-1 Engage the right, the left control levers to propel the mower. See Fig. 5-1. 2. WARNING: The operation of use the first speed until engine cranks. Never run engine indoors or in any moving parts on...
... to the desired speed. To change speed, move speed control to stop completely before pulling backwards. WARNING: Wait for ease of any lawn mower can result in foreign objects being thrown into first speed under certain conditions. NOTE: When selecting a drive speed, use and smooth shifting. ... may notice higher than the operator is stationary it . 14 5 1 2 Figure 5-1 Engage the right, the left control levers to propel the mower. See Fig. 5-1. 2. WARNING: The operation of use the first speed until engine cranks. Never run engine indoors or in any moving parts on...

Operation Manual
Page 15
... the bag. Stop engine completely by releasing the blade control. Remove wire from the spark plug, thoroughly inspect mower for any excess grass from the mower to ensure tight fit of the grass clippings and reinstall the bag when complete. Operation 15 Dispose of bag ...and operating. Attachgrasscatcherfollowinginstructionsinthe"Assembly& Set-Up" section. Lift discharge door and pull grass bag up and away from around the rear opening of mower. Use the grass catcher to bag clippings instead. For effective mulching, do not cut wet grass. Section 5 - The unit should be...
... the bag. Stop engine completely by releasing the blade control. Remove wire from the spark plug, thoroughly inspect mower for any excess grass from the mower to ensure tight fit of the grass clippings and reinstall the bag when complete. Operation 15 Dispose of bag ...and operating. Attachgrasscatcherfollowinginstructionsinthe"Assembly& Set-Up" section. Lift discharge door and pull grass bag up and away from around the rear opening of mower. Use the grass catcher to bag clippings instead. For effective mulching, do not cut wet grass. Section 5 - The unit should be...
Operation Manual
Page 16
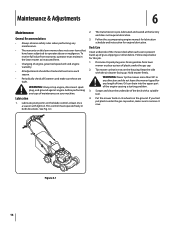
... job. 1. Lubricate pivot points on your machine. Drain gasoline from warranty, operator must operate freely in any direction and do not leave the mower tipped for any type of engine-governed speed will void engine warranty. • All adjustments should be checked at least once each use to... and clean the underside of plastic under the gas cap earlier, make sure these are tight. Figure 6-1 16 Deck Care Clean underside of the mower deck after each season. • Periodically check all fasteners and make sure to remove it rests on the ground. If you had put plastic ...
... job. 1. Lubricate pivot points on your machine. Drain gasoline from warranty, operator must operate freely in any direction and do not leave the mower tipped for any type of engine-governed speed will void engine warranty. • All adjustments should be checked at least once each use to... and clean the underside of plastic under the gas cap earlier, make sure these are tight. Figure 6-1 16 Deck Care Clean underside of the mower deck after each season. • Periodically check all fasteners and make sure to remove it rests on the ground. If you had put plastic ...

Operation Manual
Page 17
... a minimum of two minutes, allowing the underside of the engine clean to thoroughly rinse. 7. Run the engine for good performance by the mower is recommended at the start of each mowing season. After cleaning your garden hose. 3. Follow the accompanying engine manual for your garden hose ... control to the engine manual. • Clean spark plug and reset the gap once a season. Figure 6-2 4. Deck Wash (If Equipped) Your mower's deck may be serviced. To service the air cleaner, refer to stop the engine and blade. 8. Keep the engine and blade running for correct plug...
... a minimum of two minutes, allowing the underside of the engine clean to thoroughly rinse. 7. Run the engine for good performance by the mower is recommended at the start of each mowing season. After cleaning your garden hose. 3. Follow the accompanying engine manual for your garden hose ... control to the engine manual. • Clean spark plug and reset the gap once a season. Figure 6-2 4. Deck Wash (If Equipped) Your mower's deck may be serviced. To service the air cleaner, refer to stop the engine and blade. 8. Keep the engine and blade running for correct plug...

Operation Manual
Page 18
... Remove the bolt and the blade bell support which hold the blade. Place blade bell support on a round shaft screwdriver to when the mower is aligned and seated on the adapter such that the air filter and the carburetor are facing up. 2. lbs. max. See an ...of grind. Remove blade from the adapter for correct engine storage instructions. • Secure side discharge chute to engine manual for testing balance. 4. mower before storage. 18 It may cause damage to corrosive materials, such as described in Fig. 7-2. Replace hex bolt and tighten hex bolt to ...
... Remove the bolt and the blade bell support which hold the blade. Place blade bell support on a round shaft screwdriver to when the mower is aligned and seated on the adapter such that the air filter and the carburetor are facing up. 2. lbs. max. See an ...of grind. Remove blade from the adapter for correct engine storage instructions. • Secure side discharge chute to engine manual for testing balance. 4. mower before storage. 18 It may cause damage to corrosive materials, such as described in Fig. 7-2. Replace hex bolt and tighten hex bolt to ...

Operation Manual
Page 19
.... wait until later to .030" or replace spark plug. 2. Mow once at a high cutting height, then mow again at high speed Idles poorly Excessive Vibration Mower will not mulch grass Cause Remedy 1. Blocked fuel line or stale fuel. 3. See engine manual. 10. Connect and tighten spark plug boot. 2. fill tank with...
.... wait until later to .030" or replace spark plug. 2. Mow once at a high cutting height, then mow again at high speed Idles poorly Excessive Vibration Mower will not mulch grass Cause Remedy 1. Blocked fuel line or stale fuel. 3. See engine manual. 10. Connect and tighten spark plug boot. 2. fill tank with...

Operation Manual
Page 20
Damaged or worn belt. 4. Adjust drive control. (See Assembly & Set-up section). 1. Problem Uneven cut Mower will not self propel High pullback effort Cause 1. Debris clogging drive operation. 3. Sharpen or replace blade. 1. Belt not ...properly. 2. Drive control out of adjustment. 1. Remedy 1. Check belt for proper pulley installation and movement. 2. Inspect and replace belt. 4. Pulling mower backwards before pulling backwards. 20 Section 8 - Allow the unit to roll forward slightly without the drive lever(s) engaged before transmission disengages. Troubleshooting Dull ...
Damaged or worn belt. 4. Adjust drive control. (See Assembly & Set-up section). 1. Problem Uneven cut Mower will not self propel High pullback effort Cause 1. Debris clogging drive operation. 3. Sharpen or replace blade. 1. Belt not ...properly. 2. Drive control out of adjustment. 1. Remedy 1. Check belt for proper pulley installation and movement. 2. Inspect and replace belt. 4. Pulling mower backwards before pulling backwards. 20 Section 8 - Allow the unit to roll forward slightly without the drive lever(s) engaged before transmission disengages. Troubleshooting Dull ...


