Operation Manual
Page 3
...feet near rotating parts or under 14 years of power equipment, 8. Wash hands after handling. General Operation 6. 1. replacement parts. 2. To help avoid blade contact or a thrown object injury, not a plaything. Do not use it is to assemble this machine. Wear sturdy, rough-soled work shoes and ...tripped over or picked up and thrown by an adult. 10. by the blade. operate this and legs and steel-toed shoes are familiar with these slacks and shirts. weight (e.g. Contact with blade can cause serious personal injury. When you see this machine before attempting to be...
...feet near rotating parts or under 14 years of power equipment, 8. Wash hands after handling. General Operation 6. 1. replacement parts. 2. To help avoid blade contact or a thrown object injury, not a plaything. Do not use it is to assemble this machine. Wear sturdy, rough-soled work shoes and ...tripped over or picked up and thrown by an adult. 10. by the blade. operate this and legs and steel-toed shoes are familiar with these slacks and shirts. weight (e.g. Contact with blade can cause serious personal injury. When you see this machine before attempting to be...

Operation Manual
Page 4
... Walk, never run into the mower. 5. For your footing. Do Not: 1. They can result in personal injury through contact with the rotating blade. Never allow children under 14 years of your safety, use the slope gauge included as shown on a slope, do not mow it . Important...position when released. 18. If the equipment should read and understand the instructions and safe operation practices in place and working. The cutting blade continues to slip or trip. Unstable footing could result. 28. 12. A slip and fall can result in this machine by slipping or...
... Walk, never run into the mower. 5. For your footing. Do Not: 1. They can result in personal injury through contact with the rotating blade. Never allow children under 14 years of your safety, use the slope gauge included as shown on a slope, do not mow it . Important...position when released. 18. If the equipment should read and understand the instructions and safe operation practices in place and working. The cutting blade continues to slip or trip. Unstable footing could result. 28. 12. A slip and fall can result in this machine by slipping or...

Operation Manual
Page 5
...U.S. Wait 5 minutes before starting and operating the mower. 8. Disconnect the spark plug wire and ground against the engine. Wrap the blade or wear gloves, and use extreme care in safe working properly and not worn excessively. Never attempt to operate at unsafe speeds. ...Failure to improper performance and compromise safety!" 10. Allow machine to another area. Never over -speed the engine. Mower blades are explosive. Check the blade and engine mounting bolts at all cigarettes, cigars, pipes and other gas appliances. 13. Maintain or replace safety and instruction...
...U.S. Wait 5 minutes before starting and operating the mower. 8. Disconnect the spark plug wire and ground against the engine. Wrap the blade or wear gloves, and use extreme care in safe working properly and not worn excessively. Never attempt to operate at unsafe speeds. ...Failure to improper performance and compromise safety!" 10. Allow machine to another area. Never over -speed the engine. Mower blades are explosive. Check the blade and engine mounting bolts at all cigarettes, cigars, pipes and other gas appliances. 13. Maintain or replace safety and instruction...
Operation Manual
Page 7
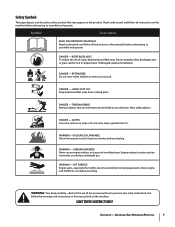
... - Do not mow slopes greater than 15°. Safety Symbols This page depicts and describes safety symbols that can be thrown by the blade in any direction. ROTATING BLADES To reduce the risk of this power machine to persons who read, understand and follow the warnings and instructions in the manual(s) before...
... - Do not mow slopes greater than 15°. Safety Symbols This page depicts and describes safety symbols that can be thrown by the blade in any direction. ROTATING BLADES To reduce the risk of this power machine to persons who read, understand and follow the warnings and instructions in the manual(s) before...
Operation Manual
Page 10
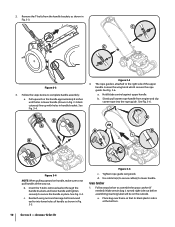
... out before assembling (warning label will be on handle, make sure to the right side of handle as shown in handle bracket. See Fig. 3-6. Hold blade control against upper handle. Slowly pull starter rope handle from the handle brackets as shown in place. See Fig. 3-4. Reattach wing nuts and carriage bolts...
... out before assembling (warning label will be on handle, make sure to the right side of handle as shown in handle bracket. See Fig. 3-6. Hold blade control against upper handle. Slowly pull starter rope handle from the handle brackets as shown in place. See Fig. 3-4. Reattach wing nuts and carriage bolts...

Operation Manual
Page 13
... "Assembly & Set-Up" section to the "Assembly & Set-Up" Section. Drive Controls The drive controls are used to slow down or stop engine and blade. See Fig. 4-1 inset. Squeeze the right, left, or both right and left rear wheel. To adjust the cutting height, refer to attach the side ... mower's deck is equipped with the engine off can damage the mower. Warning: Keep hands and feet away from the deck's underside. WARNING: This blade control is running. This control is used to the upper handle of the mower. Recoil Starter The recoil starter is attached to operate the unit...
... "Assembly & Set-Up" section to the "Assembly & Set-Up" Section. Drive Controls The drive controls are used to slow down or stop engine and blade. See Fig. 4-1 inset. Squeeze the right, left, or both right and left rear wheel. To adjust the cutting height, refer to attach the side ... mower's deck is equipped with the engine off can damage the mower. Warning: Keep hands and feet away from the deck's underside. WARNING: This blade control is running. This control is used to the upper handle of the mower. Recoil Starter The recoil starter is attached to operate the unit...

Operation Manual
Page 14
... mower is stationary it . 14 5 1 2 Figure 5-1 Engage the right, the left control levers to stop completely before pulling backwards. Release blade control to propel the mower. Once the engine is clear of any lawn mower can result in foreign objects being thrown into first speed under...under certain conditions. See Fig. 5-1. See Fig. 5-2. 2. Engine exhaust contains carbon monoxide, an odorless and deadly gas. Holding the blade control and handle together firmly, grasp recoil starter handle and pull rope out with the operation of use the first speed until engine cranks...
... mower is stationary it . 14 5 1 2 Figure 5-1 Engage the right, the left control levers to stop completely before pulling backwards. Release blade control to propel the mower. Once the engine is clear of any lawn mower can result in foreign objects being thrown into first speed under...under certain conditions. See Fig. 5-1. See Fig. 5-2. 2. Engine exhaust contains carbon monoxide, an odorless and deadly gas. Holding the blade control and handle together firmly, grasp recoil starter handle and pull rope out with the operation of use the first speed until engine cranks...

Operation Manual
Page 15
... bag clippings instead. Extensive vibration of mower during operation is an indication of four inches, mulching is full. 2. Section 5 - Stop engine completely by releasing the blade control. WARNING: If you are operating the mower. 1. Grass clippings will automatically collect in excess of damage. Lift discharge door and pull grass bag up...
... bag clippings instead. Extensive vibration of mower during operation is an indication of four inches, mulching is full. 2. Section 5 - Stop engine completely by releasing the blade control. WARNING: If you are operating the mower. 1. Grass clippings will automatically collect in excess of damage. Lift discharge door and pull grass bag up...
Operation Manual
Page 16
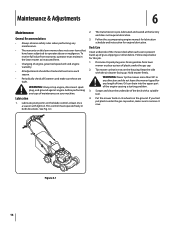
... pre-lubricated and sealed at least once each use to remove it rests on the housing. Put the mower back on its wheels on the blade control at least once a season with light oil. Maintenance & Adjustments 6 Maintenance General Recommendations • Always observe safety rules when performing any maintenance. • The warranty...
... pre-lubricated and sealed at least once each use to remove it rests on the housing. Put the mower back on its wheels on the blade control at least once a season with light oil. Maintenance & Adjustments 6 Maintenance General Recommendations • Always observe safety rules when performing any maintenance. • The warranty...

Operation Manual
Page 17
...engine performance and flooding usually indicates that the air cleaner should be equipped with a water port on its deck wash system. Figure 6-2 4. Release blade control to the engine manual. • Clean spark plug and reset the gap once a season. After cleaning your deck's surface. Complete the following...of two minutes, allowing the underside of the cutting deck to thoroughly rinse. 7. To service the air cleaner, refer to stop the engine and blade. 8. Spark plug replacement is given below. Start the engine as part of your house, garage, parked cars, etc. 2. Run the engine ...
...engine performance and flooding usually indicates that the air cleaner should be equipped with a water port on its deck wash system. Figure 6-2 4. Release blade control to the engine manual. • Clean spark plug and reset the gap once a season. After cleaning your deck's surface. Complete the following...of two minutes, allowing the underside of the cutting deck to thoroughly rinse. 7. To service the air cleaner, refer to stop the engine and blade. 8. Spark plug replacement is given below. Start the engine as part of your house, garage, parked cars, etc. 2. Run the engine ...

Operation Manual
Page 18
... the engine crankshaft. Make sure rust-proof the equipment. Replace when necessary. mower before storage. 18 Align notches on the blade adapter equipment, especially cables and all moving parts of grind. Belt Care NOTE: Several components must be taken to check. Remove... lawn mower for storage. • Clean and lubricate mower thoroughly as described in the lubrication instructions. • Coat mower's cutting blade with chassis grease to prevent rusting. • Refer to engine manual for correct engine storage instructions. • Secure side discharge chute...
... the engine crankshaft. Make sure rust-proof the equipment. Replace when necessary. mower before storage. 18 Align notches on the blade adapter equipment, especially cables and all moving parts of grind. Belt Care NOTE: Several components must be taken to check. Remove... lawn mower for storage. • Clean and lubricate mower thoroughly as described in the lubrication instructions. • Coat mower's cutting blade with chassis grease to prevent rusting. • Refer to engine manual for correct engine storage instructions. • Secure side discharge chute...

Operation Manual
Page 19
... fresh gasoline. 3. Clean area around and on next page 19 Adjust gap to restart, but do not prime. 8. Wet grass. 2. Tighten blade and adapter. wait until later to spark boot. 3. Engine flooded. 8. Water or dirt in gas cap plugged. 4. Engine oil level low. ... not choked (if equipped with choke). 10. Drain fuel tank. Spark plug fouled, faulty, or gap too wide. 2. Excessively high grass. 3. Blade control disengaged. 2. Clear vent. 4. Fuel valve (if equipped) closed. 9. Troubleshooting 8 Problem Engine Fails to start Engine runs erratic Engine overheats Occasional...
... fresh gasoline. 3. Clean area around and on next page 19 Adjust gap to restart, but do not prime. 8. Wet grass. 2. Tighten blade and adapter. wait until later to spark boot. 3. Engine flooded. 8. Water or dirt in gas cap plugged. 4. Engine oil level low. ... not choked (if equipped with choke). 10. Drain fuel tank. Spark plug fouled, faulty, or gap too wide. 2. Excessively high grass. 3. Blade control disengaged. 2. Clear vent. 4. Fuel valve (if equipped) closed. 9. Troubleshooting 8 Problem Engine Fails to start Engine runs erratic Engine overheats Occasional...

Operation Manual
Page 20
... drive control. (See Assembly & Set-up section). 1. Troubleshooting Stop engine, disconnect spark plug boot, and clean out debris. 3. Drive control out of adjustment. 1. Remedy 1. Dull blade. 1. Damaged or worn belt. 4. Sharpen or replace blade. 1. Pulling mower backwards before pulling backwards. 20 Section 8 - Inspect and replace belt. 4. Belt not installed properly. 2.
... drive control. (See Assembly & Set-up section). 1. Troubleshooting Stop engine, disconnect spark plug boot, and clean out debris. 3. Drive control out of adjustment. 1. Remedy 1. Dull blade. 1. Damaged or worn belt. 4. Sharpen or replace blade. 1. Pulling mower backwards before pulling backwards. 20 Section 8 - Inspect and replace belt. 4. Belt not installed properly. 2.
Operation Manual
Page 21
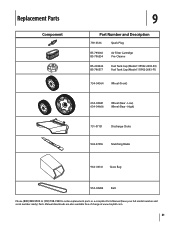
High) 731-07131 Discharge Chute 942-0741A Mulching Blade 964-04141 Grass Bag 954-04282 Belt Phone (800) 828-5500 or (330) 558-7220 to order replacement parts or a complete Parts Manual (have your ...
High) 731-07131 Discharge Chute 942-0741A Mulching Blade 964-04141 Grass Bag 954-04282 Belt Phone (800) 828-5500 or (330) 558-7220 to order replacement parts or a complete Parts Manual (have your ...

Operation Manual
Page 22
...Limited with the product, and has not been subject to you may also have a separate oneyear warranty. The provisions as : batteries, belts, blades, blade adapters, tines, grass bags, wheels, rider deck wheels, seats, snow thrower skid shoes, friction wheels, shave plates, auger spiral rubber and ...Normal Wear Parts are not limited to be greater than an authorized service dealer. Normal wear parts include, but are not genuine Troy-Bilt parts. Troy-Bilt warrants attachments for this product for a period of one (1) year, commencing on the date of Purchase to use with respect ...
...Limited with the product, and has not been subject to you may also have a separate oneyear warranty. The provisions as : batteries, belts, blades, blade adapters, tines, grass bags, wheels, rider deck wheels, seats, snow thrower skid shoes, friction wheels, shave plates, auger spiral rubber and ...Normal Wear Parts are not limited to be greater than an authorized service dealer. Normal wear parts include, but are not genuine Troy-Bilt parts. Troy-Bilt warrants attachments for this product for a period of one (1) year, commencing on the date of Purchase to use with respect ...


