Operation Manual
Page 1
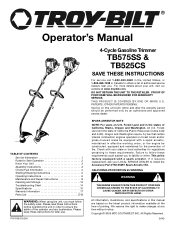
... and Washington. Copyright© 2005 MTD SOUTHWEST INC, All Rights Reserved. (5/06) Please keep these instructions for Safe Operation 2 Know Your Unit 3 Assembly Instructions 3 Oil and Fuel Information 4 Starting/Stopping Instructions 5 Operating Instructions 6 Maintenance and Repair Instructions 8 Cleaning and Storage 13 Troubleshooting Chart 14 Specifications 15 Warranty Information 17 Parts List E18 WARNING: When using the unit, you must follow these requirements. DO NOT RETURN THE UNIT TO THE RETAILER...
... and Washington. Copyright© 2005 MTD SOUTHWEST INC, All Rights Reserved. (5/06) Please keep these instructions for Safe Operation 2 Know Your Unit 3 Assembly Instructions 3 Oil and Fuel Information 4 Starting/Stopping Instructions 5 Operating Instructions 6 Maintenance and Repair Instructions 8 Cleaning and Storage 13 Troubleshooting Chart 14 Specifications 15 Warranty Information 17 Parts List E18 WARNING: When using the unit, you must follow these requirements. DO NOT RETURN THE UNIT TO THE RETAILER...
Operation Manual
Page 2
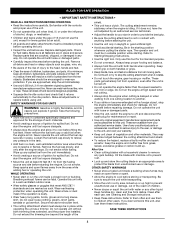
... machine oil to prevent rust. • Lock up . Keep the engine and muffler free from the area while adding fuel or operating the unit. After Use • Clean cutting blades with loose or damaged parts. • Carefully inspect the area before starting the unit. • Use the unit only in an appropriate area to instruct other users. Clean after the engine stops. Refer to the idle position. SAVE THESE INSTRUCTIONS 2 Replace parts that...
... machine oil to prevent rust. • Lock up . Keep the engine and muffler free from the area while adding fuel or operating the unit. After Use • Clean cutting blades with loose or damaged parts. • Carefully inspect the area before starting the unit. • Use the unit only in an appropriate area to instruct other users. Clean after the engine stops. Refer to the idle position. SAVE THESE INSTRUCTIONS 2 Replace parts that...
Operation Manual
Page 3
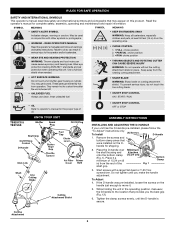
... operate without the cutting attachment shield in the operating position, manuever the D-handle to operator's manual for complete safety, assembly, operating and maintenance and repair information. These parts get burned. Do not tighten until the D-handle is turned off. • SHARP BLADE WARNING: Sharp blade on cutting attachment shield. KNOW YOUR UNIT Muffler Spark Plug Oil Fill Plug Shaft Grip On/Off Stop Control D-Handle Click Link Starter Rope Grip Throttle Control Fuel Cap Choke Lever Air Filter Primer Cover Bulb Shaft Line Cutting Blade Cutting Attachment...
... operate without the cutting attachment shield in the operating position, manuever the D-handle to operator's manual for complete safety, assembly, operating and maintenance and repair information. These parts get burned. Do not tighten until the D-handle is turned off. • SHARP BLADE WARNING: Sharp blade on cutting attachment shield. KNOW YOUR UNIT Muffler Spark Plug Oil Fill Plug Shaft Grip On/Off Stop Control D-Handle Click Link Starter Rope Grip Throttle Control Fuel Cap Choke Lever Air Filter Primer Cover Bulb Shaft Line Cutting Blade Cutting Attachment...

Operation Manual
Page 4
... • Drain tank and run the engine dry before filling the fuel tank. Use a high-quality SAE 30 weight oil of oil and remove the paper seal covering the opening. ADDING OIL TO CRANKCASE: INITIAL USE NOTE: This unit is the primary reason for improper unit performance. Replace the top. Fig. 3 3. NOTE: Never add oil to Checking the Oil Level. Fig. 4 RECOMMENDED FUEL TYPE Old fuel is shipped without the fuel cap securely in...
... • Drain tank and run the engine dry before filling the fuel tank. Use a high-quality SAE 30 weight oil of oil and remove the paper seal covering the opening. ADDING OIL TO CRANKCASE: INITIAL USE NOTE: This unit is the primary reason for improper unit performance. Replace the top. Fig. 3 3. NOTE: Never add oil to Checking the Oil Level. Fig. 4 RECOMMENDED FUEL TYPE Old fuel is shipped without the fuel cap securely in...
Operation Manual
Page 5
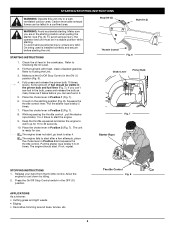
.... 6 Choke Lever Primer Bulb Fig. 7 Starter Rope STOPPING INSTRUCTIONS 1. APPLICATIONS As a trimmer: • Cutting grass and light weeds • Edging • Decorative trimming around trees, fences, etc. 5 Throttle Control Fig. 8 To avoid serious personal injury, ensure any AddOn being used is ready for 15 to start , go back to Checking the Oil Level. 2. Check the oil level in the ON ( I ) WARNING: Avoid accidental starting position when pulling the starter rope (Fig. 8). Some amount of fuel should start the engine...
.... 6 Choke Lever Primer Bulb Fig. 7 Starter Rope STOPPING INSTRUCTIONS 1. APPLICATIONS As a trimmer: • Cutting grass and light weeds • Edging • Decorative trimming around trees, fences, etc. 5 Throttle Control Fig. 8 To avoid serious personal injury, ensure any AddOn being used is ready for 15 to start , go back to Checking the Oil Level. 2. Check the oil level in the ON ( I ) WARNING: Avoid accidental starting position when pulling the starter rope (Fig. 8). Some amount of fuel should start the engine...

Operation Manual
Page 7
... not remove or alter the line cutting blade assembly. Fig. 14 7 OPERATING INSTRUCTIONS HOLDING THE TRIMMER WARNING: Always wear eye, hearing, foot and body protection to reduce the risk of the line to do the cutting, especially along walls. Before operating the unit, stand in a forward-backward or side-toside motion. This may stall. ADJUSTING TRIMMING LINE LENGTH The Bump Head™ cutting attachment allows you...
... not remove or alter the line cutting blade assembly. Fig. 14 7 OPERATING INSTRUCTIONS HOLDING THE TRIMMER WARNING: Always wear eye, hearing, foot and body protection to reduce the risk of the line to do the cutting, especially along walls. Before operating the unit, stand in a forward-backward or side-toside motion. This may stall. ADJUSTING TRIMMING LINE LENGTH The Bump Head™ cutting attachment allows you...

Operation Manual
Page 8
... ensure that the unit cannot start. DO NOT attempt to valve clearance and adjust Check spark plug condition and gap SEE p. 4 p. 9 p. 10 p. 10 p. 10 p. 13 p. 11 p. 11 p. 12 WARNING: Never use original equipment manufacturer 0.095 inch (2.41 mm) replacement line. Hold the outer spool and turn the inner reel counterclockwise to install a new trimming line. 1. Eyelet 5. NOTE: Maintenance, replacement, or repair of the emission control devices and system may be...
... ensure that the unit cannot start. DO NOT attempt to valve clearance and adjust Check spark plug condition and gap SEE p. 4 p. 9 p. 10 p. 10 p. 10 p. 13 p. 11 p. 11 p. 12 WARNING: Never use original equipment manufacturer 0.095 inch (2.41 mm) replacement line. Hold the outer spool and turn the inner reel counterclockwise to install a new trimming line. 1. Eyelet 5. NOTE: Maintenance, replacement, or repair of the emission control devices and system may be...

Operation Manual
Page 9
...® does not release line correctly, pull the ends of the outer spool. Bump Knob Foam Seal Spring Fig. 21 NOTE: Do not wind the inner reel before installing the second piece of the engine. Remove any debris or grass from the holding slots in place on the oil fill hole. Fig. 26 3. MAINTENANCE AND REPAIR INSTRUCTIONS 9. Push the new inner reel, arrow side...
...® does not release line correctly, pull the ends of the outer spool. Bump Knob Foam Seal Spring Fig. 21 NOTE: Do not wind the inner reel before installing the second piece of the engine. Remove any debris or grass from the holding slots in place on the oil fill hole. Fig. 26 3. MAINTENANCE AND REPAIR INSTRUCTIONS 9. Push the new inner reel, arrow side...

Operation Manual
Page 10
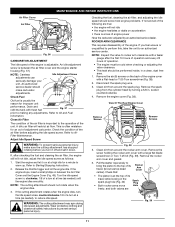
... and clean up . (Fig. 31). 7. Cleaning the Air Filter Clean and re-oil the air filter every 10 hours of SAE 30 SF, SG, SH oil. Open the air filter cover. Reinstall the air filter cover. Unplug spark plug boot to lightly coat the filter (Fig. 33). 5. Pour the oil out of oil. If the level is operated without the air filter, you clean or service it to dry. 4. Remove the air filter (Fig. 31). 3. Replace the oil fill plug. 7. Then pull the air filter cover...
... and clean up . (Fig. 31). 7. Cleaning the Air Filter Clean and re-oil the air filter every 10 hours of SAE 30 SF, SG, SH oil. Open the air filter cover. Reinstall the air filter cover. Unplug spark plug boot to lightly coat the filter (Fig. 33). 5. Pour the oil out of oil. If the level is operated without the air filter, you clean or service it to dry. 4. Remove the air filter (Fig. 31). 3. Replace the oil fill plug. 7. Then pull the air filter cover...
Operation Manual
Page 11
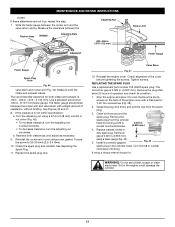
... REPAIR INSTRUCTIONS Air Filter Cover Air Filter Tab Fig. 36 CARBURETOR ADJUSTMENT The idle speed of its travel while looking in a clean, dust free area. 1. Turn the idle speed screw in between the air filter cover and the engine starter housing (Fig. 37). WARNING: The cutting attachment may spin during idle speed adjustments. Drain and refill the tank with a large flat blade screwdriver or Torx T-25 bit (Fig. 39). An authorized service dealer should not rotate when the engine idles. 3. Remove the spark plug from the cylinder head...
... REPAIR INSTRUCTIONS Air Filter Cover Air Filter Tab Fig. 36 CARBURETOR ADJUSTMENT The idle speed of its travel while looking in a clean, dust free area. 1. Turn the idle speed screw in between the air filter cover and the engine starter housing (Fig. 37). WARNING: The cutting attachment may spin during idle speed adjustments. Drain and refill the tank with a large flat blade screwdriver or Torx T-25 bit (Fig. 39). An authorized service dealer should not rotate when the engine idles. 3. Remove the spark plug from the cylinder head...
Operation Manual
Page 12
... to cool. Check the spark plug and reinstall. Reinstall the engine cover. Check alignment of resistance, without binding. REPLACING THE SPARK PLUG Use a replacement part number 753-05255 spark plug. Remove the plug after every 25 hours of the engine cover with a slight amount of the cover before tightening the screws. Remove the six (6) screws on the back of operation and check its condition. 1. Set the air gap at 0.025 in •lb (2.2-3.4 N•m). 10. If using a feeler gauge (Fig...
... to cool. Check the spark plug and reinstall. Reinstall the engine cover. Check alignment of resistance, without binding. REPLACING THE SPARK PLUG Use a replacement part number 753-05255 spark plug. Remove the plug after every 25 hours of the engine cover with a slight amount of the cover before tightening the screws. Remove the six (6) screws on the back of operation and check its condition. 1. Set the air gap at 0.025 in •lb (2.2-3.4 N•m). 10. If using a feeler gauge (Fig...
Operation Manual
Page 13
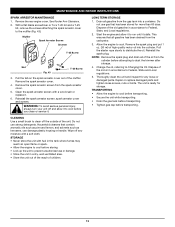
... reach of the muffler. MAINTENANCE AND REPAIR INSTRUCTIONS SPARK ARRESTOR MAINTENANCE 1. See Rocker Arm Clearance. 2. With a flat blade screwdriver or Torx T-20 bit and a T-25 bit, remove the screws attaching the spark arrestor cover to run until it stalls. Remove the spark arrestor screen from the carburetor. 3. Clean the spark arrestor screen with a wire brush or replace it . LONG TERM STORAGE 1. Do not use strong detergents. Start the engine and allow it to cool before storing. • Lock up the unit...
... reach of the muffler. MAINTENANCE AND REPAIR INSTRUCTIONS SPARK ARRESTOR MAINTENANCE 1. See Rocker Arm Clearance. 2. With a flat blade screwdriver or Torx T-20 bit and a T-25 bit, remove the screws attaching the spark arrestor cover to run until it stalls. Remove the spark arrestor screen from the carburetor. 3. Clean the spark arrestor screen with a wire brush or replace it . LONG TERM STORAGE 1. Do not use strong detergents. Start the engine and allow it to cool before storing. • Lock up the unit...
Operation Manual
Page 14
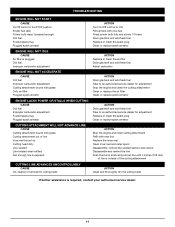
... carburetor adjustment Cutting attachment bound with grass Dirty air filter Plugged spark arrestor ACTION Turn On/Off control to ON Fill fuel tank with new fuel Press primer bulb fully and slowly 10 times Drain gas tank and add fresh fuel Replace or clean the spark plug Clean or replace spark arrestor ACTION Replace or clean the air filter Drain gas tank and add fresh fuel Adjust carburetor ACTION Drain gas tank and add fresh fuel Take to an authorized service dealer for adjustment Stop the engine and clean the cutting attachment Clean or replace the air filter Clean or replace spark arrestor...
... carburetor adjustment Cutting attachment bound with grass Dirty air filter Plugged spark arrestor ACTION Turn On/Off control to ON Fill fuel tank with new fuel Press primer bulb fully and slowly 10 times Drain gas tank and add fresh fuel Replace or clean the spark plug Clean or replace spark arrestor ACTION Replace or clean the air filter Drain gas tank and add fresh fuel Adjust carburetor ACTION Drain gas tank and add fresh fuel Take to an authorized service dealer for adjustment Stop the engine and clean the cutting attachment Clean or replace the air filter Clean or replace spark arrestor...

Operation Manual
Page 15
... time of printing. in. (29 cc) Operating RPM...6,800+ rpm Idle Speed RPM ...2,800 - 3,600 rpm Ignition Type ...Electronic Ignition Switch ...Rocker Switch Valve clearance...0.003-0.006 in. (0.076-0.152 mm) Spark Plug Gap ...0.025 inch (0.655 mm) Lubrication ...SAE 30 Oil Crankcase Oil Capacity ...3.04 oz (90 ml) Fuel ...Unleaded Carburetor...Diaphragm, All-Position Starter...Auto Rewind Muffler ...Baffled with Guard Throttle...Manual Spring Return Fuel Tank Capacity...14 oz (414 ml) DRIVE SHAFT AND CUTTING ATTACHMENT* Drive Shaft Housing ...Steel Tube (EZ-Link™) Throttle Control...
... time of printing. in. (29 cc) Operating RPM...6,800+ rpm Idle Speed RPM ...2,800 - 3,600 rpm Ignition Type ...Electronic Ignition Switch ...Rocker Switch Valve clearance...0.003-0.006 in. (0.076-0.152 mm) Spark Plug Gap ...0.025 inch (0.655 mm) Lubrication ...SAE 30 Oil Crankcase Oil Capacity ...3.04 oz (90 ml) Fuel ...Unleaded Carburetor...Diaphragm, All-Position Starter...Auto Rewind Muffler ...Baffled with Guard Throttle...Manual Spring Return Fuel Tank Capacity...14 oz (414 ml) DRIVE SHAFT AND CUTTING ATTACHMENT* Drive Shaft Housing ...Steel Tube (EZ-Link™) Throttle Control...
Operation Manual
Page 17
... engine, air filter, carburetor, primer, fuel lines, fuel pick up to you however should be aware that part. • The owner will be provided at an Authorized Troy-Bilt Service Center. If any warranty maintenance or repair of time up / fuel filter, ignition module, spark plug and muffler. 17 California / EPA Emission Control Warranty Statement Your Warranty Rights and Obligations The California Air Resources Board, the Environmental Protection Agency and Troy-Bilt LLC (Troy-Bilt) are warranted for two years. The warranty repairs...
... engine, air filter, carburetor, primer, fuel lines, fuel pick up to you however should be aware that part. • The owner will be provided at an Authorized Troy-Bilt Service Center. If any warranty maintenance or repair of time up / fuel filter, ignition module, spark plug and muffler. 17 California / EPA Emission Control Warranty Statement Your Warranty Rights and Obligations The California Air Resources Board, the Environmental Protection Agency and Troy-Bilt LLC (Troy-Bilt) are warranted for two years. The warranty repairs...
Operation Manual
Page 18
... was purchased as a gift. This warranty is limited to P.O. To locate the dealer in your area, please check for a listing in material or workmanship. This limited warranty does not provide coverage in Canada call 1-800-668-1238. Spark Plugs, Carburetor Adjustments, Filters B. This limited warranty shall not extend to any accessory or attachment not approved by Troy-Bilt for use of any resulting damage. Damage...
... was purchased as a gift. This warranty is limited to P.O. To locate the dealer in your area, please check for a listing in material or workmanship. This limited warranty does not provide coverage in Canada call 1-800-668-1238. Spark Plugs, Carburetor Adjustments, Filters B. This limited warranty shall not extend to any accessory or attachment not approved by Troy-Bilt for use of any resulting damage. Damage...
Operation Manual
Page 53
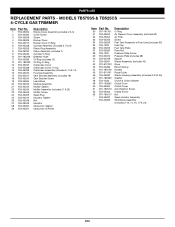
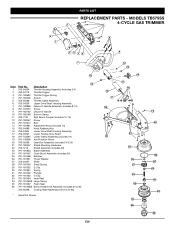
... 753-1238 791-153592 753-05263 791-182519 753-04003 791-180217 753-05297 753-05265 Description O-Ring Air Cleaner Cover Assembly (includes 32) Air Filter Screw Fuel Tank Assembly w/Fuel Lines (includes 35) Fuel Cap Fuel Tank Pads Push Nut Pressure Plate Screw Pressure Plate (includes 38) Spacer Starter Assembly (includes 42) Rope Recoil Spring Handle Rope Guide Starter Housing Assembly (includes 3 & 37-45) Washer Clutch & Clutch Washer Clutch Drum Clutch Cover Anti-Rotation Screw Clamp Screw Nut Spark Arrestor Assembly Shortblock Assembly (includes 3-12, 14, 15, 17 & 24) E19
... 753-1238 791-153592 753-05263 791-182519 753-04003 791-180217 753-05297 753-05265 Description O-Ring Air Cleaner Cover Assembly (includes 32) Air Filter Screw Fuel Tank Assembly w/Fuel Lines (includes 35) Fuel Cap Fuel Tank Pads Push Nut Pressure Plate Screw Pressure Plate (includes 38) Spacer Starter Assembly (includes 42) Rope Recoil Spring Handle Rope Guide Starter Housing Assembly (includes 3 & 37-45) Washer Clutch & Clutch Washer Clutch Drum Clutch Cover Anti-Rotation Screw Clamp Screw Nut Spark Arrestor Assembly Shortblock Assembly (includes 3-12, 14, 15, 17 & 24) E19
Operation Manual
Page 54
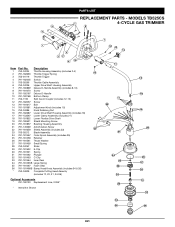
MODELS TB575SS 4-CYCLE GAS TRIMMER 1 4 1 23 56 7 10 15 Item Part No. PARTS LIST REPLACEMENT PARTS - Description 1 753-04234 Throttle Housing Assembly (includes 2-4) 2 753-04119 Throttle Trigger 3 791-182690 Throttle Trigger Spring 4 791-182405 Switch 5 753-05266 Throttle Cable Assembly 6 753-04236 Upper Drive Shaft Housing Assembly 7 791-180869 Deluxe D-Handle Assembly (includes 8-10) 8 791-181070 Screw 9 791-182167 Deluxe D-Handle 10 791-182168 Bottom Clamp 11 753-1190 Split Boom Coupler (includes 12-15) 12 791-182057 Screw 13 791...
MODELS TB575SS 4-CYCLE GAS TRIMMER 1 4 1 23 56 7 10 15 Item Part No. PARTS LIST REPLACEMENT PARTS - Description 1 753-04234 Throttle Housing Assembly (includes 2-4) 2 753-04119 Throttle Trigger 3 791-182690 Throttle Trigger Spring 4 791-182405 Switch 5 753-05266 Throttle Cable Assembly 6 753-04236 Upper Drive Shaft Housing Assembly 7 791-180869 Deluxe D-Handle Assembly (includes 8-10) 8 791-181070 Screw 9 791-182167 Deluxe D-Handle 10 791-182168 Bottom Clamp 11 753-1190 Split Boom Coupler (includes 12-15) 12 791-182057 Screw 13 791...
Operation Manual
Page 55
... * Part No. Description 753-04234 Throttle Housing Assembly (includes 2-4) 791-182690 Throttle Trigger Spring 753-04119 Throttle Trigger 791-182405 Switch 753-05266 Throttle Cable Assembly 753-04236 Upper Drive Shaft Housing Assembly 791-180869 Deluxe D-Handle Assembly (includes 8-10) 791-181070 Screw 791-182167 Deluxe D-Handle 791-182168 Bottom Clamp 753-1190 Split boom Coupler (includes 12-15) 791-182057 Screw 791-181617 Bolt 791-181981 Adjustment Knob (includes 15) 753-04386 Knob Retaining Nut 791...
... * Part No. Description 753-04234 Throttle Housing Assembly (includes 2-4) 791-182690 Throttle Trigger Spring 753-04119 Throttle Trigger 791-182405 Switch 753-05266 Throttle Cable Assembly 753-04236 Upper Drive Shaft Housing Assembly 791-180869 Deluxe D-Handle Assembly (includes 8-10) 791-181070 Screw 791-182167 Deluxe D-Handle 791-182168 Bottom Clamp 753-1190 Split boom Coupler (includes 12-15) 791-182057 Screw 791-181617 Bolt 791-181981 Adjustment Knob (includes 15) 753-04386 Knob Retaining Nut 791...
Parts List
Page 2
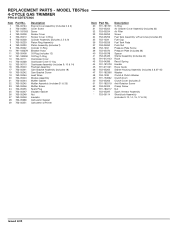
... 791-153592 753-05263 791-182519 753-04003 791-180217 753-05297 753-06114 Description O-Ring Air Cleaner Cover Assembly (includes 32) Air Filter Screw Fuel Tank Assembly w/Fuel Lines (includes 35) Fuel Cap Fuel Tank Pads Push Nut Pressure Plate Screw Pressure Plate (includes 38) Spacer Starter Assembly (includes 42) Rope Recoil Spring Handle Rope Guide Starter Housing Assembly (includes 3 & 37-45) Washer Clutch & Clutch Washer Clutch Drum Clutch Cover (includes 2) Anti-Rotation Screw Clamp Screw Nut Spark Arrestor Assembly Shortblock Assembly (includes 3-12, 14, 15, 17 & 24) Issued 6/09
... 791-153592 753-05263 791-182519 753-04003 791-180217 753-05297 753-06114 Description O-Ring Air Cleaner Cover Assembly (includes 32) Air Filter Screw Fuel Tank Assembly w/Fuel Lines (includes 35) Fuel Cap Fuel Tank Pads Push Nut Pressure Plate Screw Pressure Plate (includes 38) Spacer Starter Assembly (includes 42) Rope Recoil Spring Handle Rope Guide Starter Housing Assembly (includes 3 & 37-45) Washer Clutch & Clutch Washer Clutch Drum Clutch Cover (includes 2) Anti-Rotation Screw Clamp Screw Nut Spark Arrestor Assembly Shortblock Assembly (includes 3-12, 14, 15, 17 & 24) Issued 6/09


