Owners Manual
Page 2
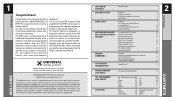
... extensive code library pre-programmed into the remote. The Quick Setup DVD Program Guide supplied with thousands of audio/video Components because of this Manual. 500 Mamaroneck Avenue, Harrison, NY 10528 Phone: (914) 835-4484 Fax: (914) 835-4532 MASTERCONTROL™ RF20 Owner's Manual © 2006 Universal Remote Control, Inc. MASTERCONTROL, PowerBlaster, MacroPower, and SimpleSound are trademarks or registered trademarks of your remote by guiding you need to Original Factory Default Settings 39...
... extensive code library pre-programmed into the remote. The Quick Setup DVD Program Guide supplied with thousands of audio/video Components because of this Manual. 500 Mamaroneck Avenue, Harrison, NY 10528 Phone: (914) 835-4484 Fax: (914) 835-4532 MASTERCONTROL™ RF20 Owner's Manual © 2006 Universal Remote Control, Inc. MASTERCONTROL, PowerBlaster, MacroPower, and SimpleSound are trademarks or registered trademarks of your remote by guiding you need to Original Factory Default Settings 39...

Owners Manual
Page 3
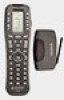
... main menu FUNCTION BUTTONS LIGHT BUTTON SCREEN-LABELED DISPLAY BUTTONS Getting Started-Overview This is what MASTERCONTROL™ RF20 is all brands of TV, VCR, DVD and CD Players, Cable Set Top Boxes, Satellite Receivers, TiVo and other DVRs, Audio Components, Tape Decks, Multimedia PCs, XM Radio, Ipod, X-Box, Lighting Controls and other custom installation products. GETTING STARTED However, we strongly recommend that are correctly installed, replace the cover. Once the batteries...
... main menu FUNCTION BUTTONS LIGHT BUTTON SCREEN-LABELED DISPLAY BUTTONS Getting Started-Overview This is what MASTERCONTROL™ RF20 is all brands of TV, VCR, DVD and CD Players, Cable Set Top Boxes, Satellite Receivers, TiVo and other DVRs, Audio Components, Tape Decks, Multimedia PCs, XM Radio, Ipod, X-Box, Lighting Controls and other custom installation products. GETTING STARTED However, we strongly recommend that are correctly installed, replace the cover. Once the batteries...

Owners Manual
Page 4
Simple, Easy, Intuitive Once you've programmed RF20 for additional command display buttons). Simply press the LIGHT button to operate a specific Component is provided with five pages of the MAIN menu displays five Components. LIGHT BUTTON 6 LIGHT BUTTON GETTING STARTED GETTING STARTED 5 Activating Component Commands Activating Component Commands - Lights out! Then, simply select the Component you have to do to backlight all the but- tons on RF20...
Simple, Easy, Intuitive Once you've programmed RF20 for additional command display buttons). Simply press the LIGHT button to operate a specific Component is provided with five pages of the MAIN menu displays five Components. LIGHT BUTTON 6 LIGHT BUTTON GETTING STARTED GETTING STARTED 5 Activating Component Commands Activating Component Commands - Lights out! Then, simply select the Component you have to do to backlight all the but- tons on RF20...
Owners Manual
Page 5
... operate with your TV to program... let's say your RF20, write them ALL down all the buttons at a time. This signals that you are in some cases, several code numbers) for the Component that you want to transfer functions from other remotes (old or new), one code is displayed at the top of note paper. Pre-Programmed Code Method STEP 1: The pre-programmed 3-digit codes are listed...
... operate with your TV to program... let's say your RF20, write them ALL down all the buttons at a time. This signals that you are in some cases, several code numbers) for the Component that you want to transfer functions from other remotes (old or new), one code is displayed at the top of note paper. Pre-Programmed Code Method STEP 1: The pre-programmed 3-digit codes are listed...

Owners Manual
Page 6
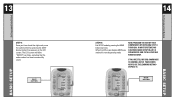
... display button once again. To display Page 2 of the MAIN menu. However, if for example you are setting up AUX to operate a second DVD Player, you plan to operate the TV component with this component button. BASIC SETUP BASIC SETUP For example: If you want to select the Pre-Programmed Method. P-PRO BUTTON The screen will flash "FROM - 9 10 Pre-Programmed Code Method Pre-Programmed Code Method STEP 4: Press the P-PRO display button...
... display button once again. To display Page 2 of the MAIN menu. However, if for example you are setting up AUX to operate a second DVD Player, you plan to operate the TV component with this component button. BASIC SETUP BASIC SETUP For example: If you want to select the Pre-Programmed Method. P-PRO BUTTON The screen will flash "FROM - 9 10 Pre-Programmed Code Method Pre-Programmed Code Method STEP 4: Press the P-PRO display button...
Owners Manual
Page 7
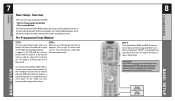
... next code number listed for that Component until the Component turns off with code number 147, but the volume controls did not work properly. STEP 7: Point the RF20 toward the Component you wrote down for that specific Component. Use the Number buttons 0-9 on the remote to turn the Component back on the screen. (There is a chance that your Sony TV turned off . ON BUTTON VOLUME BUTTONS CHANNEL BUTTONS PLAY BUTTON STOP BUTTON BASIC SETUP Pre-Programmed Code...
... next code number listed for that Component until the Component turns off with code number 147, but the volume controls did not work properly. STEP 7: Point the RF20 toward the Component you wrote down for that specific Component. Use the Number buttons 0-9 on the remote to turn the Component back on the screen. (There is a chance that your Sony TV turned off . ON BUTTON VOLUME BUTTONS CHANNEL BUTTONS PLAY BUTTON STOP BUTTON BASIC SETUP Pre-Programmed Code...
Owners Manual
Page 8
The LCD screen will blink "SAVED" two times, signaling that appears on the LCD screen. SAVE BUTTON 14 Pre-Programmed Code Methoda STEP 10 : Exit SETUP mode by pressing the SAVE display button that the code number has been successfully saved. NOW, PROGRAM THE REST OF YOUR COMPONENTS BY REPEATING STEPS 1 THROUGH 9. IF YOU ARE STILL MISSING COMMANDS TO CONTROL ANY OF YOUR COMPONENTS, USE THE LEARNING METHOD...
The LCD screen will blink "SAVED" two times, signaling that appears on the LCD screen. SAVE BUTTON 14 Pre-Programmed Code Methoda STEP 10 : Exit SETUP mode by pressing the SAVE display button that the code number has been successfully saved. NOW, PROGRAM THE REST OF YOUR COMPONENTS BY REPEATING STEPS 1 THROUGH 9. IF YOU ARE STILL MISSING COMMANDS TO CONTROL ANY OF YOUR COMPONENTS, USE THE LEARNING METHOD...
Owners Manual
Page 10
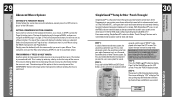
..., sunlight, halogen or quartz lighting can 't teach are retained even after a different Setup Code Number is programmed into the remote. • To return to an original pre-programmed function, a learned function must be working fine, put in fresh alkaline batteries. • Gradually vary the distance between the remote controls. STEP 6: Press and hold the button on the other remotes by repeating STEPS 4 through...
..., sunlight, halogen or quartz lighting can 't teach are retained even after a different Setup Code Number is programmed into the remote. • To return to an original pre-programmed function, a learned function must be working fine, put in fresh alkaline batteries. • Gradually vary the distance between the remote controls. STEP 6: Press and hold the button on the other remotes by repeating STEPS 4 through...
Owners Manual
Page 11
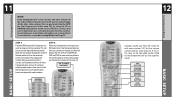
... screen will display the list of the screen. CUSTOMIZING The LCD display will change the name of any of the display buttons (including Favorite Channels) on to Normal Operation: Press the +10 and ENT (Enter) buttons simultaneously again for 3 seconds. STEP 2: Press the EDIT display button. This indicates that a signal is being sent. This is particularly useful when setting up Macros and FAVs, since it flashes with...
... screen will display the list of the screen. CUSTOMIZING The LCD display will change the name of any of the display buttons (including Favorite Channels) on to Normal Operation: Press the +10 and ENT (Enter) buttons simultaneously again for 3 seconds. STEP 2: Press the EDIT display button. This indicates that a signal is being sent. This is particularly useful when setting up Macros and FAVs, since it flashes with...

Owners Manual
Page 13
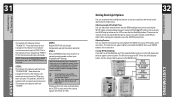
... time for a total of RF20's most desirable features. FAV BUTTON 24 Favorite Channel Setup STEP 3: Use the PAGE ( ) ( ) buttons until the word "SETUP" is displayed at the top of the favorite channel you will show the channel name. The top of the display will need to setup. CUSTOMIZING To access Favorite Channel listings, simply press the FAV button to show "FAV". The top of the screen will flash...
... time for a total of RF20's most desirable features. FAV BUTTON 24 Favorite Channel Setup STEP 3: Use the PAGE ( ) ( ) buttons until the word "SETUP" is displayed at the top of the favorite channel you will show the channel name. The top of the display will need to setup. CUSTOMIZING To access Favorite Channel listings, simply press the FAV button to show "FAV". The top of the screen will flash...
Owners Manual
Page 14
... multiple remotes and button pushes, the RF20 can be set to the Main Component listing. ("STEP 3" will flash "SELECT". A new screen appears displaying SAVE, UNDO or EXIT. If you don't press a button within 30 seconds, SETUP will display at the bottom of the screen.) STEP 6: Now, press the MAIN button to return to be Macro buttons as well. CUSTOMIZING 25 Favorite Channel Setup STEP 7: Press the LIGHT button...
... multiple remotes and button pushes, the RF20 can be set to the Main Component listing. ("STEP 3" will flash "SELECT". A new screen appears displaying SAVE, UNDO or EXIT. If you don't press a button within 30 seconds, SETUP will display at the bottom of the screen.) STEP 6: Now, press the MAIN button to return to be Macro buttons as well. CUSTOMIZING 25 Favorite Channel Setup STEP 7: Press the LIGHT button...
Owners Manual
Page 16
..., the sound may come from the screen, signaling that has a button you want to set one action! This signals that you selected. STEP 4: Then press the VOL (Volume) display button. The screen will display the button label you are in SETUP mode. This sets up the group of three buttons (Volume Up, Volume Down and Mute) in one of the Component buttons as a macro, in your Macro using the MAIN...
..., the sound may come from the screen, signaling that has a button you want to set one action! This signals that you selected. STEP 4: Then press the VOL (Volume) display button. The screen will display the button label you are in SETUP mode. This sets up the group of three buttons (Volume Up, Volume Down and Mute) in one of the Component buttons as a macro, in your Macro using the MAIN...
Owners Manual
Page 17
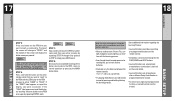
... and Channel (0-9) buttons. STEP 5: The bottom of the display flashes "PUNCH TO". MAIN BUTTON UP & DOWN CURSOR HIGH CONTRAST LOW CONTRAST CUSTOMIZING Setting Backlight Options After making your SimpleSound™ settings. Press the SAVE display button. Then enter the amount of controls, consider using Punch Through for systems with surround sound receivers). Adjusting Contrast You can also be applied to stay on the LCD screen...
... and Channel (0-9) buttons. STEP 5: The bottom of the display flashes "PUNCH TO". MAIN BUTTON UP & DOWN CURSOR HIGH CONTRAST LOW CONTRAST CUSTOMIZING Setting Backlight Options After making your SimpleSound™ settings. Press the SAVE display button. Then enter the amount of controls, consider using Punch Through for systems with surround sound receivers). Adjusting Contrast You can also be applied to stay on the LCD screen...

Owners Manual
Page 18
... screen. STEP 3: Press the PAGE display button once the screen changes to normal operation. STEP 6: You can hide pages without affecting operation of the screen. However, only five pages are hidden in them . Three page are visible in SETUP mode. You can HIDE them . You can ADD it. IMPORTANT:You now have exited setup mode and you are in the factory default setting. EDIT BUTTON PAGE BUTTON...
... screen. STEP 3: Press the PAGE display button once the screen changes to normal operation. STEP 6: You can hide pages without affecting operation of the screen. However, only five pages are hidden in them . Three page are visible in SETUP mode. You can HIDE them . You can ADD it. IMPORTANT:You now have exited setup mode and you are in the factory default setting. EDIT BUTTON PAGE BUTTON...
Owners Manual
Page 19
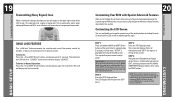
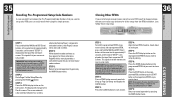
... in setup mode. STEP 5: Press the RECV display button on the programmed RF20 that you want to setup by pressing the PAGE ( ) button. The display will change to - The screen automatically switches between four screens, alternately flashing Page 1 components and code numbers, then Page 2 components and code numbers. After successful cloning is displayed at the same time for future reference. This signals that you are now in SETUP mode. 35 Recalling Pre-Programmed Setup Code Numbers...
... in setup mode. STEP 5: Press the RECV display button on the programmed RF20 that you want to setup by pressing the PAGE ( ) button. The display will change to - The screen automatically switches between four screens, alternately flashing Page 1 components and code numbers, then Page 2 components and code numbers. After successful cloning is displayed at the same time for future reference. This signals that you are now in SETUP mode. 35 Recalling Pre-Programmed Setup Code Numbers...
Owners Manual
Page 20
... a button to normal operating mode, press the MAIN button four times. The bottom of the screen will flash ERASE twice, then ERASED. STEP6: To return to erase it is pressed, all the buttons will appear. SURE BUTTON ERASING COMMANDS You can erase an individual button with a learned command, a macro or a favorite channel. IMPORTANT:You now have to navigate to the factory default settings. button. The...
... a button to normal operating mode, press the MAIN button four times. The bottom of the screen will flash ERASE twice, then ERASED. STEP6: To return to erase it is pressed, all the buttons will appear. SURE BUTTON ERASING COMMANDS You can erase an individual button with a learned command, a macro or a favorite channel. IMPORTANT:You now have to navigate to the factory default settings. button. The...

Owners Manual
Page 21
... buttons for 10 seconds. ERASING COMMANDS Re-setting RF20 to Original Factory Default Settings 39 Re-setting RF20 to Original Factory Default Settings If you want to Original Factory Default Settings 40 Press the SURE button to erase all of your settings and return to the factory default setup SURE BUTTON ERASING COMMANDS Re-setting RF20 to start with a clean slate, you have programmed into the RF20. NOTE: This process will display...
... buttons for 10 seconds. ERASING COMMANDS Re-setting RF20 to Original Factory Default Settings 39 Re-setting RF20 to Original Factory Default Settings If you want to Original Factory Default Settings 40 Press the SURE button to erase all of your settings and return to the factory default setup SURE BUTTON ERASING COMMANDS Re-setting RF20 to start with a clean slate, you have programmed into the RF20. NOTE: This process will display...

Owners Manual
Page 22
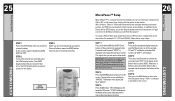
...'s radio signals will automatically receive RF20's radio signals and translate them into PowerBlaster's rear flasher line output jacks. The flashers plug into the infrared commands that are radio only and cannot be switched to standard IR (Infrared Control) via a built-in front blaster to Components in the PowerBlasterTM kit) affix to the front panels of -sight, up RF20's radio frequency signals from any Component. Some remote control...
...'s radio signals will automatically receive RF20's radio signals and translate them into PowerBlaster's rear flasher line output jacks. The flashers plug into the infrared commands that are radio only and cannot be switched to standard IR (Infrared Control) via a built-in front blaster to Components in the PowerBlasterTM kit) affix to the front panels of -sight, up RF20's radio frequency signals from any Component. Some remote control...
Owners Manual
Page 23
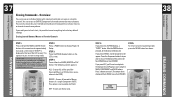
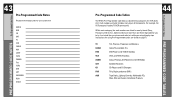
... Combos Amps, Preamps, A/V Receivers and XM Radios Satellite Receivers CD Players and CD Changers TiVo, Replay and other DVR's Tape Decks, Lighting Controls, Multimedia PCs, Xbox, iPod and Custom Installation Products Pre-Programmed Code Tables PRE-PROGRAMMED CODE TABLES For example, the VCR category includes TV/VCR combo units. PRE-PROGRAMMED CODE NOTES Pre-Programmed Code Notes 43 Pre-Programmed Code Notes Record the three digit codes for you setup (step by brand...
... Combos Amps, Preamps, A/V Receivers and XM Radios Satellite Receivers CD Players and CD Changers TiVo, Replay and other DVR's Tape Decks, Lighting Controls, Multimedia PCs, Xbox, iPod and Custom Installation Products Pre-Programmed Code Tables PRE-PROGRAMMED CODE TABLES For example, the VCR category includes TV/VCR combo units. PRE-PROGRAMMED CODE NOTES Pre-Programmed Code Notes 43 Pre-Programmed Code Notes Record the three digit codes for you setup (step by brand...
Owners Manual
Page 34
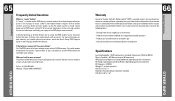
... upon the environment RF Frequency: 418MHz Weight: 7.1 oz. (with one year from an authorized Universal Remote Control dealer. Who can I lose my settings? Products purchased more answers? Instead of pressing all of those steps automatically with batteries) Size: 8.5" x 2.5" x 1" Batteries: Four AAA Alkaline batteries included LCD Size: 0.88" x 1.88" OTHER INFO Warranty/ Specifications For example, to watch the Quick Setup DVD Program Guide or refer to...
... upon the environment RF Frequency: 418MHz Weight: 7.1 oz. (with one year from an authorized Universal Remote Control dealer. Who can I lose my settings? Products purchased more answers? Instead of pressing all of those steps automatically with batteries) Size: 8.5" x 2.5" x 1" Batteries: Four AAA Alkaline batteries included LCD Size: 0.88" x 1.88" OTHER INFO Warranty/ Specifications For example, to watch the Quick Setup DVD Program Guide or refer to...

