
English Owners Manual
Page 2
... outstanding performance. Features • 900 MHz Extended Range • Secure Digital Transmission • Answering Device • 50 Number Caller ID Memory • 30 Number Memory • 32 Digit Redial • 3-Line, 16 Character Backlit LCD Handset Display • Redial, Flash and Pause • Pulse / Tone Dialing • 7 Hour Talk Time • 7 Day Standby Battery Life • Handset Earpiece and Ringer Volume Control • Speakerphone • 3-Way Conference Operation INTRODUCTION TO YOUR NEW PHONE Introduction Thank you for explanation...
... outstanding performance. Features • 900 MHz Extended Range • Secure Digital Transmission • Answering Device • 50 Number Caller ID Memory • 30 Number Memory • 32 Digit Redial • 3-Line, 16 Character Backlit LCD Handset Display • Redial, Flash and Pause • Pulse / Tone Dialing • 7 Hour Talk Time • 7 Day Standby Battery Life • Handset Earpiece and Ringer Volume Control • Speakerphone • 3-Way Conference Operation INTRODUCTION TO YOUR NEW PHONE Introduction Thank you for explanation...
English Owners Manual
Page 4
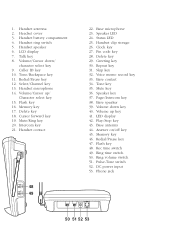
.... Delete key 29. Skip key 32. Base antenna 44. Handset ring switch 5. Status LED 25. Handset clip storage 26. Answer on/off key 45. Flash key 48. Phone jack 50 51 52 53 Handset antenna 2. Select/Channel key 13. Volume up / Character select key 15. Redial/Pause key 47. Handset speaker 6. Intercom key 21. Voice memo record key 33. Pulse-Tone switch 52. Base microphone 23. Rec time switch 49. Tone/Backspace key 11. Memory key 17. Speaker LED 24. LCD display 7. Speaker key 37. Ring time switch 50. Delete key 18. Greeting key...
.... Delete key 29. Skip key 32. Base antenna 44. Handset ring switch 5. Status LED 25. Handset clip storage 26. Answer on/off key 45. Flash key 48. Phone jack 50 51 52 53 Handset antenna 2. Select/Channel key 13. Volume up / Character select key 15. Redial/Pause key 47. Handset speaker 6. Intercom key 21. Voice memo record key 33. Pulse-Tone switch 52. Base microphone 23. Rec time switch 49. Tone/Backspace key 11. Memory key 17. Speaker LED 24. LCD display 7. Speaker key 37. Ring time switch 50. Delete key 18. Greeting key...

English Owners Manual
Page 5
... base unit 5 Mounting the base unit on a wall ...........8 Step 3: Preparing the battery pack 10 Step 4: Setting the Caller ID options 12 Entering your area code 13 Basics Making a call 14 Receiving a call 15 Mute 16 Adjusting ringer and earpiece volume 17 Redialing a call 18 Using the speaker phone 20 Using your EXAI 8985 intercom 21 Transferring a call 22 Memory Dialing Storing phone numbers and names 23 Making calls with memory dialing 26 Editing a stored name and/or phone number ...28 Erasing a stored name and phone number...
... base unit 5 Mounting the base unit on a wall ...........8 Step 3: Preparing the battery pack 10 Step 4: Setting the Caller ID options 12 Entering your area code 13 Basics Making a call 14 Receiving a call 15 Mute 16 Adjusting ringer and earpiece volume 17 Redialing a call 18 Using the speaker phone 20 Using your EXAI 8985 intercom 21 Transferring a call 22 Memory Dialing Storing phone numbers and names 23 Making calls with memory dialing 26 Editing a stored name and/or phone number ...28 Erasing a stored name and phone number...

English Owners Manual
Page 6
... cordless handsets from making calls through your Handset calling area requires 10 digit dialing. A random security code will be set up before using the phone. Read this first This cordless telephone must be assigned automatically between your base unit. Base unit Step 3 (page 10 to11) Then, insert the battery pack into the handset. Follow these steps; Note: Skip the setting of area code if your base unit. Step 1 (page 4) Unpack the telephone and accessories. About the digital security code This cordless telephone uses a digital security code...
... cordless handsets from making calls through your Handset calling area requires 10 digit dialing. A random security code will be set up before using the phone. Read this first This cordless telephone must be assigned automatically between your base unit. Base unit Step 3 (page 10 to11) Then, insert the battery pack into the handset. Follow these steps; Note: Skip the setting of area code if your base unit. Step 1 (page 4) Unpack the telephone and accessories. About the digital security code This cordless telephone uses a digital security code...
English Owners Manual
Page 7
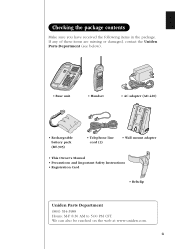
... contents Make sure you have received the following items in the package. If any of these items are missing or damaged, contact the Uniden Parts Department (see below). • Base unit • Handset • AC adapter (AD-420) • Rechargeable battery pack (BT-905) • Telephone line cord (2) • Wall mount adapter • This Owner's Manual • Precautions and Important Safety Instructions • Registration Card • Beltclip Uniden Parts Department...
... contents Make sure you have received the following items in the package. If any of these items are missing or damaged, contact the Uniden Parts Department (see below). • Base unit • Handset • AC adapter (AD-420) • Rechargeable battery pack (BT-905) • Telephone line cord (2) • Wall mount adapter • This Owner's Manual • Precautions and Important Safety Instructions • Registration Card • Beltclip Uniden Parts Department...
English Owners Manual
Page 13
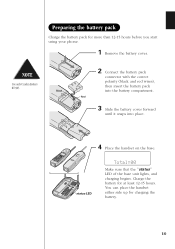
... LED Total:00 Make sure that the "status" LED of the base unit lights, and charging begins. Charge the battery for more than 12-15 hours before you start using your phone. 1 Remove the battery cover. You can place the handset either side up for charging the battery. 10 Red 3 Slide the battery cover forward until it snaps into the battery compartment. Black 2 Connect the battery pack connector with the...
... LED Total:00 Make sure that the "status" LED of the base unit lights, and charging begins. Charge the battery for more than 12-15 hours before you start using your phone. 1 Remove the battery cover. You can place the handset either side up for charging the battery. 10 Red 3 Slide the battery cover forward until it snaps into the battery compartment. Black 2 Connect the battery pack connector with the...
English Owners Manual
Page 16
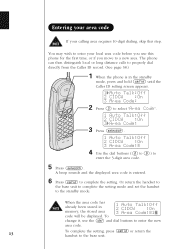
... . To complete the setting, press call id or return the 13 handset to the standby mode. You may wish to enter your calling area requires 10-digit dialing, skip this phone for the first time, or if you use the del and dial buttons to enter the new area code. Or return the handset to the base unit to complete the setting mode and set the handset to the base unit. Entering your area...
... . To complete the setting, press call id or return the 13 handset to the standby mode. You may wish to enter your calling area requires 10-digit dialing, skip this phone for the first time, or if you use the del and dial buttons to enter the new area code. Or return the handset to the base unit to complete the setting mode and set the handset to the base unit. Entering your area...
English Owners Manual
Page 17
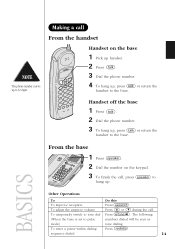
... handset. 2 Press talk . 3 Dial the phone number. 4 To hang up . Handset off the base 1 Press talk . 2 Dial the phone number. 3 To hang up to 32 digits. BASICS Other Operations To Do this To improve reception Press select/ch . The following (When the base is set to pulse numbers dialed will be up , press talk or return the handset to the base. The phone number can be sent as mode) tone dialing. Making a call From the handset Handset...
... handset. 2 Press talk . 3 Dial the phone number. 4 To hang up . Handset off the base 1 Press talk . 2 Dial the phone number. 3 To hang up to 32 digits. BASICS Other Operations To Do this To improve reception Press select/ch . The following (When the base is set to pulse numbers dialed will be up , press talk or return the handset to the base. The phone number can be sent as mode) tone dialing. Making a call From the handset Handset...
English Owners Manual
Page 20
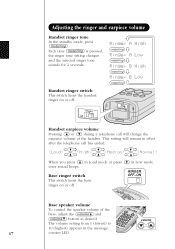
... error sound beeps. The volume setting from 1 (lowest) to volume 10 (highest) appears in Low mode, RINGER OFF-ON Base speaker volume To control the speaker volume of the handset. Base ringer switch This switch turns the base ringer on or off . ringer off on Ringer A High mute/ring Ringer A Low mute/ring Ringer B High mute/ring Ringer B Low mute/ring ringer off on or off . ª in the message 17 counter LED. Adjusting the ringer and earpiece volume Handset ringer tone In the standby mode, press mute/ring . This setting will change...
... error sound beeps. The volume setting from 1 (lowest) to volume 10 (highest) appears in Low mode, RINGER OFF-ON Base speaker volume To control the speaker volume of the handset. Base ringer switch This switch turns the base ringer on or off . ringer off on Ringer A High mute/ring Ringer A Low mute/ring Ringer B High mute/ring Ringer B Low mute/ring ringer off on or off . ª in the message 17 counter LED. Adjusting the ringer and earpiece volume Handset ringer tone In the standby mode, press mute/ring . This setting will change...
English Owners Manual
Page 21
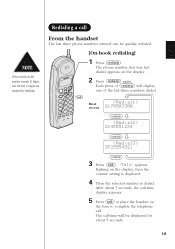
... quickly redialed. [On-hook redialing] 1 Press redial/p . After about 5 seconds. 18 The call-time will display one of the last three numbers dialed. "Talk" appears flashing on the display. 2 Press redial/p again. If the recently dialed number exceeds 32 digits, only the first 32 digits are retained for about 5 seconds, the call-time display appears. 5 Press talk or place the handset on the base to complete the telephone call...
... quickly redialed. [On-hook redialing] 1 Press redial/p . After about 5 seconds. 18 The call-time will display one of the last three numbers dialed. "Talk" appears flashing on the display. 2 Press redial/p again. If the recently dialed number exceeds 32 digits, only the first 32 digits are retained for about 5 seconds, the call-time display appears. 5 Press talk or place the handset on the base to complete the telephone call...
English Owners Manual
Page 26
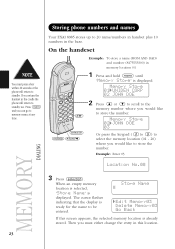
...Location No.0 MEMORY DIALING 3 Press select/ch . Then you can go to 20 name/numbers in handset plus 10 numbers in the base. Press mem and you must press a key within 20 seconds or the phone will return to be entered. On the handeset del #/ 1 select/ch redial/p */tone/0 Example: To...name to standby too. The cursor flashes indicating that the display is displayed. Store Name Edit Memory03 Delete Memory03 Go Back If this location. 23 Storing phone numbers and names Your EXAI 8985 stores up to memory menu at any time. When an empty memory location is selected, "Store Name"...
...Location No.0 MEMORY DIALING 3 Press select/ch . Then you can go to 20 name/numbers in handset plus 10 numbers in the base. Press mem and you must press a key within 20 seconds or the phone will return to be entered. On the handeset del #/ 1 select/ch redial/p */tone/0 Example: To...name to standby too. The cursor flashes indicating that the display is displayed. Store Name Edit Memory03 Delete Memory03 Go Back If this location. 23 Storing phone numbers and names Your EXAI 8985 stores up to memory menu at any time. When an empty memory location is selected, "Store Name"...

English Owners Manual
Page 27
... name cannot exceed 13 characters. • Use the • and ª key to enter pause in the dialing sequence. The cursor flashes indicating that reguire a pause between digits. • Use the del key to enter the Store Number 817555330 phone number. Memory03 Stored After about 2 seconds, "Memory Store" is Store Number displayed. The handset beeps and displays the confirmation screen. 4 Use the 1 , */tone/0 , or del keys to delete characters as needed . 5 Press select/ch...
... name cannot exceed 13 characters. • Use the • and ª key to enter pause in the dialing sequence. The cursor flashes indicating that reguire a pause between digits. • Use the del key to enter the Store Number 817555330 phone number. Memory03 Stored After about 2 seconds, "Memory Store" is Store Number displayed. The handset beeps and displays the confirmation screen. 4 Use the 1 , */tone/0 , or del keys to delete characters as needed . 5 Press select/ch...
English Owners Manual
Page 29
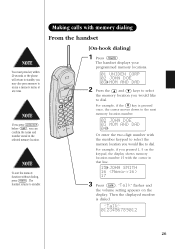
... in that line. 15 JOHN SMITH 16 17 3 Press talk . You must press key within 20 seconds or the phone will return to standby, you would like to dial. Making calls with the cursor in the selected memory location. "Talk" flashes and the volume setting appears on the keypad, the display shows memory location number 15 with memory dialing From the handset [On-hook dialing] 1 Press mem...
... in that line. 15 JOHN SMITH 16 17 3 Press talk . You must press key within 20 seconds or the phone will return to standby, you would like to dial. Making calls with the cursor in the selected memory location. "Talk" flashes and the volume setting appears on the keypad, the display shows memory location number 15 with memory dialing From the handset [On-hook dialing] 1 Press mem...
English Owners Manual
Page 35
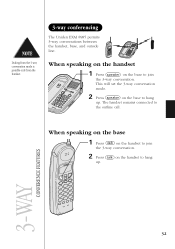
When speaking on the handset 1 Press speaker on the base to the outline call. The handset remains connected to join the 3-way conversation. When speaking on the base 1 Press talk on the handset to join the 3-way conversation. 2 Press talk on the base to hang up . This will set the 3-way conversation mode. 2 Press speaker on the handset to hang up . 3-WAY CONFERENCE FEATURES 32 Dialing from the 3-way conversation mode is possible only from the handset. 3-way conferencing The Uniden EXAI 8985 permits 3-way conversations between the handset, base, and outside line.
When speaking on the handset 1 Press speaker on the base to the outline call. The handset remains connected to join the 3-way conversation. When speaking on the base 1 Press talk on the handset to join the 3-way conversation. 2 Press talk on the base to hang up . This will set the 3-way conversation mode. 2 Press speaker on the handset to hang up . 3-WAY CONFERENCE FEATURES 32 Dialing from the 3-way conversation mode is possible only from the handset. 3-way conferencing The Uniden EXAI 8985 permits 3-way conversations between the handset, base, and outside line.
English Owners Manual
Page 36
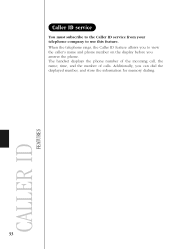
When the telephone rings, the Caller ID feature allows you to use this feature. The handset displays the phone number of the incoming call, the name, time, and the number of calls. Additionally, you answer the phone. CALLER ID FEATURES Caller ID service You must subscribe to the Caller ID service from your telephone company to view the caller's name and phone number on the display before you can dial the displayed number, and store the information for memory dialing. 33
When the telephone rings, the Caller ID feature allows you to use this feature. The handset displays the phone number of the incoming call, the name, time, and the number of calls. Additionally, you answer the phone. CALLER ID FEATURES Caller ID service You must subscribe to the Caller ID service from your telephone company to view the caller's name and phone number on the display before you can dial the displayed number, and store the information for memory dialing. 33
English Owners Manual
Page 43
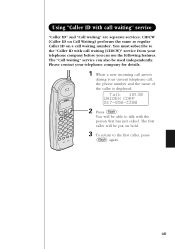
... a new incoming call , the phone number and the name of the caller is displayed. The first caller will be able to talk with call waiting (CIDCW)" service from your current telephone call arrives during your telephone company before you can also be put on a call waiting" service "Caller ID" and "Call waiting" are separate services. The "Call waiting" service can use the following features. You will be used independently. You must subscribe to the first caller, press flash...
... a new incoming call , the phone number and the name of the caller is displayed. The first caller will be able to talk with call waiting (CIDCW)" service from your current telephone call arrives during your telephone company before you can also be put on a call waiting" service "Caller ID" and "Call waiting" are separate services. The "Call waiting" service can use the following features. You will be used independently. You must subscribe to the first caller, press flash...
English Owners Manual
Page 44
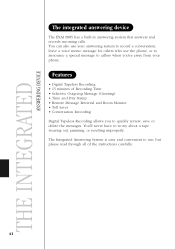
... resetting improperly. You'll never have to quickly review, save or delete the messages. THE INTEGRATED ANSWERING DEVICE The integrated answering device The EXAI 8985 has a built-in answering system that answers and records incoming calls. You can also use your answering system to record a conversation, leave a voice memo message for others who use , but please read through all of Recording Time • Selective Outgoing Message (Greeting) • Time and Day Stamp • Remote Message Retrieval...
... resetting improperly. You'll never have to quickly review, save or delete the messages. THE INTEGRATED ANSWERING DEVICE The integrated answering device The EXAI 8985 has a built-in answering system that answers and records incoming calls. You can also use your answering system to record a conversation, leave a voice memo message for others who use , but please read through all of Recording Time • Selective Outgoing Message (Greeting) • Time and Day Stamp • Remote Message Retrieval...
English Owners Manual
Page 57
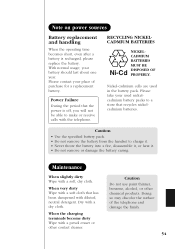
... battery packs to make or receive calls with the telephone. When very dirty Wipe with a soft cloth that recycles nickelcadmium batteries. Caution • Use the specified battery pack. • Do not remove the battery from the handset to charge it. • Never throw the battery into a fire, disassemble it, or heat it. • Do not remove or damage the battery casing. Note on power sources Battery replacement...
... battery packs to make or receive calls with the telephone. When very dirty Wipe with a soft cloth that recycles nickelcadmium batteries. Caution • Use the specified battery pack. • Do not remove the battery from the handset to charge it. • Never throw the battery into a fire, disassemble it, or heat it. • Do not remove or damage the battery casing. Note on power sources Battery replacement...
English Owners Manual
Page 59
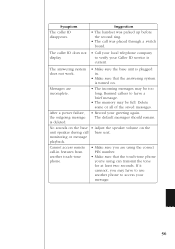
... a power failure, the outgoing message is turned on the unit speaker during call base unit. Symptom The caller ID disappears. Cannot access remote call was placed through a switch board. Messages are using can transmit the tone for at least two seconds. No sounds on the base • Adjust the speaker volume on . If it cannnot, you 're using the correct PIN number. • Make sure that the answering system is deleted. • Record your message. 56...
... a power failure, the outgoing message is turned on the unit speaker during call base unit. Symptom The caller ID disappears. Cannot access remote call was placed through a switch board. Messages are using can transmit the tone for at least two seconds. No sounds on the base • Adjust the speaker volume on . If it cannnot, you 're using the correct PIN number. • Make sure that the answering system is deleted. • Record your message. 56...
English Owners Manual
Page 61
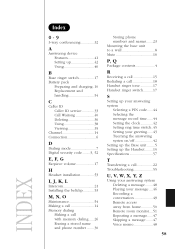
...B Base ringer switch 17 Battery pack Preparing and charging..10 Replacement and handling 54 C Caller ID Caller ID service 33 Call Waitong 40 Deleting 36 Using 38 Viewing 35 Channel 14 Connection 6 D Dialing mode 7 Digital security code ........3, 52 E, F, G Earpiece volume 17 H Headset installation 53 I, J, K, L Intercom 21 Installing the beltclip............53 M, N, O Maintenance 54 Making a call 14 Memory dialing Making a call with memory dialing......26 Erasing a stored name and phone number ........30 Storing phone numbers and names.......23 Mounting the base unit to a wall...
...B Base ringer switch 17 Battery pack Preparing and charging..10 Replacement and handling 54 C Caller ID Caller ID service 33 Call Waitong 40 Deleting 36 Using 38 Viewing 35 Channel 14 Connection 6 D Dialing mode 7 Digital security code ........3, 52 E, F, G Earpiece volume 17 H Headset installation 53 I, J, K, L Intercom 21 Installing the beltclip............53 M, N, O Maintenance 54 Making a call 14 Memory dialing Making a call with memory dialing......26 Erasing a stored name and phone number ........30 Storing phone numbers and names.......23 Mounting the base unit to a wall...


