English Owners Manual
Page 2
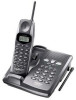
... Dialing • 14 Day Standby Battery Life • 7 Hour Talk Time • Handset Earpiece and Ringer Volume Control • Speakerphone • 3-Way and 4-Way Conference Operation The EXI2926 features include AutoTalkTM and AutoStandbyTM. Also, the AutoSecureTM feature electronically locks your phone being activated by simply returning the handset to waste time pushing buttons or flipping switches. Note: Some illustrations in the base. To protect you with Intercom • Caller ID and Call Waiting Caller...
... Dialing • 14 Day Standby Battery Life • 7 Hour Talk Time • Handset Earpiece and Ringer Volume Control • Speakerphone • 3-Way and 4-Way Conference Operation The EXI2926 features include AutoTalkTM and AutoStandbyTM. Also, the AutoSecureTM feature electronically locks your phone being activated by simply returning the handset to waste time pushing buttons or flipping switches. Note: Some illustrations in the base. To protect you with Intercom • Caller ID and Call Waiting Caller...
English Owners Manual
Page 3
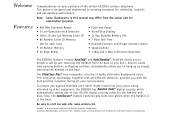
... 3: Mounting the Base unit on a wall 9 Making calls with memory dialing 22 Step 4: Setting Caller ID options 11 Chain dialing 22 Entering your Area Code 12 Editing a stored name and/or phone number 23 Erasing a stored name and phone number 24 Basics Making and receiving calls 13 Caller ID Features Terminology 13 Caller ID 25 Adjusting the handset ringer and earpiece volume 14 When the telephone rings 25 Redial 14 Viewing the Caller ID message list 26 Tone dialing switch-over 15 Using the Caller ID list...
... 3: Mounting the Base unit on a wall 9 Making calls with memory dialing 22 Step 4: Setting Caller ID options 11 Chain dialing 22 Entering your Area Code 12 Editing a stored name and/or phone number 23 Erasing a stored name and phone number 24 Basics Making and receiving calls 13 Caller ID Features Terminology 13 Caller ID 25 Adjusting the handset ringer and earpiece volume 14 When the telephone rings 25 Redial 14 Viewing the Caller ID message list 26 Tone dialing switch-over 15 Using the Caller ID list...
English Owners Manual
Page 6
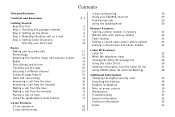
... calling area requires 10-digit dialing. [ 4 ] GETTING STARTED To realize the full capabilities of your base unit. Read This First This cordless telephone must charge the batter y pack for the first time. Step 3 (page 7 to your base unit and handset when you want to reset the security code, see page 29. Step 2 (page 6) Next, choose the best location to use . This security code prevents other cordless handsets from making calls through your two-line tip phone, contact...
... calling area requires 10-digit dialing. [ 4 ] GETTING STARTED To realize the full capabilities of your base unit. Read This First This cordless telephone must charge the batter y pack for the first time. Step 3 (page 7 to your base unit and handset when you want to reset the security code, see page 29. Step 2 (page 6) Next, choose the best location to use . This security code prevents other cordless handsets from making calls through your two-line tip phone, contact...
English Owners Manual
Page 9
... this connection. If the phone is not in order to the base unit for up to the base unit after each telephone call. • If you must replace the battery pack during a telephone call . note The last number dialed in the redial memory is programmed to eliminate functions in use . • Fourteen days when the handset is completely discharged. • Use only the Uniden Battery (BT-905) supplied with your phone. GETTING STARTED...
... this connection. If the phone is not in order to the base unit for up to the base unit after each telephone call. • If you must replace the battery pack during a telephone call . note The last number dialed in the redial memory is programmed to eliminate functions in use . • Fourteen days when the handset is completely discharged. • Use only the Uniden Battery (BT-905) supplied with your phone. GETTING STARTED...
English Owners Manual
Page 12
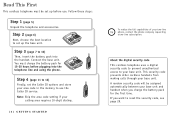
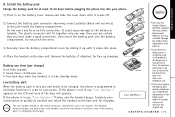
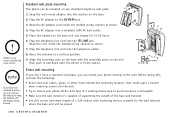
... when inserting screws into the telephone outlet. Wrap the cord inside the molded wiring channel as shown. 7) Plug the telephone line cord into the wall. • Tr y to mount your phone directly to the wall. Standard wall plate mounting This phone can mount your phone within 6-10 feet of 1-3/8 inches) with the display facing forward. Direct wall mounting If you don´t have wall mounted the base, you can be placed...
... when inserting screws into the telephone outlet. Wrap the cord inside the molded wiring channel as shown. 7) Plug the telephone line cord into the wall. • Tr y to mount your phone directly to the wall. Standard wall plate mounting This phone can mount your phone within 6-10 feet of 1-3/8 inches) with the display facing forward. Direct wall mounting If you don´t have wall mounted the base, you can be placed...
English Owners Manual
Page 13
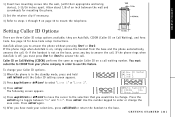
... (Caller ID on a call . If the phone rings when AutoTalk is in order to answer the call id/hold until the Caller ID setting screen appears. You must press line 1 or line 2 to use this feature. Press the sel/vol key to enter or change . Use the number keypad to toggle between the wall and screwheads for Area Code setup instructions. If the phone rings when AutoTalk is not on , simply remove the handset from your Caller ID...
... (Caller ID on a call . If the phone rings when AutoTalk is in order to answer the call id/hold until the Caller ID setting screen appears. You must press line 1 or line 2 to use this feature. Press the sel/vol key to enter or change . Use the number keypad to toggle between the wall and screwheads for Area Code setup instructions. If the phone rings when AutoTalk is not on , simply remove the handset from your Caller ID...
English Owners Manual
Page 14
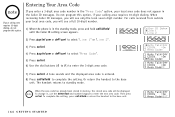
... setting screen appears. A tone sounds and the displayed area code is in the "Area Code" option, your calling area requires 10-digit dialing. note When the area code has already been stored in the Caller ID messages. To change it, use the delete/flash and number keypad to the base unit. The handset returns to the base unit. 817 [ 12 ] G E T T I N G S T A R T E D To complete the setting, press call id/hold or return the handset to standby mode. When reviewing Caller ID messages, you will be displayed. Caller ID Setup 1 Line 1 2 Line...
... setting screen appears. A tone sounds and the displayed area code is in the "Area Code" option, your calling area requires 10-digit dialing. note When the area code has already been stored in the Caller ID messages. To change it, use the delete/flash and number keypad to the base unit. The handset returns to the base unit. 817 [ 12 ] G E T T I N G S T A R T E D To complete the setting, press call id/hold or return the handset to standby mode. When reviewing Caller ID messages, you will be displayed. Caller ID Setup 1 Line 1 2 Line...
English Owners Manual
Page 15
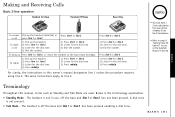
... turn on the AutoTalk feature if desired. note • You must have a 2-line subscription from your phone company to use , of f the base and line 1 or line 2 has been pressed enabling a dial tone. For clarity, the instructions in use the 2-line features. • Refer to page 11 "Setting Caller ID Options" to line 2. B A S I C S [ 13 ] Press line 1 or line 2. 1) Press line 1 or line 2. 2) Listen for the dial tone. 3) Dial the number. A dial tone is the terminology explanation. • Standby Mode - To make a call press line...
... turn on the AutoTalk feature if desired. note • You must have a 2-line subscription from your phone company to use , of f the base and line 1 or line 2 has been pressed enabling a dial tone. For clarity, the instructions in use the 2-line features. • Refer to page 11 "Setting Caller ID Options" to line 2. B A S I C S [ 13 ] Press line 1 or line 2. 1) Press line 1 or line 2. 2) Listen for the dial tone. 3) Dial the number. A dial tone is the terminology explanation. • Standby Mode - To make a call press line...
English Owners Manual
Page 16
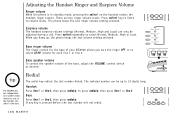
... two independent last number redial memories; The redialed number can only be up , the phone keeps the last volume setting selected. Press sel/vol repeatedly to volume levels. Redial The redial key redials the last number dialed. Base Press line 1 or line 2, then press redial/p. The phone keeps the last ringer volume setting selected. Base ringer volume The ringer control for each line 1 or line 2. Adjusting the Handset Ringer and Earpiece Volume Ringer volume When the phone is pressed before...
... two independent last number redial memories; The redialed number can only be up , the phone keeps the last volume setting selected. Press sel/vol repeatedly to volume levels. Redial The redial key redials the last number dialed. Base Press line 1 or line 2, then press redial/p. The phone keeps the last ringer volume setting selected. Base ringer volume The ringer control for each line 1 or line 2. Adjusting the Handset Ringer and Earpiece Volume Ringer volume When the phone is pressed before...
English Owners Manual
Page 17
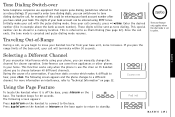
... base unit, your call will be sent as Chain Dialing (See page 22). Enter the desired number (like in example above the bank account number). During a call, as rotary dialing). The handset beeps for clearer operation. BASICS Selecting a Different Channel If you encounter interference while using DTMF tones. Paging B A S I C S [ 15 ] The digits of -Range note The tone feature only applies when the dial mode is use equipment that require pulse dialing (sometimes referred...
... base unit, your call will be sent as Chain Dialing (See page 22). Enter the desired number (like in example above the bank account number). During a call, as rotary dialing). The handset beeps for clearer operation. BASICS Selecting a Different Channel If you encounter interference while using DTMF tones. Paging B A S I C S [ 15 ] The digits of -Range note The tone feature only applies when the dial mode is use equipment that require pulse dialing (sometimes referred...
English Owners Manual
Page 18
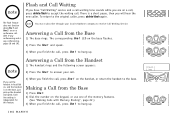
... will hear the new caller. The flash feature does not function when line 1 and line 2 are on a conference call. (See 3-way conferencing and 4way conferencing, pages 18 and 19). note Answering a Call from the Base 1) The base rings. Answering a Call from the Handset 1) The handset rings and the following screen appears: 2) Press the line 1 to accept the waiting call. note Flash and Call Waiting If you have "Call Waiting" service and a call waiting tone sounds while you are on a call, press delete/flash to answer your local telephone company...
... will hear the new caller. The flash feature does not function when line 1 and line 2 are on a conference call. (See 3-way conferencing and 4way conferencing, pages 18 and 19). note Answering a Call from the Base 1) The base rings. Answering a Call from the Handset 1) The handset rings and the following screen appears: 2) Press the line 1 to accept the waiting call. note Flash and Call Waiting If you have "Call Waiting" service and a call waiting tone sounds while you are on a call, press delete/flash to answer your local telephone company...

English Owners Manual
Page 20
... add a third party to conference using the handset. If you can make a call with line 1, you attempt to hang up . Return to the original call by pressing line 1. 5) To remove either the handset or the base. Press the corresponding line button to the conversation. The line 1 LED turns from your call, you want to the base, all calls are green. If the third person´s number is busy or doesn´t answer...
... add a third party to conference using the handset. If you can make a call with line 1, you attempt to hang up . Return to the original call by pressing line 1. 5) To remove either the handset or the base. Press the corresponding line button to the conversation. The line 1 LED turns from your call, you want to the base, all calls are green. If the third person´s number is busy or doesn´t answer...
English Owners Manual
Page 22
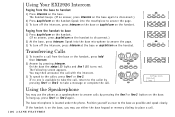
On the base the status LED lights and line 1 LED turns red. Using the Speakerphone Intercom (Hold) Line 1 You may use either the base keypad or memory dialing to the base as possible and speak clearly. Using Your EXI2926 Intercom Paging from the base to answer calls by pressing the line 1 or line 2 button on the base. To hang up, press line 1 or line 2 again. Position yourself as a speakerphone to handset 1) Press intercom on the handset. If the handset is on the base, you...
On the base the status LED lights and line 1 LED turns red. Using the Speakerphone Intercom (Hold) Line 1 You may use either the base keypad or memory dialing to the base as possible and speak clearly. Using Your EXI2926 Intercom Paging from the base to answer calls by pressing the line 1 or line 2 button on the base. To hang up, press line 1 or line 2 again. Position yourself as a speakerphone to handset 1) Press intercom on the handset. If the handset is on the base, you...
English Owners Manual
Page 24
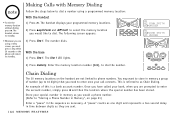
... to phone numbers. This is a bank account number. The following screen appears: 3) Press line 1. The line 1 LED lights. 01 02 JOHN SMITH 03 UNIDEN 01 02 JOHN SMITH 03 UNIDEN 2) Press memory. Once you have called your bank, when you need to as necessar y. A "pause" counts as one digit and represents a two second delay in memory a group of this is referred to enter once your call connects...
... to phone numbers. This is a bank account number. The following screen appears: 3) Press line 1. The line 1 LED lights. 01 02 JOHN SMITH 03 UNIDEN 01 02 JOHN SMITH 03 UNIDEN 2) Press memory. Once you have called your bank, when you need to as necessar y. A "pause" counts as one digit and represents a two second delay in memory a group of this is referred to enter once your call connects...
English Owners Manual
Page 27
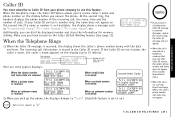
.../Call Waiting feature (See page 11). If the Caller ID service includes the caller´s name, the caller´s name appears on the display (up the phone, the display changes to "Talk". (AutoTalk feature is set to review caller´s name and phone number on .) note • If you answer a call before the Caller ID message is received (Example : before you can dial the displayed number and store the information for memor y dialing. Additionally, you answer the phone. The date and time...
.../Call Waiting feature (See page 11). If the Caller ID service includes the caller´s name, the caller´s name appears on the display (up the phone, the display changes to "Talk". (AutoTalk feature is set to review caller´s name and phone number on .) note • If you answer a call before the Caller ID message is received (Example : before you can dial the displayed number and store the information for memor y dialing. Additionally, you answer the phone. The date and time...
English Owners Manual
Page 30
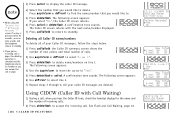
... "Delete Message ?" Yes No New Total Line1 00 00 Line2 00 01 New Total Line1 00 00 Line2 00 00 Call(Line 1) Schlitz Maren 817-555-1212 Using CIDCW (Caller ID with the next name/number displayed. 7) Press call or page, the deleting operation is pressed within 20 seconds, an error tone sounds and the telephone returns to standby. • If you get an incoming call id/hold . The following screen...
... "Delete Message ?" Yes No New Total Line1 00 00 Line2 00 01 New Total Line1 00 00 Line2 00 00 Call(Line 1) Schlitz Maren 817-555-1212 Using CIDCW (Caller ID with the next name/number displayed. 7) Press call or page, the deleting operation is pressed within 20 seconds, an error tone sounds and the telephone returns to standby. • If you get an incoming call id/hold . The following screen...
English Owners Manual
Page 31
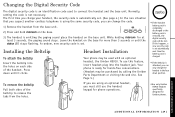
... connect the handset and the base unit. Normally, setting the code is set automatically next time the battery pack is charged. •If the beltclip is emitting the paging sound place the handset on the base for hands-free conversations. (Headset may be used to release the tabs from the base unit. 2) Press and hold intercom on the base. 3) The handset is attached, you must still use the handset keypad for phone operations. Changing the Digital Security Code...
... connect the handset and the base unit. Normally, setting the code is set automatically next time the battery pack is charged. •If the beltclip is emitting the paging sound place the handset on the base for hands-free conversations. (Headset may be used to release the tabs from the base unit. 2) Press and hold intercom on the base. 3) The handset is attached, you must still use the handset keypad for phone operations. Changing the Digital Security Code...
English Owners Manual
Page 33
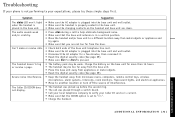
... wall outlet. Troubleshooting If your phone is not performing to your Caller ID service is current. • Make sure that the base unit antenna is in the base unit. • Make sure the charging contacts on the base unit for a few minutes, then reconnect it. • Reset the digital security code (See page 29). • Make sure line 1 or line 2 is pressed. Can´t make or receive calls. • Check both ends of interference. ADDITIONAL...
... wall outlet. Troubleshooting If your phone is not performing to your Caller ID service is current. • Make sure that the base unit antenna is in the base unit. • Make sure the charging contacts on the base unit for a few minutes, then reconnect it. • Reset the digital security code (See page 29). • Make sure line 1 or line 2 is pressed. Can´t make or receive calls. • Check both ends of interference. ADDITIONAL...
English Owners Manual
Page 34
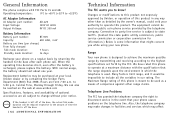
... with FCC Parts 15 and 68. Connection to party line service is subject to state tariffs. (Contact the state public utility commission, public service commission or corporation commission for information.) Below is some information that your phone causes problems on the web at www.uniden.com Specifications, features, and availability of time the handset is used. to the highest specifications set forth by returning the handset to know...
... with FCC Parts 15 and 68. Connection to party line service is subject to state tariffs. (Contact the state public utility commission, public service commission or corporation commission for information.) Below is some information that your phone causes problems on the web at www.uniden.com Specifications, features, and availability of time the handset is used. to the highest specifications set forth by returning the handset to know...
English Owners Manual
Page 36
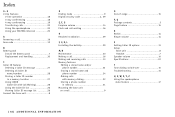
... message list 26 Connect the base unit 8 D Dialing mode 9 Digital security code 4, 29 E, F, G Earpiece volume 14 Flash and call waiting 16 H Headset installation 29 I, J, K, L Installing the beltclip 29 M, N Maintenance 30 Making a call 16 Making and receiving calls 13 Memory features Editing a stored name and/or phone number 23 Erasing a stored name and phone number 24 Making calls with memory dialing 22 Storing a phone number in memory 21 Mounting the base unit on a wall 9 O Out-of-range 15 P, Q Package contents 5 Page feature 15 R Redial 14 Ringer volume 14 S Setting...
... message list 26 Connect the base unit 8 D Dialing mode 9 Digital security code 4, 29 E, F, G Earpiece volume 14 Flash and call waiting 16 H Headset installation 29 I, J, K, L Installing the beltclip 29 M, N Maintenance 30 Making a call 16 Making and receiving calls 13 Memory features Editing a stored name and/or phone number 23 Erasing a stored name and phone number 24 Making calls with memory dialing 22 Storing a phone number in memory 21 Mounting the base unit on a wall 9 O Out-of-range 15 P, Q Package contents 5 Page feature 15 R Redial 14 Ringer volume 14 S Setting...


