English Owners Manual
Page 1
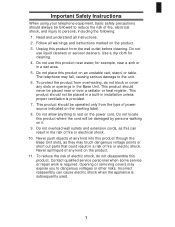
... in the Base Unit. Contact qualified service personnel when some service or repair work is provided. 7. Do not use liquid cleaners or aerosol cleaners. The telephone may fall, causing serious damage to dangerous voltages or other risks. This product should not be placed in a built-in the risk of fire or electric shock. Important Safety Instructions When using your telephone equipment, basic...
... in the Base Unit. Contact qualified service personnel when some service or repair work is provided. 7. Do not use liquid cleaners or aerosol cleaners. The telephone may fall, causing serious damage to dangerous voltages or other risks. This product should not be placed in a built-in the risk of fire or electric shock. Important Safety Instructions When using your telephone equipment, basic...

English Owners Manual
Page 2
... disposal instructions. 3. Unplug this product from the wall outlet and refer servicing to report a gas leak in this Guide for use the telephone to qualified service personnel under the following the operating instructions. Adjust only those controls that are covered by a qualified technician to restore the product to normal operation. The battery or conductor may be toxic if swallowed. 4. Check the Battery Disposal...
... disposal instructions. 3. Unplug this product from the wall outlet and refer servicing to report a gas leak in this Guide for use the telephone to qualified service personnel under the following the operating instructions. Adjust only those controls that are covered by a qualified technician to restore the product to normal operation. The battery or conductor may be toxic if swallowed. 4. Check the Battery Disposal...
English Owners Manual
Page 3
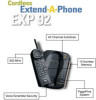
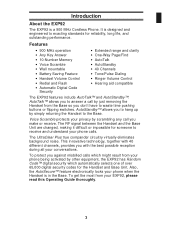
... your phone when the Handset is in the Base. Features • 900 MHz operation • Any Key Answer • 10-Number Memory • Voice Scramble • Wall mountable • Battery Saving Feature • Handset Volume Control • Redial and Flash • Automatic Digital Code Security • Extended range and clarity • One-Way Page/Find • AutoTalk • AutoStandby • 40 Channels • Tone/Pulse Dialing • Ringer Volume Control • Hearing aid compatible The EXP92 features...
... your phone when the Handset is in the Base. Features • 900 MHz operation • Any Key Answer • 10-Number Memory • Voice Scramble • Wall mountable • Battery Saving Feature • Handset Volume Control • Redial and Flash • Automatic Digital Code Security • Extended range and clarity • One-Way Page/Find • AutoTalk • AutoStandby • 40 Channels • Tone/Pulse Dialing • Ringer Volume Control • Hearing aid compatible The EXP92 features...

English Owners Manual
Page 4
... items are missing or damaged, contact your place of purchase. Wall Mount Screws Operating Guide Other Printed Material with 2 Memory Memo Stickers redial/pause mem 8 tuv 7pqrs tone # 0oper flash ringer volume 4ghi 1 5 jkl 9wxyz 2abc 6mno talk 3def A`e9wtah`wthg...gbtwgrsdw`ƒpdttdsgfcddt batt chan talk ® Operating Guide AC Adapter Long Telephone Cord Short Telephone Cord EXP92 Base EXP92 Handset Rechargeable Battery redial/pause mem 8 tuv 7pqrs tone # 0oper flash ringer volume 4ghi 1 5 jkl 9wxyz 2abc 6mno talk 3def batt chan talk What...
... items are missing or damaged, contact your place of purchase. Wall Mount Screws Operating Guide Other Printed Material with 2 Memory Memo Stickers redial/pause mem 8 tuv 7pqrs tone # 0oper flash ringer volume 4ghi 1 5 jkl 9wxyz 2abc 6mno talk 3def A`e9wtah`wthg...gbtwgrsdw`ƒpdttdsgfcddt batt chan talk ® Operating Guide AC Adapter Long Telephone Cord Short Telephone Cord EXP92 Base EXP92 Handset Rechargeable Battery redial/pause mem 8 tuv 7pqrs tone # 0oper flash ringer volume 4ghi 1 5 jkl 9wxyz 2abc 6mno talk 3def batt chan talk What...
English Owners Manual
Page 5
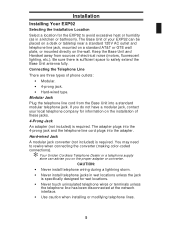
... EXP92 can be placed on a desk or tabletop near a standard 120V AC outlet and telephone line jack, mounted on a standard AT&T or GTE wall plate, or mounted directly on the proper adapter or converter. Connecting the Telephone Line There are three types of electrical noise (motors, fluorescent lighting, etc.). The adapter plugs into the 4-prong jack and the telephone line cord plugs into a standard modular telephone jack. The Base Unit...
... EXP92 can be placed on a desk or tabletop near a standard 120V AC outlet and telephone line jack, mounted on a standard AT&T or GTE wall plate, or mounted directly on the proper adapter or converter. Connecting the Telephone Line There are three types of electrical noise (motors, fluorescent lighting, etc.). The adapter plugs into the 4-prong jack and the telephone line cord plugs into a standard modular telephone jack. The Base Unit...

English Owners Manual
Page 6
Plug the AC adapter cord into the TEL LINE jack on the Base Unit. Setting the Dial Mode Switch Place the switch in the T position for tone dialing, or the P position for pulse dialing. Desk or Tabletop Installation 1. Plug one end of the long telephone cord into the 9V DC input jack on the Base Unit. 6 AC ADAPTOR SEE OWNER'S MANUAL 93tnpls AC ADAPTOR SEE OWNER'S MANUAL 93dskt AC ADAPTOR SEE OWNER'S MANUAL 93dskt2 Note: Place the AC adapter cord inside the molded strain-relief. 2.
Plug the AC adapter cord into the TEL LINE jack on the Base Unit. Setting the Dial Mode Switch Place the switch in the T position for tone dialing, or the P position for pulse dialing. Desk or Tabletop Installation 1. Plug one end of the long telephone cord into the 9V DC input jack on the Base Unit. 6 AC ADAPTOR SEE OWNER'S MANUAL 93tnpls AC ADAPTOR SEE OWNER'S MANUAL 93dskt AC ADAPTOR SEE OWNER'S MANUAL 93dskt2 Note: Place the AC adapter cord inside the molded strain-relief. 2.
English Owners Manual
Page 7
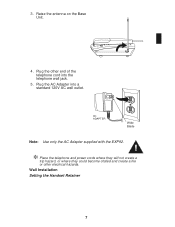
Plug the other electrical hazards. h Place the telephone and power cords where they will not create a trip hazard, or where they could become chafed and create a fire or other end of the telephone cord into a standard 120V AC wall outlet. 93antup tellnin2 AC ADAPTER Wide Blade widblde1 Note: Use only the AC Adapter supplied with the EXP92. 3. Wall Installation Setting the Handset Retainer 7 Plug the AC Adapter into the telephone wall jack. 5. Raise the antenna on the Base Unit. 4.
Plug the other electrical hazards. h Place the telephone and power cords where they will not create a trip hazard, or where they could become chafed and create a fire or other end of the telephone cord into a standard 120V AC wall outlet. 93antup tellnin2 AC ADAPTER Wide Blade widblde1 Note: Use only the AC Adapter supplied with the EXP92. 3. Wall Installation Setting the Handset Retainer 7 Plug the AC Adapter into the telephone wall jack. 5. Raise the antenna on the Base Unit. 4.

English Owners Manual
Page 9
Plug the AC Adapter into the phone and the wall plate jack. 93pwrin AC ADAPTOR SEE OWNER'S MANUAL 93plamt1 9 AC ADAPTOR SEE OWNER'S MANUAL DIAL MODE DC IN 9V TEL LINE P• •T AC ADAPTOR SEE OWNER'S MANUAL 93dskt 3. Mounting on a Standard Wall Plate The EXP92 is designed to be mounted on a standard AT&T or GTE wall plate. 1. Plug the short telephone cord into the Base Unit. 2. Place the AC Adapter cord inside the left channel cord holder.
Plug the AC Adapter into the phone and the wall plate jack. 93pwrin AC ADAPTOR SEE OWNER'S MANUAL 93plamt1 9 AC ADAPTOR SEE OWNER'S MANUAL DIAL MODE DC IN 9V TEL LINE P• •T AC ADAPTOR SEE OWNER'S MANUAL 93dskt 3. Mounting on a Standard Wall Plate The EXP92 is designed to be mounted on a standard AT&T or GTE wall plate. 1. Plug the short telephone cord into the Base Unit. 2. Place the AC Adapter cord inside the left channel cord holder.
English Owners Manual
Page 10
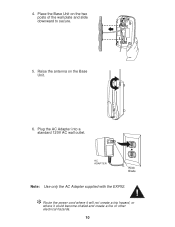
h Route the power cord where it will not create a trip hazard, or where it could become chafed and create a fire or other electrical hazards. 10 AC ADAPTOR SEE OWNER'S MANUAL 5. Raise the antenna on the two posts of the wall plate and slide downward to secure. Plug the AC Adapter into a standard 120V AC wall outlet. 93ant2 AC ADAPTER Wide Blade widblde1 Note: Use only the AC Adapter supplied with the EXP92. 4. Place the Base Unit on the Base Unit. 93plamt2 6.
h Route the power cord where it will not create a trip hazard, or where it could become chafed and create a fire or other electrical hazards. 10 AC ADAPTOR SEE OWNER'S MANUAL 5. Raise the antenna on the two posts of the wall plate and slide downward to secure. Plug the AC Adapter into a standard 120V AC wall outlet. 93ant2 AC ADAPTER Wide Blade widblde1 Note: Use only the AC Adapter supplied with the EXP92. 4. Place the Base Unit on the Base Unit. 93plamt2 6.
English Owners Manual
Page 11
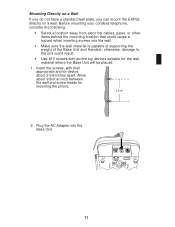
... Base Unit. 900scrmt AC ADAPTOR SEE OWNER'S MANUAL 93dskt 11 Mounting Directly on a Wall If you do not have a standard wall plate, you can mount the EXP92 directly on a wall. Insert the screws, with anchoring devices suitable for mounting the phone. 3 5/16" 2. Before mounting your cordless telephone, consider the following: • Select a location away from electrical cables, pipes, or other items behind the mounting location that could result. • Use...
... Base Unit. 900scrmt AC ADAPTOR SEE OWNER'S MANUAL 93dskt 11 Mounting Directly on a Wall If you do not have a standard wall plate, you can mount the EXP92 directly on a wall. Insert the screws, with anchoring devices suitable for mounting the phone. 3 5/16" 2. Before mounting your cordless telephone, consider the following: • Select a location away from electrical cables, pipes, or other items behind the mounting location that could result. • Use...
English Owners Manual
Page 12
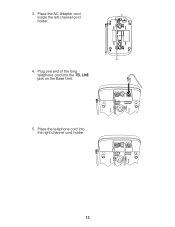
3. Place the telephone cord into the TEL LINE jack on the Base Unit. 5. Plug one end of the long telephone cord into the right channel cord holder. 12 93pwrin AC ADAPTOR SEE OWNER'S MANUAL 93teln4 AC ADAPTOR SEE OWNER'S MANUAL 93teln3 Place the AC Adapter cord inside the left channel cord holder. DIAL MODE DC IN 9V TEL LINE P• •T AC ADAPTOR SEE OWNER'S MANUAL 4.
3. Place the telephone cord into the TEL LINE jack on the Base Unit. 5. Plug one end of the long telephone cord into the right channel cord holder. 12 93pwrin AC ADAPTOR SEE OWNER'S MANUAL 93teln4 AC ADAPTOR SEE OWNER'S MANUAL 93teln3 Place the AC Adapter cord inside the left channel cord holder. DIAL MODE DC IN 9V TEL LINE P• •T AC ADAPTOR SEE OWNER'S MANUAL 4.
English Owners Manual
Page 15
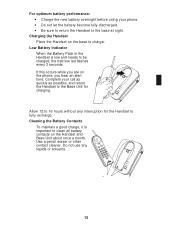
... the phone, you are on the Handset and Base Unit about once a month. For optimum battery performance: • Charge the new battery overnight before using your call as quickly as possible, and return the Handset to the Base Unit for the Handset to 16 hours without any liquids or solvents. 93cntcts 15 Use a pencil eraser or other contact cleaner. If this occurs while you hear an alert tone. Low Battery Indicator...
... the phone, you are on the Handset and Base Unit about once a month. For optimum battery performance: • Charge the new battery overnight before using your call as quickly as possible, and return the Handset to the Base Unit for the Handset to 16 hours without any liquids or solvents. 93cntcts 15 Use a pencil eraser or other contact cleaner. If this occurs while you hear an alert tone. Low Battery Indicator...

English Owners Manual
Page 16
... light. 3. When the EXP92 rings, pick up the Handset and press T. 2. This function works only when the phone is changing to hang up . 3. The C button on the Handset allows you hear static or noise which makes it difficult to different channels. During the course of a conversation if you to choose between 40 factory set to hear the caller: 1. Operating Instructions Placing a Call When the Handset Is on the Base 1. Answering a Call...
... light. 3. When the EXP92 rings, pick up the Handset and press T. 2. This function works only when the phone is changing to hang up . 3. The C button on the Handset allows you hear static or noise which makes it difficult to different channels. During the course of a conversation if you to choose between 40 factory set to hear the caller: 1. Operating Instructions Placing a Call When the Handset Is on the Base 1. Answering a Call...

English Owners Manual
Page 17
... send a timed hook-flash for the memory location you wish to use. Press the F button on one of the enclosed stickers. 17 Using the Redial Button The R button dials the last number that you called is pressed before R, the phone will not redial the last number. The last number called . Note: If any key other key is dialed again. Enter a number (0-9) for accessing services such as call waiting, etc. Note: If you hear a beep. 3.
... send a timed hook-flash for the memory location you wish to use. Press the F button on one of the enclosed stickers. 17 Using the Redial Button The R button dials the last number that you called is pressed before R, the phone will not redial the last number. The last number called . Note: If any key other key is dialed again. Enter a number (0-9) for accessing services such as call waiting, etc. Note: If you hear a beep. 3.

English Owners Manual
Page 18
... time. 18 Dial the main number. 3. Storing a Mixed Tone/Pulse Numbers If your phone is set up to 16 digits) to enter a special access code, such as one of the memory locations (0-9). 2. The O button counts as when performing a banking transaction. 1. Note: If you select any key other than 0-9, the Handset will beep rapidly and no number will be dialed in pulse mode. Your EXP92 will sound. 4. Dialing a Stored Number To dial a number stored in tone mode. 6. Chain Dialing...
... time. 18 Dial the main number. 3. Storing a Mixed Tone/Pulse Numbers If your phone is set up to 16 digits) to enter a special access code, such as one of the memory locations (0-9). 2. The O button counts as when performing a banking transaction. 1. Note: If you select any key other than 0-9, the Handset will beep rapidly and no number will be dialed in pulse mode. Your EXP92 will sound. 4. Dialing a Stored Number To dial a number stored in tone mode. 6. Chain Dialing...

English Owners Manual
Page 19
... Base Unit to the Handset causing it is useful for locating the Handset when it to clear. Press page/find on a call, press V. 2. Adjusting Ringer/Volume Controls Ringer Tone and Volume 1. The phone has two ringer tones, each with two volume levels. Press G again until you select the receiver volume you want . The Handset beeps several times. Setting the Receiver Volume 1. Press V again until you select the ringer tone and volume you are on the Base Unit...
... Base Unit to the Handset causing it is useful for locating the Handset when it to clear. Press page/find on a call, press V. 2. Adjusting Ringer/Volume Controls Ringer Tone and Volume 1. The phone has two ringer tones, each with two volume levels. Press G again until you select the receiver volume you want . The Handset beeps several times. Setting the Receiver Volume 1. Press V again until you select the ringer tone and volume you are on the Base Unit...
English Owners Manual
Page 20
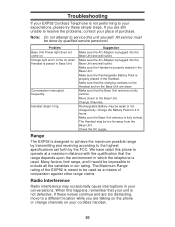
... to service this unit yourself. Check the AC supply. Range The EXP92 is designed to achieve the maximum possible range by qualified service personnel. Problem Base Unit Power light does not come on . Make sure the Handset is properly placed in the Handset. Suggestion Make sure the AC Adapter is plugged into the Base Unit and wall outlet. Change Channels. When this phone to the Base Unit. All service must be too far away from the Base Unit. Charge light...
... to service this unit yourself. Check the AC supply. Range The EXP92 is designed to achieve the maximum possible range by qualified service personnel. Problem Base Unit Power light does not come on . Make sure the Handset is properly placed in the Handset. Suggestion Make sure the AC Adapter is plugged into the Base Unit and wall outlet. Change Channels. When this phone to the Base Unit. All service must be too far away from the Base Unit. Charge light...
English Owners Manual
Page 25
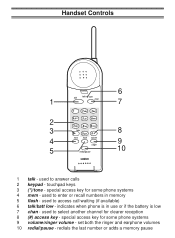
used to access call waiting (if available) 6 talk/batt low - special access key for some phone systems 9 volume/ringer volume - indicates when phone is in memory 5 flash - special access key for some phone systems 4 mem - used to select another channel for clearer reception 8 (#) access key - set both the ringer and earphone volumes 10 redial/pause - used to answer calls 2 keypad - used to enter or recall numbers in use or if the battery is low 7 chan - redials the last number or adds a memory pause touchpad keys 3 (*)/tone - Handset Controls...
used to access call waiting (if available) 6 talk/batt low - special access key for some phone systems 9 volume/ringer volume - indicates when phone is in memory 5 flash - special access key for some phone systems 4 mem - used to select another channel for clearer reception 8 (#) access key - set both the ringer and earphone volumes 10 redial/pause - used to answer calls 2 keypad - used to enter or recall numbers in use or if the battery is low 7 chan - redials the last number or adds a memory pause touchpad keys 3 (*)/tone - Handset Controls...
English Owners Manual
Page 26
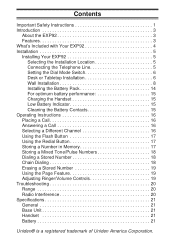
... or Tabletop Installation 6 Wall Installation 8 Installing the Battery Pack 14 For optimum battery performance 15 Charging the Handset 15 Low Battery Indicator 15 Cleaning the Battery Contacts 15 Operating Instructions 16 Placing a Call 16 Answering a Call 16 Selecting a Different Channel 16 Using the Flash Button 17 Using the Redial Button 17 Storing a Number in Memory 17 Storing a Mixed Tone/Pulse Numbers 18 Dialing a Stored Number 18 Chain Dialing 18 Erasing a Stored Number 19 Using the Page Feature 19 Adjusting Ringer/Volume Controls 19 Troubleshooting 20 Range 20...
... or Tabletop Installation 6 Wall Installation 8 Installing the Battery Pack 14 For optimum battery performance 15 Charging the Handset 15 Low Battery Indicator 15 Cleaning the Battery Contacts 15 Operating Instructions 16 Placing a Call 16 Answering a Call 16 Selecting a Different Channel 16 Using the Flash Button 17 Using the Redial Button 17 Storing a Number in Memory 17 Storing a Mixed Tone/Pulse Numbers 18 Dialing a Stored Number 18 Chain Dialing 18 Erasing a Stored Number 19 Using the Page Feature 19 Adjusting Ringer/Volume Controls 19 Troubleshooting 20 Range 20...

English Owners Manual
Page 29
... in its representatives in connection with the performance of any other cost (except shipping and handling) incurred by the Operating Guide for this product. WARRANTOR: UNIDEN AMERICA CORPORATION ("Uniden") ELEMENTS OF WARRANTY: Uniden warrants, for parts, service, or any system not manufactured by Uniden, or (F) installed or programmed by anyone other rights which vary from defects in any time while this warranty...
... in its representatives in connection with the performance of any other cost (except shipping and handling) incurred by the Operating Guide for this product. WARRANTOR: UNIDEN AMERICA CORPORATION ("Uniden") ELEMENTS OF WARRANTY: Uniden warrants, for parts, service, or any system not manufactured by Uniden, or (F) installed or programmed by anyone other rights which vary from defects in any time while this warranty...

