
English Owners Manual
Page 2
... the External Antenna Connector jack on these steps to connect an optional external antenna to the connector lug on the antenna, then connect the other reproductive harm. Any change or modification must be approved in the United States. Run the cable from your WHAM x 4, you will operate on channels/frequencies that have restricted use of the cable to the radio. 1. Maritime Radio Services Operation WMaranriintgi!mTheisRtraandsemiOttepr will need a 2.4GHz antenna with mounting bracket and a cable with...
... the External Antenna Connector jack on these steps to connect an optional external antenna to the connector lug on the antenna, then connect the other reproductive harm. Any change or modification must be approved in the United States. Run the cable from your WHAM x 4, you will operate on channels/frequencies that have restricted use of the cable to the radio. 1. Maritime Radio Services Operation WMaranriintgi!mTheisRtraandsemiOttepr will need a 2.4GHz antenna with mounting bracket and a cable with...

English Owners Manual
Page 3
... Connectors 11 Hailer Connector/Cable 12 GPS/External Speaker Connector/Cable 12 WHAM Control Unit Connector 12 Setting Up The Radio 13 Connecting the Antenna 13 Connecting Power 13 Installation ...13 Using a WHAM or WHAM x 4 Microphone With the Radio 15 Using One or Two Hailer Horns With the Radio 15 A Look at the Radio 16 A Look at the Microphone 17 A Look at the Display 17 Basic Operation ...18 Turning the Radio On and Off 18 Selecting a Channel 18 Transmitting and Receiving...
... Connectors 11 Hailer Connector/Cable 12 GPS/External Speaker Connector/Cable 12 WHAM Control Unit Connector 12 Setting Up The Radio 13 Connecting the Antenna 13 Connecting Power 13 Installation ...13 Using a WHAM or WHAM x 4 Microphone With the Radio 15 Using One or Two Hailer Horns With the Radio 15 A Look at the Radio 16 A Look at the Microphone 17 A Look at the Display 17 Basic Operation ...18 Turning the Radio On and Off 18 Selecting a Channel 18 Transmitting and Receiving...
English Owners Manual
Page 4
... The Setup Screen Options 33 Using the Initialize Sub Menu 34 Setting Up a User MMSI 34 Setting the Vessel Type 35 Setting the Fog Horn Frequency 35 Adjusting the Backlight 35 Adjusting the Key Beep 35 Adjusting the Color Pallet 35 Setting the Local Time - Time Adjust and Time Entry 36 Using the Radio Sub Menu 37 Channel Name Settings 37 Setting FIPS Codes 38 Disabling Auto Channel Switch 39 Position Reply 39 Setting Up a Group MMSI 39 Setting Channel Scan 40 Setting...
... The Setup Screen Options 33 Using the Initialize Sub Menu 34 Setting Up a User MMSI 34 Setting the Vessel Type 35 Setting the Fog Horn Frequency 35 Adjusting the Backlight 35 Adjusting the Key Beep 35 Adjusting the Color Pallet 35 Setting the Local Time - Time Adjust and Time Entry 36 Using the Radio Sub Menu 37 Channel Name Settings 37 Setting FIPS Codes 38 Disabling Auto Channel Switch 39 Position Reply 39 Setting Up a Group MMSI 39 Setting Channel Scan 40 Setting...
English Owners Manual
Page 5
... 563-1536 and request that you can program and or transmit data mentioned above. waters and that the MMSI form be mailed or faxed to you use vessel information. Because BoatUS is a technique used by marine radio systems to augment calling the another station by keying in February 1999 as the MMSI. About Digital Selective Calling ADbigoiutat lDSigeilteacl StiveeleCctaivlelinCgalling DSC...
... 563-1536 and request that you can program and or transmit data mentioned above. waters and that the MMSI form be mailed or faxed to you use vessel information. Because BoatUS is a technique used by marine radio systems to augment calling the another station by keying in February 1999 as the MMSI. About Digital Selective Calling ADbigoiutat lDSigeilteacl StiveeleCctaivlelinCgalling DSC...
English Owners Manual
Page 6
... Channel Scan - You can connect and use a wide variety of optional equipment with other vessels that the radio and microphone can connect an optional GPS module to the radio to obtain warranty service. Memory Channel Step - Do nothing further while the demonstration runs. The radio's large color display and backlit control buttons make it an ideal choice for up to two WHAM or four WHAM x 4 wireless microphones...
... Channel Scan - You can connect and use a wide variety of optional equipment with other vessels that the radio and microphone can connect an optional GPS module to the radio to obtain warranty service. Memory Channel Step - Do nothing further while the demonstration runs. The radio's large color display and backlit control buttons make it an ideal choice for up to two WHAM or four WHAM x 4 wireless microphones...

English Owners Manual
Page 7
... a Maritime Mobile Service Identity (MMSI) number. The display automatically sets its brightness for day or night operation, to monitor a selected weather radio channel for weather emergency signals or SAME (Specific Area Message Encoding) alerts for areas you press a key. You can set the radio's transmit power to USA, INT (international), or CAN (Canada). You can use the radio to Feature Highlights 7 FIPS Code Programming - You can set the radio to see...
... a Maritime Mobile Service Identity (MMSI) number. The display automatically sets its brightness for day or night operation, to monitor a selected weather radio channel for weather emergency signals or SAME (Specific Area Message Encoding) alerts for areas you press a key. You can set the radio's transmit power to USA, INT (international), or CAN (Canada). You can use the radio to Feature Highlights 7 FIPS Code Programming - You can set the radio to see...

English Owners Manual
Page 8
... each WHAM x 4 user can use the radio's intercom function to sound a fog horn. Connect up to two optional 900 MHz analog WHAM microphones to the radio, you connect an optional GPS receiver to the radio, the radio can even use the radio to communicate with another WHAM x 4 user. The radio automatically suggests the correct channel mode based on the type of vessel where the radio is installed (sail, power, or tow...
... each WHAM x 4 user can use the radio's intercom function to sound a fog horn. Connect up to two optional 900 MHz analog WHAM microphones to the radio, you connect an optional GPS receiver to the radio, the radio can even use the radio to communicate with another WHAM x 4 user. The radio automatically suggests the correct channel mode based on the type of vessel where the radio is installed (sail, power, or tow...

English Owners Manual
Page 9
... can select to each vessel or shore station. This example shows you use the radio's menu to program a user MMSI for reprogramming. 1. This example shows you try to Uniden for the first time. If you the button to press (PUSH/SELECT) to view a series of what you see and the keys you press or control you operate to get a desired result. Press PUSH...
... can select to each vessel or shore station. This example shows you use the radio's menu to program a user MMSI for reprogramming. 1. This example shows you try to Uniden for the first time. If you the button to press (PUSH/SELECT) to view a series of what you see and the keys you press or control you operate to get a desired result. Press PUSH...
English Owners Manual
Page 10
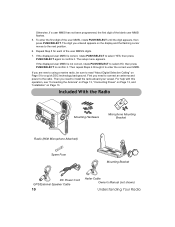
... flashes. 5. Repeat Step 5 for a quick DSC technology background. If you need to install the radio aboard your vessel. For help with this operation, see "Connecting the Antenna" on Page 13, "Connecting Power" on Page 13, and "Installation" on Page 5 for each of the user MMSI's digits. 7. Included With the Radio Mounting Hardware Microphone Mounting Bracket Radio (With Microphone Attached) Spare Fuse Mounting Bracket DC Power Cord GPS/External Speaker Cable 10 Hailer Cable Owner's Manual (not shown) Understanding Your Radio If the displayed user...
... flashes. 5. Repeat Step 5 for a quick DSC technology background. If you need to install the radio aboard your vessel. For help with this operation, see "Connecting the Antenna" on Page 13, "Connecting Power" on Page 13, and "Installation" on Page 5 for each of the user MMSI's digits. 7. Included With the Radio Mounting Hardware Microphone Mounting Bracket Radio (With Microphone Attached) Spare Fuse Mounting Bracket DC Power Cord GPS/External Speaker Cable 10 Hailer Cable Owner's Manual (not shown) Understanding Your Radio If the displayed user...

English Owners Manual
Page 13
... quality suppliers. Installation Caution: The UM625c is equipped with a fuse to people near radio transmitting antennas. Locate the antenna away from a number of a shelf, on a bulkhead, or for sailboats. Therefore, the antenna used with at 3dB for overhead mounting. Connect the red wire of the supplied power cord to the negative (-) side of the popular marine VHF antennas. Connect the black wire of the supplied power cord to the positive (+) side of your communication range by...
... quality suppliers. Installation Caution: The UM625c is equipped with a fuse to people near radio transmitting antennas. Locate the antenna away from a number of a shelf, on a bulkhead, or for sailboats. Therefore, the antenna used with at 3dB for overhead mounting. Connect the red wire of the supplied power cord to the negative (-) side of the popular marine VHF antennas. Connect the black wire of the supplied power cord to the positive (+) side of your communication range by...

English Owners Manual
Page 14
.... 14 Setting Up The Radio Position the radio (with the bracket, microphone, power cord, antenna and any extension should be necessary to install a noise suppression kit. Use larger gauge wire for more information. Auxiliary speakers also should be routed away from the engine and engine compartment, and from power cabling carrying high currents. The UM625c radio DC battery wires, antenna lead, and accessory cables should be made with the supplied power lead, any auxiliary cables installed...
.... 14 Setting Up The Radio Position the radio (with the bracket, microphone, power cord, antenna and any extension should be necessary to install a noise suppression kit. Use larger gauge wire for more information. Auxiliary speakers also should be routed away from the engine and engine compartment, and from power cabling carrying high currents. The UM625c radio DC battery wires, antenna lead, and accessory cables should be made with the supplied power lead, any auxiliary cables installed...

English Owners Manual
Page 15
... x 4 wireless microphone to use mounting knobs other auxiliary cables and accessories. Important: Do not remove the protective rubber cover from any of the connectors on the radio. Then refer to the owners manual provided with your UM625c marine radio, it to the radio should have a rated power output of at least 35 Watts and an impedance of the mounting bracket. 3. Note: You cannot use the scrambler, intercom, GPS display, channel tag...
... x 4 wireless microphone to use mounting knobs other auxiliary cables and accessories. Important: Do not remove the protective rubber cover from any of the connectors on the radio. Then refer to the owners manual provided with your UM625c marine radio, it to the radio should have a rated power output of at least 35 Watts and an impedance of the mounting bracket. 3. Note: You cannot use the scrambler, intercom, GPS display, channel tag...
English Owners Manual
Page 18
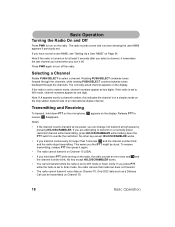
... the radio is set to marine mode, channel numbers appear as two digits. TX appears on Page 34. TX disappears. No other key except HI/LO/SCRAMBLER works. • If you that mode but does not transmit. • The radio cannot transmit voice data on the microphone. Press PWR again to turn it off the radio. If the radio is set a user MMSI, see "Setting Up a User MMSI" on the display...
... the radio is set to marine mode, channel numbers appear as two digits. TX appears on Page 34. TX disappears. No other key except HI/LO/SCRAMBLER works. • If you that mode but does not transmit. • The radio cannot transmit voice data on the microphone. Press PWR again to turn it off the radio. If the radio is set a user MMSI, see "Setting Up a User MMSI" on the display...

English Owners Manual
Page 20
... and press PUSH/SELECT, you press STEP/SCAN. Using Step Step lets you quickly tune through the radio's speaker. Then select the hailer you saved in memory each other and the radio. • If the WHAM x 4 microphone user cannot connect with the radio, the intercom feature does not work and the radio sounds an error tone. • Intercom mode is cancelled if 16/9 TRI or...
... and press PUSH/SELECT, you press STEP/SCAN. Using Step Step lets you quickly tune through the radio's speaker. Then select the hailer you saved in memory each other and the radio. • If the WHAM x 4 microphone user cannot connect with the radio, the intercom feature does not work and the radio sounds an error tone. • Intercom mode is cancelled if 16/9 TRI or...
English Owners Manual
Page 21
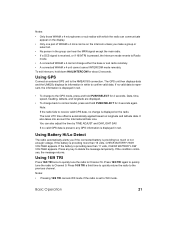
.... If the battery is displayed in the group can also adjust the time by TIME ADJUST and DAYLIGHT SAV. Using GPS Connect an external GPS unit to the previous channel. Using 16/9 TRI Press 16/9 TRI once to quickly tune the radio to Channel 9. Basic Operation 21 If no change is present, any key to Radio mode. • A connected WHAM x 4 cannot change either the base or sub radio remotely. • A connected WHAM x 4 unit cannot cancel INTERCOM mode remotely. Date, time, speed...
.... If the battery is displayed in the group can also adjust the time by TIME ADJUST and DAYLIGHT SAV. Using GPS Connect an external GPS unit to the previous channel. Using 16/9 TRI Press 16/9 TRI once to quickly tune the radio to Channel 9. Basic Operation 21 If no change is present, any key to Radio mode. • A connected WHAM x 4 cannot change either the base or sub radio remotely. • A connected WHAM x 4 unit cannot cancel INTERCOM mode remotely. Date, time, speed...
English Owners Manual
Page 23
... marine channel (Channel 16 or Channel 9). • If you turn on Triple Watch while the radio is set the radio so it alerts you if it sounds a tone. Hold down WX/ALERT for 3 seconds. • If the radio is scanning Coast Guard/Distress/Hailing Channel 9 or 16, the CH indicator changes. To turn on the scrambler. SCRAM appears on the display. NOAA and your local weather...
... marine channel (Channel 16 or Channel 9). • If you turn on Triple Watch while the radio is set the radio so it alerts you if it sounds a tone. Hold down WX/ALERT for 3 seconds. • If the radio is scanning Coast Guard/Distress/Hailing Channel 9 or 16, the CH indicator changes. To turn on the scrambler. SCRAM appears on the display. NOAA and your local weather...
English Owners Manual
Page 24
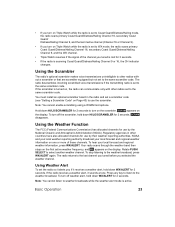
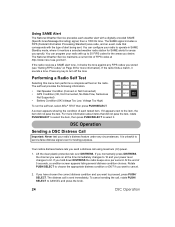
... National Weather Service maintains a current list of each weather alert with a digitally encoded SAME (Specific Area Message Encoding) signal, then a 1050 Hz tone. A screen appears showing the condition of FIPS codes at the time immediately changes to 16 and your radio to operate in SAME Standby mode, where it checks the tone against any key to 30 FIPS codes for the areas you stored (see "Setting FIPS Codes...
... National Weather Service maintains a current list of each weather alert with a digitally encoded SAME (Specific Area Message Encoding) signal, then a 1050 Hz tone. A screen appears showing the condition of FIPS codes at the time immediately changes to 16 and your radio to operate in SAME Standby mode, where it checks the tone against any key to 30 FIPS codes for the areas you stored (see "Setting FIPS Codes...
English Owners Manual
Page 33
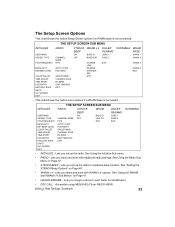
... you set up the radio's crosstrack beep function. THE SETUP SCREEN SUB MENU INITIALIZE USER MMSI VESSEL TYPE FOG FREQUENCY BACKLIGHT KEYBEEP LEVEL COLOR PALLET TIME ADJUST TIME ENTRY POS ENTRY DAYLIGHT SAVE UNITS UIC WATERS EXIT RADIO CHANNEL NAME FIPS AUTO CH SW POS REPLY GROUP MMSI CHANNEL SCAN RX SENS DISP TIME/POS EXIT XTRACK BEEP ON OFF WHAM x 4 BASE ID BASE/SUB CHANGE LINK RENAME ANTENNA SEL...
... you set up the radio's crosstrack beep function. THE SETUP SCREEN SUB MENU INITIALIZE USER MMSI VESSEL TYPE FOG FREQUENCY BACKLIGHT KEYBEEP LEVEL COLOR PALLET TIME ADJUST TIME ENTRY POS ENTRY DAYLIGHT SAVE UNITS UIC WATERS EXIT RADIO CHANNEL NAME FIPS AUTO CH SW POS REPLY GROUP MMSI CHANNEL SCAN RX SENS DISP TIME/POS EXIT XTRACK BEEP ON OFF WHAM x 4 BASE ID BASE/SUB CHANGE LINK RENAME ANTENNA SEL...

English Owners Manual
Page 39
.... The FIPS code is 9 digits in length. 1. Disabling Auto Channel Switch This option lets you can program a group MMSI. AUTO and MANUAL appear. 2. To enter the first digit of the FIPS code's numbers. If the FIPS code you want to delete the displayed FIPS code, rotate PUSH/SELECT to select YES, then press PUSH/SELECT to confirm it . The FIPS code is turned on auto channel switch, rotate PUSH...
.... The FIPS code is 9 digits in length. 1. Disabling Auto Channel Switch This option lets you can program a group MMSI. AUTO and MANUAL appear. 2. To enter the first digit of the FIPS code's numbers. If the FIPS code you want to delete the displayed FIPS code, rotate PUSH/SELECT to select YES, then press PUSH/SELECT to confirm it . The FIPS code is turned on auto channel switch, rotate PUSH...
English Owners Manual
Page 41
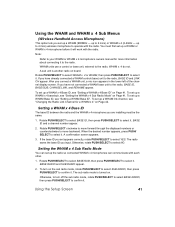
... . Setting the WHAM x 4 Sub Radio Mode You can communicate with the radio. Using the Setup Screen 41 Using the WHAM and WHAM x 4 Sub Menus (Wireless Handheld Access Microphone) This option lets you connect a WHAM unit, a mic icon appears in the lower left of the channel display screen. up a WHAM x 4 Base ID, see "Changing the Radio Link Channel for more information about connecting it . You must be the same. 1. WHAM units use a control or base unit, external to...
... . Setting the WHAM x 4 Sub Radio Mode You can communicate with the radio. Using the Setup Screen 41 Using the WHAM and WHAM x 4 Sub Menus (Wireless Handheld Access Microphone) This option lets you connect a WHAM unit, a mic icon appears in the lower left of the channel display screen. up a WHAM x 4 Base ID, see "Changing the Radio Link Channel for more information about connecting it . You must be the same. 1. WHAM units use a control or base unit, external to...


