Via EPIA-PX10000G - VIA Motherboard - Pico ITX Support and Manuals
Get Help and Manuals for this VIA Technologies item
View All Support Options Below
Free Via EPIA-PX10000G manuals!
Problems with Via EPIA-PX10000G?
Ask a Question
Free Via EPIA-PX10000G manuals!
Problems with Via EPIA-PX10000G?
Ask a Question
Popular Via EPIA-PX10000G Manual Pages
User Manual - Page 4

...Replace only with the same or equivalent battery type recommended by a service personnel:
• The power cord or plug is incorrectly replaced. DO NOT COVER THE OPENINGS. 6. Make sure the voltage of the power...module. 9. Safety Instructions
1. Always read the safety instructions carefully. 2. The openings on the equipment should be noted. 10. Keep this User's Manual for air convection ...
User Manual - Page 6

TABLE OF CONTENTS
SPECIFICATIONS 1
MAINBOARD SPECIFICATIONS 2 MAINBOARD LAYOUT 4 BACK PANEL LAYOUT 4
INSTALLATION 5
CPU 6 CPU Fan: CPU_FAN 6
MEMORY MODULE INSTALLATION 7 Memory Slot: DDR2_SODIMM 7 Available DDR2 SDRAM Configurations 7
CONNECTING THE POWER SUPPLY 8 Pico-ITX 12-Pin Power Connector 8
BACK PANEL PORTS 9 VGA Port 9 RJ45 LAN Port 9
CONNECTORS 10 IDE Connector: IDE 10 ...
User Manual - Page 7

... MAIN MENU 24
Standard CMOS Features 24 Advanced BIOS Features 24 Advanced Chipset Features 24 Integrated Peripherals 24 Power Management Setup 24 PnP/PCI Configurations 24 Frequency/Voltage Control 24 Load Fail-Safe Defaults 25 Load Optimized Defaults 25 Set Supervisor Password 25 Set User Password 25 Save & Exit Setup 25 Exit Without Saving 25 STANDARD CMOS FEATURES...
User Manual - Page 10

Maximum ASPM supported 48 Maximum Payload Size 48 FREQUENCY / VOLTAGE CONTROL 49 DRAM Clock 49 Auto Detect ... Command Rate 51 RDSAIT mode 51 LOAD FAIL-SAFE DEFAULTS 52 LOAD OPTIMIZED DEFAULTS 53 SET SUPERVISOR / USER PASSWORD 54 SAVE & EXIT SETUP 56 EXIT WITHOUT SAVING 57 DRIVER INSTALLATION 59 DRIVER UTILITIES 60 Getting Started 60 Running the Driver Utilities CD 61 CD CONTENT 62
vi
User Manual - Page 13

CHAPTER 1
Specifications
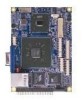
The ultra-compact and highly integrated VIA EPIA-PX Pico-ITX mainboard is the smallest form-factor available today. The mainboard enables the creation of an exciting new generation of a Mini-ITX mainboard. Through a high level of integration, the Pico-ITX measures at only 25% of the size of small, ergonomic, innovative and affordable embedded systems.
1
User Manual - Page 15

..., MIC-in, S/PDIF in, and 7.1 Channels Audio Output • 1 Multimedia connector to support External TV-Out Interface, Video Capture Port Interface and Low Pin Count Interface. (One VT1625M add-on card is required.) • 1 x Pico-ITX power connector
BIOS • Award BIOS with LPC 4/8Mbit flash memory capacity
Form Factor • Pico-ITX (10 layers) • 10 cm X 7.2 cm
3
User Manual - Page 18

Chapter 2
CPU
The VIA EPIA-PX Pico-ITX mainboard can support VIA C7 NanoBGA2 processor. The black wire is Ground and should be connected to +5V. The processor requires a heatsink with fan for 1.0GHz SKU. CPU Fan: CPU_FAN
The CPU_FAN runs on +5V and maintain CPU cooling. When connecting the wire to the ...
User Manual - Page 19

MEMORY MODULE INSTALLATION
Installation
Memory Slot: DDR2_SODIMM
The VIA EPIA-PX Pico-ITX mainboard provides one SODIMM slot for DDR2 533 SDRAM memory modules and supports memory sizes up to the table below for available DDR2 SDRAM configurations on the mainboard.
Slot
Module Size
SODIMM
64MB, 128MB, 256MB, 512MB, 1GB
Maximum supported system memory
Total
64MB-1GB 64MB-1GB
7
Insert...
User Manual - Page 20
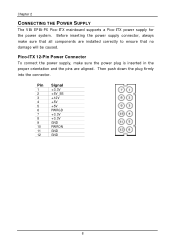
Pico-ITX 12-Pin Power Connector
To connect the power supply, make sure that no damage will be caused. Chapter 2
CONNECTING THE POWER SUPPLY
The VIA EPIA-PX Pico-ITX mainboard supports a Pico-ITX power supply for the power system. Then push down the plug firmly into the connector.
Pin Signal
1
+3.3V
2
+5V_SB
3
+12V
4
+5V
5
+5V
6
PWRGD
7
+3.3V
8
+3.3V
9
GND
10
PWRON
11...
User Manual - Page 24

... Panel
This pin header allows you to this pin.
If the system is still working. Connect the reset switch from the system case to a 2-pin power button switch. Avoid turning the power off . Pressing this pin. Suspend To RAM) state, the LED will turn the system power on .
Connect the HDD LED from the system case to connect the power switch, reset switch, power LED, HDD...
User Manual - Page 27

...
6
SPD1
32
SPD1
7
SPCLK1
34
SPCLK1
8
ENAVDD2
37
ENAVDD2
9
ENABLT2
36
ENABLT2
15
Installation
For LCD Connector Signal
Pin
LCD Connector SignalSignal
Function
11 RxCLK-
-LVDS Receiver Clock Signal
13 RxCLK+
+LVDS Receiver Clock Signal
17... -LCD2_D0 +LCD2_D1 -LCD2_D1
This connector work also as an interface and allows you to connect the EPIA PX's daughter card, PX-O.
User Manual - Page 42
...]
30 Chapter 3
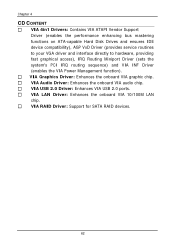
Security Option
Selects whether the password is powered on the system. Setting
Setup
System
Description
Password prompt appears only when end users try to run BIOS Setup Password prompt appears every time when the computer is required every time the System boots, or only when you are running OS/2 operating system with greater ...
User Manual - Page 62

...installed in your system.
Changing the value from the factory setting is not recommended unless you install new memory that has a different performance rating than the original modules. Settings: [Manual, Auto By SPD]
50
Chapter 3
DRAM CLOCK/DRIVE CONTROL
Phoenix - AwardBIOS CMOS Setup...
The chipset supports synchronous and asynchronous mode between host clock and DRAM clock frequency.
User Manual - Page 73

The CD should then appear on the "Start" button and select "Run..." Then type: "D:\Setup.exe". Driver Installation
Running the Driver Utilities CD
To start using the CD, insert the CD into the CD-ROM or DVD-ROM drive. The driver utilities and software menu screen should run automatically, click on the screen. If the CD...
User Manual - Page 74
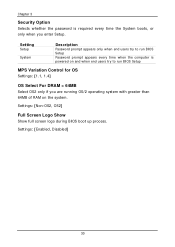
... Vendor Support Driver (enables the performance enhancing bus mastering functions on ATA-capable Hard Disk Drives and ensures IDE device compatibility), AGP VxD Driver (provides service routines to your VGA driver and interface directly to hardware, providing fast graphical access), IRQ Routing Miniport Driver (sets the system's PCI IRQ routing sequence) and VIA INF Driver (enables the VIA Power...
Via EPIA-PX10000G Reviews
 Via has a rating of 1.00 based upon 1 review.
Get much more information including the actual reviews and ratings that combined to make up the overall score listed above. Our reviewers
have graded the Via EPIA-PX10000G based upon the following criteria:
Via has a rating of 1.00 based upon 1 review.
Get much more information including the actual reviews and ratings that combined to make up the overall score listed above. Our reviewers
have graded the Via EPIA-PX10000G based upon the following criteria:
- Durability [1 rating]
- Cost Effective [1 rating]
- Quality [1 rating]
- Operate as Advertised [1 rating]
- Customer Service [1 rating]