
Manual
Page 5
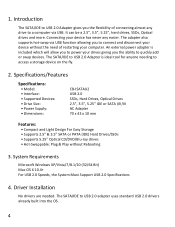
... supports hot-swap allowing you to connect and disconnect your device without opening your case. Specifications/Features: SATA/IDE-USB Adapter: Specifications: • Model: • Interface: • Supported Devices: • Drive Size: • Power Supply: • Dimensions: CB-ISATAU2 USB 2.0 IDE & SATA 1.5Gb/s, SATA 3Gb/s, SATA 6Gb/s SSDs, Hard Drives, CD/DVD/Blu-ray Drives 2.5" & 3.5" & 5.25" AC Adapter 70 x 43 x 10 mm Features: • Compact And Light Design For Easy Storage • Supports 2.5" & 3.5" SATA or PATA(IDE) Hard Drives • Supports...
... supports hot-swap allowing you to connect and disconnect your device without opening your case. Specifications/Features: SATA/IDE-USB Adapter: Specifications: • Model: • Interface: • Supported Devices: • Drive Size: • Power Supply: • Dimensions: CB-ISATAU2 USB 2.0 IDE & SATA 1.5Gb/s, SATA 3Gb/s, SATA 6Gb/s SSDs, Hard Drives, CD/DVD/Blu-ray Drives 2.5" & 3.5" & 5.25" AC Adapter 70 x 43 x 10 mm Features: • Compact And Light Design For Easy Storage • Supports 2.5" & 3.5" SATA or PATA(IDE) Hard Drives • Supports...
Manual
Page 6
3. The SATA/IDE to USB 2.0 adapter uses standard USB 2.0 drivers. 3 System Requirements: Microsoft Windows XP/Vista/7 (32/64 Bit) Mac OS X 10.4+ For USB 2.0 Speeds, The System Must Support USB 2.0 Specifications 4. Driver Installation: No drivers are needed.
3. The SATA/IDE to USB 2.0 adapter uses standard USB 2.0 drivers. 3 System Requirements: Microsoft Windows XP/Vista/7 (32/64 Bit) Mac OS X 10.4+ For USB 2.0 Speeds, The System Must Support USB 2.0 Specifications 4. Driver Installation: No drivers are needed.
Manual
Page 7
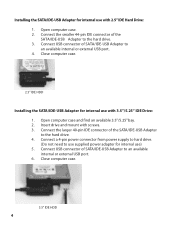
... case and find an available 3.5"/5.25" bay. 2. Connect USB connector of the SATA/IDE-USB Adapter to an available internal or external USB port. 4. Installing the SATA/IDE-USB Adapter for internal use) 5. Connect a 4-pin power connector from power supply to hard drive. (Do not need to an available internal or external USB port. 6. Close computer case. 2.5" IDE HDD Installing the SATA/IDE-USB Adapter for internal use with 2.5" IDE Hard Drive: 1. Connect the larger 40-pin IDE connector of SATA/IDE-USB Adapter to use supplied power adapter for internal use with screws. 3.
... case and find an available 3.5"/5.25" bay. 2. Connect USB connector of the SATA/IDE-USB Adapter to an available internal or external USB port. 4. Installing the SATA/IDE-USB Adapter for internal use) 5. Connect a 4-pin power connector from power supply to hard drive. (Do not need to an available internal or external USB port. 6. Close computer case. 2.5" IDE HDD Installing the SATA/IDE-USB Adapter for internal use with 2.5" IDE Hard Drive: 1. Connect the larger 40-pin IDE connector of SATA/IDE-USB Adapter to use supplied power adapter for internal use with screws. 3.
Manual
Page 8
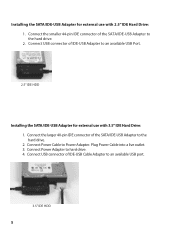
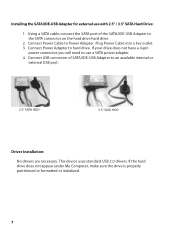
... of the SATA/IDE-USB Adapter to an available USB Port. 2.5" IDE HDD Installing the SATA/IDE-USB Adapter for external use with 2.5" IDE Hard Drive: 1. Connect the larger 40-pin IDE connector of IDE-USB Adapter to the hard drive. 2. Plug Power Cable into a live outlet. 3. Connect Power Adapter to Power Adapter. Connect the smaller 44-pin IDE connector of IDE-USB Cable Adapter to the hard drive. 2. Connect Power Cable to hard drive. 4. Installing the SATA/IDE-USB Adapter for external use with 3.5" IDE Hard Drive: 1. Connect USB connector of the SATA/IDE-USB Adapter to...
... of the SATA/IDE-USB Adapter to an available USB Port. 2.5" IDE HDD Installing the SATA/IDE-USB Adapter for external use with 2.5" IDE Hard Drive: 1. Connect the larger 40-pin IDE connector of IDE-USB Adapter to the hard drive. 2. Plug Power Cable into a live outlet. 3. Connect Power Adapter to Power Adapter. Connect the smaller 44-pin IDE connector of IDE-USB Cable Adapter to the hard drive. 2. Connect Power Cable to hard drive. 4. Installing the SATA/IDE-USB Adapter for external use with 3.5" IDE Hard Drive: 1. Connect USB connector of the SATA/IDE-USB Adapter to...

Manual
Page 9
...a 4-pin power connector or SATA power connector from power supply to an available internal or external USB port. 6. Connect USB connector of the SATA/IDE-USB Adapter to use supplied power adapter for internal use ) 5. Open computer case. 2. Insert drive and mount with 2.5"/3.5" SATA Hard Drive: 1. Do not connect both. (Do not need to the SATA connector on the hard drive hard drive. 4. Close computer case. 2.5" SATA HDD 3.5" SATA HDD 6 Using a SATA cable, connect the SATA port of SATA/IDE-USB Adapter to hard drive. Installing the SATA/IDE-USB Adapter for internal use with...
...a 4-pin power connector or SATA power connector from power supply to an available internal or external USB port. 6. Connect USB connector of the SATA/IDE-USB Adapter to use supplied power adapter for internal use ) 5. Open computer case. 2. Insert drive and mount with 2.5"/3.5" SATA Hard Drive: 1. Do not connect both. (Do not need to the SATA connector on the hard drive hard drive. 4. Close computer case. 2.5" SATA HDD 3.5" SATA HDD 6 Using a SATA cable, connect the SATA port of SATA/IDE-USB Adapter to hard drive. Installing the SATA/IDE-USB Adapter for internal use with...
Manual
Page 10
.... Plug Power Cable into a live outlet. 3. If your drive does not have a 4-pin power connector, you will need to use with 2.5" / 3.5" SATA Hard Drive: 1. Connect USB connector of the SATA/IDE-USB Adapter to hard drive. This device uses standard USB 2.0 drivers. Connect Power Adapter to the SATA connector on the hard drive hard drive. 2. If the hard drive does not appear under My Computer, make sure the drive is properly partitioned or formatted or initialized. 7 Using a SATA cable, connect the SATA port of SATA/IDE-USB Adapter to Power Adapter. Installing...
.... Plug Power Cable into a live outlet. 3. If your drive does not have a 4-pin power connector, you will need to use with 2.5" / 3.5" SATA Hard Drive: 1. Connect USB connector of the SATA/IDE-USB Adapter to hard drive. This device uses standard USB 2.0 drivers. Connect Power Adapter to the SATA connector on the hard drive hard drive. 2. If the hard drive does not appear under My Computer, make sure the drive is properly partitioned or formatted or initialized. 7 Using a SATA cable, connect the SATA port of SATA/IDE-USB Adapter to Power Adapter. Installing...
Manual
Page 11
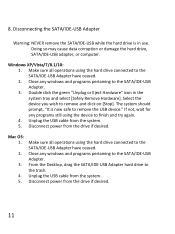
... Remove Hardware]. From the Desktop, drag the SATA/IDE-USB Adapter hard drive to remove and click on [Stop]. 5. Double click the green "Unplug or Eject Hardware" icon in use. Select the device you wish to the trash. 4. Windows 98SE/ME/XP/2000: 1. Disconnect power from the system. 5. Mac OS: 1. If not, wait for any programs still using the hard drive connected to finish and try...
... Remove Hardware]. From the Desktop, drag the SATA/IDE-USB Adapter hard drive to remove and click on [Stop]. 5. Double click the green "Unplug or Eject Hardware" icon in use. Select the device you wish to the trash. 4. Windows 98SE/ME/XP/2000: 1. Disconnect power from the system. 5. Mac OS: 1. If not, wait for any programs still using the hard drive connected to finish and try...
Manual
Page 13
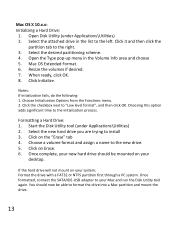
... menu in the list to your Mac and run the Disk Utility tool again. Click Initialize. Click on Erase. 6. Click it and then click the partition tab to install 3. Start the Disk Utility tool (under Applications\Utilities) 2. Once formatted, connect the SATA/IDE-USB adapter to the left. Creating A New Partition (continued): Mac OS X 10.x.x: Initializing a Hard Drive: 1. Select the attached drive in the...
... menu in the list to your Mac and run the Disk Utility tool again. Click Initialize. Click on Erase. 6. Click it and then click the partition tab to install 3. Start the Disk Utility tool (under Applications\Utilities) 2. Once formatted, connect the SATA/IDE-USB adapter to the left. Creating A New Partition (continued): Mac OS X 10.x.x: Initializing a Hard Drive: 1. Select the attached drive in the...
Manual
Page 14
... have this limitation. 11 Can I copy files larger than one drive at once. The cables connecting front USB ports are probably using a brand new hard drive. What should the jumper settings on the hard drive because it . Q. A. The SATA/IDE-USB can 't I connect the SATA/IDE-USB Adapter to a rear port, directly off the motherboard or USB PCI card. Q. A. If your drive. The NTFS file system does not have probably formatted the...
... have this limitation. 11 Can I copy files larger than one drive at once. The cables connecting front USB ports are probably using a brand new hard drive. What should the jumper settings on the hard drive because it . Q. A. The SATA/IDE-USB can 't I connect the SATA/IDE-USB Adapter to a rear port, directly off the motherboard or USB PCI card. Q. A. If your drive. The NTFS file system does not have probably formatted the...
Manual
Page 15
Make sure all files in use are no longer in use before removing the unit. 12 Connecting your hard drive to the SATA/IDE-USB Adapter is just like connecting a hard drive to the inside of your data has become corrupt, it is likely caused by the removal of the SATA/IDE-USB Adapter while data was still being written to become corrupt. Doing so may cause...
Make sure all files in use are no longer in use before removing the unit. 12 Connecting your hard drive to the SATA/IDE-USB Adapter is just like connecting a hard drive to the inside of your data has become corrupt, it is likely caused by the removal of the SATA/IDE-USB Adapter while data was still being written to become corrupt. Doing so may cause...

Manual
Page 16
Contact: Vantec Thermal Technology www.vantecusa.com 13 Please check the contents of the unit to receive warranty exchange or repair. Warranty: The SATA/IDE To USB 2.0 Adapter comes with a 1 year limited warranty (90 day parts). Cosmetic defects and missing parts are cosmetic defects, please contact the retailer from which you received all parts. If any cosmetic flaws...., please go to http://www.vantecusa.com for information on how to make sure you purchased the unit immediately and ask for any parts are missing or if there are not covered under this warranty. Also, check for...
Contact: Vantec Thermal Technology www.vantecusa.com 13 Please check the contents of the unit to receive warranty exchange or repair. Warranty: The SATA/IDE To USB 2.0 Adapter comes with a 1 year limited warranty (90 day parts). Cosmetic defects and missing parts are cosmetic defects, please contact the retailer from which you received all parts. If any cosmetic flaws...., please go to http://www.vantecusa.com for information on how to make sure you purchased the unit immediately and ask for any parts are missing or if there are not covered under this warranty. Also, check for...

Manual
Page 19
Detecting the Drive or Creating a New Partition 12 10. Specifications/Features 4 3. Disconnecting the SATA/IDE-USB Adapter 11 9. Driver Installation 4 5. Contact 15 3 Installing Adapter to 2.5"/3.5"/5.25" SATA Drive 7 7. Installing Adapter to 3.5"/5.25"(PATA) IDE Drive 5 6. Table of Contents: 1. System Requirements 4 4. Warranty 15 12. Installing Adapter to 2.5" (PATA) IDE Drive 9 8. Introduction 4 2. Troubleshooting/FAQ 14 11.
Detecting the Drive or Creating a New Partition 12 10. Specifications/Features 4 3. Disconnecting the SATA/IDE-USB Adapter 11 9. Driver Installation 4 5. Contact 15 3 Installing Adapter to 2.5"/3.5"/5.25" SATA Drive 7 7. Installing Adapter to 3.5"/5.25"(PATA) IDE Drive 5 6. Table of Contents: 1. System Requirements 4 4. Warranty 15 12. Installing Adapter to 2.5" (PATA) IDE Drive 9 8. Introduction 4 2. Troubleshooting/FAQ 14 11.
Manual
Page 20
... via USB. Specifications/Features Specifications: • Model: • Interface: • Supported Devices: • Drive Size: • Power Supply: • Dimensions: CB-ISATAU2 USB 2.0 SSDs, Hard Drives, Optical Drives 2.5", 3.5", 5.25" IDE or SATA I/II/III AC Adapter 70 x 43 x 10 mm Features: • Compact and Light Design For Easy Storage • Supports 2.5" & 3.5" SATA or PATA (IDE) Hard Drives/SSDs • Supports 5.25" Optical CD/DVD/Blu-ray drives • Hot-Swappable: Plug & Play without the need of connecting...
... via USB. Specifications/Features Specifications: • Model: • Interface: • Supported Devices: • Drive Size: • Power Supply: • Dimensions: CB-ISATAU2 USB 2.0 SSDs, Hard Drives, Optical Drives 2.5", 3.5", 5.25" IDE or SATA I/II/III AC Adapter 70 x 43 x 10 mm Features: • Compact and Light Design For Easy Storage • Supports 2.5" & 3.5" SATA or PATA (IDE) Hard Drives/SSDs • Supports 5.25" Optical CD/DVD/Blu-ray drives • Hot-Swappable: Plug & Play without the need of connecting...

Manual
Page 21
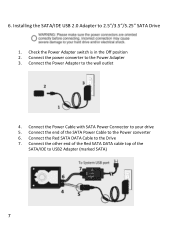
... the Power Adapter 3. Connect the end of your drive to your drive 5 Check and change the jumper setting on the label of the Molex cable to 3.5"/5.25"(PATA) IDE Drive 1. Connect the power converter to the wall outlet 4. Connect the Power Cable with Molex Power Connector to Master Single Drive Mode (the information for changing drive mode is in the Off position 2. 5. Installing the SATA/IDE USB 2.0 Adapter to the Power converter 7. Check the Power Adapter switch...
... the Power Adapter 3. Connect the end of your drive to your drive 5 Check and change the jumper setting on the label of the Molex cable to 3.5"/5.25"(PATA) IDE Drive 1. Connect the power converter to the wall outlet 4. Connect the Power Cable with Molex Power Connector to Master Single Drive Mode (the information for changing drive mode is in the Off position 2. 5. Installing the SATA/IDE USB 2.0 Adapter to the Power converter 7. Check the Power Adapter switch...
Manual
Page 23
Check the Power Adapter switch is in the Off position 2. 6. Connect the Power Cable with SATA Power Connector to the Power Adapter 3. Connect the power converter to your drive 5. Connect the Power Adapter to the Drive 7. Connect the Red SATA DATA Cable to the wall outlet 4. Installing the SATA/IDE USB 2.0 Adapter to the Power converter 6. Connect the end of the SATA/IDE to USB2 Adapter (marked SATA) 7 Connect the other end of the Red SATA DATA cable top of the SATA Power Cable to 2.5"/3.5"/5.25" SATA Drive 1.
Check the Power Adapter switch is in the Off position 2. 6. Connect the Power Cable with SATA Power Connector to the Power Adapter 3. Connect the power converter to your drive 5. Connect the Power Adapter to the Drive 7. Connect the Red SATA DATA Cable to the wall outlet 4. Installing the SATA/IDE USB 2.0 Adapter to the Power converter 6. Connect the end of the SATA/IDE to USB2 Adapter (marked SATA) 7 Connect the other end of the Red SATA DATA cable top of the SATA Power Cable to 2.5"/3.5"/5.25" SATA Drive 1.
Manual
Page 25
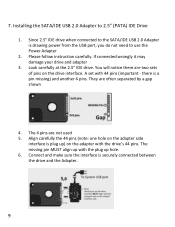
... instruction carefully. Look carefully at the 2.5" IDE drive. A set with the plug up ) on the drive interface. If connected wrongly it may damage your drive and adapter 3. Align carefully the 44 pins (note: one hole on the adapter side interface is drawing power from the USB port, you do not need to 2.5" (PATA) IDE Drive 1. The missing pin MUST align up with 44 pins (important - They are not used 5. 7. Installing the SATA/IDE USB 2.0 Adapter...
... instruction carefully. Look carefully at the 2.5" IDE drive. A set with the plug up ) on the drive interface. If connected wrongly it may damage your drive and adapter 3. Align carefully the 44 pins (note: one hole on the adapter side interface is drawing power from the USB port, you do not need to 2.5" (PATA) IDE Drive 1. The missing pin MUST align up with 44 pins (important - They are not used 5. 7. Installing the SATA/IDE USB 2.0 Adapter...
Manual
Page 27
... drive connected to the SATA/IDE-USB Adapter have ceased. 2. The system should prompt, "It is in the system tray and select [Safely Remove Hardware]. Make sure all operations using the device to remove the USB device." 8. Double click the green "Unplug or Eject Hardware" icon in use. Unplug the USB cable from the drive if desired. 11 Windows XP/Vista/7/8.1/10: 1. Mac OS: 1. 2. 3. 4. 5. From the Desktop, drag the SATA/IDE-USB Adapter...
... drive connected to the SATA/IDE-USB Adapter have ceased. 2. The system should prompt, "It is in the system tray and select [Safely Remove Hardware]. Make sure all operations using the device to remove the USB device." 8. Double click the green "Unplug or Eject Hardware" icon in use. Unplug the USB cable from the drive if desired. 11 Windows XP/Vista/7/8.1/10: 1. Mac OS: 1. 2. 3. 4. 5. From the Desktop, drag the SATA/IDE-USB Adapter...
Manual
Page 29
... Applications\Utilities) 2. If the hard drive will not mount on the "Erase" tab 4. When ready, click OK. 8. Formatting a Hard Drive: 1. Select the desired partitioning scheme. 4. Choose Initialization Options from the Functions menu. 2. Once formatted, connect the SATA/IDE-USB adapter to format the drive into a Mac partition and mount the drive. 13 Resize the volumes if desired. 7. Click on your desktop. Click...
... Applications\Utilities) 2. If the hard drive will not mount on the "Erase" tab 4. When ready, click OK. 8. Formatting a Hard Drive: 1. Select the desired partitioning scheme. 4. Choose Initialization Options from the Functions menu. 2. Once formatted, connect the SATA/IDE-USB adapter to format the drive into a Mac partition and mount the drive. 13 Resize the volumes if desired. 7. Click on your desktop. Click...

Manual
Page 30
... my SATA/IDE USB 2.0 Adapter? A. Q. Connecting your computer. What should the jumper settings on the front of your hard drive to the SATA/IDE USB 2.0 Adapter is being run off the motherboard or USB PCI card. A. A. The USB ports on my hard drive be set to the inside of the system may not be set to become corrupt, it is likely caused by the removal of the SATA/IDE USB 2.0 Adapter while data was...
... my SATA/IDE USB 2.0 Adapter? A. Q. Connecting your computer. What should the jumper settings on the front of your hard drive to the SATA/IDE USB 2.0 Adapter is being run off the motherboard or USB PCI card. A. A. The USB ports on my hard drive be set to the inside of the system may not be set to become corrupt, it is likely caused by the removal of the SATA/IDE USB 2.0 Adapter while data was...

Manual
Page 31
...repair. Cosmetic defects and missing parts are cosmetic defects, please contact the retailer from which you received all parts. Also, check for any parts are missing or if there are not covered under this warranty. Warranty: The SATA/IDE to https://www.vantecusa.com for a replacement.... 12. If any cosmetic flaws. If your unit should become defective within that time frame, please go to USB 2.0 Adapter comes with a 1 year limited warranty (90 day parts). Contact: Vantec Thermal Technology www....
...repair. Cosmetic defects and missing parts are cosmetic defects, please contact the retailer from which you received all parts. Also, check for any parts are missing or if there are not covered under this warranty. Warranty: The SATA/IDE to https://www.vantecusa.com for a replacement.... 12. If any cosmetic flaws. If your unit should become defective within that time frame, please go to USB 2.0 Adapter comes with a 1 year limited warranty (90 day parts). Contact: Vantec Thermal Technology www....
