

M1 mini Plus User Guide
Page 1
"Antes de operar su equipo lea cu idadosamente las instrucciones en este manual" Model No. M1 mini Plus Portable LED Projector User Guide IMPORTANT: Please read this User Guide will describe your limited coverage from ViewSonic® Corporation, which is also found on installing and using the Regional selection box in a safe manner, as well as...
"Antes de operar su equipo lea cu idadosamente las instrucciones en este manual" Model No. M1 mini Plus Portable LED Projector User Guide IMPORTANT: Please read this User Guide will describe your limited coverage from ViewSonic® Corporation, which is also found on installing and using the Regional selection box in a safe manner, as well as...
M1 mini Plus User Guide
Page 3
... become heated and deformed or even cause a fire. • The lamp becomes extremely hot during operation. Excessive use of the projector to disassemble the projector. The intense light beam may increase the temperature of lamps beyond the rated lamp life. Do not install near any heat sources ... uneven or unstable surface. Safety Precautions Please read the following Safety Precautions before you should come into contact with any objects when the projector is under operation as radiators, heat registers, stoves, or other sources of more than 10° degrees left or right, nor at...
... become heated and deformed or even cause a fire. • The lamp becomes extremely hot during operation. Excessive use of the projector to disassemble the projector. The intense light beam may increase the temperature of lamps beyond the rated lamp life. Do not install near any heat sources ... uneven or unstable surface. Safety Precautions Please read the following Safety Precautions before you should come into contact with any objects when the projector is under operation as radiators, heat registers, stoves, or other sources of more than 10° degrees left or right, nor at...
M1 mini Plus User Guide
Page 4
...all servicing to qualified service personnel. 4 If the plug does not fit into your dealer or ViewSonic®. In areas where voltage may fluctuate or cut out, it from the AC outlet if the projector is NOT stable. A polarized plug has two blades with one wider than the other. A ...grounding-type plug has two blades and a third grounding prong. It is dangerous to continue using the projector. • Use only attachments/accessories specified by the manufacturer. • Disconnect the power cord from the power supply and call your outlet, obtain...
...all servicing to qualified service personnel. 4 If the plug does not fit into your dealer or ViewSonic®. In areas where voltage may fluctuate or cut out, it from the AC outlet if the projector is NOT stable. A polarized plug has two blades with one wider than the other. A ...grounding-type plug has two blades and a third grounding prong. It is dangerous to continue using the projector. • Use only attachments/accessories specified by the manufacturer. • Disconnect the power cord from the power supply and call your outlet, obtain...

M1 mini Plus User Guide
Page 5
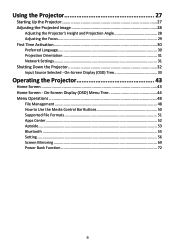
... 20 Bluetooth Out...22 Connecting to Networks 23 Wi-Fi Connection...23 Custom SSID...25 5 Contents Safety Precautions 3 Introduction 8 Features...8 Package Contents...9 Product Overview 10 Projector...10 Remote Control...11 Remote Control - Effective Range 12 Remote Control -
... 20 Bluetooth Out...22 Connecting to Networks 23 Wi-Fi Connection...23 Custom SSID...25 5 Contents Safety Precautions 3 Introduction 8 Features...8 Package Contents...9 Product Overview 10 Projector...10 Remote Control...11 Remote Control - Effective Range 12 Remote Control -
M1 mini Plus User Guide
Page 6
On-Screen Display (OSD) Tree 33 Operating the Projector 43 Home Screen...43 Home Screen - Using the Projector 27 Starting Up the Projector 27 Adjusting the Projected Image 28 Adjusting the Projector's Height and Projection Angle 28 Adjusting the Focus 29 First Time Activation 30 Preferred Language 30 ...Projection Orientation 31 Network Settings...31 Shutting Down the Projector 32 Input Source Selected - On-Screen Display (OSD) Menu Tree 44 Menu Operations 48 File Management 48 How to Use the...
On-Screen Display (OSD) Tree 33 Operating the Projector 43 Home Screen...43 Home Screen - Using the Projector 27 Starting Up the Projector 27 Adjusting the Projected Image 28 Adjusting the Projector's Height and Projection Angle 28 Adjusting the Focus 29 First Time Activation 30 Preferred Language 30 ...Projection Orientation 31 Network Settings...31 Shutting Down the Projector 32 Input Source Selected - On-Screen Display (OSD) Menu Tree 44 Menu Operations 48 File Management 48 How to Use the...
M1 mini Plus User Guide
Page 7
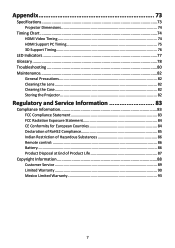
... Support Timing 76 LED Indicators...77 Glossary...78 Troubleshooting...80 Maintenance...82 General Precautions 82 Cleaning the Lens 82 Cleaning the Case 82 Storing the Projector 82 Regulatory and Service Information 83 Compliance Information 83 FCC Compliance Statement 83 FCC Radiation Exposure Statement 84 CE Conformity for European Countries 84 Declaration...
... Support Timing 76 LED Indicators...77 Glossary...78 Troubleshooting...80 Maintenance...82 General Precautions 82 Cleaning the Lens 82 Cleaning the Case 82 Storing the Projector 82 Regulatory and Service Information 83 Compliance Information 83 FCC Compliance Statement 83 FCC Radiation Exposure Statement 84 CE Conformity for European Countries 84 Declaration...
M1 mini Plus User Guide
Page 8
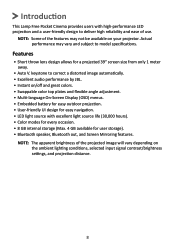
... features. NOTE: Some of the features may vary and subject to deliver high reliability and ease of the projected image will vary depending on your projector.
... features. NOTE: Some of the features may vary and subject to deliver high reliability and ease of the projected image will vary depending on your projector.
M1 mini Plus User Guide
Page 10
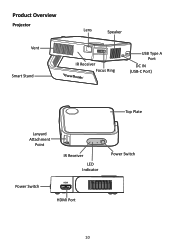
Product Overview Projector Vent Smart Stand Lens Speaker IR Receiver Focus Ring USB Type A Port DC IN (USB-C Port) Top Plate Lanyard Attachment Point IR Receiver LED Indicator HDMI Power Switch HDMI Port Power Switch 10
Product Overview Projector Vent Smart Stand Lens Speaker IR Receiver Focus Ring USB Type A Port DC IN (USB-C Port) Top Plate Lanyard Attachment Point IR Receiver LED Indicator HDMI Power Switch HDMI Port Power Switch 10
M1 mini Plus User Guide
Page 11
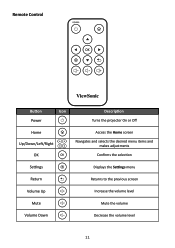
Remote Control Button Icon Power Home Up/Down/Left/Right OK Settings Return Volume Up Mute Volume Down Description Turns the projector On or Off Access the Home screen Navigates and selects the desired menu items and makes adjustments Confirms the selection Displays the Settings menu Returns to the previous screen Increase the volume level Mute the volume Decrease the volume level 11
Remote Control Button Icon Power Home Up/Down/Left/Right OK Settings Return Volume Up Mute Volume Down Description Turns the projector On or Off Access the Home screen Navigates and selects the desired menu items and makes adjustments Confirms the selection Displays the Settings menu Returns to the previous screen Increase the volume level Mute the volume Decrease the volume level 11
M1 mini Plus User Guide
Page 12
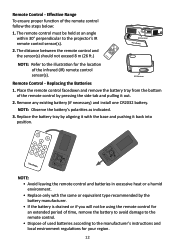
... the battery manufacturer. • If the battery is drained or if you will not be held at an angle within 30° perpendicular to the projector's IR remote control sensor(s). 2. Replace the battery tray by aligning it with the same or equivalent type recommended by pressing the side tab and pulling...
... the battery manufacturer. • If the battery is drained or if you will not be held at an angle within 30° perpendicular to the projector's IR remote control sensor(s). 2. Replace the battery tray by aligning it with the same or equivalent type recommended by pressing the side tab and pulling...
M1 mini Plus User Guide
Page 13
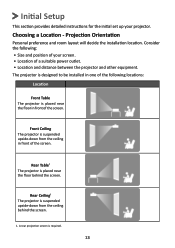
...upside-down from the ceiling behind the screen. Rear Ceiling¹ The projector is designed to be installed in one of the following : • Size and position of your projector. Rear Table¹ The projector is placed near the floor behind the screen. 1. A rear projection...set up your screen. • Location of a suitable power outlet. • Location and distance between the projector and other equipment. Consider the following locations: Location Front Table The projector is placed near the floor in front of the screen. Choosing a Location - Front Ceiling The...
...upside-down from the ceiling behind the screen. Rear Ceiling¹ The projector is designed to be installed in one of the following : • Size and position of your projector. Rear Table¹ The projector is placed near the floor behind the screen. 1. A rear projection...set up your screen. • Location of a suitable power outlet. • Location and distance between the projector and other equipment. Consider the following locations: Location Front Table The projector is placed near the floor in front of the screen. Choosing a Location - Front Ceiling The...

M1 mini Plus User Guide
Page 14
... Size (b) Projection Distance in . cm in . It is a 3% tolerance among these numbers due to physically test the projection size and distance before permanently installing the projector. 14 m 30 76.2 32.16 0.82 40 101.6 42.88 1.09 50 127 53.6 1.36 60 152.4 64.32 1.63 70 177.8 75.04 1.91...
... Size (b) Projection Distance in . cm in . It is a 3% tolerance among these numbers due to physically test the projection size and distance before permanently installing the projector. 14 m 30 76.2 32.16 0.82 40 101.6 42.88 1.09 50 127 53.6 1.36 60 152.4 64.32 1.63 70 177.8 75.04 1.91...
M1 mini Plus User Guide
Page 15
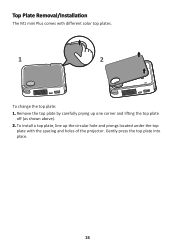
To install a top plate, line up one corner and lifting the top plate off (as shown above). 2. Top Plate Removal/Installation The M1 mini Plus comes with the spacing and holes of the projector. Gently press the top plate into place. 15 Remove the top plate by carefully prying up the circular hole and prongs located under the top plate with different color top plates. 1 2 To change the top plate: 1.
To install a top plate, line up one corner and lifting the top plate off (as shown above). 2. Top Plate Removal/Installation The M1 mini Plus comes with the spacing and holes of the projector. Gently press the top plate into place. 15 Remove the top plate by carefully prying up the circular hole and prongs located under the top plate with different color top plates. 1 2 To change the top plate: 1.
M1 mini Plus User Guide
Page 16
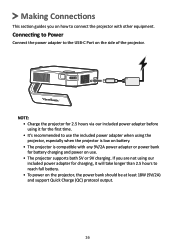
...9V/2A power adapter or power bank for charging, it will take longer than 2.5 hours to reach full battery. • To power on the projector, the power bank should be at least 18W (9V/2A) and support Quick Charge (QC) protocol output. 16 Making Connections This section guides you... are not using the projector, especially when the projector is low on battery. • The projector is compatible with other equipment. Connecting to Power Connect the power adapter to use . • The...
...9V/2A power adapter or power bank for charging, it will take longer than 2.5 hours to reach full battery. • To power on the projector, the power bank should be at least 18W (9V/2A) and support Quick Charge (QC) protocol output. 16 Making Connections This section guides you... are not using the projector, especially when the projector is low on battery. • The projector is compatible with other equipment. Connecting to Power Connect the power adapter to use . • The...
M1 mini Plus User Guide
Page 18
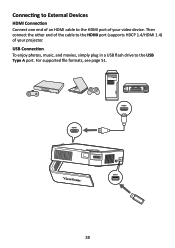
Then connect the other end of the cable to the USB Type A port. HDMI HDMI USB A 18 USB Connection To enjoy photos, music, and movies, simply plug in a USB flash drive to the HDMI port (supports HDCP 1.4/HDMI 1.4) of your video device. Connecting to External Devices HDMI Connection Connect one end of an HDMI cable to the HDMI port of your projector. For supported file formats, see page 51.
Then connect the other end of the cable to the USB Type A port. HDMI HDMI USB A 18 USB Connection To enjoy photos, music, and movies, simply plug in a USB flash drive to the HDMI port (supports HDCP 1.4/HDMI 1.4) of your video device. Connecting to External Devices HDMI Connection Connect one end of an HDMI cable to the HDMI port of your projector. For supported file formats, see page 51.
M1 mini Plus User Guide
Page 19
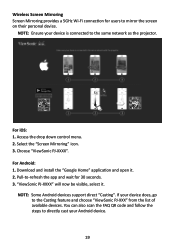
... 2. Choose "ViewSonic PJ-XXXX". Wireless Screen Mirroring Screen Mirroring provides a 5GHz Wi-Fi connection for 30 seconds. 3. For iOS: 1. If your device does, go to -refresh the app and wait for users to directly cast your device is connected to the same network as the projector. Access the drop... down control menu. 2. Pull-to the Casting feature and choose "ViewSonic PJ-XXX" from the list of available devices. NOTE: Ensure your Android device. 19
... 2. Choose "ViewSonic PJ-XXXX". Wireless Screen Mirroring Screen Mirroring provides a 5GHz Wi-Fi connection for 30 seconds. 3. For iOS: 1. If your device does, go to -refresh the app and wait for users to directly cast your device is connected to the same network as the projector. Access the drop... down control menu. 2. Pull-to the Casting feature and choose "ViewSonic PJ-XXX" from the list of available devices. NOTE: Ensure your Android device. 19

M1 mini Plus User Guide
Page 20
Then press OK on the remote control to : Home > Bluetooth. 2. Go to select Bluetooth Speaker or Bluetooth Pairing. Use the Left and Right directional buttons on the remote control. 20 Connecting to Bluetooth Bluetooth Speaker The projector is equipped with Bluetooth that allows the user to connect their device wirelessly for audio playback. 13:00 Apps Center Bluetooth Seƫng Screen Mirroring File Management HDMI Add App Add App Add App To connect and pair your device: 1.
Then press OK on the remote control to : Home > Bluetooth. 2. Go to select Bluetooth Speaker or Bluetooth Pairing. Use the Left and Right directional buttons on the remote control. 20 Connecting to Bluetooth Bluetooth Speaker The projector is equipped with Bluetooth that allows the user to connect their device wirelessly for audio playback. 13:00 Apps Center Bluetooth Seƫng Screen Mirroring File Management HDMI Add App Add App Add App To connect and pair your device: 1.

M1 mini Plus User Guide
Page 21
Upon successful connection, another sound effect will be audible upon entering pairing mode. 5. A sound effect will be labeled as "M1 mini Plus". 21 3. NOTE: • Once paired, if both the projector and your device are powered On they will automatically connect via Bluetooth. • The projector's name will be audible. When the below dialogue box appears, select Yes and press OK on the remote control to enter Bluetooth mode. 4.
Upon successful connection, another sound effect will be audible upon entering pairing mode. 5. A sound effect will be labeled as "M1 mini Plus". 21 3. NOTE: • Once paired, if both the projector and your device are powered On they will automatically connect via Bluetooth. • The projector's name will be audible. When the below dialogue box appears, select Yes and press OK on the remote control to enter Bluetooth mode. 4.
M1 mini Plus User Guide
Page 22
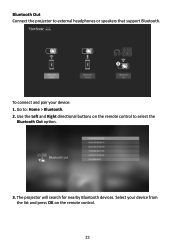
Select your device: 1. To connect and pair your device from the list and press OK on the remote control to select the Bluetooth Out option. 3. Go to external headphones or speakers that support Bluetooth. Use the Left and Right directional buttons on the remote control. 22 The projector will search for nearby Bluetooth devices. Bluetooth Out Connect the projector to : Home > Bluetooth. 2.
Select your device: 1. To connect and pair your device from the list and press OK on the remote control to select the Bluetooth Out option. 3. Go to external headphones or speakers that support Bluetooth. Use the Left and Right directional buttons on the remote control. 22 The projector will search for nearby Bluetooth devices. Bluetooth Out Connect the projector to : Home > Bluetooth. 2.
M1 mini Plus User Guide
Page 27
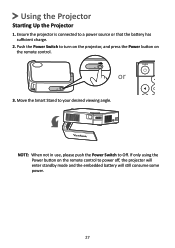
Move the Smart Stand to a power source or that the battery has sufficient charge. 2. Using the Projector Starting Up the Projector 1. Ensure the projector is connected to your desired viewing angle. NOTE: When not in use, please push the Power Switch to power off, the projector will enter standby mode and the embedded battery will still consume some power. 27 If only using the Power button on the remote control. or 3. Push the Power Switch to turn on the projector, and press the Power button on the remote control to Off.
Move the Smart Stand to a power source or that the battery has sufficient charge. 2. Using the Projector Starting Up the Projector 1. Ensure the projector is connected to your desired viewing angle. NOTE: When not in use, please push the Power Switch to power off, the projector will enter standby mode and the embedded battery will still consume some power. 27 If only using the Power button on the remote control. or 3. Push the Power Switch to turn on the projector, and press the Power button on the remote control to Off.


