

M1 mini Plus User Guide
Page 1
... manual" Model No. M1 mini Plus Portable LED Projector User Guide IMPORTANT: Please read this User Guide to obtain important information on installing and using your product in a safe manner, as well as registering your limited coverage from ViewSonic® Corporation, which is also found on our web site at http://www.viewsonic.com in English, or in specific languages using the Regional selection box in this User Guide...
... manual" Model No. M1 mini Plus Portable LED Projector User Guide IMPORTANT: Please read this User Guide to obtain important information on installing and using your product in a safe manner, as well as registering your limited coverage from ViewSonic® Corporation, which is also found on our web site at http://www.viewsonic.com in English, or in specific languages using the Regional selection box in this User Guide...
M1 mini Plus User Guide
Page 3
... the projector or connection cables. • Do not stand the projector on end vertically. Safety Precautions Please read the following Safety Precautions before you should come into contact with any heat sources such as this user guide in a well-ventilated area. Doing so may damage your eyes. • Always open the lens shutter or remove the lens cap when the projector lamp is...
... the projector or connection cables. • Do not stand the projector on end vertically. Safety Precautions Please read the following Safety Precautions before you should come into contact with any heat sources such as this user guide in a well-ventilated area. Doing so may damage your eyes. • Always open the lens shutter or remove the lens cap when the projector lamp is...
M1 mini Plus User Guide
Page 6
... Buttons 50 Supported File Formats 51 Apps Center...52 Aptoide...53 Bluetooth...55 Setting...56 Screen Mirroring...69 Power Bank Function 72 6 On-Screen Display (OSD) Tree 33 Operating the Projector 43 Home Screen...43 Home Screen - Using the Projector 27 Starting Up the Projector 27 Adjusting the Projected Image 28 Adjusting the Projector's Height and Projection Angle 28 Adjusting the Focus 29 First Time Activation 30 Preferred Language 30 Projection Orientation 31 Network Settings...31 Shutting Down the Projector 32 Input Source...
... Buttons 50 Supported File Formats 51 Apps Center...52 Aptoide...53 Bluetooth...55 Setting...56 Screen Mirroring...69 Power Bank Function 72 6 On-Screen Display (OSD) Tree 33 Operating the Projector 43 Home Screen...43 Home Screen - Using the Projector 27 Starting Up the Projector 27 Adjusting the Projected Image 28 Adjusting the Projector's Height and Projection Angle 28 Adjusting the Focus 29 First Time Activation 30 Preferred Language 30 Projection Orientation 31 Network Settings...31 Shutting Down the Projector 32 Input Source...
M1 mini Plus User Guide
Page 8
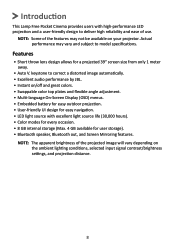
... angle adjustment. • Multi-language On-Screen Display (OSD) menus. • Embedded battery for easy outdoor projection. • User-friendly UI design for easy navigation. • LED light source with high-performance LED projection and a user-friendly design to model specifications. Introduction This Lamp Free Pocket Cinema provides users with excellent light source life (30,000 hours). • Color modes for every occasion. • 8 GB internal storage (Max. 4 GB available for a projected 39" screen size from...
... angle adjustment. • Multi-language On-Screen Display (OSD) menus. • Embedded battery for easy outdoor projection. • User-friendly UI design for easy navigation. • LED light source with high-performance LED projection and a user-friendly design to model specifications. Introduction This Lamp Free Pocket Cinema provides users with excellent light source life (30,000 hours). • Color modes for every occasion. • 8 GB internal storage (Max. 4 GB available for a projected 39" screen size from...
M1 mini Plus User Guide
Page 11
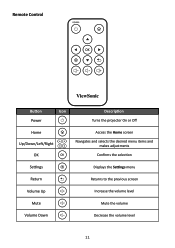
Remote Control Button Icon Power Home Up/Down/Left/Right OK Settings Return Volume Up Mute Volume Down Description Turns the projector On or Off Access the Home screen Navigates and selects the desired menu items and makes adjustments Confirms the selection Displays the Settings menu Returns to the previous screen Increase the volume level Mute the volume Decrease the volume level 11
Remote Control Button Icon Power Home Up/Down/Left/Right OK Settings Return Volume Up Mute Volume Down Description Turns the projector On or Off Access the Home screen Navigates and selects the desired menu items and makes adjustments Confirms the selection Displays the Settings menu Returns to the previous screen Increase the volume level Mute the volume Decrease the volume level 11
M1 mini Plus User Guide
Page 16
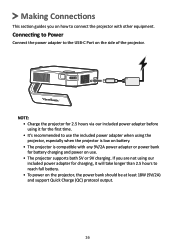
.../2A power adapter or power bank for battery charging and power on use the included power adapter when using our included power adapter for charging, it will take longer than 2.5 hours to the USB-C Port on the projector, the power bank should be at least 18W (9V/2A) and support Quick Charge (QC) protocol output. 16 Making Connections This section guides you are not using the projector, especially when the projector...
.../2A power adapter or power bank for battery charging and power on use the included power adapter when using our included power adapter for charging, it will take longer than 2.5 hours to the USB-C Port on the projector, the power bank should be at least 18W (9V/2A) and support Quick Charge (QC) protocol output. 16 Making Connections This section guides you are not using the projector, especially when the projector...
M1 mini Plus User Guide
Page 19
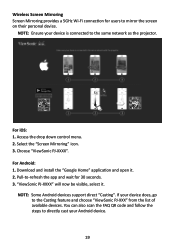
... and wait for users to the same network as the projector. Choose "ViewSonic PJ-XXXX". NOTE: Some Android devices support direct "Casting". For Android: 1. If your Android device. 19 Wireless Screen Mirroring Screen Mirroring provides a 5GHz Wi-Fi connection for 30 seconds. 3. Download and install the "Google Home" application and open it . NOTE: Ensure your device is connected to mirror the screen on their personal...
... and wait for users to the same network as the projector. Choose "ViewSonic PJ-XXXX". NOTE: Some Android devices support direct "Casting". For Android: 1. If your Android device. 19 Wireless Screen Mirroring Screen Mirroring provides a 5GHz Wi-Fi connection for 30 seconds. 3. Download and install the "Google Home" application and open it . NOTE: Ensure your device is connected to mirror the screen on their personal...
M1 mini Plus User Guide
Page 27
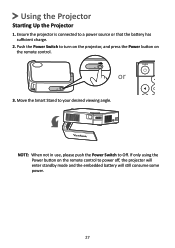
NOTE: When not in use, please push the Power Switch to your desired viewing angle. Using the Projector Starting Up the Projector 1. or 3. Move the Smart Stand to Off. Push the Power Switch to power off, the projector will enter standby mode and the embedded battery will still consume some power. 27 If only using the Power button on the remote control to turn on the projector, and press the Power button on the remote control. Ensure the projector is connected to a power source or that the battery has sufficient charge. 2.
NOTE: When not in use, please push the Power Switch to your desired viewing angle. Using the Projector Starting Up the Projector 1. or 3. Move the Smart Stand to Off. Push the Power Switch to power off, the projector will enter standby mode and the embedded battery will still consume some power. 27 If only using the Power button on the remote control to turn on the projector, and press the Power button on the remote control. Ensure the projector is connected to a power source or that the battery has sufficient charge. 2.

M1 mini Plus User Guide
Page 30
When the "Finish screen" appears, this indicates the projector is activated for the first time, you will need to select your Preferred Language, Projection Orientation, and Network Settings. First Time Activation If the projector is ready to use. Preferred Language Select the desired language and press OK to confirm the selection. 30 Follow the on-screen instructions using the OK and Up/Down/Left/Right buttons on the remote control.
When the "Finish screen" appears, this indicates the projector is activated for the first time, you will need to select your Preferred Language, Projection Orientation, and Network Settings. First Time Activation If the projector is ready to use. Preferred Language Select the desired language and press OK to confirm the selection. 30 Follow the on-screen instructions using the OK and Up/Down/Left/Right buttons on the remote control.
M1 mini Plus User Guide
Page 32
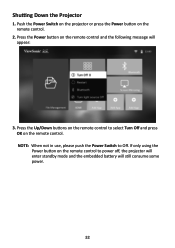
Push the Power Switch on the projector or press the Power button on the remote control and the following message will still consume some power. 32 If only using the Power button on the remote control to select Turn Off and press OK on the remote control to power off, the projector will enter standby mode and the embedded battery will appear: 3. Press the Up/Down buttons on the remote control. NOTE: When not in use, please push the Power Switch to Off. Shutting Down the Projector 1. Press the Power button on the remote control. 2.
Push the Power Switch on the projector or press the Power button on the remote control and the following message will still consume some power. 32 If only using the Power button on the remote control to select Turn Off and press OK on the remote control to power off, the projector will enter standby mode and the embedded battery will appear: 3. Press the Up/Down buttons on the remote control. NOTE: When not in use, please push the Power Switch to Off. Shutting Down the Projector 1. Press the Power button on the remote control. 2.
M1 mini Plus User Guide
Page 37
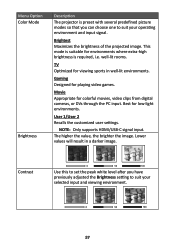
... image. This mode is suitable for environments where extra-high brightness is preset with several predefined picture modes so that you have previously adjusted the Brightness setting to suit your selected input and viewing environment. 1 37 The higher the value, the brighter the image. Menu Option Color Mode Brightness Description The projector is required, i.e. well-lit rooms. TV Optimized for playing video games. NOTE: Only supports HDMI/USB-C signal input...
... image. This mode is suitable for environments where extra-high brightness is preset with several predefined picture modes so that you have previously adjusted the Brightness setting to suit your selected input and viewing environment. 1 37 The higher the value, the brighter the image. Menu Option Color Mode Brightness Description The projector is required, i.e. well-lit rooms. TV Optimized for playing video games. NOTE: Only supports HDMI/USB-C signal input...
M1 mini Plus User Guide
Page 38
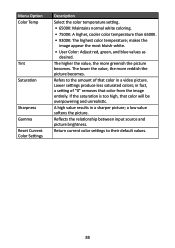
..., a setting of that color in a sharper picture; A high value results in a video picture. Refers to their default values. 38 a low value softens the picture. makes the image appear the most bluish-white. • User Color: Adjust red, green, and blue values as desired. Reflects the relationship between input source and picture brightness. Menu Option Color Temp Tint Saturation Sharpness Gamma Reset Current Color Settings Description Select the color temperature setting. • 6500K: Maintains normal white coloring. • 7500K: A higher, cooler color temperature...
..., a setting of that color in a sharper picture; A high value results in a video picture. Refers to their default values. 38 a low value softens the picture. makes the image appear the most bluish-white. • User Color: Adjust red, green, and blue values as desired. Reflects the relationship between input source and picture brightness. Menu Option Color Temp Tint Saturation Sharpness Gamma Reset Current Color Settings Description Select the color temperature setting. • 6500K: Maintains normal white coloring. • 7500K: A higher, cooler color temperature...
M1 mini Plus User Guide
Page 50
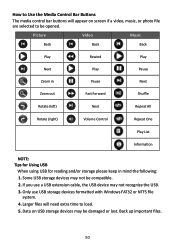
... Data on screen if a video, music, or photo file are selected to load. 5. Only use a USB extension cable, the USB device may not recognize the USB. 3. Some USB storage devices may be opened. How to Use the Media Control Bar Buttons The media control bar buttons will need extra time to be damaged or lost. Picture Video Music Back Back Back Play Rewind Play Next Play Pause Zoom in...
... Data on screen if a video, music, or photo file are selected to load. 5. Only use a USB extension cable, the USB device may not recognize the USB. 3. Some USB storage devices may be opened. How to Use the Media Control Bar Buttons The media control bar buttons will need extra time to be damaged or lost. Picture Video Music Back Back Back Play Rewind Play Next Play Pause Zoom in...

M1 mini Plus User Guide
Page 63
...% 5. Select Enter by pressing OK on the remote control. 3. The whole updating process will take about 10 minutes. 6. Upon reaching 100%, the projector will restart and the screen will check the ViewSonic website (OTA) and display the below dialog message if their is new Firmware. 4. The system will turn to black for a few minutes to : Home > Setting > Firmware Upgrade > Software Update Online. 2. By selecting Yes, a progress bar will...
...% 5. Select Enter by pressing OK on the remote control. 3. The whole updating process will take about 10 minutes. 6. Upon reaching 100%, the projector will restart and the screen will check the ViewSonic website (OTA) and display the below dialog message if their is new Firmware. 4. The system will turn to black for a few minutes to : Home > Setting > Firmware Upgrade > Software Update Online. 2. By selecting Yes, a progress bar will...

M1 mini Plus User Guide
Page 67
... use this projector can operate under other extreme conditions excluding the above, it may display auto shut-down symptoms, which is between 1,5003,000 m above sea level, and a temperature between 5°C-25°C. NOTE: Language, High Altitude Mode, Projector Position, Network Settings, All installed Apps in the Apps Center, Add App, and Light Source Hours will remain unchanged. 67 Reset Settings Reset to Factory Default NOTE: If you should switch to High Altitude Mode...
... use this projector can operate under other extreme conditions excluding the above, it may display auto shut-down symptoms, which is between 1,5003,000 m above sea level, and a temperature between 5°C-25°C. NOTE: Language, High Altitude Mode, Projector Position, Network Settings, All installed Apps in the Apps Center, Add App, and Light Source Hours will remain unchanged. 67 Reset Settings Reset to Factory Default NOTE: If you should switch to High Altitude Mode...
M1 mini Plus User Guide
Page 72
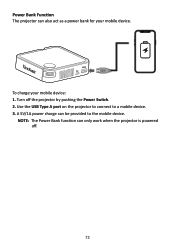
Turn off . 72 Use the USB Type A port on the projector to connect to the mobile device. A 5V/1A power charge can also act as a power bank for your mobile device: 1. Power Bank Function The projector can be provided to a mobile device. 3. To charge your mobile device. NOTE: The Power Bank function can only work when the projector is powered off the projector by pushing the Power Switch. 2.
Turn off . 72 Use the USB Type A port on the projector to connect to the mobile device. A 5V/1A power charge can also act as a power bank for your mobile device: 1. Power Bank Function The projector can be provided to a mobile device. 3. To charge your mobile device. NOTE: The Power Bank function can only work when the projector is powered off the projector by pushing the Power Switch. 2.
M1 mini Plus User Guide
Page 73
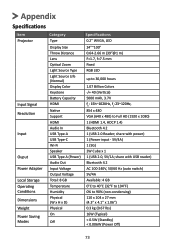
... Item Projector Input Signal Resolution Input Ouput Power Adapter Local Storage Operating Conditions Dimensions Weight Power Saving Modes Category Type Display Size Throw Distance Lens Optical Zoom Light Source Type Light Source Life (Normal) Display Color Keystone Battery Capacity HDMI Native Support HDMI Audio In USB Type-A USB Type-C Wi-Fi Speaker USB Type A (Power) Audio Out Input Voltage Output Voltage Total: 8 GB Temperature Humidity Physical (W x H x D) Physical On Off Specifications 0.2" WVGA, LED 24"~100" 0.64-2.66 m (39"@1 m) F=1.7, f=7.5 mm Fixed RGB LED up to 30,000 hours 1.07...
... Item Projector Input Signal Resolution Input Ouput Power Adapter Local Storage Operating Conditions Dimensions Weight Power Saving Modes Category Type Display Size Throw Distance Lens Optical Zoom Light Source Type Light Source Life (Normal) Display Color Keystone Battery Capacity HDMI Native Support HDMI Audio In USB Type-A USB Type-C Wi-Fi Speaker USB Type A (Power) Audio Out Input Voltage Output Voltage Total: 8 GB Temperature Humidity Physical (W x H x D) Physical On Off Specifications 0.2" WVGA, LED 24"~100" 0.64-2.66 m (39"@1 m) F=1.7, f=7.5 mm Fixed RGB LED up to 30,000 hours 1.07...
M1 mini Plus User Guide
Page 78
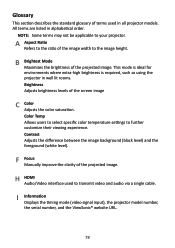
... as using the projector in well lit rooms. Brightness Adjusts brightness levels of the projected image. F Focus Manually improve the clarity of the screen image C Color Adjusts the color saturation. I Information Displays the timing mode (video signal input), the projector model number, the serial number, and the ViewSonic® website URL. 78 A Aspect Ratio Refers to the ratio of the image width to your projector. NOTE: Some terms may not be applicable to the image height. H HDMI Audio/Video interface used...
... as using the projector in well lit rooms. Brightness Adjusts brightness levels of the projected image. F Focus Manually improve the clarity of the screen image C Color Adjusts the color saturation. I Information Displays the timing mode (video signal input), the projector model number, the serial number, and the ViewSonic® website URL. 78 A Aspect Ratio Refers to the ratio of the image width to your projector. NOTE: Some terms may not be applicable to the image height. H HDMI Audio/Video interface used...
M1 mini Plus User Guide
Page 80
... the video source is turned on. • If the input source is properly attached to the projector and to turn off and charge the battery for a long time. 80 Please switch the projector off and on either the projector or the remote control. • Adjusting the Focus Ring will help correctly focus the projection lens. • Ensure the projector and screen are aligned properly. If necessary, adjust the height of power, please check and replace...
... the video source is turned on. • If the input source is properly attached to the projector and to turn off and charge the battery for a long time. 80 Please switch the projector off and on either the projector or the remote control. • Adjusting the Focus Ring will help correctly focus the projection lens. • Ensure the projector and screen are aligned properly. If necessary, adjust the height of power, please check and replace...
M1 mini Plus User Guide
Page 82
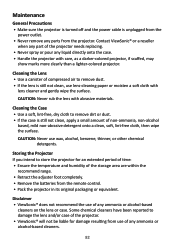
... remote control. • Pack the projector in its original packaging or equivalent. Maintenance General Precautions • Make sure the projector is turned off and the power cable is unplugged from the power outlet. • Never remove any ammonia or alcohol-based cleaners. 82 Cleaning the Case • Use a soft, lint-free, dry cloth to damage the lens and/or case of the projector. • ViewSonic...
... remote control. • Pack the projector in its original packaging or equivalent. Maintenance General Precautions • Make sure the projector is turned off and the power cable is unplugged from the power outlet. • Never remove any ammonia or alcohol-based cleaners. 82 Cleaning the Case • Use a soft, lint-free, dry cloth to damage the lens and/or case of the projector. • ViewSonic...


