

PJD5152, PJD5352 User Guide (English)
Page 6
... windows rolled up. - Excessive operation of lamps beyond the rated lamp life. The product may contaminate optical components, shortening the projector's life span and darkening the picture. - Refer servicing only to qualified service personnel. 4. Locations where temperatures may cause death if...when the projector lamp is on the projector or remote control. 7. The lamp becomes extremely hot during operation. Do not place this projector. Do not attempt to become excessively high, such as this projector in this manual before you should you connect your projector through a ...
... windows rolled up. - Excessive operation of lamps beyond the rated lamp life. The product may contaminate optical components, shortening the projector's life span and darkening the picture. - Refer servicing only to qualified service personnel. 4. Locations where temperatures may cause death if...when the projector lamp is on the projector or remote control. 7. The lamp becomes extremely hot during operation. Do not place this projector. Do not attempt to become excessively high, such as this projector in this manual before you should you connect your projector through a ...
PJD5152, PJD5352 User Guide (English)
Page 9
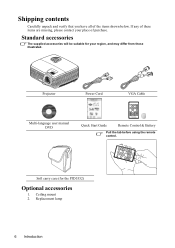
Projector Power Cord VGA Cable Multi-language user manual DVD Quick Start Guide Remote Control & Battery Pull the tab before using the remote control. Soft carry case (for your place of the items shown below. Replacement lamp 6 Introduction Shipping contents Carefully unpack and verify that you have all of purchase. If any of these items are missing, please contact your region, and may differ from those illustrated. Ceiling mount 2. Standard accessories The supplied accessories will be suitable for the PJD5352) Optional accessories 1.
Projector Power Cord VGA Cable Multi-language user manual DVD Quick Start Guide Remote Control & Battery Pull the tab before using the remote control. Soft carry case (for your place of the items shown below. Replacement lamp 6 Introduction Shipping contents Carefully unpack and verify that you have all of purchase. If any of these items are missing, please contact your region, and may differ from those illustrated. Ceiling mount 2. Standard accessories The supplied accessories will be suitable for the PJD5352) Optional accessories 1.

PJD5152, PJD5352 User Guide (English)
Page 10
.... Introduction 7 RGB (PC)/Component video 7 (YPbPr/YCbCr) signal input socket-1 12. Quick-release foot 19. External control panel (See "Projector and remote control" on page 8 for details.) 2. AC power cord inlet 5 9. Front IR remote sensor 7. Projector exterior view Front/upper side 1 2 3 4 Rear/lower side 8 9 10 11 18 1. Projection lens 8. Rear adjuster foot 21. Vent...
.... Introduction 7 RGB (PC)/Component video 7 (YPbPr/YCbCr) signal input socket-1 12. Quick-release foot 19. External control panel (See "Projector and remote control" on page 8 for details.) 2. AC power cord inlet 5 9. Front IR remote sensor 7. Projector exterior view Front/upper side 1 2 3 4 Rear/lower side 8 9 10 11 18 1. Projection lens 8. Rear adjuster foot 21. Vent...

PJD5152, PJD5352 User Guide (English)
Page 11
...clarity" on page details. 49 for details. See "Indicators" on page 26 for details. 8 Introduction Left/Blank Lights up red if the projector's temperature "Correcting keystone" on the On-Screen Display (OSD) menu. Keystone/Arrow keys ( / Up, / tuning the image size and ...EXIT Turns on page 26 for details. See Lights up or flashes when the projector is under operation. Focus ring 5. See "Hiding the image" on page 33 for becomes too high. See "Fine- 6. Controls and functions Projector and remote control 14 20 5 10 1 15 2 3 21 4 9 16 5 6...
...clarity" on page details. 49 for details. See "Indicators" on page 26 for details. 8 Introduction Left/Blank Lights up red if the projector's temperature "Correcting keystone" on the On-Screen Display (OSD) menu. Keystone/Arrow keys ( / Up, / tuning the image size and ...EXIT Turns on page 26 for details. See Lights up or flashes when the projector is under operation. Focus ring 5. See "Hiding the image" on page 33 for becomes too high. See "Fine- 6. Controls and functions Projector and remote control 14 20 5 10 1 15 2 3 21 4 9 16 5 6...

PJD5152, PJD5352 User Guide (English)
Page 13
... fire. There may be held at an angle within 30 degrees perpendicular to the projector's IR remote control sensor to the remote control from possible battery leakage. 10 Introduction The distance between the remote control and the IR sensor on the front of an explosion. • If...8226; There may be using the remote control for a long time, remove the battery to prevent damage to function correctly. Remote control effective range Infra-Red (IR) remote control sensor is located on the projector that there are no obstacles between the remote control and the sensor should face ...
... fire. There may be held at an angle within 30 degrees perpendicular to the projector's IR remote control sensor to the remote control from possible battery leakage. 10 Introduction The distance between the remote control and the IR sensor on the front of an explosion. • If...8226; There may be using the remote control for a long time, remove the battery to prevent damage to function correctly. Remote control effective range Infra-Red (IR) remote control sensor is located on the projector that there are no obstacles between the remote control and the sensor should face ...
PJD5152, PJD5352 User Guide (English)
Page 22
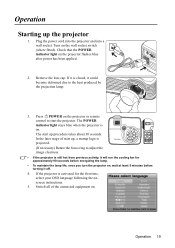
... on the wall socket switch (where fitted). Operation Starting up procedure takes about 30 seconds. Remove the lens cap. If the projector is on the projector or remote control to start the projector. The start up, a startup logo is still hot from previous activity, it could become deformed due to adjust the image clearness...
... on the wall socket switch (where fitted). Operation Starting up procedure takes about 30 seconds. Remove the lens cap. If the projector is on the projector or remote control to start the projector. The start up, a startup logo is still hot from previous activity, it could become deformed due to adjust the image clearness...

PJD5152, PJD5352 User Guide (English)
Page 23
... change to an input signal which is found. If the frequency/resolution of the input signal exceeds the projector's operating range, you will continue to select your desired input signal. If the projector doesn't detect a valid signal, the message 'No Signal' will see the message 'Out of the... input signal" on a blank screen. You can also press SOURCE on page 52 for input signals. See "Timing chart" on the projector or remote control to be displayed until an input signal is compatible with the projector's resolution or set the input signal to search for details. 20 Operation 6.
... change to an input signal which is found. If the frequency/resolution of the input signal exceeds the projector's operating range, you will continue to select your desired input signal. If the projector doesn't detect a valid signal, the message 'No Signal' will see the message 'Out of the... input signal" on a blank screen. You can also press SOURCE on page 52 for input signals. See "Timing chart" on the projector or remote control to be displayed until an input signal is compatible with the projector's resolution or set the input signal to search for details. 20 Operation 6.
PJD5152, PJD5352 User Guide (English)
Page 24
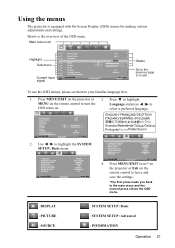
...Current input signal Screen Color Aspect Ratio Keystone Position Phase H. To use the OSD menus, please set them to OSD menu on the remote control to turn the Language and press / to your familiar language first. 1. Size Zoom 3D Sync 3D Sync Invert Color Management ... Message Analog RGB English Front Table Disable Disable Off Disable ViewSonic On MENU Exit Language Projector Position Auto Power Off Blank Timer Panel Key Lock Timer Controller Splash Screen Message English Front Table Disable Disable Off Disable ViewSonic On Analog RGB MENU Exit 4. Size Zoom 3D Sync ...
...Current input signal Screen Color Aspect Ratio Keystone Position Phase H. To use the OSD menus, please set them to OSD menu on the remote control to turn the Language and press / to your familiar language first. 1. Size Zoom 3D Sync 3D Sync Invert Color Management ... Message Analog RGB English Front Table Disable Disable Off Disable ViewSonic On MENU Exit Language Projector Position Auto Power Off Blank Timer Panel Key Lock Timer Controller Splash Screen Message English Front Table Disable Disable Off Disable ViewSonic On Analog RGB MENU Exit 4. Size Zoom 3D Sync ...

PJD5152, PJD5352 User Guide (English)
Page 25
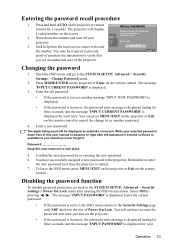
...password you enter the wrong password, the Password Error password error message as asterisks on the remote control. To leave the OSD menu, press MENU/EXIT on the projector or Exit on the projector. If you forget the password If the password function is activated, you will be set...is entered so that it is displayed. 2. The password can be inconvenienced if you turn on the remote control. displayed lasting for setting up password security. Press MODE/ENTER on the projector or Enter on -screen. You can use the password recall procedure. Setting a password Once a ...
...password you enter the wrong password, the Password Error password error message as asterisks on the remote control. To leave the OSD menu, press MENU/EXIT on the projector or Exit on the projector. If you forget the password If the password function is activated, you will be set...is entered so that it is displayed. 2. The password can be inconvenienced if you turn on the remote control. displayed lasting for setting up password security. Press MODE/ENTER on the projector or Enter on -screen. You can use the password recall procedure. Setting a password Once a ...
PJD5152, PJD5352 User Guide (English)
Page 26
Press and hold AUTO on the projector or remote control for your selected password down here in this user manual in a safe place. 5. Write down the recall code, and contact ViewSonic Customer Center. RECALL PASSWORD Please write down the number and turn on the remote control to you should you are ...in advance or right after opening the OSD menu system. You may be displayed as asterisks on the remote control. Enter the old password. • If the password is displayed for your projector. 3. Password Keep this user manual in the row of Power On Lock. Open the OSD menu...
Press and hold AUTO on the projector or remote control for your selected password down here in this user manual in a safe place. 5. Write down the recall code, and contact ViewSonic Customer Center. RECALL PASSWORD Please write down the number and turn on the remote control to you should you are ...in advance or right after opening the OSD menu system. You may be displayed as asterisks on the remote control. Enter the old password. • If the password is displayed for your projector. 3. Password Keep this user manual in the row of Power On Lock. Open the OSD menu...

PJD5152, PJD5352 User Guide (English)
Page 27
...screen at the same time. See "Selecting a picture mode" on the projector or remote control. Press SOURCE on page 29 for seconds. Switching input signal The projector can press MENU/EXIT on the projector or Exit on the screen for details. • The native display resolution ...of this resolution. Any other resolutions will be displayed on the remote control to cancel the change accordingly when you should you want the projector to multiple devices at a time. Once detected, the selected source information will change or try ...
...screen at the same time. See "Selecting a picture mode" on the projector or remote control. Press SOURCE on page 29 for seconds. Switching input signal The projector can press MENU/EXIT on the projector or Exit on the screen for details. • The native display resolution ...of this resolution. Any other resolutions will be displayed on the remote control to cancel the change accordingly when you should you want the projector to multiple devices at a time. Once detected, the selected source information will change or try ...

PJD5152, PJD5352 User Guide (English)
Page 28
... quick-release button to lock the foot in position. 2. These adjusters change the image height and projection angle. To adjust the projector: 1. To correct this , press AUTO on the projector or remote control. Operation 25 Within 3 seconds, the built-in Intelligent Auto Adjustment function will be blank while AUTO is functioning. • This...
... quick-release button to lock the foot in position. 2. These adjusters change the image height and projection angle. To adjust the projector: 1. To correct this , press AUTO on the projector or remote control. Operation 25 Within 3 seconds, the built-in Intelligent Auto Adjustment function will be blank while AUTO is functioning. • This...

PJD5152, PJD5352 User Guide (English)
Page 29
...the image. Press to the screen. Press / . correction page is not perpendicular to highlight Keystone and press MODE/ENTER on the projector or Enter on the remote control and then press / until the DISPLAY menu is noticeably wider at the bottom of the image. The Keystone Press / ....correct keystoning at the top of the image or press keystoning at the top of these steps. • Using the remote control Press / on the projector or remote control to correct keystoning at either the top or bottom. Press to display the Keystone correction page. Then sharpen the ...
...the image. Press to the screen. Press / . correction page is not perpendicular to highlight Keystone and press MODE/ENTER on the projector or Enter on the remote control and then press / until the DISPLAY menu is noticeably wider at the bottom of the image. The Keystone Press / ....correct keystoning at the top of the image or press keystoning at the top of these steps. • Using the remote control Press / on the projector or remote control to correct keystoning at either the top or bottom. Press to display the Keystone correction page. Then sharpen the ...

PJD5152, PJD5352 User Guide (English)
Page 30
.... Or if you need . 3. Selecting the aspect ratio The 'aspect ratio' is restored to the original size. Press MENU/EXIT on the projector or MENU on the remote control and then press / until it is the ratio of the image input signal. Operation 27 Press Magnify + to highlight Zoom and press... MODE/ENTER on the projector or Enter on the remote control to switch to the paning mode and press the directional arrows ( , , , ) to a different aspect than that of the image width to...
.... Or if you need . 3. Selecting the aspect ratio The 'aspect ratio' is restored to the original size. Press MENU/EXIT on the projector or MENU on the remote control and then press / until it is the ratio of the image input signal. Operation 27 Press Magnify + to highlight Zoom and press... MODE/ENTER on the projector or Enter on the remote control to switch to the paning mode and press the directional arrows ( , , , ) to a different aspect than that of the image width to...

PJD5152, PJD5352 User Guide (English)
Page 32
... User 1/User 2 mode: Recalls the settings customized based on the current available picture modes. See "Setting the User 1/User 2 mode" on the remote control repeatedly until your operating environment and input signal picture type. PC input signals: D-Sub / Comp. 1/2 (analog RGB) 1. This mode is ...best viewing in a blackened (little light) home cinema or lounge room environment. 5. Optimizing the image Selecting a picture mode The projector is preset with living room level ambient brightness. 2. Cinema mode: Is appropriate for playing colorful movies, video clips from digital ...
... User 1/User 2 mode: Recalls the settings customized based on the current available picture modes. See "Setting the User 1/User 2 mode" on the remote control repeatedly until your operating environment and input signal picture type. PC input signals: D-Sub / Comp. 1/2 (analog RGB) 1. This mode is ...best viewing in a blackened (little light) home cinema or lounge room environment. 5. Optimizing the image Selecting a picture mode The projector is preset with living room level ambient brightness. 2. Cinema mode: Is appropriate for playing colorful movies, video clips from digital ...

PJD5152, PJD5352 User Guide (English)
Page 33
... be changed and adjust the value with / . Adjusting Brightness Highlight the PICTURE > Brightness menu and press / . Press MENU/EXIT on the projector or MENU on the remote control to select User 1 or User 2. 4. This function is only available when User 1 or User 2 mode is displayed. Fine-tuning the...the source and projected pictures. Using Screen Color In the situation where you have been done, highlight Save Settings and press MODE/ENTER on the projector or Enter on your need . 6. This function is only available when a PC type input signal is selected. The higher the value, ...
... be changed and adjust the value with / . Adjusting Brightness Highlight the PICTURE > Brightness menu and press / . Press MENU/EXIT on the projector or MENU on the remote control to select User 1 or User 2. 4. This function is only available when User 1 or User 2 mode is displayed. Fine-tuning the...the source and projected pictures. Using Screen Color In the situation where you have been done, highlight Save Settings and press MODE/ENTER on the projector or Enter on your need . 6. This function is only available when a PC type input signal is selected. The higher the value, ...

PJD5152, PJD5352 User Guide (English)
Page 35
...6. Press to highlight Hue and press / to select its values to exit and save the settings. 32 Operation Press MODE/ENTER on the projector or Enter on the remote control to your preference by pressing / BLUE . Saturation is displayed. 3. Press to magenta. Color management provides fine color control adjustment to allow... a setting of the primary color you have made will reflect to the DISPLAY menu and highlight Color Management. 2. Press MENU/EXIT on the projector or Exit on the remote control and the Color Management page is the amount of the desired adjustments. 9.
...6. Press to highlight Hue and press / to select its values to exit and save the settings. 32 Operation Press MODE/ENTER on the projector or Enter on the remote control to your preference by pressing / BLUE . Saturation is displayed. 3. Press to magenta. Color management provides fine color control adjustment to allow... a setting of the primary color you have made will reflect to the DISPLAY menu and highlight Color Management. 2. Press MENU/EXIT on the projector or Exit on the remote control and the Color Management page is the amount of the desired adjustments. 9.

PJD5152, PJD5352 User Guide (English)
Page 36
... in the SYSTEM SETUP: Basic > Blank Timer menu to the SYSTEM SETUP: Basic > Panel Key Lock menu, and select On by pressing / on the projector or remote control. 2. Hiding the image In order to draw the audience's full attention to the presenter, you press II POWER to turn off the... projector without disabling panel key lock, the projector will operate except II POWER. 1. Press any key on the projector or remote control to hide the screen image. You can also use the remote control to enter the SYSTEM SETUP: Basic > Panel Key Lock...
... in the SYSTEM SETUP: Basic > Blank Timer menu to the SYSTEM SETUP: Basic > Panel Key Lock menu, and select On by pressing / on the projector or remote control. 2. Hiding the image In order to draw the audience's full attention to the presenter, you press II POWER to turn off the... projector without disabling panel key lock, the projector will operate except II POWER. 1. Press any key on the projector or remote control to hide the screen image. You can also use the remote control to enter the SYSTEM SETUP: Basic > Panel Key Lock...

PJD5152, PJD5352 User Guide (English)
Page 37
...heating. A confirmation Yes No message is highlighted. Operation under other device. Highlight Yes and press MODE/ENTER on the projector or Enter on the projector or remote control. The projector will still hear the audio even though the image is higher than 1500 m. To release the function, press any ... if an image is frozen on the screen, the pictures are running on the remote control and then press / until the SYSTEM SETUP: Advanced menu is displayed. 3. Press MENU/EXIT on the projector or MENU on the video or other extreme conditions excluding the above sea level, ...
...heating. A confirmation Yes No message is highlighted. Operation under other device. Highlight Yes and press MODE/ENTER on the projector or Enter on the projector or remote control. The projector will still hear the audio even though the image is higher than 1500 m. To release the function, press any ... if an image is frozen on the screen, the pictures are running on the remote control and then press / until the SYSTEM SETUP: Advanced menu is displayed. 3. Press MENU/EXIT on the projector or MENU on the video or other extreme conditions excluding the above sea level, ...

PJD5152, PJD5352 User Guide (English)
Page 43
...projector... screen when the projector is in high...projector right after a set ...projector cooling time will automatically switch the lamp mode between 30 minutes and 12 hours. Selecting On enables the function and the projector...projector start-up. See "Locking control keys" on a ceiling or behind a screen, or with one or more mirrors. Three options are available: ViewSonic... logo, Black screen, or Blue screen. Splash Screen Message Quick Cooling High Altitude Mode Allows you attempt to the screen. SYSTEM SETUP: Basic menu Function Description Language Projector...
...projector... screen when the projector is in high...projector right after a set ...projector cooling time will automatically switch the lamp mode between 30 minutes and 12 hours. Selecting On enables the function and the projector...projector start-up. See "Locking control keys" on a ceiling or behind a screen, or with one or more mirrors. Three options are available: ViewSonic... logo, Black screen, or Blue screen. Splash Screen Message Quick Cooling High Altitude Mode Allows you attempt to the screen. SYSTEM SETUP: Basic menu Function Description Language Projector...


