PJD7526W User Guide English
Page 1
.../VS16445/VS16483 "Antes de operar su equipo lea cu idadosamente las instrucciones en este manual" Model No. PJD6252L/PJD6551W/PJD7326/ PJD7526W/PJD7720HD DLP Projector User Guide IMPORTANT: Please read this User Guide will describe your limited coverage from ViewSonic Corporation, which is also found on installing and using your product for future service.
.../VS16445/VS16483 "Antes de operar su equipo lea cu idadosamente las instrucciones en este manual" Model No. PJD6252L/PJD6551W/PJD7326/ PJD7526W/PJD7720HD DLP Projector User Guide IMPORTANT: Please read this User Guide will describe your limited coverage from ViewSonic Corporation, which is also found on installing and using your product for future service.

PJD7526W User Guide English
Page 5
... notice. Registering your product online. Product Name: Model Number: Document Number: Serial Number: Purchase Date: For Your Records PJD6252L/PJD6551W/PJD7326/PJD7526W/PJD7720HD ViewSonic DLP Projector VS16443/VS15913/VS16444/VS16445/VS16483 PJD6252L/PJD6551W/PJD7326/PJD7526W/PJD7720HD_ UG_ENG Rev. 1B 05-04-16 Product disposal at end of VESA. DPMS and DDC are registered trademarks...
... notice. Registering your product online. Product Name: Model Number: Document Number: Serial Number: Purchase Date: For Your Records PJD6252L/PJD6551W/PJD7326/PJD7526W/PJD7720HD ViewSonic DLP Projector VS16443/VS15913/VS16444/VS16445/VS16483 PJD6252L/PJD6551W/PJD7326/PJD7526W/PJD7720HD_ UG_ENG Rev. 1B 05-04-16 Product disposal at end of VESA. DPMS and DDC are registered trademarks...

PJD7526W User Guide English
Page 6
... computer or monitor .... 17 Connecting Video source devices ...... 18 Playing sound through the projector .. 20 Using the cable management cover (for selected models 21 Operation 22 Starting up the projector 22 Using the menus 23 Utilizing the password function ......... 24 Switching input signal 26 ... the 3D functions 38 Controlling the projector through a LAN environment (for selected models) .... 39 Using the projector in standby mode. 46 Adjusting the sound 46 Shutting down the projector 48 Menu operation 49 Maintenance 59 Care of the projector 59 Using the dust filter (optional...
... computer or monitor .... 17 Connecting Video source devices ...... 18 Playing sound through the projector .. 20 Using the cable management cover (for selected models 21 Operation 22 Starting up the projector 22 Using the menus 23 Utilizing the password function ......... 24 Switching input signal 26 ... the 3D functions 38 Controlling the projector through a LAN environment (for selected models) .... 39 Using the projector in standby mode. 46 Adjusting the sound 46 Shutting down the projector 48 Menu operation 49 Maintenance 59 Care of the projector 59 Using the dust filter (optional...

PJD7526W User Guide English
Page 7
... may damage your eyes. 3. Under no circumstances should come into contact with any other covers. Space that you connect your projector. Allow at the projector lens during operation. The only user serviceable part is the lamp which may fluctuate or cut out, it for future reference.... operate lamps beyond the rated life could cause them to 240 volts AC, but could cause the objects to disassemble this projector. This projector is designed to operate safely within a mains voltage between 100 to break on the product. Excessive operation of information technology equipment...
... may damage your eyes. 3. Under no circumstances should come into contact with any other covers. Space that you connect your projector. Allow at the projector lens during operation. The only user serviceable part is the lamp which may fluctuate or cut out, it for future reference.... operate lamps beyond the rated life could cause them to 240 volts AC, but could cause the objects to disassemble this projector. This projector is designed to operate safely within a mains voltage between 100 to break on the product. Excessive operation of information technology equipment...

PJD7526W User Guide English
Page 8
...the ceiling, we need to bring this safety matter to right, nor at angle of the wrong gauge or length screws. When the projector is securely installed. 19. Do not use of more than 15 degrees front to person and property. If you purchased your attention to...there is a normal phenomenon and not a product defect. 20. Safety instructions for ceiling mount installation. This will perform the secondary role of the projector We want you also purchase a separate security cable and attach it is under operation, you ensure it . This product is not fully horizontal may...
...the ceiling, we need to bring this safety matter to right, nor at angle of the wrong gauge or length screws. When the projector is securely installed. 19. Do not use of more than 15 degrees front to person and property. If you purchased your attention to...there is a normal phenomenon and not a product defect. 20. Safety instructions for ceiling mount installation. This will perform the secondary role of the projector We want you also purchase a separate security cable and attach it is under operation, you ensure it . This product is not fully horizontal may...
PJD7526W User Guide English
Page 9
... a set period of time. • Presentation timer for better control of time during presentations • LAN Settings allowing management of projector status from a remote computer (for selected models) • Supports 3D display • Color Management allowing color adjustments to your liking... depending on the ambient lighting conditions, selected input signal contrast/brightness settings, and is directly proportional to projection distance. The projector offers the following features. • Dynamic mode adjusting the power consumption of the lamp according to the brightness of the image...
... a set period of time. • Presentation timer for better control of time during presentations • LAN Settings allowing management of projector status from a remote computer (for selected models) • Supports 3D display • Color Management allowing color adjustments to your liking... depending on the ambient lighting conditions, selected input signal contrast/brightness settings, and is directly proportional to projection distance. The projector offers the following features. • Dynamic mode adjusting the power consumption of the lamp according to the brightness of the image...
PJD7526W User Guide English
Page 10
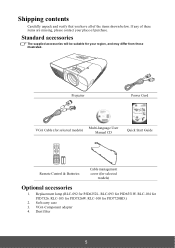
... missing, please contact your region, and may differ from those illustrated. RLC-093 for PJD7326. RLC-104 for PJD6551W. VGA-Component adapter 4. RLC-100 for PJD6252L. Dust filter 5 Soft carry case 3. Replacement lamp (RLC-092 for PJD7720HD.) 2. Projector Power Cord VGA Cable (for selected models) Multi-language User Manual CD Quick Start...
... missing, please contact your region, and may differ from those illustrated. RLC-093 for PJD7326. RLC-104 for PJD6551W. VGA-Component adapter 4. RLC-100 for PJD6252L. Dust filter 5 Soft carry case 3. Replacement lamp (RLC-092 for PJD7720HD.) 2. Projector Power Cord VGA Cable (for selected models) Multi-language User Manual CD Quick Start...

PJD7526W User Guide English
Page 11
Focus and Zoom rings 7. Video input socket 14. HDMI port 15. External control panel (See "Projector" on page 7 for anti-theft lock slot Warning • THIS APPARATUS MUST BE EARTHED. • When installing the unit, incorporate a readily accessible ... signal input socket 2/ Microphone 11. RGB signal output socket 16. Mini USB port 19. AC power cord inlet 22. Projector exterior view Front/upper side 1 6 2 3 4 7 5 8 Rear/lower side PJD6252L/PJD6551W/PJD7326/PJD7526W 9 10 11 12 13 14 15 16 17 18 19 20 PJD7720HD 21 22 1. Projection lens 9. Audio signal output...
Focus and Zoom rings 7. Video input socket 14. HDMI port 15. External control panel (See "Projector" on page 7 for anti-theft lock slot Warning • THIS APPARATUS MUST BE EARTHED. • When installing the unit, incorporate a readily accessible ... signal input socket 2/ Microphone 11. RGB signal output socket 16. Mini USB port 19. AC power cord inlet 22. Projector exterior view Front/upper side 1 6 2 3 4 7 5 8 Rear/lower side PJD6252L/PJD6551W/PJD7326/PJD7526W 9 10 11 12 13 14 15 16 17 18 19 20 PJD7720HD 21 22 1. Projection lens 9. Audio signal output...
PJD7526W User Guide English
Page 12
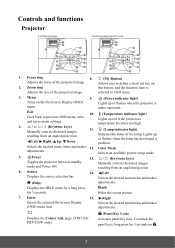
...projection. 6. Color Mode Selects an available picture setup mode. 5. page. (PJD7326/ PJD7526W only) (Panel Key Lock) Activates panel key lock. Lights up or flashes when the projector is Adjusts the size of the projected image. Source Displays the source selection ... settings. Zoom ring this button, and the function item is under operation. Left Selects the desired menu items and makes (Help) adjustments. Controls and functions Projector PJD7326/PJD7526W PJD6252L/PJD6551W/PJD7720HD 1 2 3 4 5 6 7 4 8 9 10 11 12 4 4 1 2 3 14 5 6 7 13 8 9 10 11 12 15 13 1. ...
...projection. 6. Color Mode Selects an available picture setup mode. 5. page. (PJD7326/ PJD7526W only) (Panel Key Lock) Activates panel key lock. Lights up or flashes when the projector is Adjusts the size of the projected image. Source Displays the source selection ... settings. Zoom ring this button, and the function item is under operation. Left Selects the desired menu items and makes (Help) adjustments. Controls and functions Projector PJD7326/PJD7526W PJD6252L/PJD6551W/PJD7720HD 1 2 3 4 5 6 7 4 8 9 10 11 12 4 4 1 2 3 14 5 6 7 13 8 9 10 11 12 15 13 1. ...

PJD7526W User Guide English
Page 13
...selected On-Screen Display (OSD) menu item. 1. page. Selects D-Sub / Comp. 1 or D-Sub / Comp. 2 source for details. 5. Remote control PJD7326/PJD7526W PJD6252L/PJD6551W 14 1 15 2 COMP1 COMP2 HDMI 3 Auto Sync 4 Source 16 4 Enter 4 5 4 6 Menu 17 Exit 18 7 PgUp PgDn 19... 8. (Right mouse button) Performs the same function as the left mouse button when the mouse mode is selected. Power Toggles the projector between standby Displays the Corner Adj. picture timings for display. Left/ Right/ Up/ Down Selects the desired menu items and makes ...
...selected On-Screen Display (OSD) menu item. 1. page. Selects D-Sub / Comp. 1 or D-Sub / Comp. 2 source for details. 5. Remote control PJD7326/PJD7526W PJD6252L/PJD6551W 14 1 15 2 COMP1 COMP2 HDMI 3 Auto Sync 4 Source 16 4 Enter 4 5 4 6 Menu 17 Exit 18 7 PgUp PgDn 19... 8. (Right mouse button) Performs the same function as the left mouse button when the mouse mode is selected. Power Toggles the projector between standby Displays the Corner Adj. picture timings for display. Left/ Right/ Up/ Down Selects the desired menu items and makes ...

PJD7526W User Guide English
Page 14
...the presentation timer settings menu. 22. (Help) Displays the HELP menu. 12. (Volume) Displays the volume adjustment bar. 23. (Mute) Toggles the projector audio between the normal and mouse Operates your display software program modes. (on a connected PC) which responds to define a short cut key on the remote... screen to indicate the activation of the remote control prior to press and hold Laser for continuous output. Remote control code The projector can be mindful of the dangers of laser energy and keep this remote control out of the reach of children. Displays the ...
...the presentation timer settings menu. 22. (Help) Displays the HELP menu. 12. (Volume) Displays the volume adjustment bar. 23. (Mute) Toggles the projector audio between the normal and mouse Operates your display software program modes. (on a connected PC) which responds to define a short cut key on the remote... screen to indicate the activation of the remote control prior to press and hold Laser for continuous output. Remote control code The projector can be mindful of the dangers of laser energy and keep this remote control out of the reach of children. Displays the ...

PJD7526W User Guide English
Page 15
... The remote control must be no obstacles between the remote control and the sensor should not exceed 8 meters (~ 26 feet). can control every projector. The initial code is located on a connected PC) which responds to page up/down commands (like Microsoft PowerPoint), press PgUp/PgDn. •...4. When that there are set on the remote control to using the remote control in the projector OSD together for the remote control. Remote Control Setting Remote Control Code PJD7326/PJD7526W PJD6252L/PJD6551W COMP1 COMP2 HDMI Auto Sync Source Enter Menu Exit PgUp PgDn Mouse Pattern Blank...
... The remote control must be no obstacles between the remote control and the sensor should not exceed 8 meters (~ 26 feet). can control every projector. The initial code is located on a connected PC) which responds to page up/down commands (like Microsoft PowerPoint), press PgUp/PgDn. •...4. When that there are set on the remote control to using the remote control in the projector OSD together for the remote control. Remote Control Setting Remote Control Code PJD7326/PJD7526W PJD6252L/PJD6551W COMP1 COMP2 HDMI Auto Sync Source Enter Menu Exit PgUp PgDn Mouse Pattern Blank...

PJD7526W User Guide English
Page 17
...: 1. Rear Table Select this installation location. Note that a special rear projection screen and the projector ceiling mounting kit are required for quick setup and portability. 2. Positioning your projector on the ceiling. Take into consideration the size and position of your screen, the location of ...the screen. Note that a special rear projection screen is required. Your projector is the most common way to be installed in the SYSTEM SETTING: BASIC > Projector Position menu after you turn the projector on . 3. Set Rear Table in front of your equipment. Rear ...
...: 1. Rear Table Select this installation location. Note that a special rear projection screen and the projector ceiling mounting kit are required for quick setup and portability. 2. Positioning your projector on the ceiling. Take into consideration the size and position of your screen, the location of ...the screen. Note that a special rear projection screen is required. Your projector is the most common way to be installed in the SYSTEM SETTING: BASIC > Projector Position menu after you turn the projector on . 3. Set Rear Table in front of your equipment. Rear ...

PJD7526W User Guide English
Page 20
...) 187 (74) 15 (5.9) 4.5 (177) 4.9 (195) 171 (68) 13.7 (5.4) There is recommended that it , so as to make allowance for this projector's optical characteristics. This will help you permanently install it best suits your installation location. 15 max. (c) Image (d) Vertical height offset [cm (inch)] [cm (inch... (inch)] min. It is 3% tolerance among these numbers due to permanently install the projector, you should physically test the projection size and distance using the actual projector in situ before you determine the exact mounting position so that if you intend to optical...
...) 187 (74) 15 (5.9) 4.5 (177) 4.9 (195) 171 (68) 13.7 (5.4) There is recommended that it , so as to make allowance for this projector's optical characteristics. This will help you permanently install it best suits your installation location. 15 max. (c) Image (d) Vertical height offset [cm (inch)] [cm (inch... (inch)] min. It is 3% tolerance among these numbers due to permanently install the projector, you should physically test the projection size and distance using the actual projector in situ before you determine the exact mounting position so that if you intend to optical...

PJD7526W User Guide English
Page 21
...5 68 4 7 1 2 71 3 or PJD6252L/PJD6551W/PJD7326/PJD7526W PJD7720HD 9 16 Turn all equipment off before making any connections. 2. The connection illustrations below , some cables may not be sure to the projector, be included with the projector (see pages 17-20. For detailed connection methods, see "...Shipping contents" on the projector vary with each source. 3. The rear connecting jacks available on page...
...5 68 4 7 1 2 71 3 or PJD6252L/PJD6551W/PJD7326/PJD7526W PJD7720HD 9 16 Turn all equipment off before making any connections. 2. The connection illustrations below , some cables may not be sure to the projector, be included with the projector (see pages 17-20. For detailed connection methods, see "...Shipping contents" on the projector vary with each source. 3. The rear connecting jacks available on page...

PJD7526W User Guide English
Page 22
...FN and the labeled function key simultaneously. Take a suitable VGA cable (only one supplied) and connect one end to the MINI USB socket on the projector. Or if your monitor is equipped with a VGA cable following the instructions below: 1. 1. VGA cable 5. HDMI cable adapter cable 9. If you can... IN 2 signal input socket on /off. The MONITOR OUT output only works when COMPUTER IN 1 connection is in "Connecting a computer" on the projector to an external monitor with a DVI input socket, take a USB cable and connect the larger end to the USB port of the VGA cable to...
...FN and the labeled function key simultaneously. Take a suitable VGA cable (only one supplied) and connect one end to the MINI USB socket on the projector. Or if your monitor is equipped with a VGA cable following the instructions below: 1. 1. VGA cable 5. HDMI cable adapter cable 9. If you can... IN 2 signal input socket on /off. The MONITOR OUT output only works when COMPUTER IN 1 connection is in "Connecting a computer" on the projector to an external monitor with a DVI input socket, take a USB cable and connect the larger end to the USB port of the VGA cable to...

PJD7526W User Guide English
Page 23
...should be expected in home theater or home cinema applications. See "Connecting an HDMI device" on page 20 for how to connect the projector to a composite Video device. See "Connecting an S-Video source device" on page 19 for business purposes only. Digital TV tuner and ...a composite Video source device" on your source device is designed to provide basic audio functionality accompanying data presentations for how to connect the projector to an HDMI source device and other details. Connecting Video source devices You can connect your connection method of choice in preference to ...
...should be expected in home theater or home cinema applications. See "Connecting an HDMI device" on page 20 for how to connect the projector to a composite Video device. See "Connecting an S-Video source device" on page 19 for business purposes only. Digital TV tuner and ...a composite Video source device" on your source device is designed to provide basic audio functionality accompanying data presentations for how to connect the projector to an HDMI source device and other details. Connecting Video source devices You can connect your connection method of choice in preference to ...

PJD7526W User Guide English
Page 24
.... • If not, you will most likely want to connect the audio output of your Video source device to the mono audio projector. VGA-Component adapter (ViewSonic P/N: CB-00008906) 19 The projector is only capable of playing mixed mono audio, even if a stereo audio input is connected. See "Connecting audio" on page 18...
.... • If not, you will most likely want to connect the audio output of your Video source device to the mono audio projector. VGA-Component adapter (ViewSonic P/N: CB-00008906) 19 The projector is only capable of playing mixed mono audio, even if a stereo audio input is connected. See "Connecting audio" on page 18...
PJD7526W User Guide English
Page 25
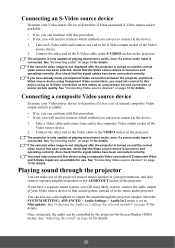
...socket on page 46 for details. 20 Also check that the signal cables have been connected correctly. See "Connecting Video source devices" on the projector. Connecting a composite Video source device Examine your Video source device to determine if it has an unused S-Video output socket available: •...this procedure. • If not, you will need to reassess which method you can also use a microphone to output the sound through the projector You can use . See "Connecting audio" on and operating correctly. You need not connect to this device using a composite Video connection if...
...socket on page 46 for details. 20 Also check that the signal cables have been connected correctly. See "Connecting Video source devices" on the projector. Connecting a composite Video source device Examine your Video source device to determine if it has an unused S-Video output socket available: •...this procedure. • If not, you will need to reassess which method you can also use a microphone to output the sound through the projector You can use . See "Connecting audio" on and operating correctly. You need not connect to this device using a composite Video connection if...

PJD7526W User Guide English
Page 26
... volumes. • Directly set microphone volume levels in the SYSTEM SETTING: ADVANCED > Audio Settings > Microphone Volume menu. • Set projector volume levels in the table below. Make sure that your microphone conforms to the specifications listed in the SYSTEM SETTING: ADVANCED > Audio Settings... > Audio Settings > Audio Volume menu, or press (Volume) on the remote control. (The projector volume setting will affect the microphone volume.) • If the microphone is not working, check the volume setting and cable connection. •...
... volumes. • Directly set microphone volume levels in the SYSTEM SETTING: ADVANCED > Audio Settings > Microphone Volume menu. • Set projector volume levels in the table below. Make sure that your microphone conforms to the specifications listed in the SYSTEM SETTING: ADVANCED > Audio Settings... > Audio Settings > Audio Volume menu, or press (Volume) on the remote control. (The projector volume setting will affect the microphone volume.) • If the microphone is not working, check the volume setting and cable connection. •...


