

VSD220 Datasheet Hires (English,US)
Page 2
... integrated Bluetooth, Wi-Fi and LAN (RJ45) for complete details. Three-year limited warranty on parts, labor and backlight. VSD220 smart display, power cord and adapter, micro HDMI to HDMI cable, micro USB to USB cable, Quick Start Guide ViewSonic Corporation's QMS & EMS have been registered to ISO 9001 & ISO 14001, respectively, by country...
... integrated Bluetooth, Wi-Fi and LAN (RJ45) for complete details. Three-year limited warranty on parts, labor and backlight. VSD220 smart display, power cord and adapter, micro HDMI to HDMI cable, micro USB to USB cable, Quick Start Guide ViewSonic Corporation's QMS & EMS have been registered to ISO 9001 & ISO 14001, respectively, by country...
VSD220 User Guide (English)
Page 13
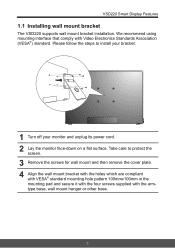
... Features 1.1 Installing wall mount bracket The VSD220 supports wall mount bracket installation. We recommend using mounting interface that comply with the armtype base, wall mount hanger or other base. 3 Take care to install your bracket: 1 Turn off your monitor and unplug its power cord. 2 Lay the monitor face-down on a flat surface. Please...
... Features 1.1 Installing wall mount bracket The VSD220 supports wall mount bracket installation. We recommend using mounting interface that comply with the armtype base, wall mount hanger or other base. 3 Take care to install your bracket: 1 Turn off your monitor and unplug its power cord. 2 Lay the monitor face-down on a flat surface. Please...

VSD220 User Guide (English)
Page 15
Set Up Your VSD220 Smart Display 2 Insert a micro SD card if desired and/ or available. Connect the Power Cord 1 Open the compartment cover on the back of the smart display. 2 Connect the included power cord to the power jack. 3 Connect the other end of the power cord to a suitable power outlet. 5
Set Up Your VSD220 Smart Display 2 Insert a micro SD card if desired and/ or available. Connect the Power Cord 1 Open the compartment cover on the back of the smart display. 2 Connect the included power cord to the power jack. 3 Connect the other end of the power cord to a suitable power outlet. 5
VSD220 User Guide (English)
Page 16
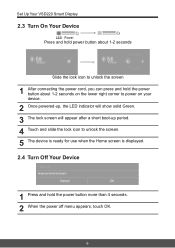
Set Up Your VSD220 Smart Display 2.3 Turn On Your Device Press and hold power button about 1-2 seconds Slide the lock icon to unlock the screen 1 After connecting the power cord, you can press and hold the power button about 1-2 seconds on the lower right corner to power on your device. 2 Once powered-up, the LED indicator will show... icon to unlock the screen. 5 The device is ready for use when the Home screen is displayed. 2.4 Turn Off Your Device 1 Press and hold the power button more than 4 seconds. 2 When the power off menu appears, touch OK. 6
Set Up Your VSD220 Smart Display 2.3 Turn On Your Device Press and hold power button about 1-2 seconds Slide the lock icon to unlock the screen 1 After connecting the power cord, you can press and hold the power button about 1-2 seconds on the lower right corner to power on your device. 2 Once powered-up, the LED indicator will show... icon to unlock the screen. 5 The device is ready for use when the Home screen is displayed. 2.4 Turn Off Your Device 1 Press and hold the power button more than 4 seconds. 2 When the power off menu appears, touch OK. 6

