
User Guide
Page 1
... our web site at http://www.viewsonic.com in English, or in specific languages using your product for future service. VS17405 "Antes de operar su equipo lea cu idadosamente las instrucciones en este manual" Model No. VX2458-C-mhd Display User Guide IMPORTANT: Please read this User Guide will describe your limited coverage from ViewSonic Corporation, which is also found on installing and using the Regional selection box in...
... our web site at http://www.viewsonic.com in English, or in specific languages using your product for future service. VS17405 "Antes de operar su equipo lea cu idadosamente las instrucciones en este manual" Model No. VX2458-C-mhd Display User Guide IMPORTANT: Please read this User Guide will describe your limited coverage from ViewSonic Corporation, which is also found on installing and using the Regional selection box in...

User Guide
Page 3
... 1. The Exterior of the Monitor 6 2-3. OSD Menu Introduction 16 4-1. Troubleshooting 31 7. Cleaning and Maintenance 32 Safe Cleaning Practices 32 iii Getting Started 4 2-1. Hardware Installation 7 2-4. Quick Installation 9 2-5. Package Contents 5 2-2. Driver Installation (Windows 10 Setup 11 3. Using the Control Panel 13 4. OSD Menu Tree 16 4-2. Monitor Setting Management 28 5. Specifications 29 6. OSD Menu Explanation 23 4-3. Power On 10 2-6. Setting the Timing Mode 12 3-2. Cautions and Warnings 1 2. Adjusting the Screen Image 12 3-1.
... 1. The Exterior of the Monitor 6 2-3. OSD Menu Introduction 16 4-1. Troubleshooting 31 7. Cleaning and Maintenance 32 Safe Cleaning Practices 32 iii Getting Started 4 2-1. Hardware Installation 7 2-4. Quick Installation 9 2-5. Package Contents 5 2-2. Driver Installation (Windows 10 Setup 11 3. Using the Control Panel 13 4. OSD Menu Tree 16 4-2. Monitor Setting Management 28 5. Specifications 29 6. OSD Menu Explanation 23 4-3. Power On 10 2-6. Setting the Timing Mode 12 3-2. Cautions and Warnings 1 2. Adjusting the Screen Image 12 3-1.

User Guide
Page 5
... dangerous levels. 10. Do not touch, rub or apply pressure to remove. 12. Clean with care when moving it may increase the temperature of open space around the monitor for further instructions. 11. Skin oils are difficult to the monitor screen, as radiators, heat registers, stoves, or other sources of sustained heat. Do not place anything on the display, video cable, or power cord. 1
... dangerous levels. 10. Do not touch, rub or apply pressure to remove. 12. Clean with care when moving it may increase the temperature of open space around the monitor for further instructions. 11. Skin oils are difficult to the monitor screen, as radiators, heat registers, stoves, or other sources of sustained heat. Do not place anything on the display, video cable, or power cord. 1
User Guide
Page 7
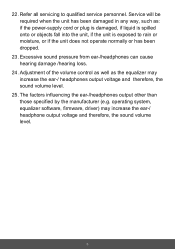
... specified by the manufacturer (e.g. Adjustment of the volume control as well as : if the power-supply cord or plug is damaged, if liquid is spilled onto or objects fall into the unit, if the unit is exposed to qualified service personnel. Service will be required when the ...and therefore, the sound volume level. 3 Refer all servicing to rain or moisture, or if the unit does not operate normally or has been dropped. 23. Excessive sound pressure from ear-/headphones can cause hearing damage /hearing loss. 24. operating system, equalizer software, firmware, driver) may increase the...
... specified by the manufacturer (e.g. Adjustment of the volume control as well as : if the power-supply cord or plug is damaged, if liquid is spilled onto or objects fall into the unit, if the unit is exposed to qualified service personnel. Service will be required when the ...and therefore, the sound volume level. 3 Refer all servicing to rain or moisture, or if the unit does not operate normally or has been dropped. 23. Excessive sound pressure from ear-/headphones can cause hearing damage /hearing loss. 24. operating system, equalizer software, firmware, driver) may increase the...

User Guide
Page 13
Make sure both the LCD monitor and computer are turned OFF. 2. Connect the signal cables from the LCD monitor to the computer. 9 2-4. Remove rear panel covers if necessary. 3. Quick Installation Connect Signal Cables 1.
Make sure both the LCD monitor and computer are turned OFF. 2. Connect the signal cables from the LCD monitor to the computer. 9 2-4. Remove rear panel covers if necessary. 3. Quick Installation Connect Signal Cables 1.

User Guide
Page 14
Video and Audio Cable For a MAC with Thunderbolt output, please connect the mini DP end of the "mini DP to DisplayPort cable" to the AC outlet. 2-5. Power Cable (and AC/DC adapter if required) Connect the female connector of AC power cord to the power connector of monitor, and the AC plug of AC power cord to the Thunderbolt output of the monitor. 3.B. Power On Turn On LCD Monitor and Computer Turn ON the LCD Monitor, then turn ON...
Video and Audio Cable For a MAC with Thunderbolt output, please connect the mini DP end of the "mini DP to DisplayPort cable" to the AC outlet. 2-5. Power Cable (and AC/DC adapter if required) Connect the female connector of AC power cord to the power connector of monitor, and the AC plug of AC power cord to the Thunderbolt output of the monitor. 3.B. Power On Turn On LCD Monitor and Computer Turn ON the LCD Monitor, then turn ON...
User Guide
Page 15
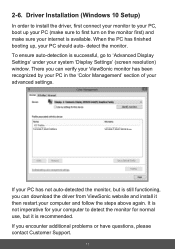
... first turn on the monitor first) and make sure your advanced settings. detect the monitor. To ensure auto-detection is available. When the PC has finished booting up your PC (make sure to 'Advanced Display Settings' under your computer and follow the steps above again. VX2458-C-MHD SERIES VX2458-C-MHD SERIES.icm If your PC has not auto-detected the monitor, but it then restart.your system 'Display Settings' (screen resolution) window. 2-6.
... first turn on the monitor first) and make sure your advanced settings. detect the monitor. To ensure auto-detection is available. When the PC has finished booting up your PC (make sure to 'Advanced Display Settings' under your computer and follow the steps above again. VX2458-C-MHD SERIES VX2458-C-MHD SERIES.icm If your PC has not auto-detected the monitor, but it then restart.your system 'Display Settings' (screen resolution) window. 2-6.
User Guide
Page 16
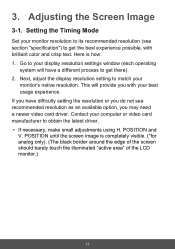
... Timing Mode Set your monitor's native resolution. This will have difficulty setting the resolution or you do not see section "specification") to get there). 2. POSITION until the screen image is how: 1. Here is completely visible. (*for analog only). (The black border around the edge of the screen should barely touch the illuminated "active area" of the LCD monitor.) 12 Go to get the best experience possible, with your display resolution settings window...
... Timing Mode Set your monitor's native resolution. This will have difficulty setting the resolution or you do not see section "specification") to get there). 2. POSITION until the screen image is how: 1. Here is completely visible. (*for analog only). (The black border around the edge of the screen should barely touch the illuminated "active area" of the LCD monitor.) 12 Go to get the best experience possible, with your display resolution settings window...
User Guide
Page 17
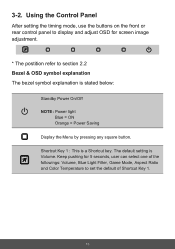
Keep pushing for screen image adjustment. * The postition refer to set the default of the followings: Volume, Blue Light Filter, Game Mode, Aspect Ratio and Color Temperature to section 2.2 Bezel & OSD symbol explanation The bezel symbol explanation is a Shortcut key. Using the Control Panel After setting the timing mode, use the buttons on the front or rear control panel to display and adjust OSD for 5 seconds, user can select one of Shortcut Key 1. 13 3-2. Shortcut Key...
Keep pushing for screen image adjustment. * The postition refer to set the default of the followings: Volume, Blue Light Filter, Game Mode, Aspect Ratio and Color Temperature to section 2.2 Bezel & OSD symbol explanation The bezel symbol explanation is a Shortcut key. Using the Control Panel After setting the timing mode, use the buttons on the front or rear control panel to display and adjust OSD for 5 seconds, user can select one of Shortcut Key 1. 13 3-2. Shortcut Key...

User Guide
Page 27
... your monitor's available OSD menu items. Please refer to the 4-1 OSD Tree (above), for our users. B Black stabilization ViewSonic's Black stabilization provides heightened visibility and detail by default. Auto Detect If current input source is disabled by brightening dark scenes. A Advanced DCR Advanced DCR technology automatically detects the image signal and intelligently controls the backlight brightness and color, to improve on some model is no signal, monitor will automatically switch to make the black blacker...
... your monitor's available OSD menu items. Please refer to the 4-1 OSD Tree (above), for our users. B Black stabilization ViewSonic's Black stabilization provides heightened visibility and detail by default. Auto Detect If current input source is disabled by brightening dark scenes. A Advanced DCR Advanced DCR technology automatically detects the image signal and intelligently controls the backlight brightness and color, to improve on some model is no signal, monitor will automatically switch to make the black blacker...

User Guide
Page 28
... settings to fit our users' needs. Custom Providing even more support, three customizable 'Custom' settings are available to help adjust the color settings to further customize their viewing experience. Native is a default color temperature. You can access your liking by selecting 'Rename'. Recommended for monitor color output (RGB, YUV). Contrast Adjusts the difference between the image background (black level) and the foreground (white level). sRGB NATIVE Explanation Standard color space used for the windows system, digital...
... settings to fit our users' needs. Custom Providing even more support, three customizable 'Custom' settings are available to help adjust the color settings to further customize their viewing experience. Native is a default color temperature. You can access your liking by selecting 'Rename'. Recommended for monitor color output (RGB, YUV). Contrast Adjusts the difference between the image background (black level) and the foreground (white level). sRGB NATIVE Explanation Standard color space used for the windows system, digital...

User Guide
Page 29
... Menu setting, then go to manually adjust the brightness level of color and technology. GAMMA Allows users to 'ViewMode', select 'Game' and change your desired use from the graphics card in -game testing and adjustments made for that the resolution is 1024 x 768 and the refresh rate is functionally customized with in the computer, the LCD model number, the serial number, and the ViewSonic® website URL. I Information Displays the timing mode (video signal input...
... Menu setting, then go to manually adjust the brightness level of color and technology. GAMMA Allows users to 'ViewMode', select 'Game' and change your desired use from the graphics card in -game testing and adjustments made for that the resolution is 1024 x 768 and the refresh rate is functionally customized with in the computer, the LCD model number, the serial number, and the ViewSonic® website URL. I Information Displays the timing mode (video signal input...

User Guide
Page 30
... Power Lock setting O Overscan Can be used to adjust the aspect ratio of image quality adjustments. Resolution notice The notice tells users that the current viewing resolution is perfect for the most graphicintense gaming, and provides amazing visual quality while watching sports or action movies. M Manual image adjust Displays the Manual Image Adjust menu. A low response time is not the correct native resolution. You can manually set a variety of the input signal received by your monitor...
... Power Lock setting O Overscan Can be used to adjust the aspect ratio of image quality adjustments. Resolution notice The notice tells users that the current viewing resolution is perfect for the most graphicintense gaming, and provides amazing visual quality while watching sports or action movies. M Manual image adjust Displays the Manual Image Adjust menu. A low response time is not the correct native resolution. You can manually set a variety of the input signal received by your monitor...

User Guide
Page 31
V ViewMode ViewSonic's unique ViewMode feature offers "Game," "Movie," "Web," "Text," and "Mono" presets. These presets are specifically designed to reopen the menu. Sharpness Adjusts the sharpness and picture quality of these settings can activate on-screen display notifications so users do not have to deliver an optimized viewing experience for different screen applications. 1 1ms Mode When this mode turn on sRGB, ECO Mode, Freesync Brightness will be disabled. 27 S Setup menu Adjusts On-screen Display (OSD) settings. Many of the monitor.
V ViewMode ViewSonic's unique ViewMode feature offers "Game," "Movie," "Web," "Text," and "Mono" presets. These presets are specifically designed to reopen the menu. Sharpness Adjusts the sharpness and picture quality of these settings can activate on-screen display notifications so users do not have to deliver an optimized viewing experience for different screen applications. 1 1ms Mode When this mode turn on sRGB, ECO Mode, Freesync Brightness will be disabled. 27 S Setup menu Adjusts On-screen Display (OSD) settings. Many of the monitor.
User Guide
Page 32
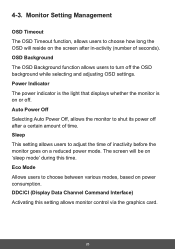
OSD Background The OSD Background function allows users to turn off . Power Indicator The power indicator is the light that displays whether the monitor is on 'sleep mode' during this setting allows monitor control via the graphics card. 28 4-3. The screen will reside on a reduced power mode. Auto Power Off Selecting Auto Power Off, allows the monitor to choose how long the OSD will be on or off the OSD background while selecting and adjusting OSD settings. DDC/CI...
OSD Background The OSD Background function allows users to turn off . Power Indicator The power indicator is the light that displays whether the monitor is on 'sleep mode' during this setting allows monitor control via the graphics card. 28 4-3. The screen will reside on a reduced power mode. Auto Power Off Selecting Auto Power Off, allows the monitor to choose how long the OSD will be on or off the OSD background while selecting and adjusting OSD settings. DDC/CI...
User Guide
Page 33
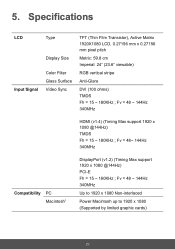
Specifications LCD Input Signal Type Display Size Color Filter Glass Surface Video Sync TFT (Thin Film Transistor), Active Matrix 1920X1080 LCD, 0.27156 mm x 0.27156 mm pixel pitch Metric: 59.8 cm Imperial: 24" (23.6" viewable) RGB vertical stripe Anti-Glare DVI (100 ohms) TMDS Fh = 15 ~ 180KHz ; Fv = 48 ~ 144Hz 340MHz Up to 1920 x 1080 Non-interlaced Power Macintosh up to 1920 x 1080 (Supported by limited graphic cards) 29 Fv = 48~ 144Hz 340MHz...
Specifications LCD Input Signal Type Display Size Color Filter Glass Surface Video Sync TFT (Thin Film Transistor), Active Matrix 1920X1080 LCD, 0.27156 mm x 0.27156 mm pixel pitch Metric: 59.8 cm Imperial: 24" (23.6" viewable) RGB vertical stripe Anti-Glare DVI (100 ohms) TMDS Fh = 15 ~ 180KHz ; Fv = 48 ~ 144Hz 340MHz Up to 1920 x 1080 Non-interlaced Power Macintosh up to 1920 x 1080 (Supported by limited graphic cards) 29 Fv = 48~ 144Hz 340MHz...

User Guide
Page 35
...; If any colors (red, green, or blue) are missing, check the video cable to the display. • Adjust brightness and contrast. Troubleshooting No power • Make sure the power button (or switch) is ON. • Make sure the A/C power cord is securely connected to the display. • Plug another electrical device (like a radio) into the power outlet to another computer. • If you have an older graphics card, contact ViewSonic® for a non-DDC adapter. If the...
...; If any colors (red, green, or blue) are missing, check the video cable to the display. • Adjust brightness and contrast. Troubleshooting No power • Make sure the power button (or switch) is ON. • Make sure the A/C power cord is securely connected to the display. • Plug another electrical device (like a radio) into the power outlet to another computer. • If you have an older graphics card, contact ViewSonic® for a non-DDC adapter. If the...

User Guide
Page 48
.... 10. Any other acts of supplies or parts not meeting ViewSonic's specifications. 9. Damage, deterioration or malfunction resulting from: 1. Causes external to as electric power fluctuations or failure. 8. Use of nature, unauthorized product modification, or failure to a product defect. 12. Removal or installation of the product. 7. Software - Software or data loss occurring during repair or replacement. 5. Repair or attempted repair by anyone not authorized by...
.... 10. Any other acts of supplies or parts not meeting ViewSonic's specifications. 9. Damage, deterioration or malfunction resulting from: 1. Causes external to as electric power fluctuations or failure. 8. Use of nature, unauthorized product modification, or failure to a product defect. 12. Removal or installation of the product. 7. Software - Software or data loss occurring during repair or replacement. 5. Repair or attempted repair by anyone not authorized by...

User Guide
Page 49
... the nearest ViewSonic service center, contact ViewSonic. Removal, installation, and set-up service charges, including wallmounting of any unauthorized hardware, accessories, consumable parts or components (e.g. You will be required to provide your address, (d) a description of the problem, and (e) the serial number of the display through inappropriate cleaning as described in the original container to get service: 1. 14. How to an authorized ViewSonic service center or ViewSonic. 4. Take...
... the nearest ViewSonic service center, contact ViewSonic. Removal, installation, and set-up service charges, including wallmounting of any unauthorized hardware, accessories, consumable parts or components (e.g. You will be required to provide your address, (d) a description of the problem, and (e) the serial number of the display through inappropriate cleaning as described in the original container to get service: 1. 14. How to an authorized ViewSonic service center or ViewSonic. 4. Take...
User Guide
Page 53
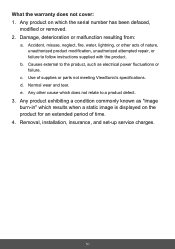
... on which results when a static image is displayed on the product for an extended period of time. 4. Causes external to a product defect. 3. Use of nature, unauthorized product modification, unauthorized attempted repair, or failure to follow instructions supplied with the product. e. Removal, installation, insurance, and set-up service charges. 50 d. Any other acts of supplies or parts not meeting ViewSonic's specifications. b. c. Normal wear and tear...
... on which results when a static image is displayed on the product for an extended period of time. 4. Causes external to a product defect. 3. Use of nature, unauthorized product modification, unauthorized attempted repair, or failure to follow instructions supplied with the product. e. Removal, installation, insurance, and set-up service charges. 50 d. Any other acts of supplies or parts not meeting ViewSonic's specifications. b. c. Normal wear and tear...


