
Installation Instructions
Page 1
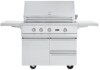
Viking Use/Installation Guide Viking Range, LLC 111 Front Street Greenwood, Mississippi 38930 USA (662) 455-1200 For product information, call 1-888-(845-4641) or visit the Viking website at vikingrange.com F21362 EN (120913) Outdoor Gas Grill VGBQ 5 Series Carts
Viking Use/Installation Guide Viking Range, LLC 111 Front Street Greenwood, Mississippi 38930 USA (662) 455-1200 For product information, call 1-888-(845-4641) or visit the Viking website at vikingrange.com F21362 EN (120913) Outdoor Gas Grill VGBQ 5 Series Carts

Installation Instructions
Page 2
... and clockwise to 4 inches hanging out the front making sure that the shelf adjustment screw is very heavy! After securing the grill to drill them out with the cart into the 5/8" (1.6 cm) holes in the grill heat shields. Shelf adjustment screw Front View Supports 2 3 Drill through the heat shield. BEFORE INSTALLING GRILL TO CART: Remove drip tray, grill grates, flavor grids, and...
... and clockwise to 4 inches hanging out the front making sure that the shelf adjustment screw is very heavy! After securing the grill to drill them out with the cart into the 5/8" (1.6 cm) holes in the grill heat shields. Shelf adjustment screw Front View Supports 2 3 Drill through the heat shield. BEFORE INSTALLING GRILL TO CART: Remove drip tray, grill grates, flavor grids, and...

Installation Instructions
Page 3
...screws in or out will center the door in the frame. 2) The back screw is used to align the front of the door with the cart frame and secure the door to secure the door. CART DIMENSIONS 5 Series 30" W. Retighten the screw to the cart. Slightly loosen the screw and slide the ...door in the opening. Depending on how level the surface the cart is being placed on, the door(s) may need to be adjusted after the grill is assembled on the hinge receiver. 1) The front screw is used to...
...screws in or out will center the door in the frame. 2) The back screw is used to align the front of the door with the cart frame and secure the door to secure the door. CART DIMENSIONS 5 Series 30" W. Retighten the screw to the cart. Slightly loosen the screw and slide the ...door in the opening. Depending on how level the surface the cart is being placed on, the door(s) may need to be adjusted after the grill is assembled on the hinge receiver. 1) The front screw is used to...

Installation Instructions
Page 5
... to have the following information handy: • Model Number • Serial Number • Date of Purchase • Name of parts, use only authorized parts to obtain the name of the authorized service agency can be obtained from whom purchased Be ready to clearly describe the problem that you continue to have service problems, contact Viking Range, LLC at (888) 845-4641...
... to have the following information handy: • Model Number • Serial Number • Date of Purchase • Name of parts, use only authorized parts to obtain the name of the authorized service agency can be obtained from whom purchased Be ready to clearly describe the problem that you continue to have service problems, contact Viking Range, LLC at (888) 845-4641...

Installation Instructions
Page 6
... and to be free from the date of the warranty. Replacement of the product or its free installation, except as detailed below*, are warranted to each transferee owner of the product during the full warranty period after a reasonable number of attempts by a factory authorized Viking Range, LLC service agent or representative. This warranty gives you specific legal rights, and...
... and to be free from the date of the warranty. Replacement of the product or its free installation, except as detailed below*, are warranted to each transferee owner of the product during the full warranty period after a reasonable number of attempts by a factory authorized Viking Range, LLC service agent or representative. This warranty gives you specific legal rights, and...


