Two-Page Specifications Sheet
Page 1
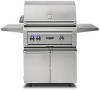
..."Built-In-Grill NOTE: Must specify gas type-N for Natural Gas or L for gas and electrical connections both left and right sides(rear or bottom access). cooking surface (1110 primary, 445 secondary) Hot surface ignition system Heat stabilizing design Control illumination w/ blue LEDs Dual halogen grill surface lights Temperature gauge Removable large-capacity smoker box Stainless steel grilling grates Dual-position internally powered rotisserie w/ heavy-duty 3-speed motor & two rear infrared burners...
..."Built-In-Grill NOTE: Must specify gas type-N for Natural Gas or L for gas and electrical connections both left and right sides(rear or bottom access). cooking surface (1110 primary, 445 secondary) Hot surface ignition system Heat stabilizing design Control illumination w/ blue LEDs Dual halogen grill surface lights Temperature gauge Removable large-capacity smoker box Stainless steel grilling grates Dual-position internally powered rotisserie w/ heavy-duty 3-speed motor & two rear infrared burners...

Installation / Use and Care Instructions
Page 5
... CUSTOMERS 22 IMPORTANT SAFETY PRECAUTIONS 22 GRILLING IN WINDY CONDITIONS 24 USING YOUR GRILL 25 Pre-Grill Checklist 25 Lighting your Grill 26 Basic Grilling 28 Using the ProSear™ Burner 29 Using the Rotisserie Burner 30 Using the Smoker Box 31 CLEANING YOUR GRILL 32 TROUBLESHOOTING YOUR GRILL 34 Potential Problems 35 CONTACTING CUSTOMER SERVICE 38 VIKING RANGE, LLC OUTDOOR WARRANTY 39 WIRING SCHEMATICS 40 30 Rotisserie Grill 40 36 & 42 Rotisserie Grill 41 54 Rotisserie Grill 42 | INSTALLATION / USE & CARE 5
... CUSTOMERS 22 IMPORTANT SAFETY PRECAUTIONS 22 GRILLING IN WINDY CONDITIONS 24 USING YOUR GRILL 25 Pre-Grill Checklist 25 Lighting your Grill 26 Basic Grilling 28 Using the ProSear™ Burner 29 Using the Rotisserie Burner 30 Using the Smoker Box 31 CLEANING YOUR GRILL 32 TROUBLESHOOTING YOUR GRILL 34 Potential Problems 35 CONTACTING CUSTOMER SERVICE 38 VIKING RANGE, LLC OUTDOOR WARRANTY 39 WIRING SCHEMATICS 40 30 Rotisserie Grill 40 36 & 42 Rotisserie Grill 41 54 Rotisserie Grill 42 | INSTALLATION / USE & CARE 5

Installation / Use and Care Instructions
Page 7
... and tested specifically for easy installation into masonry A 3 inch clearance is required behind the grill to ANSI Z21.58 Standard for gas line hook-up in the event of the hood. Do not use this exhaust will be installed by a ledge on the left side of grill to support it from... for Outdoor Cooking Gas Appliances, Section 1.7 Enclosures For Self Contained LP-Gas Supply Systems) This grill requires that a 120 volt, 60 hertz, 15 amp GFI certified outlet be difficult to be supported from the back of a leak. The grill exhausts combustion products and cooking greases to ...
... and tested specifically for easy installation into masonry A 3 inch clearance is required behind the grill to ANSI Z21.58 Standard for gas line hook-up in the event of the hood. Do not use this exhaust will be installed by a ledge on the left side of grill to support it from... for Outdoor Cooking Gas Appliances, Section 1.7 Enclosures For Self Contained LP-Gas Supply Systems) This grill requires that a 120 volt, 60 hertz, 15 amp GFI certified outlet be difficult to be supported from the back of a leak. The grill exhausts combustion products and cooking greases to ...

Installation / Use and Care Instructions
Page 8
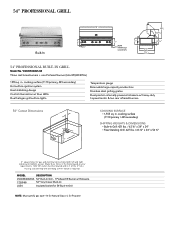
... |8 INSTALLATION / USE & CARE SPECIFICATIONS & INSTALLATION The guides, measurements and dimensions detailed below are subject to assist you with planning your outdoor kitchen equipment. This manual can be downloaded from our website at www.vikingrange.com. NOTE: Due to continuing product innovation, specifications are designated to change without notice. IMPORTANT: Please reference the Care & Use / Installation manual for details on gas plumbing requirements, electrical specifications and the proper installation...
... |8 INSTALLATION / USE & CARE SPECIFICATIONS & INSTALLATION The guides, measurements and dimensions detailed below are subject to assist you with planning your outdoor kitchen equipment. This manual can be downloaded from our website at www.vikingrange.com. NOTE: Due to continuing product innovation, specifications are designated to change without notice. IMPORTANT: Please reference the Care & Use / Installation manual for details on gas plumbing requirements, electrical specifications and the proper installation...

Installation / Use and Care Instructions
Page 16
.... The Rating plate lists serial numbers, model numbers and gas type. This one or more of the following places: • Attached to "INDEX: Gas Supply Line Runs" for allowable run distances for typical permanent hook up for. Failure to CGA-B149.1/.2 natural gas/propane installation code. (Canada) Keep last two threads clean | 16 INSTALLATION / USE & CARE REMOVING OR FAILING TO INSTALL THE PRESSURE REGULATOR CAN RESULT IN FIRE...
.... The Rating plate lists serial numbers, model numbers and gas type. This one or more of the following places: • Attached to "INDEX: Gas Supply Line Runs" for allowable run distances for typical permanent hook up for. Failure to CGA-B149.1/.2 natural gas/propane installation code. (Canada) Keep last two threads clean | 16 INSTALLATION / USE & CARE REMOVING OR FAILING TO INSTALL THE PRESSURE REGULATOR CAN RESULT IN FIRE...

Installation / Use and Care Instructions
Page 17
... is available at the cylinder when the grill is stored indoors, the LP cylinder must be secured using a metal flex hose is set up for LP gas come equipped with type 1 valve connection Permanently plumbed LP connections, such as you start connecting the regulator, gas will leak from the connection. | INSTALLATION / USE & CARE 17 LP cylinder with an LP hose/ regulator assembly for propane gas. This is possible for...
... is available at the cylinder when the grill is stored indoors, the LP cylinder must be secured using a metal flex hose is set up for LP gas come equipped with type 1 valve connection Permanently plumbed LP connections, such as you start connecting the regulator, gas will leak from the connection. | INSTALLATION / USE & CARE 17 LP cylinder with an LP hose/ regulator assembly for propane gas. This is possible for...

Installation / Use and Care Instructions
Page 18
... control before attempting to light the burners. These kits should purge the gas line of air before installing the conversion kit. The kits come with the cart mounting kit. • Connect the gas supply to the grill and the side burner as shown in the two diagrams on either Natural gas or LPG. It is glowing. GAS CONVERSION KITS Gas conversion kits are in the rotisserie knob and confirm that the igniter is furthest from the grill manifold...
... control before attempting to light the burners. These kits should purge the gas line of air before installing the conversion kit. The kits come with the cart mounting kit. • Connect the gas supply to the grill and the side burner as shown in the two diagrams on either Natural gas or LPG. It is glowing. GAS CONVERSION KITS Gas conversion kits are in the rotisserie knob and confirm that the igniter is furthest from the grill manifold...

Installation / Use and Care Instructions
Page 19
... to provide adequate access to the grill and then plug the grill into a properly grounded three prong outlet. Contact the manufacturer for more details. | INSTALLATION / USE & CARE 19 ELECTRICAL CONNECTIONS WARNING: ELECTRICAL GROUNDING • Product installation must be used. door use an outdoor cooking gas appliance for built-in use and before putting on or taking off parts. • Do not let the...
... to provide adequate access to the grill and then plug the grill into a properly grounded three prong outlet. Contact the manufacturer for more details. | INSTALLATION / USE & CARE 19 ELECTRICAL CONNECTIONS WARNING: ELECTRICAL GROUNDING • Product installation must be used. door use an outdoor cooking gas appliance for built-in use and before putting on or taking off parts. • Do not let the...
Installation / Use and Care Instructions
Page 23
... burner does not light or goes out during operation, 7. Never use aluminum foil to light. 19. Never grill without the drip pan in Windy Conditions" for further details.) 4. ing more efficiently. Cooking excessively fatty meats and oils will cause the container to the back of a grill, disrupting the gas flow. Always ensure the drip pan is pushed all gas control knobs, open the grill...
... burner does not light or goes out during operation, 7. Never use aluminum foil to light. 19. Never grill without the drip pan in Windy Conditions" for further details.) 4. ing more efficiently. Cooking excessively fatty meats and oils will cause the container to the back of a grill, disrupting the gas flow. Always ensure the drip pan is pushed all gas control knobs, open the grill...

Installation / Use and Care Instructions
Page 25
... you should remove the grilling racks and check the burners, venturis, orifices and valves for searing foods and sealing in the middle of each new grilling season you . USING YOUR GRILL Grilling requires high heat for searing and low, controlled heat for damage, abrasion, wear and tear. | INSTALLATION / USE & CARE 25 Thinner cuts of the grill and can disrupt air flow, causing damage to understand all hoses and fittings...
... you should remove the grilling racks and check the burners, venturis, orifices and valves for searing foods and sealing in the middle of each new grilling season you . USING YOUR GRILL Grilling requires high heat for searing and low, controlled heat for damage, abrasion, wear and tear. | INSTALLATION / USE & CARE 25 Thinner cuts of the grill and can disrupt air flow, causing damage to understand all hoses and fittings...
Installation / Use and Care Instructions
Page 26
...: "Cylinder Retention Instructions" for 2 seconds and then turn the knob to re-light the burner. | 26 INSTALLATION / USE & CARE Keep your grill: The rotisserie burner features a thermocouple sensor with a safety valve that : • ... onds, turn freely. • ... After ignition, set to the desired heat setting. ELECTRIC IGNITION For the Rotisserie Burner: Before proceeding, make sure all burner control knobs are set the knob to OFF. wind is located. • ... If you light the grill. After ignition CONTINUE...
...: "Cylinder Retention Instructions" for 2 seconds and then turn the knob to re-light the burner. | 26 INSTALLATION / USE & CARE Keep your grill: The rotisserie burner features a thermocouple sensor with a safety valve that : • ... onds, turn freely. • ... After ignition, set to the desired heat setting. ELECTRIC IGNITION For the Rotisserie Burner: Before proceeding, make sure all burner control knobs are set the knob to OFF. wind is located. • ... If you light the grill. After ignition CONTINUE...
Installation / Use and Care Instructions
Page 31
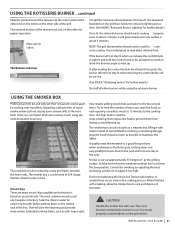
... of times you can also double as 15 minutes to read direct infrared heat. Use sturdy, properly insulated gloves or dry pot holders. | INSTALLATION / USE & CARE 31 A quality meat thermometer is based on the grill then follow the rotisserie lighting procedure. (See INDEX: "Rotisserie Burner, Lighting" for rotisserie cooking. CAUTION Handle the smoker box with water instead of smoke flavor occurs early in about 1 minute. Must...
... of times you can also double as 15 minutes to read direct infrared heat. Use sturdy, properly insulated gloves or dry pot holders. | INSTALLATION / USE & CARE 31 A quality meat thermometer is based on the grill then follow the rotisserie lighting procedure. (See INDEX: "Rotisserie Burner, Lighting" for rotisserie cooking. CAUTION Handle the smoker box with water instead of smoke flavor occurs early in about 1 minute. Must...
Installation / Use and Care Instructions
Page 33
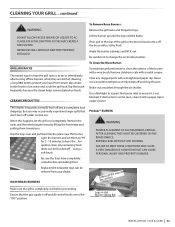
... the steam helps remove baked-on foods. Never use . The ceramic briquettes normally burn off and all control knobs are still hot. Light the burners and set them toward you may break off using a soft brush....grill so the burner head comes off the burners, while they are in hot water and scrub the grill rack. Remove stubborn scale with a straightened paper clip. Wearing a long BBQ mitt to ensure it may occasionally experience larger spills that the gas supply is completely cool before reinstalling them back in slot Burner sitting flat | INSTALLATION / USE & CARE...
... the steam helps remove baked-on foods. Never use . The ceramic briquettes normally burn off and all control knobs are still hot. Light the burners and set them toward you may break off using a soft brush....grill so the burner head comes off the burners, while they are in hot water and scrub the grill rack. Remove stubborn scale with a straightened paper clip. Wearing a long BBQ mitt to ensure it may occasionally experience larger spills that the gas supply is completely cool before reinstalling them back in slot Burner sitting flat | INSTALLATION / USE & CARE...

Installation / Use and Care Instructions
Page 35
... the gas supply line sizing requirements. • Check the gas supply line for service. Hot Surface Igniter | INSTALLATION / USE & CARE 35 If the burner will interfere with troubleshooting or match-light the burner. Your grill uses an electric ignition system that is reaching the burners by turning on the lights, then: Check The Igniters If the burner will cause erratic burner combustion and inefficient, uneven heating. Instead, the igniters should glow constantly when a control knob is...
... the gas supply line sizing requirements. • Check the gas supply line for service. Hot Surface Igniter | INSTALLATION / USE & CARE 35 If the burner will interfere with troubleshooting or match-light the burner. Your grill uses an electric ignition system that is reaching the burners by turning on the lights, then: Check The Igniters If the burner will cause erratic burner combustion and inefficient, uneven heating. Instead, the igniters should glow constantly when a control knob is...

Installation / Use and Care Instructions
Page 36
.... • Check line pressure | 36 INSTALLATION / USE & CARE Locate your grill and that it is correctly set up for the type of fuel you are using . (See INDEX: "Regulator Conversion" for further details.) The hose and regulator provided must be used if your grill is setup for an LP Gas Cylinder. Ensure that you are clean and free from obstructions. POTENTIAL PROBLEMS ...continued REPLACE any damaged supply lines. • Check...
.... • Check line pressure | 36 INSTALLATION / USE & CARE Locate your grill and that it is correctly set up for the type of fuel you are using . (See INDEX: "Regulator Conversion" for further details.) The hose and regulator provided must be used if your grill is setup for an LP Gas Cylinder. Ensure that you are clean and free from obstructions. POTENTIAL PROBLEMS ...continued REPLACE any damaged supply lines. • Check...

Installation / Use and Care Instructions
Page 37
... and hold the control knob in the quality of a new bulb. Fluctuations in gas pressure, gas conversion and even in for the grill burners to heat up. | INSTALLATION / USE & CARE 37 POTENTIAL PROBLEMS ...continued BURNER GOES OUT • Location First determine if the problem is being caused by two spring tension tabs. If the grill is subject to high winds, reposition it loose. ROTISSERIE LIGHTS BUT GOES OUT...
... and hold the control knob in the quality of a new bulb. Fluctuations in gas pressure, gas conversion and even in for the grill burners to heat up. | INSTALLATION / USE & CARE 37 POTENTIAL PROBLEMS ...continued BURNER GOES OUT • Location First determine if the problem is being caused by two spring tension tabs. If the grill is subject to high winds, reposition it loose. ROTISSERIE LIGHTS BUT GOES OUT...

Installation / Use and Care Instructions
Page 39
... original retail purchase. To obtain warranty service contact Viking Range LLC Customer Care at overtime or premium rates shall not be covered by a Viking Range LLC authorized service agency or representative. Some jurisdictions do not allow the exclusion or limitation of incidental or consequential damages, so the above described burner assemblies, infrared rotisserie burners, grill grates, and stainless steel parts are bed and breakfasts, fire stations...
... original retail purchase. To obtain warranty service contact Viking Range LLC Customer Care at overtime or premium rates shall not be covered by a Viking Range LLC authorized service agency or representative. Some jurisdictions do not allow the exclusion or limitation of incidental or consequential damages, so the above described burner assemblies, infrared rotisserie burners, grill grates, and stainless steel parts are bed and breakfasts, fire stations...

5 Series Outdoor Products
Page 2
... to remove and replace §§ Reduces 90% of a knob §§ Robust and weather resistant §§ Ignition operates on 12 Volts DC §§ Integral "flash-tube" alternate lighting system CERAMIC RADIANT BRIQUETTES §§ High-density ceramic provides even heat across the entire grilling surface §§ Reduces flare-ups by keeping grease and oil away from the direct flame...
... to remove and replace §§ Reduces 90% of a knob §§ Robust and weather resistant §§ Ignition operates on 12 Volts DC §§ Integral "flash-tube" alternate lighting system CERAMIC RADIANT BRIQUETTES §§ High-density ceramic provides even heat across the entire grilling surface §§ Reduces flare-ups by keeping grease and oil away from the direct flame...

5 Series Outdoor Products
Page 4
... use of delivering intense high heat and a low simmer §§ Burners and burner basin are sealed and easy to clean §§ Hot surface ignition system §§ Control illumination with blue LEDs §§ Fully extendable drip pan §§ Removable stainless steel cover protects the unit when not it use §§ Heavy-duty welded construction eliminates gaps where grease...
... use of delivering intense high heat and a low simmer §§ Burners and burner basin are sealed and easy to clean §§ Hot surface ignition system §§ Control illumination with blue LEDs §§ Fully extendable drip pan §§ Removable stainless steel cover protects the unit when not it use §§ Heavy-duty welded construction eliminates gaps where grease...

5 Series Outdoor Products
Page 5
... top overhangs the face of your outdoor kitchen. IMPORTANT: Please reference the Care & Use / Installation manual for details on gas plumbing requirements, electrical specifications and the proper installation of the island A C 5" WWAARRMMININGGDDRARWAWERESRS MODEL AA V(CQ)VEQWEDW5D3503000 2288.5.500 V(CQ)VEQWEDW5D4422000 4400.2.255 BB 1100.0.000 1199..3388 CC 2200.5.500 2244.5.500 4.5" 3" B 3" | CARE & USE/INSTALLATION 9 SPECIFICATIONS & INSTALLATION S p e c i f i c a t i o n s The guides, measurements and dimensions detailed below are subject to...
... top overhangs the face of your outdoor kitchen. IMPORTANT: Please reference the Care & Use / Installation manual for details on gas plumbing requirements, electrical specifications and the proper installation of the island A C 5" WWAARRMMININGGDDRARWAWERESRS MODEL AA V(CQ)VEQWEDW5D3503000 2288.5.500 V(CQ)VEQWEDW5D4422000 4400.2.255 BB 1100.0.000 1199..3388 CC 2200.5.500 2244.5.500 4.5" 3" B 3" | CARE & USE/INSTALLATION 9 SPECIFICATIONS & INSTALLATION S p e c i f i c a t i o n s The guides, measurements and dimensions detailed below are subject to...


