Two-Page Specifications Sheet
Page 1
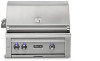
... ignition system Heat stabilizing design Control illumination w/ blue LEDs Dual halogen grill surface lights Temperature gauge Removable large-capacity smoker box Stainless steel grilling grates Dual-position internally powered rotisserie w/ heavy-duty 3-speed motor & two rear infrared burners 54" Cutout Dimensions 60" 5" 26 1/2" 4 1/2" 3" 11 5/8" insulated jacket COOKING SURFACE • 1,555 sq. cooking surface (1110 primary / 445 secondary) SHIPPING WEIGHTS & DIMENSIONS • Built-In Grill: 421 lbs. / 63 ¼" x 34" x 34" • Free...
... ignition system Heat stabilizing design Control illumination w/ blue LEDs Dual halogen grill surface lights Temperature gauge Removable large-capacity smoker box Stainless steel grilling grates Dual-position internally powered rotisserie w/ heavy-duty 3-speed motor & two rear infrared burners 54" Cutout Dimensions 60" 5" 26 1/2" 4 1/2" 3" 11 5/8" insulated jacket COOKING SURFACE • 1,555 sq. cooking surface (1110 primary / 445 secondary) SHIPPING WEIGHTS & DIMENSIONS • Built-In Grill: 421 lbs. / 63 ¼" x 34" x 34" • Free...

Installation / Use and Care Instructions
Page 5
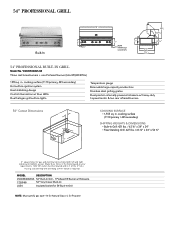
... CUSTOMERS 22 IMPORTANT SAFETY PRECAUTIONS 22 GRILLING IN WINDY CONDITIONS 24 USING YOUR GRILL 25 Pre-Grill Checklist 25 Lighting your Grill 26 Basic Grilling 28 Using the ProSear™ Burner 29 Using the Rotisserie Burner 30 Using the Smoker Box 31 CLEANING YOUR GRILL 32 TROUBLESHOOTING YOUR GRILL 34 Potential Problems 35 CONTACTING CUSTOMER SERVICE 38 VIKING RANGE, LLC OUTDOOR WARRANTY 39 WIRING SCHEMATICS 40 30 Rotisserie Grill 40 36 & 42 Rotisserie Grill 41 54 Rotisserie Grill 42 | INSTALLATION / USE & CARE 5
... CUSTOMERS 22 IMPORTANT SAFETY PRECAUTIONS 22 GRILLING IN WINDY CONDITIONS 24 USING YOUR GRILL 25 Pre-Grill Checklist 25 Lighting your Grill 26 Basic Grilling 28 Using the ProSear™ Burner 29 Using the Rotisserie Burner 30 Using the Smoker Box 31 CLEANING YOUR GRILL 32 TROUBLESHOOTING YOUR GRILL 34 Potential Problems 35 CONTACTING CUSTOMER SERVICE 38 VIKING RANGE, LLC OUTDOOR WARRANTY 39 WIRING SCHEMATICS 40 30 Rotisserie Grill 40 36 & 42 Rotisserie Grill 41 54 Rotisserie Grill 42 | INSTALLATION / USE & CARE 5

Installation / Use and Care Instructions
Page 7
.... NOTE: Built-in grills are intended either for installation in a built-in enclosure constructed of non-combustible materials or for an installation in a built in enclosure constructed of grill to adjacent combustible construction extending above the counter top for gas line hook-up in a combustible enclosure, the jacket must be placed into masonry A 3 inch clearance is not required to support it...
.... NOTE: Built-in grills are intended either for installation in a built-in enclosure constructed of non-combustible materials or for an installation in a built in enclosure constructed of grill to adjacent combustible construction extending above the counter top for gas line hook-up in a combustible enclosure, the jacket must be placed into masonry A 3 inch clearance is not required to support it...

Installation / Use and Care Instructions
Page 8
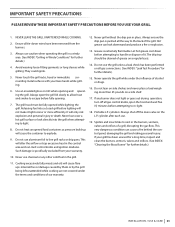
....25 B 10.00 19.38 C 20.50 24.50 |8 INSTALLATION / USE & CARE SPECIFICATIONS & INSTALLATION The guides, measurements and dimensions detailed below are subject to assist you with planning your outdoor kitchen equipment. IMPORTANT: Please reference the Care & Use / Installation manual for details on gas plumbing requirements, electrical specifications and the proper installation of your outdoor kitchen. NOTE: Due to continuing product innovation, specifications are designated to change without notice.
....25 B 10.00 19.38 C 20.50 24.50 |8 INSTALLATION / USE & CARE SPECIFICATIONS & INSTALLATION The guides, measurements and dimensions detailed below are subject to assist you with planning your outdoor kitchen equipment. IMPORTANT: Please reference the Care & Use / Installation manual for details on gas plumbing requirements, electrical specifications and the proper installation of your outdoor kitchen. NOTE: Due to continuing product innovation, specifications are designated to change without notice.

Installation / Use and Care Instructions
Page 16
...-B149.1/.2 natural gas/propane installation code. (Canada) Keep last two threads clean | 16 INSTALLATION / USE & CARE The grill is located in installations, it is recommended that the gas you use threading compound on any small pieces of compound break loose and clog a burner valve or orifice. In no case should pipe less than that for specific model outputs) Ensure that line. The rating plate is factory set up .) Converting to...
...-B149.1/.2 natural gas/propane installation code. (Canada) Keep last two threads clean | 16 INSTALLATION / USE & CARE The grill is located in installations, it is recommended that the gas you use threading compound on any small pieces of compound break loose and clog a burner valve or orifice. In no case should pipe less than that for specific model outputs) Ensure that line. The rating plate is factory set up .) Converting to...

Installation / Use and Care Instructions
Page 17
... the regulator, gas will leak from the connection. | INSTALLATION / USE & CARE 17 This is stored indoors, the LP cylinder must be stored outside. Cylinders must be stored outdoors in accordance with the specifications for LP gas cylinders of children. If your grill is the regulator fuel setting. It is possible for further details.) Always shut off the LP-gas supply at the cylinder when the grill is set...
... the regulator, gas will leak from the connection. | INSTALLATION / USE & CARE 17 This is stored indoors, the LP cylinder must be stored outside. Cylinders must be stored outdoors in accordance with the specifications for LP gas cylinders of children. If your grill is the regulator fuel setting. It is possible for further details.) Always shut off the LP-gas supply at the cylinder when the grill is set...

Installation / Use and Care Instructions
Page 18
... rotisserie knob and confirm that the igniter is hand tight. Grasp the coupler and turn counter clockwise. The inlet will completely purge the lines. These instructions should purge the gas line of air before installing the conversion kit. It is turned off the gas supply at the main valve. • Disconnect all plumbing (if already attached) from the grill and the gas supply valve. • Remove...
... rotisserie knob and confirm that the igniter is hand tight. Grasp the coupler and turn counter clockwise. The inlet will completely purge the lines. These instructions should purge the gas line of air before installing the conversion kit. It is turned off the gas supply at the main valve. • Disconnect all plumbing (if already attached) from the grill and the gas supply valve. • Remove...

Installation / Use and Care Instructions
Page 19
... the grill be careful to cool before cleaning. See the Troubleshooting section for repair. CONNECTION TO AC Installation requires an outdoor 120VAC 15A GFI (Ground Fault Interrupter) electrical outlet adjacent to facilitate service if the transformer or connections should need future maintenance. It is recommended that reduces shock hazard. For built-in grills, the supplied 12VDC should be installed by...
... the grill be careful to cool before cleaning. See the Troubleshooting section for repair. CONNECTION TO AC Installation requires an outdoor 120VAC 15A GFI (Ground Fault Interrupter) electrical outlet adjacent to facilitate service if the transformer or connections should need future maintenance. It is recommended that reduces shock hazard. For built-in grills, the supplied 12VDC should be installed by...
Installation / Use and Care Instructions
Page 23
... to handle or dispose of our warranty. | INSTALLATION / USE & CARE 23 If your grill has been unused for a long time, inspect and clean the burners, venturis, valves and orifices. (See INDEX: "Cleaning the Brass Burner" for further details.) 4. They could ignite. 12. Never operate the grill while under the terms and conditions of it light sooner or more than 25 pounds on...
... to handle or dispose of our warranty. | INSTALLATION / USE & CARE 23 If your grill has been unused for a long time, inspect and clean the burners, venturis, valves and orifices. (See INDEX: "Cleaning the Brass Burner" for further details.) 4. They could ignite. 12. Never operate the grill while under the terms and conditions of it light sooner or more than 25 pounds on...

Installation / Use and Care Instructions
Page 25
... Gas Line" AT EACH NEW SEASON At the start of the food without burning the outside. Also, check all hoses and fittings for slow cooking. USING YOUR GRILL Grilling requires high heat for searing and low, controlled heat for damage, abrasion, wear and tear. | INSTALLATION / USE & CARE 25 Depending on all three. Spiders and insects often nest in these features work for slow rotisserie...
... Gas Line" AT EACH NEW SEASON At the start of the food without burning the outside. Also, check all hoses and fittings for slow cooking. USING YOUR GRILL Grilling requires high heat for searing and low, controlled heat for damage, abrasion, wear and tear. | INSTALLATION / USE & CARE 25 Depending on all three. Spiders and insects often nest in these features work for slow rotisserie...
Installation / Use and Care Instructions
Page 26
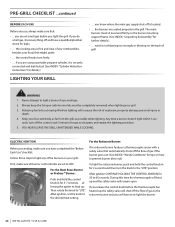
... all burner control knobs are using a portable propane cylinder, it is not blowing too strongly or blowing on the back of explosion, property damage, personal injury or death. 4. the control knobs turn off the flow of gas to the rotisserie burner and you are set the knob to light a burner if you light the grill. if you will heat up . The main burners must be completely removed) when lighting your grill: The rotisserie burner...
... all burner control knobs are using a portable propane cylinder, it is not blowing too strongly or blowing on the back of explosion, property damage, personal injury or death. 4. the control knobs turn off the flow of gas to the rotisserie burner and you are set the knob to light a burner if you light the grill. if you will heat up . The main burners must be completely removed) when lighting your grill: The rotisserie burner...
Installation / Use and Care Instructions
Page 29
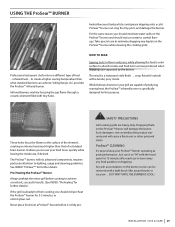
... allows you to control flareups. Dropping them on the ProSear™ burner while cleaning the cooking grids. BUT WAIT UNTIL THE BURNER IS COOL! | INSTALLATION / USE & CARE 29 HOW TO SEAR Professional restaurant chefs rely on a different type of producing searing heat, the ProSear™ infrared burner is specifically designed for this purpose. Viking Range, LLC provides the ProSear™ infrared burner. Such damage is...
... allows you to control flareups. Dropping them on the ProSear™ burner while cleaning the cooking grids. BUT WAIT UNTIL THE BURNER IS COOL! | INSTALLATION / USE & CARE 29 HOW TO SEAR Professional restaurant chefs rely on a different type of producing searing heat, the ProSear™ infrared burner is specifically designed for this purpose. Viking Range, LLC provides the ProSear™ infrared burner. Such damage is...
Installation / Use and Care Instructions
Page 31
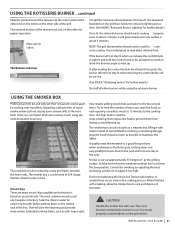
... to the next and from drying out and flaming up . Use sturdy, properly insulated gloves or dry pot holders. | INSTALLATION / USE & CARE 31 The smoker box will not stay lit when releasing the control knob, call for service. (See INDEX: "Obtaining service" for further details.) Shut off all other burners while using the smoker/steamer accessory. Use high heat to start the chips smoking, then reduce the...
... to the next and from drying out and flaming up . Use sturdy, properly insulated gloves or dry pot holders. | INSTALLATION / USE & CARE 31 The smoker box will not stay lit when releasing the control knob, call for service. (See INDEX: "Obtaining service" for further details.) Shut off all other burners while using the smoker/steamer accessory. Use high heat to start the chips smoking, then reduce the...
Installation / Use and Care Instructions
Page 33
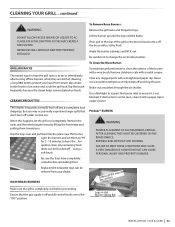
... that the gas supply is not blocked. CERAMIC BRIQUETTES To Remove Brass Burners: Remove the grill racks and briquette trays. To Clean the Brass Burner: To maximize grill performance, clean the exterior of the grill so the burner head comes off any accumulated food drippings. Replacement briquette trays can be brushed off and all control knobs are still hot. NEVER USE GRILL WITHOUT DRIP TRAY PROPERLY INSTALLED. Shake out...
... that the gas supply is not blocked. CERAMIC BRIQUETTES To Remove Brass Burners: Remove the grill racks and briquette trays. To Clean the Brass Burner: To maximize grill performance, clean the exterior of the grill so the burner head comes off any accumulated food drippings. Replacement briquette trays can be brushed off and all control knobs are still hot. NEVER USE GRILL WITHOUT DRIP TRAY PROPERLY INSTALLED. Shake out...

Installation / Use and Care Instructions
Page 35
... on the burner flame are set to OFF. • Remove the cooking grates and briquette trays. • Watch an igniter as you push in the correct control knob and keep the knob in . • Ensure that is out of air. Proper leveling during installation is pushed in the "OFF" position). Gas Collector Hood If the low heat problem persists: • Check the gas supply line sizing...
... on the burner flame are set to OFF. • Remove the cooking grates and briquette trays. • Watch an igniter as you push in the correct control knob and keep the knob in . • Ensure that is out of air. Proper leveling during installation is pushed in the "OFF" position). Gas Collector Hood If the low heat problem persists: • Check the gas supply line sizing...

Installation / Use and Care Instructions
Page 36
... all burner controls and close the LP cylinder valve. • Wait 30 seconds and, very slowly, reopen the cylinder valve. • Wait a few seconds and relite a burner. Locate your grill is setup for the type of the grill. Check that it is correctly set up for an LP Gas Cylinder. POTENTIAL PROBLEMS ...continued REPLACE any damaged supply lines. • Check the Regulator Make sure that the regulator & hose assembly is...
... all burner controls and close the LP cylinder valve. • Wait 30 seconds and, very slowly, reopen the cylinder valve. • Wait a few seconds and relite a burner. Locate your grill is setup for the type of the grill. Check that it is correctly set up for an LP Gas Cylinder. POTENTIAL PROBLEMS ...continued REPLACE any damaged supply lines. • Check the Regulator Make sure that the regulator & hose assembly is...

Installation / Use and Care Instructions
Page 37
... remove the lens. Pull on the grill feature an adjustable low setting. Hold the bulb using a paper towel or other cloth and gently press it loose. The rotisserie burner flame may have power, call for service. (See INDEX: "Obtaining service" for further details.) • Replace the Bulb Replacement bulbs are halogen, 12 volt, 10W max, T3 type with the rotisserie burner. ROTISSERIE LIGHTS BUT GOES OUT AS SOON AS CONTROL...
... remove the lens. Pull on the grill feature an adjustable low setting. Hold the bulb using a paper towel or other cloth and gently press it loose. The rotisserie burner flame may have power, call for service. (See INDEX: "Obtaining service" for further details.) • Replace the Bulb Replacement bulbs are halogen, 12 volt, 10W max, T3 type with the rotisserie burner. ROTISSERIE LIGHTS BUT GOES OUT AS SOON AS CONTROL...

Installation / Use and Care Instructions
Page 39
... set forth above described burner assemblies, infrared rotisserie burners, grill grates, and stainless steel parts are bed and breakfasts, fire stations, private clubs, churches, condominium/apartment common areas etc. This warranty excludes use but not limited to national and local codes. Some jurisdictions do not apply to repair or replace at the warrantor's discretion of the product or its appliance's Viking will be responsible for proper installation...
... set forth above described burner assemblies, infrared rotisserie burners, grill grates, and stainless steel parts are bed and breakfasts, fire stations, private clubs, churches, condominium/apartment common areas etc. This warranty excludes use but not limited to national and local codes. Some jurisdictions do not apply to repair or replace at the warrantor's discretion of the product or its appliance's Viking will be responsible for proper installation...
5 Series Outdoor Products
Page 1
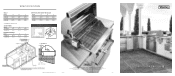
... your outdoor kitchen. SPECIFICATIONS & INSTALLATION S P E C I F I C AT I O N S The guides, measurements and dimensions detailed below are subject to change without notice. IMPORTANT: Please reference the Care & Use / Installation manual for details on gas plumbing requirements, electrical specifications and the proper installation of the island A C 5" WWAARRMMININGGDDRARWAEWRSERS MODEL AA V(CQ)VEQWEDW5D3503100 2288.5.500 V(CQ)VEQWEDW5D4422100 4400.2.255 B 1100..000 1199..338 CC 2200..5500 2244..5500 4.5" 3" B 3" | CARE & USE/INSTALLATION 9 F60390A VIKING RANGE...
... your outdoor kitchen. SPECIFICATIONS & INSTALLATION S P E C I F I C AT I O N S The guides, measurements and dimensions detailed below are subject to change without notice. IMPORTANT: Please reference the Care & Use / Installation manual for details on gas plumbing requirements, electrical specifications and the proper installation of the island A C 5" WWAARRMMININGGDDRARWAEWRSERS MODEL AA V(CQ)VEQWEDW5D3503100 2288.5.500 V(CQ)VEQWEDW5D4422100 4400.2.255 B 1100..000 1199..338 CC 2200..5500 2244..5500 4.5" 3" B 3" | CARE & USE/INSTALLATION 9 F60390A VIKING RANGE...
5 Series Outdoor Products
Page 2
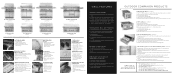
...;§ Ignition operates on grates over grilling surface §§ 10 watt halogen light §§ 36", 42" and 54" Grills feature two lights GRILLING SURFACE AREA §§ Viking grills have an extended depth for quality, strength, and beauty §§ Finished seams with finely polished mirrored edges REMOVABLE LARGE CAPACITY SMOKER BOX INCLUDED §§ Used with 30"W. Built-In Grill VQGI5541 CONTROL KNOB ILLUMINATION WITH...
...;§ Ignition operates on grates over grilling surface §§ 10 watt halogen light §§ 36", 42" and 54" Grills feature two lights GRILLING SURFACE AREA §§ Viking grills have an extended depth for quality, strength, and beauty §§ Finished seams with finely polished mirrored edges REMOVABLE LARGE CAPACITY SMOKER BOX INCLUDED §§ Used with 30"W. Built-In Grill VQGI5541 CONTROL KNOB ILLUMINATION WITH...


