DVR840XHD User Manual
Page 2
... Use 7 Inserting an SD Memory Card 8 Software Installation: Snap „n Share Pro and Video Express 9 Software Installation 9 Camera Buttons and Functions 17 DVR Functions and Menu Control 18 Camera Playback Modes 53 Connecting to a High Definition TV to view images 73 Connecting to a non High Definition TV to view images 74 Transferring Images...
... Use 7 Inserting an SD Memory Card 8 Software Installation: Snap „n Share Pro and Video Express 9 Software Installation 9 Camera Buttons and Functions 17 DVR Functions and Menu Control 18 Camera Playback Modes 53 Connecting to a High Definition TV to view images 73 Connecting to a non High Definition TV to view images 74 Transferring Images...
DVR840XHD User Manual
Page 3
... Video resolutions - 1440x1080 Pixels (HD), 1280x720p (HD), 848x480p (WVGA), 640x480p (VGA) and 320x240 (QVGA). 8 mega-pixels camera with choice of your camera you for purchasing the DVR 840XHD Digital Video Camcorder. You can shoot high resolution H.264 video clips and take pictures and short movies without a memory card. However a SD... (5M) and Low 2048x1536p (3M) 3" TFT LCD 2 In addition, 128 MB built-in order to expand the memory of 3 digital camera resolutions- Trouble Shooting ...99 Introduction Thank you can also connect it to take individual photos.
... Video resolutions - 1440x1080 Pixels (HD), 1280x720p (HD), 848x480p (WVGA), 640x480p (VGA) and 320x240 (QVGA). 8 mega-pixels camera with choice of your camera you for purchasing the DVR 840XHD Digital Video Camcorder. You can shoot high resolution H.264 video clips and take pictures and short movies without a memory card. However a SD... (5M) and Low 2048x1536p (3M) 3" TFT LCD 2 In addition, 128 MB built-in order to expand the memory of 3 digital camera resolutions- Trouble Shooting ...99 Introduction Thank you can also connect it to take individual photos.

DVR840XHD User Manual
Page 4
... to upload, copy to CD/DVD and much more with the touch of a button Edit, add text, clipart and more on your digital video camera includes Digital Video Camcorder USB cable AV cable HDMI Cable Power Adapter Lithium-ion Rechargeable Battery Snap n Share...; Quick Start Guide Built-in Microphone Snap „n Share Pro software application can be used to download the photos and videos from your camera with Video Express software.
... to upload, copy to CD/DVD and much more with the touch of a button Edit, add text, clipart and more on your digital video camera includes Digital Video Camcorder USB cable AV cable HDMI Cable Power Adapter Lithium-ion Rechargeable Battery Snap n Share...; Quick Start Guide Built-in Microphone Snap „n Share Pro software application can be used to download the photos and videos from your camera with Video Express software.
DVR840XHD User Manual
Page 8
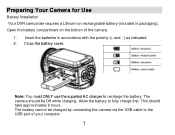
.... This should be charged by connecting the camera via the USB cable to the USB port of the camera. 1. Insert the batteries in packaging). Note: You must ONLY use the supplied AC charger to fully charge first. The camera should take approximately 6 hours. Open the... battery compartment on the bottom of your computer. 7 The battery cannot be Off while charging. Preparing Your Camera for Use Battery Installation Your DVR camcorder requires a Lithium-ion rechargeable battery (...
.... This should be charged by connecting the camera via the USB cable to the USB port of the camera. 1. Insert the batteries in packaging). Note: You must ONLY use the supplied AC charger to fully charge first. The camera should take approximately 6 hours. Open the... battery compartment on the bottom of your computer. 7 The battery cannot be Off while charging. Preparing Your Camera for Use Battery Installation Your DVR camcorder requires a Lithium-ion rechargeable battery (...

DVR840XHD User Manual
Page 9
Inserting an SD Memory Card An SD compatible memory card of up to your DVR camera. Locate the SD card slot in the battery compartment on the bottom of movies and photos that can be captured before transferring them to 8GB (not included) should be inserted into your computer. 1. Insert the SD memory card correctly in the number of the camera. 2. SD Memory cards expand the amount of memory thus allowing an increase in the direction shown. 3. Press the memory card until you hear a "Click" sound. 8
Inserting an SD Memory Card An SD compatible memory card of up to your DVR camera. Locate the SD card slot in the battery compartment on the bottom of movies and photos that can be captured before transferring them to 8GB (not included) should be inserted into your computer. 1. Insert the SD memory card correctly in the number of the camera. 2. SD Memory cards expand the amount of memory thus allowing an increase in the direction shown. 3. Press the memory card until you hear a "Click" sound. 8
DVR840XHD User Manual
Page 10
... data. Do not remove the SD memory Card during the installation process. Software Installation 1. Wait for the computer to format the card with the camera. Software Installation: Snap „n Share Pro and Video Express Follow the step by step instructions that your CD-Rom drive. 2.
... data. Do not remove the SD memory Card during the installation process. Software Installation 1. Wait for the computer to format the card with the camera. Software Installation: Snap „n Share Pro and Video Express Follow the step by step instructions that your CD-Rom drive. 2.
DVR840XHD User Manual
Page 18
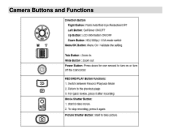
Camera Buttons and Functions 17
Camera Buttons and Functions 17
DVR840XHD User Manual
Page 19
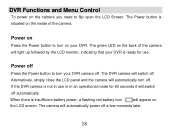
... not in use or in an operational mode for use. When there is situated on the inside of the camera will switch off . If the DVR camera is ready for 60 seconds it will appear on the LCD screen. The Power button is insufficient battery power, a flashing red battery icon will...the Power button to turn your DVR. Power on Press the Power button to flip open the LCD Screen. Alternatively, simply close the LCD panel and the camera will automatically power off . DVR Functions and Menu Control To power on the camera you need to turn on your DVR camera off a few moments later. ...
... not in use or in an operational mode for use. When there is situated on the inside of the camera will switch off . If the DVR camera is ready for 60 seconds it will appear on the LCD screen. The Power button is insufficient battery power, a flashing red battery icon will...the Power button to turn your DVR. Power on Press the Power button to flip open the LCD Screen. Alternatively, simply close the LCD panel and the camera will automatically power off . DVR Functions and Menu Control To power on the camera you need to turn on your DVR camera off a few moments later. ...
DVR840XHD User Manual
Page 20
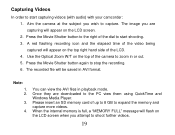
...more videos. Once they are capturing will appear on the top of the dial to start capturing videos (with audio) with your camcorder: 1. Aim the camera at the subject you attempt to shoot further videos. 19 Press the Movie Shutter button again to the PC view them using QuickTime and Windows... Media Player. Please insert an SD memory card of the LCD. 4. Press the Movie Shutter button to the right of the camera to zoom in playback mode. A red flashing recording icon and the elapsed time of the video being captured will appear on the LCD screen when...
...more videos. Once they are capturing will appear on the top of the dial to start capturing videos (with audio) with your camcorder: 1. Aim the camera at the subject you attempt to shoot further videos. 19 Press the Movie Shutter button again to the PC view them using QuickTime and Windows... Media Player. Please insert an SD memory card of the LCD. 4. Press the Movie Shutter button to the right of the camera to zoom in playback mode. A red flashing recording icon and the elapsed time of the video being captured will appear on the LCD screen when...
DVR840XHD User Manual
Page 23
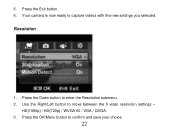
Press the Down button to confirm and save your choice. 22 Press the OK/Menu button to enter the Resolution submenu. 2. 5. Use the Right/Left button to capture videos with the new settings you selected. HD(1080p) / HD(720p) / WVGA 60 / VGA / QVGA. 3. Press the Exit button. 6. Your camera is now ready to move between the 5 video resolution settings - Resolution 1.
Press the Down button to confirm and save your choice. 22 Press the OK/Menu button to enter the Resolution submenu. 2. 5. Use the Right/Left button to capture videos with the new settings you selected. HD(1080p) / HD(720p) / WVGA 60 / VGA / QVGA. 3. Press the Exit button. 6. Your camera is now ready to move between the 5 video resolution settings - Resolution 1.
DVR840XHD User Manual
Page 24
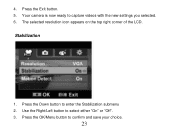
Press the Exit button. 5. Your camera is now ready to confirm and save your choice. 23 Stabilization 1. Press the OK/Menu button to capture videos with the new settings you selected. 6. Use the Right/Left button to enter the Stabilization submenu 2. Press the Down button to select either "On" or "Off". 3. The selected resolution icon appears on the top right corner of the LCD. 4.
Press the Exit button. 5. Your camera is now ready to confirm and save your choice. 23 Stabilization 1. Press the OK/Menu button to capture videos with the new settings you selected. 6. Use the Right/Left button to enter the Stabilization submenu 2. Press the Down button to select either "On" or "Off". 3. The selected resolution icon appears on the top right corner of the LCD. 4.
DVR840XHD User Manual
Page 25
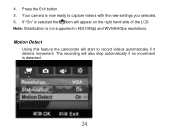
Press the Exit button. 5. Motion Detect Using this feature the camcorder will start to capture videos with the new settings you selected. 6. Note: Stabilization is detected. 24 The recording will appear on the right hand side of the LCD. 4. Your camera is now ready to record videos automatically if it detects movement. If "On" is selected the icon will also stop automatically if no movement is not supported in HD(1080p) and WVGA/60fps resolutions.
Press the Exit button. 5. Motion Detect Using this feature the camcorder will start to capture videos with the new settings you selected. 6. Note: Stabilization is detected. 24 The recording will appear on the right hand side of the LCD. 4. Your camera is now ready to record videos automatically if it detects movement. If "On" is selected the icon will also stop automatically if no movement is not supported in HD(1080p) and WVGA/60fps resolutions.
DVR840XHD User Manual
Page 26
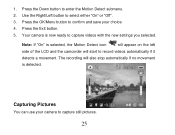
Press the Exit button. 5. Use the Right/Left button to capture videos with the new settings you selected. Your camera is now ready to select either "On" or "Off". 3. Note: If "On" is detected. Press the OK/Menu button to record videos automatically if it ... is selected, the Motion Detect icon will appear on the left side of the LCD and the camcorder will start to confirm and save your camera to enter the Motion Detect submenu. 2. Press the Down button to capture still pictures. 25 Capturing Pictures You can use your choice. 4. 1.
Press the Exit button. 5. Use the Right/Left button to capture videos with the new settings you selected. Your camera is now ready to select either "On" or "Off". 3. Note: If "On" is detected. Press the OK/Menu button to record videos automatically if it ... is selected, the Motion Detect icon will appear on the left side of the LCD and the camcorder will start to confirm and save your camera to enter the Motion Detect submenu. 2. Press the Down button to capture still pictures. 25 Capturing Pictures You can use your choice. 4. 1.
DVR840XHD User Manual
Page 27
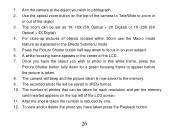
... down to appear before the picture is taken. 8. Once you have taken press the Playback button. 26 Aim the camera at the object you wish to photo in or out of the camera to Tele/Wide to the memory. 9. The zoom can be taken for a green focusing frame to focus in the... + 2X Digital) or 1X~20X (5X Optical + 4X Digital) 4. The number of the LCD screen. 11. A white focusing frame appears in on your subject. 6. The camera will be set as explained in JPEG format. 10. Use the optical zoom button on the top left of photos that can be saved in...
... down to appear before the picture is taken. 8. Once you have taken press the Playback button. 26 Aim the camera at the object you wish to photo in or out of the camera to Tele/Wide to the memory. 9. The zoom can be taken for a green focusing frame to focus in the... + 2X Digital) or 1X~20X (5X Optical + 4X Digital) 4. The number of the LCD screen. 11. A white focusing frame appears in on your subject. 6. The camera will be set as explained in JPEG format. 10. Use the optical zoom button on the top left of photos that can be saved in...

DVR840XHD User Manual
Page 30
5. Press the Exit button. 6. Press the Down button to move between the 3 picture resolution settings - Use the Right/Left button to enter the Resolution submenu. 2. Press the OK/Menu button to snap pictures with the new settings you selected. Resolution 1. High / Std / Low. 3. Your camera is now ready to confirm and save your choice. 29
5. Press the Exit button. 6. Press the Down button to move between the 3 picture resolution settings - Use the Right/Left button to enter the Resolution submenu. 2. Press the OK/Menu button to snap pictures with the new settings you selected. Resolution 1. High / Std / Low. 3. Your camera is now ready to confirm and save your choice. 29
DVR840XHD User Manual
Page 31
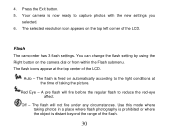
... Flash submenu. The flash icons appear at the time of the flash. 30 Red Eye - Auto - A pre flash will not fire under any circumstances. Your camera is distant beyond the range of taking photos in a place where flash photography is prohibited or where the object is now ready to capture photos...
... Flash submenu. The flash icons appear at the time of the flash. 30 Red Eye - Auto - A pre flash will not fire under any circumstances. Your camera is distant beyond the range of taking photos in a place where flash photography is prohibited or where the object is now ready to capture photos...
DVR840XHD User Manual
Page 32
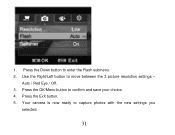
Press the OK/Menu button to move between the 3 picture resolution settings - Auto / Red Eye / Off. 3. Press the Exit button. 5. Use the Right/Left button to confirm and save your choice. 4. Your camera is now ready to enter the Flash submenu. 2. 1. Press the Down button to capture photos with the new settings you selected. 31
Press the OK/Menu button to move between the 3 picture resolution settings - Auto / Red Eye / Off. 3. Press the Exit button. 5. Use the Right/Left button to confirm and save your choice. 4. Your camera is now ready to enter the Flash submenu. 2. 1. Press the Down button to capture photos with the new settings you selected. 31
DVR840XHD User Manual
Page 33
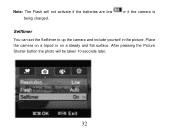
or if the camera is Selftimer You can set the Selftimer to up the camera and include yourself in the picture. Place the camera on a tripod or on a steady and flat surface. After pressing the Picture Shutter button the photo will not activate if the batteries are low being charged. Note: The Flash will be taken 10 seconds later. 32
or if the camera is Selftimer You can set the Selftimer to up the camera and include yourself in the picture. Place the camera on a tripod or on a steady and flat surface. After pressing the Picture Shutter button the photo will not activate if the batteries are low being charged. Note: The Flash will be taken 10 seconds later. 32
DVR840XHD User Manual
Page 34
... will blink until the picture is now ready to capture photos with the new settings you selected. 6. The Selftimer LED at the front of the camera will appear in the center of the LCD. 7. Effects The Effects submenu contains 4 different options - Press the Exit button. 5. Your... camera is taken. Press the Picture Shutter button to confirm and save your choice. 4. Macro, Scene, Exposure and White Balance. To enter the setup submenu options ...
... will blink until the picture is now ready to capture photos with the new settings you selected. 6. The Selftimer LED at the front of the camera will appear in the center of the LCD. 7. Effects The Effects submenu contains 4 different options - Press the Exit button. 5. Your... camera is taken. Press the Picture Shutter button to confirm and save your choice. 4. Macro, Scene, Exposure and White Balance. To enter the setup submenu options ...
DVR840XHD User Manual
Page 37
To revert to capture photos with the new settings you want before taking the photo. 36 Scene The camcorder has a selection of the LCD. 7. If "Macro" is now ready to Normal mode select "Normal" in scenes. Select the scene that you selected. 6. Your camera is selected, a Macro icon will appear on the bottom left of built-in step 2. 5.
To revert to capture photos with the new settings you want before taking the photo. 36 Scene The camcorder has a selection of the LCD. 7. If "Macro" is now ready to Normal mode select "Normal" in scenes. Select the scene that you selected. 6. Your camera is selected, a Macro icon will appear on the bottom left of built-in step 2. 5.


