DVR 910 Camera Manual
Page 7
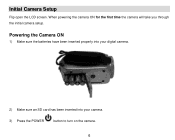
Powering the Camera ON 1) Make sure the batteries have been inserted properly into your digital camera. 2) Make sure an SD card has been inserted into your camera. 3) Press the POWER button to turn on the camera. 6 When powering the camera ON for the first time the camera will take you through the initial camera setup. Initial Camera Setup Flip open the LCD screen.
Powering the Camera ON 1) Make sure the batteries have been inserted properly into your digital camera. 2) Make sure an SD card has been inserted into your camera. 3) Press the POWER button to turn on the camera. 6 When powering the camera ON for the first time the camera will take you through the initial camera setup. Initial Camera Setup Flip open the LCD screen.

DVR 910 Camera Manual
Page 9
... will be asked to set the default ViviLink destination for photos and videos taken with the accompanying software application. 1) First you will be asked to turn your digital camera. Powering the camera OFF 8 Setting the ViviLink Default Option Once the Date and Time have been inserted properly into your camera ON...
... will be asked to set the default ViviLink destination for photos and videos taken with the accompanying software application. 1) First you will be asked to turn your digital camera. Powering the camera OFF 8 Setting the ViviLink Default Option Once the Date and Time have been inserted properly into your camera ON...

DVR 910 Camera Manual
Page 10
The Auto Power Off settings can begin to turn off completely. Use this mode to view the photos and videos you can press the Power button again at any point to capture and enjoy ...) - Changing Camera Mode Your camera has three main modes: 1) Video Capture Mode - When the camera is first powered ON, the Video Capture Mode will automatically turn your camera OFF.
The Auto Power Off settings can begin to turn off completely. Use this mode to view the photos and videos you can press the Power button again at any point to capture and enjoy ...) - Changing Camera Mode Your camera has three main modes: 1) Video Capture Mode - When the camera is first powered ON, the Video Capture Mode will automatically turn your camera OFF.
DVR 910 Camera Manual
Page 13
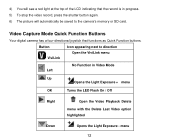
4) You will automatically be saved to direction ViviLink Open the ViviLink menu No Function in Video Mode Left Up Opens the Light Exposure + menu OK Turns the LED Flash On / Off Right Open the Video Playback Delete menu with the Delete Last Video option highlighted Down Opens the Light Exposure - Video ...
4) You will automatically be saved to direction ViviLink Open the ViviLink menu No Function in Video Mode Left Up Opens the Light Exposure + menu OK Turns the LED Flash On / Off Right Open the Video Playback Delete menu with the Delete Last Video option highlighted Down Opens the Light Exposure - Video ...
DVR 910 Camera Manual
Page 25
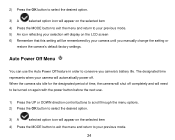
... the menu and return to your previous mode. 5) An icon reflecting your selection will display on the LCD screen 6) Remember that this setting will be turned on the selected item 4) Press the MODE button to exit the menu and return to your previous mode. 24 The designated time represents when your...
... the menu and return to your previous mode. 5) An icon reflecting your selection will display on the LCD screen 6) Remember that this setting will be turned on the selected item 4) Press the MODE button to exit the menu and return to your previous mode. 24 The designated time represents when your...
DVR 910 Camera Manual
Page 28
Press the MODE button twice to review and edit photos and videos that the settings have been reset successfully Video Playback Mode When you first turn on the camera, the camera will be reset. 5) A message will appear indicating that you‟ve already taken with you camera. The playback mode will ...
Press the MODE button twice to review and edit photos and videos that the settings have been reset successfully Video Playback Mode When you first turn on the camera, the camera will be reset. 5) A message will appear indicating that you‟ve already taken with you camera. The playback mode will ...

DVR 910 Camera Manual
Page 35
Open the ViviLink menu ViviLink Button Activate the Self-Timer Left Up Opens the Light Exposure + OK Right menu LED Flash On/Off Delete Last Image - Photo Capture Mode Menus The following are the menus that appear in dark situations, press the OK button to turn the LED off. menu LED Flash Option To increase the lighting in your camera‟s Photo Capture Mode: 34 Press the OK button again to activate the 2 LED Flash Light on the front of the camera below the lens. Allows you to delete the last image taken Down Opens the Light Exposure -
Open the ViviLink menu ViviLink Button Activate the Self-Timer Left Up Opens the Light Exposure + OK Right menu LED Flash On/Off Delete Last Image - Photo Capture Mode Menus The following are the menus that appear in dark situations, press the OK button to turn the LED off. menu LED Flash Option To increase the lighting in your camera‟s Photo Capture Mode: 34 Press the OK button again to activate the 2 LED Flash Light on the front of the camera below the lens. Allows you to delete the last image taken Down Opens the Light Exposure -

DVR 910 Camera Manual
Page 55
... you‟ve already taken with you camera. Photo Playback Mode When you to open the Playback Mode. The playback mode will allow you first turn on Your Camera 54 Viewing Photos on the camera, the camera will be reset. 6) A message will be in Video Capture mode by default...
... you‟ve already taken with you camera. Photo Playback Mode When you to open the Playback Mode. The playback mode will allow you first turn on Your Camera 54 Viewing Photos on the camera, the camera will be reset. 6) A message will be in Video Capture mode by default...
DVR 910 Camera Manual
Page 64
... TV set you are using. 5) Select the option as you can review all the photos and videos stored in the TV out cable a message will turns blank. The images will need to set to the correct TV Output setting. Note: The only limitation of your larger TV screen in place of... port to use your TV set. 4) Make sure the camera is now not portable. 1) Connect the camcorder to a TV via the TV-out cable (supplied). 2) Turn on the TV and the camera, and then set the TV to "AV" mode. 3) You will appear on the TV instead of on the camera...
... TV set you are using. 5) Select the option as you can review all the photos and videos stored in the TV out cable a message will turns blank. The images will need to set to the correct TV Output setting. Note: The only limitation of your larger TV screen in place of... port to use your TV set. 4) Make sure the camera is now not portable. 1) Connect the camcorder to a TV via the TV-out cable (supplied). 2) Turn on the TV and the camera, and then set the TV to "AV" mode. 3) You will appear on the TV instead of on the camera...

