Warranty
Page 1
.../cosmetic damage and defects resulting from other extraneous causes such as unauthorised disassembly, repair or modification. Limited One Year Warranty Vivitar warrants this quality product to be free of defects in material and workmanship for any incidental or consequential damages arising from the purchase..., use or inability to use this product which result from the date of the original purchase and expires on the first anniversary date of purchase. ...
.../cosmetic damage and defects resulting from other extraneous causes such as unauthorised disassembly, repair or modification. Limited One Year Warranty Vivitar warrants this quality product to be free of defects in material and workmanship for any incidental or consequential damages arising from the purchase..., use or inability to use this product which result from the date of the original purchase and expires on the first anniversary date of purchase. ...

Warranty
Page 2
...support in the US please call 1-800-592-9541, in the UK call from anywhere else, please visit www.vivitar.com for the from country and State to : (in the U.S.): Vivitar Attn: Technical Support 195 Carter Drive Edison NJ 08817 (in the U.K.) Sakar UK 2D Siskin Parkway East CV3.... STEP 3. WHAT TO DO WHEN SERVICE IS NEEDED STEP 1. b) Detailed description of your questions. Package the product and relevant accessories carefully, using ample padding materials and a sturdy mailing container to call 0800 917 4831. In the event the product is deemed to be not faulty or the...
...support in the US please call 1-800-592-9541, in the UK call from anywhere else, please visit www.vivitar.com for the from country and State to : (in the U.S.): Vivitar Attn: Technical Support 195 Carter Drive Edison NJ 08817 (in the U.K.) Sakar UK 2D Siskin Parkway East CV3.... STEP 3. WHAT TO DO WHEN SERVICE IS NEEDED STEP 1. b) Detailed description of your questions. Package the product and relevant accessories carefully, using ample padding materials and a sturdy mailing container to call 0800 917 4831. In the event the product is deemed to be not faulty or the...
DVR 910 Camera Manual
Page 2
...Includes ...2 Camera Technical Specifications ...3 Computer System Requirements - Macintosh 4 A Quick Look at your Digital Camera ...5 Initial Camera Setup...6 Using Your Digital Camera ...8 Changing Camera Mode ...9 Navigating the Menus...10 Video Capture Mode ...11 Video Playback Mode...27 Photo Capture ...Your Computer 67 Get started! ...68 Transfer media from my camera to my computer manually (Using Windows 69 Transfer media from my camera to my computer manually (Using Macintosh 70 Camera Maintenance ...70 Sakar Warranty Card...71 Technical Support...72 Troubleshooting...73 1 Windows...
...Includes ...2 Camera Technical Specifications ...3 Computer System Requirements - Macintosh 4 A Quick Look at your Digital Camera ...5 Initial Camera Setup...6 Using Your Digital Camera ...8 Changing Camera Mode ...9 Navigating the Menus...10 Video Capture Mode ...11 Video Playback Mode...27 Photo Capture ...Your Computer 67 Get started! ...68 Transfer media from my camera to my computer manually (Using Windows 69 Transfer media from my camera to my computer manually (Using Macintosh 70 Camera Maintenance ...70 Sakar Warranty Card...71 Technical Support...72 Troubleshooting...73 1 Windows...
DVR 910 Camera Manual
Page 3
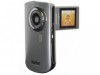
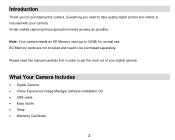
.... Note: Your camera needs an SD Memory card (up to get the most out of your camera. What Your Camera Includes Digital Camera Vivitar Experience Image Manager software Installation CD USB cable Easy Guide Strap Warranty Certificate 2 Please read this manual carefully first in order...
.... Note: Your camera needs an SD Memory card (up to get the most out of your camera. What Your Camera Includes Digital Camera Vivitar Experience Image Manager software Installation CD USB cable Easy Guide Strap Warranty Certificate 2 Please read this manual carefully first in order...

DVR 910 Camera Manual
Page 9
...and videos taken with the accompanying software application. 1) First you to quickly and easily upload your camera‟s photos and videos to start. Using Your Digital Camera Make sure the batteries have been set, you will be in Video Capture mode to the social networks of your choice ...with your camera. Powering the camera ON Press the Power button to use. The camera will be asked to choose the default ViviLink social network for Videos. Powering the camera OFF 8 The ViviLink technology allows you...
...and videos taken with the accompanying software application. 1) First you to quickly and easily upload your camera‟s photos and videos to start. Using Your Digital Camera Make sure the batteries have been set, you will be in Video Capture mode to the social networks of your choice ...with your camera. Powering the camera ON Press the Power button to use. The camera will be asked to choose the default ViviLink social network for Videos. Powering the camera OFF 8 The ViviLink technology allows you...

DVR 910 Camera Manual
Page 10
... turn your camera. The Auto Power Off settings can press the Power button again at any point to capture and enjoy clear quality photos. Use this mode to view the photos and videos you can begin to turn off completely. The icons that appear on the LCD screen are the... best default settings so that you have already taken with your camera OFF. Use this mode to capture photos with your camera. 3) Playback Mode (for photos and videos) - Use this mode to capture videos with your camera. 2) Photo Capture Mode - When the camera is powered ON...
... turn your camera. The Auto Power Off settings can press the Power button again at any point to capture and enjoy clear quality photos. Use this mode to view the photos and videos you can begin to turn off completely. The icons that appear on the LCD screen are the... best default settings so that you have already taken with your camera OFF. Use this mode to capture photos with your camera. 3) Playback Mode (for photos and videos) - Use this mode to capture videos with your camera. 2) Photo Capture Mode - When the camera is powered ON...
DVR 910 Camera Manual
Page 12
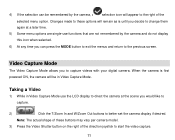
... is until you decide to change them again at the scene you can be in Video Capture Mode use the LCD display to direct the camera at a later time. 5) Some menu options are single-use functions that are not remembered by the camera, a selection icon will appear to better set the camera...
... is until you decide to change them again at the scene you can be in Video Capture Mode use the LCD display to direct the camera at a later time. 5) Some menu options are single-use functions that are not remembered by the camera, a selection icon will appear to better set the camera...
DVR 910 Camera Manual
Page 20
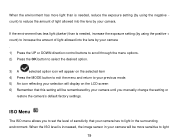
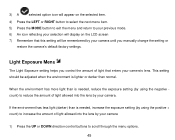
.... When the ISO level is increased, the image sensor in your camera will be more light than is needed , increase the exposure setting (by using the negative count) to reduce the amount of light allowed into the lens by your camera . 1) Press the UP or DOWN direction control buttons...your camera has to light in the surrounding environment. If the environment has less light (darker) than is needed , reduce the exposure setting (by using the positive + count) to increase the amount of light allowed into the lens by your camera. When the environment has more sensitive to light 19...
.... When the ISO level is increased, the image sensor in your camera will be more light than is needed , increase the exposure setting (by using the negative count) to reduce the amount of light allowed into the lens by your camera . 1) Press the UP or DOWN direction control buttons...your camera has to light in the surrounding environment. If the environment has less light (darker) than is needed , reduce the exposure setting (by using the positive + count) to increase the amount of light allowed into the lens by your camera. When the environment has more sensitive to light 19...
DVR 910 Camera Manual
Page 22
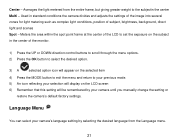
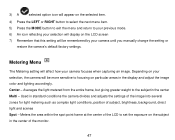
... greater weight to your previous mode. 5) An icon reflecting your camera until you manually change the setting or restore the camera‟s default factory settings. Used in the center of subject, brightness, background, direct light and scenes Spot - Averages the light metered from the Language menu. 21 Language Menu You can...
... greater weight to your previous mode. 5) An icon reflecting your camera until you manually change the setting or restore the camera‟s default factory settings. Used in the center of subject, brightness, background, direct light and scenes Spot - Averages the light metered from the Language menu. 21 Language Menu You can...
DVR 910 Camera Manual
Page 24
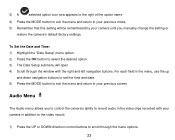
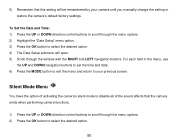
For each field in the menu, use the up and down navigation buttons to set the time and date. 5) Press the MODE button to exit the menu and return to your camera ...
For each field in the menu, use the up and down navigation buttons to set the time and date. 5) Press the MODE button to exit the menu and return to your camera ...
DVR 910 Camera Manual
Page 25
Auto Power Off Menu You can use . 1) Press the UP or DOWN direction control buttons to scroll through the menu options. 2) Press the OK button to select the desired option. 3) A selected option ... time represents when your camera will automatically power off completely and will need to be turned on again with the power button before the next use the Auto Power Off feature in order to your previous mode. 5) An icon reflecting your selection will display on the LCD screen 6) Remember that this...
Auto Power Off Menu You can use . 1) Press the UP or DOWN direction control buttons to scroll through the menu options. 2) Press the OK button to select the desired option. 3) A selected option ... time represents when your camera will automatically power off completely and will need to be turned on again with the power button before the next use the Auto Power Off feature in order to your previous mode. 5) An icon reflecting your selection will display on the LCD screen 6) Remember that this...
DVR 910 Camera Manual
Page 27
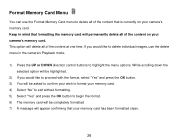
This option will permanently delete all of the content on your memory card has been formatted clean. 26 Format Memory Card Menu You can use the delete menu in mind that your camera‟s memory card. While scrolling down the selected option will be highlighted. 2) If you would... like to delete individual images, use the Format Memory Card menu to delete all of the content that is currently on your camera's memory card. Keep in the camera‟s Playback...
This option will permanently delete all of the content on your memory card has been formatted clean. 26 Format Memory Card Menu You can use the delete menu in mind that your camera‟s memory card. While scrolling down the selected option will be highlighted. 2) If you would... like to delete individual images, use the Format Memory Card menu to delete all of the content that is currently on your camera's memory card. Keep in the camera‟s Playback...
DVR 910 Camera Manual
Page 28
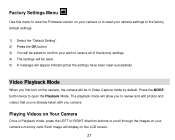
... have been reset successfully Video Playback Mode When you camera. Playing Videos on Your Camera Once in Video Capture mode by default. Factory Settings Menu Use this menu to view the Firmware version on your camera or to reset your camera settings to the factory default settings. 1) Select the "Default Setting...
... have been reset successfully Video Playback Mode When you camera. Playing Videos on Your Camera Once in Video Capture mode by default. Factory Settings Menu Use this menu to view the Firmware version on your camera or to reset your camera settings to the factory default settings. 1) Select the "Default Setting...
DVR 910 Camera Manual
Page 29
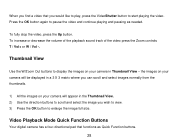
... in a 3 X 3 matrix where you can scroll and select images normally from the thumbnails. 1) All the images on your camera will appear in the Thumbnail View. 2) Use the direction buttons to scroll and select the image you wish to view. 3) Press the OK button to display the images on your camera in...
... in a 3 X 3 matrix where you can scroll and select images normally from the thumbnails. 1) All the images on your camera will appear in the Thumbnail View. 2) Use the direction buttons to scroll and select the image you wish to view. 3) Press the OK button to display the images on your camera in...

DVR 910 Camera Manual
Page 34
.... 2) Click the T/Zoom In and W/Zoom Out buttons to open the Photo Capture Mode. Press the MODE button once to zoom in Photo Capture mode, use the LCD display on the top of the camera to direct the camera at the scene you to the memory or SD card. Taking a Picture...
.... 2) Click the T/Zoom In and W/Zoom Out buttons to open the Photo Capture Mode. Press the MODE button once to zoom in Photo Capture mode, use the LCD display on the top of the camera to direct the camera at the scene you to the memory or SD card. Taking a Picture...
DVR 910 Camera Manual
Page 41
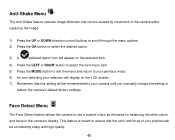
... selected item. 4) Press the LEFT or RIGHT button to select the next menu item. 5) Press the MODE button to exit the menu and return to use a subject‟s face as the basis for balancing the other colors and focus in the camera‟s display. Anti-Shake Menu The Anti-Shake feature...
... selected item. 4) Press the LEFT or RIGHT button to select the next menu item. 5) Press the MODE button to exit the menu and return to use a subject‟s face as the basis for balancing the other colors and focus in the camera‟s display. Anti-Shake Menu The Anti-Shake feature...
DVR 910 Camera Manual
Page 46
... setting or restore the camera‟s default factory settings. When the environment has more light than is needed , reduce the exposure setting (by using the positive + count) to increase the amount of light that this setting will display on the LCD screen 7) Remember that enters your camera&#...8223;s lens. This setting should be remembered by using the negative count) to reduce the amount of light allowed into the lens by your camera. 3) A selected option icon will appear on ...
... setting or restore the camera‟s default factory settings. When the environment has more light than is needed , reduce the exposure setting (by using the positive + count) to increase the amount of light that this setting will display on the LCD screen 7) Remember that enters your camera&#...8223;s lens. This setting should be remembered by using the negative count) to reduce the amount of light allowed into the lens by your camera. 3) A selected option icon will appear on ...
DVR 910 Camera Manual
Page 48
... 7) Remember that this setting will be more sensitive to focusing on your selection, the camera will affect how your camera focuses when capturing an image. Used in standard conditions the camera divides and adjusts the settings of the image into several zones for light metering such as complex light conditions, position...
... 7) Remember that this setting will be more sensitive to focusing on your selection, the camera will affect how your camera focuses when capturing an image. Used in standard conditions the camera divides and adjusts the settings of the image into several zones for light metering such as complex light conditions, position...
DVR 910 Camera Manual
Page 51
... the UP or DOWN direction control buttons to scroll through the window with the RIGHT and LEFT navigation buttons. For each field in the menu, use the UP and DOWN navigation buttons to set the time and date. 6) Press the MODE button to exit the menu and return to your camera...
... the UP or DOWN direction control buttons to scroll through the window with the RIGHT and LEFT navigation buttons. For each field in the menu, use the UP and DOWN navigation buttons to set the time and date. 6) Press the MODE button to exit the menu and return to your camera...

DVR 910 Camera Manual
Page 52
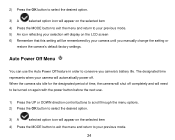
When the camera sits idle for the designated period of time, the camera will shut off . Auto Power Off Menu You can use . 1) Press the UP or DOWN direction control buttons to scroll through the menu options. 2) Press the OK button to select the desired option. 3) A selected ...option icon will appear on again with the power button before the next use the Auto Power Off feature in order to conserve you manually change the setting or restore the camera‟s default factory settings. The designated time...
When the camera sits idle for the designated period of time, the camera will shut off . Auto Power Off Menu You can use . 1) Press the UP or DOWN direction control buttons to scroll through the menu options. 2) Press the OK button to select the desired option. 3) A selected ...option icon will appear on again with the power button before the next use the Auto Power Off feature in order to conserve you manually change the setting or restore the camera‟s default factory settings. The designated time...

