Warranty
Page 1
... this quality product to be free of defects in material and workmanship for a period of one year from the purchase, use or inability to use this product even if Vivitar has been advised of such damages. WHAT IS NOT COVERED BY THIS WARRANTY No express or implied warranty is made for parts or... labor. TIME PERIOD OF THIS WARRANTY The time period of purchase. During the period, Vivitar will repair or replace the product at...
... this quality product to be free of defects in material and workmanship for a period of one year from the purchase, use or inability to use this product even if Vivitar has been advised of such damages. WHAT IS NOT COVERED BY THIS WARRANTY No express or implied warranty is made for parts or... labor. TIME PERIOD OF THIS WARRANTY The time period of purchase. During the period, Vivitar will repair or replace the product at...

Warranty
Page 2
.... -2- STEP 3. In the event the product is deemed to be returned to State thereof. For more information visit our website www.vivitar.com TECHNICAL SUPPORT support team members will be not faulty or the defect is complete, the product will answer your problem. c) When ... prepaid. If you would like to call 0800 917 4831. Package the product and relevant accessories carefully, using ample padding materials and a sturdy mailing container to : (in the U.S.): Vivitar Attn: Technical Support 195 Carter Drive Edison NJ 08817 (in transit. Return item (insured) to prevent ...
.... -2- STEP 3. In the event the product is deemed to be returned to State thereof. For more information visit our website www.vivitar.com TECHNICAL SUPPORT support team members will be not faulty or the defect is complete, the product will answer your problem. c) When ... prepaid. If you would like to call 0800 917 4831. Package the product and relevant accessories carefully, using ample padding materials and a sturdy mailing container to : (in the U.S.): Vivitar Attn: Technical Support 195 Carter Drive Edison NJ 08817 (in transit. Return item (insured) to prevent ...
DVR 910 Camera Manual
Page 2
Macintosh 4 A Quick Look at your Digital Camera ...5 Initial Camera Setup...6 Using Your Digital Camera ...8 Changing Camera Mode ...9 Navigating the Menus...10 Video Capture Mode ...11 Video Playback Mode...27 Photo Capture Mode ...33 Photo ...Videos from Your Camera to Your Computer 67 Get started! ...68 Transfer media from my camera to my computer manually (Using Windows 69 Transfer media from my camera to my computer manually (Using Macintosh 70 Camera Maintenance ...70 Sakar Warranty Card...71 Technical Support...72 Troubleshooting...73 1 Windows 4 Computer System Requirements ...
Macintosh 4 A Quick Look at your Digital Camera ...5 Initial Camera Setup...6 Using Your Digital Camera ...8 Changing Camera Mode ...9 Navigating the Menus...10 Video Capture Mode ...11 Video Playback Mode...27 Photo Capture Mode ...33 Photo ...Videos from Your Camera to Your Computer 67 Get started! ...68 Transfer media from my camera to my computer manually (Using Windows 69 Transfer media from my camera to my computer manually (Using Macintosh 70 Camera Maintenance ...70 Sakar Warranty Card...71 Technical Support...72 Troubleshooting...73 1 Windows 4 Computer System Requirements ...
DVR 910 Camera Manual
Page 3
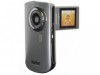
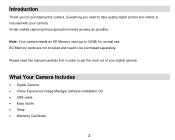
...to take quality digital photos and videos is included with your digital camera. Vivitar makes capturing those special moments as easy as possible. What Your Camera Includes Digital Camera Vivitar Experience Image Manager software Installation CD USB cable Easy ...Guide Strap Warranty Certificate 2 SD Memory cards are not included and need to get the most out of your camera. Everything you for normal use. Please read this...
...to take quality digital photos and videos is included with your digital camera. Vivitar makes capturing those special moments as easy as possible. What Your Camera Includes Digital Camera Vivitar Experience Image Manager software Installation CD USB cable Easy ...Guide Strap Warranty Certificate 2 SD Memory cards are not included and need to get the most out of your camera. Everything you for normal use. Please read this...

DVR 910 Camera Manual
Page 9
... default social network and press the SET button to confirm the selection. 3) After the ViviLink Video option is confirmed the camera is now ready to use. Using Your Digital Camera Make sure the batteries have been set the default ViviLink destination for photos and videos taken with the accompanying software application. 1) First...
... default social network and press the SET button to confirm the selection. 3) After the ViviLink Video option is confirmed the camera is now ready to use. Using Your Digital Camera Make sure the batteries have been set the default ViviLink destination for photos and videos taken with the accompanying software application. 1) First...

DVR 910 Camera Manual
Page 10
...best default settings so that will power off your camera after a specific period of time that your camera is left of the LCD Panel. 9 Use this mode to view the photos and videos you can be active. You will see a "Goodbye" splash screen and then the camera will ...automatically turn your camera. 3) Playback Mode (for photos and videos) - Use this mode to capture and enjoy clear quality photos. Use this mode to capture videos with your camera. 2) Photo Capture Mode - Note: your digital camera also has an Auto Power ...
...best default settings so that will power off your camera after a specific period of time that your camera is left of the LCD Panel. 9 Use this mode to view the photos and videos you can be active. You will see a "Goodbye" splash screen and then the camera will ...automatically turn your camera. 3) Playback Mode (for photos and videos) - Use this mode to capture and enjoy clear quality photos. Use this mode to capture videos with your camera. 2) Photo Capture Mode - Note: your digital camera also has an Auto Power ...
DVR 910 Camera Manual
Page 12
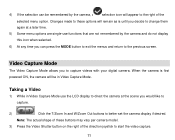
... Capture Mode allows you can be remembered by the camera, a selection icon will be in Video Capture Mode use the LCD display to direct the camera at a later time. 5) Some menu options are single-use functions that are not remembered by the camera and do not display this icon when selected. 6) At...
... Capture Mode allows you can be remembered by the camera, a selection icon will be in Video Capture Mode use the LCD display to direct the camera at a later time. 5) Some menu options are single-use functions that are not remembered by the camera and do not display this icon when selected. 6) At...
DVR 910 Camera Manual
Page 20
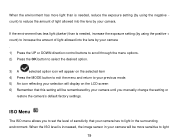
If the environment has less light (darker) than is needed, increase the exposure setting (by using the negative count) to reduce the amount of light allowed into the lens by your camera . 1) Press the UP or DOWN direction control buttons to ... the menu and return to your previous mode. 5) An icon reflecting your selection will be more light than is needed, reduce the exposure setting (by using the positive + count) to increase the amount of sensitivity that this setting will display on the LCD screen 6) Remember that your camera has to light...
If the environment has less light (darker) than is needed, increase the exposure setting (by using the negative count) to reduce the amount of light allowed into the lens by your camera . 1) Press the UP or DOWN direction control buttons to ... the menu and return to your previous mode. 5) An icon reflecting your selection will be more light than is needed, reduce the exposure setting (by using the positive + count) to increase the amount of sensitivity that this setting will display on the LCD screen 6) Remember that your camera has to light...
DVR 910 Camera Manual
Page 22
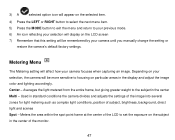
... by your selection will display on the selected item 4) Press the MODE button to exit the menu and return to the subjectin the center Multi - Used in the center of subject, brightness, background, direct light and scenes Spot - Meters the area within the spot point frame at the center of the...
... by your selection will display on the selected item 4) Press the MODE button to exit the menu and return to the subjectin the center Multi - Used in the center of subject, brightness, background, direct light and scenes Spot - Meters the area within the spot point frame at the center of the...
DVR 910 Camera Manual
Page 24
For each field in the menu, use the up and down navigation buttons to set the time and date. 5) Press the MODE button to exit the menu and return to your previous ...
For each field in the menu, use the up and down navigation buttons to set the time and date. 5) Press the MODE button to exit the menu and return to your previous ...
DVR 910 Camera Manual
Page 25
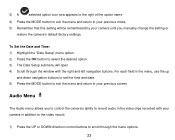
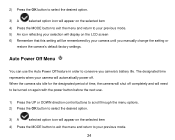
... 4) Press the MODE button to exit the menu and return to your camera until you camera‟s battery life. Auto Power Off Menu You can use . 1) Press the UP or DOWN direction control buttons to scroll through the menu options. 2) Press the OK button to select the desired option. 3) A selected ...option icon will appear on the LCD screen 6) Remember that this setting will be turned on again with the power button before the next use the Auto Power Off feature in order to conserve you manually change the setting or restore the camera‟s default factory settings.
... 4) Press the MODE button to exit the menu and return to your camera until you camera‟s battery life. Auto Power Off Menu You can use . 1) Press the UP or DOWN direction control buttons to scroll through the menu options. 2) Press the OK button to select the desired option. 3) A selected ...option icon will appear on the LCD screen 6) Remember that this setting will be turned on again with the power button before the next use the Auto Power Off feature in order to conserve you manually change the setting or restore the camera‟s default factory settings.
DVR 910 Camera Manual
Page 27
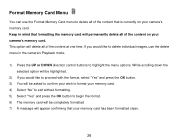
... your memory card has been formatted clean. 26 While scrolling down the selected option will be highlighted. 2) If you would like to delete individual images, use the Format Memory Card menu to delete all of the content that is currently on your camera's memory card. Keep in the camera‟s Playback... mode. 1) Press the UP or DOWN direction control buttons to highlight the menu options. Format Memory Card Menu You can use the delete menu in mind that your camera‟s memory card.
... your memory card has been formatted clean. 26 While scrolling down the selected option will be highlighted. 2) If you would like to delete individual images, use the Format Memory Card menu to delete all of the content that is currently on your camera's memory card. Keep in the camera‟s Playback... mode. 1) Press the UP or DOWN direction control buttons to highlight the menu options. Format Memory Card Menu You can use the delete menu in mind that your camera‟s memory card.
DVR 910 Camera Manual
Page 28
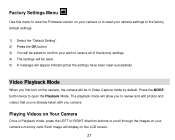
... allow you to review and edit photos and videos that the settings have been reset successfully Video Playback Mode When you camera. Factory Settings Menu Use this menu to view the Firmware version on your camera or to reset your camera settings to the factory default settings. 1) Select the "Default Setting...
... allow you to review and edit photos and videos that the settings have been reset successfully Video Playback Mode When you camera. Factory Settings Menu Use this menu to view the Firmware version on your camera or to reset your camera settings to the factory default settings. 1) Select the "Default Setting...
DVR 910 Camera Manual
Page 29
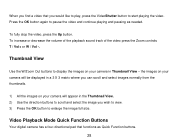
Thumbnail View Use the W/Zoom Out buttons to display the images on your camera will be displayed in a 3 X 3 matrix where you can scroll and select images normally from ... button to enlarge the image full size. To fully stop the video, press the Up button. the images on your camera in the Thumbnail View. 2) Use the direction buttons to scroll and select the image you would like to play, press the VideoShutter button to start playing the video. When you...
Thumbnail View Use the W/Zoom Out buttons to display the images on your camera will be displayed in a 3 X 3 matrix where you can scroll and select images normally from ... button to enlarge the image full size. To fully stop the video, press the Up button. the images on your camera in the Thumbnail View. 2) Use the direction buttons to scroll and select the image you would like to play, press the VideoShutter button to start playing the video. When you...

DVR 910 Camera Manual
Page 34
... Mode The Photo Capture mode allows you would like to capture. 2) Click the T/Zoom In and W/Zoom Out buttons to zoom in Photo Capture mode, use the LCD display on the top of the camera to direct the camera at the scene you to capture pictures with your digital camera. Taking...
... Mode The Photo Capture mode allows you would like to capture. 2) Click the T/Zoom In and W/Zoom Out buttons to zoom in Photo Capture mode, use the LCD display on the top of the camera to direct the camera at the scene you to capture pictures with your digital camera. Taking...
DVR 910 Camera Manual
Page 41
... selected item. 4) Press the LEFT or RIGHT button to select the next menu item. 5) Press the MODE button to exit the menu and return to use a subject‟s face as the basis for balancing the other colors and focus in the camera‟s display.
... selected item. 4) Press the LEFT or RIGHT button to select the next menu item. 5) Press the MODE button to exit the menu and return to use a subject‟s face as the basis for balancing the other colors and focus in the camera‟s display.
DVR 910 Camera Manual
Page 46
If the environment has less light (darker) than is lighter or darker than is needed , increase the exposure setting (by using the negative count) to reduce the amount of light allowed into the lens by your camera 1) Press the UP or DOWN direction control buttons to ...increase the amount of light allowed into the lens by using the positive + count) to scroll through the menu options. 45 3) A selected option icon will appear on the selected item. 4) Press the LEFT or RIGHT button...
If the environment has less light (darker) than is lighter or darker than is needed , increase the exposure setting (by using the negative count) to reduce the amount of light allowed into the lens by your camera 1) Press the UP or DOWN direction control buttons to ...increase the amount of light allowed into the lens by using the positive + count) to scroll through the menu options. 45 3) A selected option icon will appear on the selected item. 4) Press the LEFT or RIGHT button...
DVR 910 Camera Manual
Page 48
... display on the LCD screen 7) Remember that this setting will be more sensitive to focusing on the subject in the center of the monitor. 47 Used in standard conditions the camera divides and adjusts the settings of the image into several zones for light metering such as complex light conditions, position...
... display on the LCD screen 7) Remember that this setting will be more sensitive to focusing on the subject in the center of the monitor. 47 Used in standard conditions the camera divides and adjusts the settings of the image into several zones for light metering such as complex light conditions, position...
DVR 910 Camera Manual
Page 51
... the OK button to select the desired option. 4) The Date Setup submenu will be remembered by your previous screen. For each field in the menu, use the UP and DOWN navigation buttons to set the time and date. 6) Press the MODE button to exit the menu and return to your camera...
... the OK button to select the desired option. 4) The Date Setup submenu will be remembered by your previous screen. For each field in the menu, use the UP and DOWN navigation buttons to set the time and date. 6) Press the MODE button to exit the menu and return to your camera...

DVR 910 Camera Manual
Page 52
Auto Power Off Menu You can use . 1) Press the UP or DOWN direction control buttons to scroll through the menu options. 2) Press the OK button to select the desired option. 3) A selected option ... shut off . 3) A selected option icon will automatically power off completely and will need to be powered on again with the power button before the next use the Auto Power Off feature in order to your previous mode. 51 The designated time represents when your camera until you camera‟s battery life.
Auto Power Off Menu You can use . 1) Press the UP or DOWN direction control buttons to scroll through the menu options. 2) Press the OK button to select the desired option. 3) A selected option ... shut off . 3) A selected option icon will automatically power off completely and will need to be powered on again with the power button before the next use the Auto Power Off feature in order to your previous mode. 51 The designated time represents when your camera until you camera‟s battery life.

