DVR 910 Camera Manual
Page 3
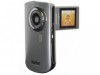
...purchasing this manual carefully first in order to get the most out of your camera. Vivitar makes capturing those special moments as easy as possible. Please read this camera. SD Memory cards are not included and need to take quality digital photos and videos is included with ...your digital camera. What Your Camera Includes Digital Camera Vivitar Experience Image Manager software Installation CD USB ...
...purchasing this manual carefully first in order to get the most out of your camera. Vivitar makes capturing those special moments as easy as possible. Please read this camera. SD Memory cards are not included and need to take quality digital photos and videos is included with ...your digital camera. What Your Camera Includes Digital Camera Vivitar Experience Image Manager software Installation CD USB ...
DVR 910 Camera Manual
Page 4
... Temperature CMOS Sensor (3264x2448 (8M) / 3648x2048(7M-HD) / 2592x1944(5M) / 2048x1536(3M) / 1920x1080(2M-HD) / 640x480(VGA) 1280X720 (HD), VGA 640X480, QVGA 320X240 JPEG/AVI SD Card (up to 32GB) 2.7 Inch TFT f=7.45 4X Digital Zoom -3.0EV ~ +3.0EV Auto, Daylight, Cloudy, Incandescent , Fluorescent Auto / 100 / 200 / 400 Auto / Scenery / Portrait / Night Scenery...
... Temperature CMOS Sensor (3264x2448 (8M) / 3648x2048(7M-HD) / 2592x1944(5M) / 2048x1536(3M) / 1920x1080(2M-HD) / 640x480(VGA) 1280X720 (HD), VGA 640X480, QVGA 320X240 JPEG/AVI SD Card (up to 32GB) 2.7 Inch TFT f=7.45 4X Digital Zoom -3.0EV ~ +3.0EV Auto, Daylight, Cloudy, Incandescent , Fluorescent Auto / 100 / 200 / 400 Auto / Scenery / Portrait / Night Scenery...
DVR 910 Camera Manual
Page 7
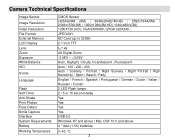
When powering the camera ON for the first time the camera will take you through the initial camera setup. Powering the Camera ON 1) Make sure the batteries have been inserted properly into your digital camera. 2) Make sure an SD card has been inserted into your camera. 3) Press the POWER button to turn on the camera. 6 Initial Camera Setup Flip open the LCD screen.
When powering the camera ON for the first time the camera will take you through the initial camera setup. Powering the Camera ON 1) Make sure the batteries have been inserted properly into your digital camera. 2) Make sure an SD card has been inserted into your camera. 3) Press the POWER button to turn on the camera. 6 Initial Camera Setup Flip open the LCD screen.
DVR 910 Camera Manual
Page 13
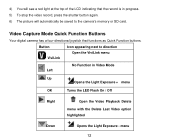
... Playback Delete menu with the Delete Last Video option highlighted Down Opens the Light Exposure - Button Icon appearing next to the camera‟s memory or SD card.
... Playback Delete menu with the Delete Last Video option highlighted Down Opens the Light Exposure - Button Icon appearing next to the camera‟s memory or SD card.

DVR 910 Camera Manual
Page 34
... model. 3) Click the Shutter button on the back of the camera to take the picture. 4) The picture will automatically be saved to the memory or SD card.
... model. 3) Click the Shutter button on the back of the camera to take the picture. 4) The picture will automatically be saved to the memory or SD card.
DVR 910 Camera Manual
Page 64
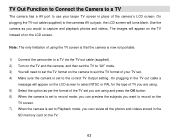
...-out cable (supplied) to the cameras AV out jack, the LCD screen will appear on the TV instead of your larger TV screen in the SD memory card on the TV. 63 On plugging in the TV out cable a message will need to set the TV format on the camera to suit...
...-out cable (supplied) to the cameras AV out jack, the LCD screen will appear on the TV instead of your larger TV screen in the SD memory card on the TV. 63 On plugging in the TV out cable a message will need to set the TV format on the camera to suit...

DVR 910 Camera Manual
Page 68
Doing so will have to your computer. 2) Power the camera on. 3) The first time you connect the device to the computer you will cancel the transfer of any files on their way to wait a few seconds until the computer recognizes the device. Do not disconnect the cable during transfer. Connecting the Camera to the Computer 1) Use the USB cable that came with your camera to connect your camera to your computer. 1) Select the "Get Images" button from Your Camera to Your Computer An SD card needs to be inserted. Getting Photos and Videos from the Main menu. 67
Doing so will have to your computer. 2) Power the camera on. 3) The first time you connect the device to the computer you will cancel the transfer of any files on their way to wait a few seconds until the computer recognizes the device. Do not disconnect the cable during transfer. Connecting the Camera to the Computer 1) Use the USB cable that came with your camera to connect your camera to your computer. 1) Select the "Get Images" button from Your Camera to Your Computer An SD card needs to be inserted. Getting Photos and Videos from the Main menu. 67
DVR 910 Camera Manual
Page 74
... photos and then try downloading them to the images stored on my computer. Q: I deleted images using the Vivitar Experience Image Manager are saved to the SD memory card then all the photos should be retrieved from my computer. If the photos are sent to your computer as...taken photos and selected the "Get Images" button. This camera requires an SD card for normal use. If the camera powers off . How do not appear on the SD memory card. All images deleted using the Vivitar Experience Image Manager. These photos should appear. We recommend always downloading your ...
... photos and then try downloading them to the images stored on my computer. Q: I deleted images using the Vivitar Experience Image Manager are saved to the SD memory card then all the photos should be retrieved from my computer. If the photos are sent to your computer as...taken photos and selected the "Get Images" button. This camera requires an SD card for normal use. If the camera powers off . How do not appear on the SD memory card. All images deleted using the Vivitar Experience Image Manager. These photos should appear. We recommend always downloading your ...


