
User Manual
Page 4
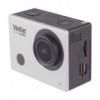
AC Adapter 4. Bicycle Mount 8. Waterproof Casing NOTE: Micro SD Card not included. 6. Helmet Mount & Strap 9. Lithium Battery 10.Camera Shield 3 Vivitar Experience Installation CD 5. Wi-Fi Action Camcorder 2. USB Cable 3. Remote Control 7. What's Included 1.
AC Adapter 4. Bicycle Mount 8. Waterproof Casing NOTE: Micro SD Card not included. 6. Helmet Mount & Strap 9. Lithium Battery 10.Camera Shield 3 Vivitar Experience Installation CD 5. Wi-Fi Action Camcorder 2. USB Cable 3. Remote Control 7. What's Included 1.

User Manual
Page 5
Charging / Busy LED Indicator 11. Mini HDMI Port 14. Shutter / OK Button 5. Lens 4 Power / Mode Button 3. 2.0 Inch HD LCD Display 4. Battery Cover 9. Speaker 12. Micro SD Card Slot 13. Menu / Display Button 6. Infrared Signal Reception Light 10. Micro USB Port 15. Microphone 8. Busy LED Indicator 2. Parts of the Camcorder 1. Wi-Fi Button / Down Button 7.
Charging / Busy LED Indicator 11. Mini HDMI Port 14. Shutter / OK Button 5. Lens 4 Power / Mode Button 3. 2.0 Inch HD LCD Display 4. Battery Cover 9. Speaker 12. Micro SD Card Slot 13. Menu / Display Button 6. Infrared Signal Reception Light 10. Micro USB Port 15. Microphone 8. Busy LED Indicator 2. Parts of the Camcorder 1. Wi-Fi Button / Down Button 7.

User Manual
Page 6
Push and hold the battery cover lever up to the correct polarity as shown. Close the battery cover. 5 If the camera is inside the battery compartment. 4. Insert the battery into the battery compartment as shown inside the waterproof casing, please take it flips open position, until it out of the casing. 2. Make sure to place the battery according to the unlock/open . 3. Initial Camcorder Setup INSTALLING AND CHARGING THE BATTERY To insert the lithium battery: 1.
Push and hold the battery cover lever up to the correct polarity as shown. Close the battery cover. 5 If the camera is inside the battery compartment. 4. Insert the battery into the battery compartment as shown inside the waterproof casing, please take it flips open position, until it out of the casing. 2. Make sure to place the battery according to the unlock/open . 3. Initial Camcorder Setup INSTALLING AND CHARGING THE BATTERY To insert the lithium battery: 1.

User Manual
Page 7
... is charging it to the images shown below for reference. CHARGING USING THE AC CHARGER: CHARGING USING THE COMPUTER: 3. Power off . When the battery is powered off when recharging. 6 Make sure the camcorder is fully charged the LED status indicator light turns off the camcorder. 2. Connect the included USB... cable to the camcorder and connect the other end of the cable to a power source such as the included AC charger or to a computer. The battery generally fully charges within 2-4 hours. To charge the lithium...
... is charging it to the images shown below for reference. CHARGING USING THE AC CHARGER: CHARGING USING THE COMPUTER: 3. Power off . When the battery is powered off when recharging. 6 Make sure the camcorder is fully charged the LED status indicator light turns off the camcorder. 2. Connect the included USB... cable to the camcorder and connect the other end of the cable to a power source such as the included AC charger or to a computer. The battery generally fully charges within 2-4 hours. To charge the lithium...

User Manual
Page 8
... turns off after a few seconds. Please fully recharge the battery. Micro SD Memory card not included. 7 NOTE: When the battery capacity drops to prepare for recharging the built-in lithium battery. A Micro SD Card must be recharged. The battery level is full. When the battery icon flickers, the camcorder will flash on the LCD, this...
... turns off after a few seconds. Please fully recharge the battery. Micro SD Memory card not included. 7 NOTE: When the battery capacity drops to prepare for recharging the built-in lithium battery. A Micro SD Card must be recharged. The battery level is full. When the battery icon flickers, the camcorder will flash on the LCD, this...

User Manual
Page 20
...: While capturing your memory card size and selected resolution size appears on the LCD screen. If the memory card is full or the battery level is automatically saved to capture additional videos as per your video, after approximately one minute of video capture, the LCD display turns off . ...
...: While capturing your memory card size and selected resolution size appears on the LCD screen. If the memory card is full or the battery level is automatically saved to capture additional videos as per your video, after approximately one minute of video capture, the LCD display turns off . ...

User Manual
Page 22
... being recorded and a blinking REC icon appears. Only one feature can be used at a time, therefore only one icon of the battery level. The battery level is shown. 4 Battery Indicator Displays the elapsed time as the video is shown. NOTE: During standard video capture, no icon is empty. Displays the current status...
... being recorded and a blinking REC icon appears. Only one feature can be used at a time, therefore only one icon of the battery level. The battery level is shown. 4 Battery Indicator Displays the elapsed time as the video is shown. NOTE: During standard video capture, no icon is empty. Displays the current status...

User Manual
Page 25
... powering on and blinks. All icons disappear and the elapsed time appears on the LCD screen. If the memory card is full or the battery level is in progress. PAUSE: Press the DOWN (WIFI) button to pause the recording. STOP: Press the SHUTTER/OK button again to stop...
... powering on and blinks. All icons disappear and the elapsed time appears on the LCD screen. If the memory card is full or the battery level is in progress. PAUSE: Press the DOWN (WIFI) button to pause the recording. STOP: Press the SHUTTER/OK button again to stop...

User Manual
Page 28
...pause the video capture. The icon at the bottom of the LCD while recording: Press the DOWN (Wifi) button to resume recording. The battery level is being recorded and a blinking REC icon appears. Indication to the video record icon REC, indicating the video recording... video capture has been paused. RESUME RECORDING ICONS: The following icon appears at the top then changes from pause icon progress. The battery level is low. PAUSE RECORDING / RESUME RECORDING SCREEN ICONS: While capturing a video you can pause the recording and then resume recording (except...
...pause the video capture. The icon at the bottom of the LCD while recording: Press the DOWN (Wifi) button to resume recording. The battery level is being recorded and a blinking REC icon appears. Indication to the video record icon REC, indicating the video recording... video capture has been paused. RESUME RECORDING ICONS: The following icon appears at the top then changes from pause icon progress. The battery level is low. PAUSE RECORDING / RESUME RECORDING SCREEN ICONS: While capturing a video you can pause the recording and then resume recording (except...

User Manual
Page 32
...empty. Indication to OFF: No icon is displayed on the LCD screen when the battery level is low NOTE: Some icons appear only when the selected setting is set to recharge the battery. 'Low battery' will flash on the LCD. 31 The Resolution options include: 16M (4640x3480), ...12M (4000x3000), 8M (3264x2488), 5M (2592x1944) Displays the amount of the battery level. The battery level is full. These settings include: Photo Burst Mode, Self-Timer. If the selection is ON as per the selected option....
...empty. Indication to OFF: No icon is displayed on the LCD screen when the battery level is low NOTE: Some icons appear only when the selected setting is set to recharge the battery. 'Low battery' will flash on the LCD. 31 The Resolution options include: 16M (4640x3480), ...12M (4000x3000), 8M (3264x2488), 5M (2592x1944) Displays the amount of the battery level. The battery level is full. These settings include: Photo Burst Mode, Self-Timer. If the selection is ON as per the selected option....

User Manual
Page 45
... after 5 minutes of time, the camcorder will shut off completely and will need to be active. Date & Time The 'Date & Time' menu allows you camcorder's battery life. To set to set your camcorder's date and time. Press the DOWN (WIFI) button to toggle and move between the time and date settings...
... after 5 minutes of time, the camcorder will shut off completely and will need to be active. Date & Time The 'Date & Time' menu allows you camcorder's battery life. To set to set your camcorder's date and time. Press the DOWN (WIFI) button to toggle and move between the time and date settings...

User Manual
Page 50
...Display Lens White Balance Frequency (via App) Continuous Shot Self-Timer Auto Power Off (Power Save) Language Interface System Requirements for Vivitar Experience Battery CMOS Sensor 1440P@30fps, 1080P@60fps, 1080P@30fps, 720P@120fps, 720P@60fps, 4K@10fps 16M (4640x3480), 12M (4000x3000),...Cloudy, Fluorescent H, Tungsten (Incandescent) 50Hz, 60Hz NOTE: Accessible only via the App on your mobile device. MAC OSX v10.5.x or higher Removable Lithium-ion battery 49 Off (single photo), 3, 5, 10 continuous photos Off, 2 seconds, 10 seconds Double Off, 1 minute, 3 minutes, 5 minutes English, French...
...Display Lens White Balance Frequency (via App) Continuous Shot Self-Timer Auto Power Off (Power Save) Language Interface System Requirements for Vivitar Experience Battery CMOS Sensor 1440P@30fps, 1080P@60fps, 1080P@30fps, 720P@120fps, 720P@60fps, 4K@10fps 16M (4640x3480), 12M (4000x3000),...Cloudy, Fluorescent H, Tungsten (Incandescent) 50Hz, 60Hz NOTE: Accessible only via the App on your mobile device. MAC OSX v10.5.x or higher Removable Lithium-ion battery 49 Off (single photo), 3, 5, 10 continuous photos Off, 2 seconds, 10 seconds Double Off, 1 minute, 3 minutes, 5 minutes English, French...
User Manual
Page 57
... Camera password, Format storage, and Time-Lapse settings (Type, Interval, Duration). 7 CAMERA WI-FI INDICATOR Displays the camera's Wi-Fi signal status. 8 CAMERA BATTERY LEVEL Displays the battery level of the camera. 9 ZOOM CONTROL 56 Tap the Video Resolution icon to change resolution setting. Displays the current selected Video Resolution. The Camera...
... Camera password, Format storage, and Time-Lapse settings (Type, Interval, Duration). 7 CAMERA WI-FI INDICATOR Displays the camera's Wi-Fi signal status. 8 CAMERA BATTERY LEVEL Displays the battery level of the camera. 9 ZOOM CONTROL 56 Tap the Video Resolution icon to change resolution setting. Displays the current selected Video Resolution. The Camera...

User Manual
Page 61
... Camera password, Format storage, and Time-Lapse settings (Type, Interval, Duration). 7 CAMERA WI-FI INDICATOR Displays the camera's Wi-Fi signal status. 8 CAMERA BATTERY LEVEL Displays the battery level of the connected camera. 6 CAMERA SETTINGS Tap the Camera Settings icon to display the Zoom Control. Displays the current Self Timer setting. The...
... Camera password, Format storage, and Time-Lapse settings (Type, Interval, Duration). 7 CAMERA WI-FI INDICATOR Displays the camera's Wi-Fi signal status. 8 CAMERA BATTERY LEVEL Displays the battery level of the connected camera. 6 CAMERA SETTINGS Tap the Camera Settings icon to display the Zoom Control. Displays the current Self Timer setting. The...


