User Manual
Page 2
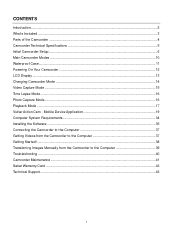
... Getting Started! ...38 Transferring Images Manually from the Camcorder to the Computer 39 Troubleshooting ...40 Camcorder Maintenance ...41 Sakar Warranty Card ...43 Technical Support ...43 1 CONTENTS Introduction...2 What's Included ...3 Parts of the Camcorder ...4 Camcorder Technical Specifications ...5 Initial Camcorder Setup ...6 Main Camcorder Modes ...10 Waterproof Case...11 Powering On Your Camcorder ...12 LCD Display ...13 Changing Camcorder Mode ...14 Video Capture Mode ...15 Time Lapse Mode...16 Photo Capture Mode...16 Playback Mode ...17 Vivitar Action...
... Getting Started! ...38 Transferring Images Manually from the Camcorder to the Computer 39 Troubleshooting ...40 Camcorder Maintenance ...41 Sakar Warranty Card ...43 Technical Support ...43 1 CONTENTS Introduction...2 What's Included ...3 Parts of the Camcorder ...4 Camcorder Technical Specifications ...5 Initial Camcorder Setup ...6 Main Camcorder Modes ...10 Waterproof Case...11 Powering On Your Camcorder ...12 LCD Display ...13 Changing Camcorder Mode ...14 Video Capture Mode ...15 Time Lapse Mode...16 Photo Capture Mode...16 Playback Mode ...17 Vivitar Action...

User Manual
Page 3
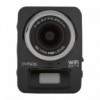
... up to take high definition digital videos and photos is included with your computer. Micro SD Memory cards are not included and need to 32GB. Vivitar makes capturing those special moments as easy as possible. You can be purchased separately. This camcorder is adapted specifically for purchasing the Vivitar DVR 936 Full HD1080 LifeCam Wearable Camcorder. Introduction Thank you install the Vivitar Experience Image Manager software to...
... up to take high definition digital videos and photos is included with your computer. Micro SD Memory cards are not included and need to 32GB. Vivitar makes capturing those special moments as easy as possible. You can be purchased separately. This camcorder is adapted specifically for purchasing the Vivitar DVR 936 Full HD1080 LifeCam Wearable Camcorder. Introduction Thank you install the Vivitar Experience Image Manager software to...
User Manual
Page 6
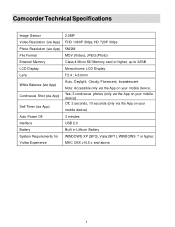
Camcorder Technical Specifications Image Sensor Video Resolution (via App) Photo Resolution (via App) File Format External Memory LCD Display Lens White Balance (via App) Continuous Shot (via App) Self Timer (via the App on your mobile device) 3 minutes USB 2.0 Built in Lithium Battery WINDOWS XP (SP3), Vista (SP1), WINDOWS 7 or higher; f=3.0mm Auto, Daylight, Cloudy, Florescent, Incandescent Note: Accessible only via the App on your mobile device. Yes; 3 continuous photos (only via the App...
Camcorder Technical Specifications Image Sensor Video Resolution (via App) Photo Resolution (via App) File Format External Memory LCD Display Lens White Balance (via App) Continuous Shot (via App) Self Timer (via the App on your mobile device) 3 minutes USB 2.0 Built in Lithium Battery WINDOWS XP (SP3), Vista (SP1), WINDOWS 7 or higher; f=3.0mm Auto, Daylight, Cloudy, Florescent, Incandescent Note: Accessible only via the App on your mobile device. Yes; 3 continuous photos (only via the App...
User Manual
Page 9
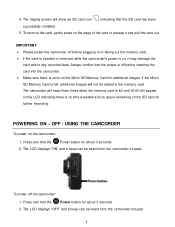
... and hold the Power button for about 3 seconds. 2. OFF / USING THE CAMCORDER To power on the Micro SD Memory Card for further recording. IMPORTANT: Please power the camcorder off before inserting the card into the camcorder. Make sure there is full and 00:00 will show an SD card icon , indicating that the power is off the camcorder: 1. POWERING ON - The LCD displays "OFF" and a beep...
... and hold the Power button for about 3 seconds. 2. OFF / USING THE CAMCORDER To power on the Micro SD Memory Card for further recording. IMPORTANT: Please power the camcorder off before inserting the card into the camcorder. Make sure there is full and 00:00 will show an SD card icon , indicating that the power is off the camcorder: 1. POWERING ON - The LCD displays "OFF" and a beep...
User Manual
Page 11
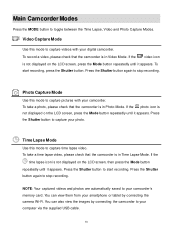
... supplied USB cable. 10 To take a photo, please check that the camcorder is not displayed on the LCD screen, press the Mode button repeatedly until it appears. Press the Shutter button again to stop recording. Video Capture Mode Use this mode to capture pictures with your photo. To start recording. If the time lapse icon is in Photo Mode. You can also view the images by connecting the camcorder to your smartphone or tablet by connecting the camera Wi...
... supplied USB cable. 10 To take a photo, please check that the camcorder is not displayed on the LCD screen, press the Mode button repeatedly until it appears. Press the Shutter button again to stop recording. Video Capture Mode Use this mode to capture pictures with your photo. To start recording. If the time lapse icon is in Photo Mode. You can also view the images by connecting the camcorder to your smartphone or tablet by connecting the camera Wi...
User Manual
Page 12
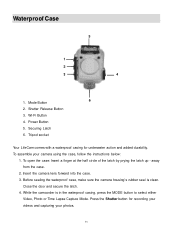
... your camera using the case, follow the instructions below: 1. Insert the camera lens forward into the case. 3. While the camcorder is clean. To assemble your photos. 11 away from the case. 2. Press the Shutter button for underwater action and added durability. To open the case: Insert a finger at the half circle of the latch by prying the latch up - Power Button 5. Mode Button...
... your camera using the case, follow the instructions below: 1. Insert the camera lens forward into the case. 3. While the camcorder is clean. To assemble your photos. 11 away from the case. 2. Press the Shutter button for underwater action and added durability. To open the case: Insert a finger at the half circle of the latch by prying the latch up - Power Button 5. Mode Button...
User Manual
Page 14
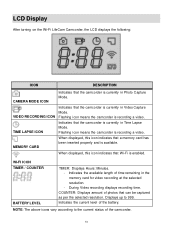
... icons vary according to 999. Flashing icon means the camcorder is currently in Video Capture Mode. When displayed, this icon indicates that a memory card has been inserted properly and is enabled. COUNTER: Displays amount of the battery. When displayed, this icon indicates that Wi-Fi is available. WI-FI ICON TIMER / COUNTER BATTERY LEVEL TIMER: Displays Hours: Minutes. - Indicates the current level of photos that the camcorder is currently in Time Lapse Mode. During Video recording displays recording time. Displays...
... icons vary according to 999. Flashing icon means the camcorder is currently in Video Capture Mode. When displayed, this icon indicates that a memory card has been inserted properly and is enabled. COUNTER: Displays amount of the battery. When displayed, this icon indicates that Wi-Fi is available. WI-FI ICON TIMER / COUNTER BATTERY LEVEL TIMER: Displays Hours: Minutes. - Indicates the current level of photos that the camcorder is currently in Time Lapse Mode. During Video recording displays recording time. Displays...
User Manual
Page 15
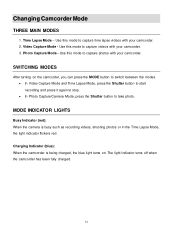
... the MODE button to switch between the modes. In Video Capture Mode and Time Lapse Mode, press the Shutter button to start recording and press it again to stop. In Photo Capture/Camera Mode, press the Shutter button to capture time lapse videos with your camcorder. 3. Use this mode to take photo. Photo Capture Mode - Charging Indicator (blue): When the camcorder is busy such as recording videos, shooting photos or in the Time Lapse Mode, the light indicator flickers red. SWITCHING MODES After turning on . Video Capture Mode - The light indicator turns...
... the MODE button to switch between the modes. In Video Capture Mode and Time Lapse Mode, press the Shutter button to start recording and press it again to stop. In Photo Capture/Camera Mode, press the Shutter button to capture time lapse videos with your camcorder. 3. Use this mode to take photo. Photo Capture Mode - Charging Indicator (blue): When the camcorder is busy such as recording videos, shooting photos or in the Time Lapse Mode, the light indicator flickers red. SWITCHING MODES After turning on . Video Capture Mode - The light indicator turns...

User Manual
Page 16
... power on the LCD screen. During recording, 0:01 indicates video recorded for more information. 15 See 'Camera Settings' for 1 minute. After recording the video, the amount of your video the video icon on the LCD display blinks, the LED light indicator by default. The video is low, the camcorder will automatically stop the video capture. During the recording of available time left to stop recording. Capture Your Video: Press the Shutter button to open the Video Capture Mode...
... power on the LCD screen. During recording, 0:01 indicates video recorded for more information. 15 See 'Camera Settings' for 1 minute. After recording the video, the amount of your video the video icon on the LCD display blinks, the LED light indicator by default. The video is low, the camcorder will automatically stop the video capture. During the recording of available time left to stop recording. Capture Your Video: Press the Shutter button to open the Video Capture Mode...

User Manual
Page 17
... the camcorder's Micro SD Memory card. TAKING A TIME LAPSE VIDEO 1. Photo Capture Mode The Photo Capture Mode allows you to capture photos with your digital camcorder. The Photo Capture icon will be active. NOTE: Use the 'Vivitar Action Cam' application to control the following Capture Settings: Resolution, White Balance, Time-lapse options and to stop recording. TAKING A PHOTO 1. The Time Lapse icon appears on the LCD. 16 Power On: Press and hold the Power button to power for about 3 seconds...
... the camcorder's Micro SD Memory card. TAKING A TIME LAPSE VIDEO 1. Photo Capture Mode The Photo Capture Mode allows you to capture photos with your digital camcorder. The Photo Capture icon will be active. NOTE: Use the 'Vivitar Action Cam' application to control the following Capture Settings: Resolution, White Balance, Time-lapse options and to stop recording. TAKING A PHOTO 1. The Time Lapse icon appears on the LCD. 16 Power On: Press and hold the Power button to power for about 3 seconds...

User Manual
Page 18
... Photo Capture Settings: Resolution, White Balance, Time-lapse, Burst, Self-Timer and to the camcorder's Micro SD Memory card. Connect your camcorder to open the 'JPG' and 'VIDEO' folder. Now you can be a portable disc added named 'Removable Disk'. Click to your computer. Your captured videos are stored in the window of your computer or view directly from the memory card. NOTE: Do not disconnect the USB cable during file transfer. Alternatively, in the folder...
... Photo Capture Settings: Resolution, White Balance, Time-lapse, Burst, Self-Timer and to the camcorder's Micro SD Memory card. Connect your camcorder to open the 'JPG' and 'VIDEO' folder. Now you can be a portable disc added named 'Removable Disk'. Click to your computer. Your captured videos are stored in the window of your computer or view directly from the memory card. NOTE: Do not disconnect the USB cable during file transfer. Alternatively, in the folder...
User Manual
Page 20
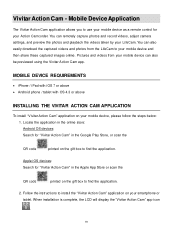
... application allows you to your mobile device can also be previewed using the Vivitar Action Cam app. You can also easily download the captured videos and photos from your mobile device and then share these captured images online. You can remotely capture photos and record videos, adjust camera settings, and preview the photos and playback the videos taken by your Action Camcorder. MOBILE DEVICE REQUIREMENTS iPhone...
... application allows you to your mobile device can also be previewed using the Vivitar Action Cam app. You can also easily download the captured videos and photos from your mobile device and then share these captured images online. You can remotely capture photos and record videos, adjust camera settings, and preview the photos and playback the videos taken by your Action Camcorder. MOBILE DEVICE REQUIREMENTS iPhone...
User Manual
Page 28
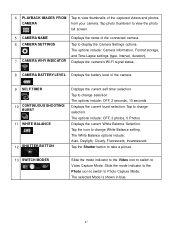
... Photo icon to switch to Video Capture Mode. The options include: OFF, 3 photos, 5 Photos Displays the current White Balance Selection. Tap to view the photo full screen. 5 CAMERA NAME Displays the name of the captured videos and photos CAMERA from your camera. The options include: Camera information, Format storage, and Time-Lapse settings (type, interval, duration). 7 CAMERA WI-FI INDICATOR Displays the camera's Wi-Fi signal status. 8 CAMERA BATTERY LEVEL Displays the battery level of the camera. 9 SELF TIMER 10 CONTINUOUS SHOOTING/ BURST 11 WHITE BALANCE 12 SHUTTER BUTTON...
... Photo icon to switch to Video Capture Mode. The options include: OFF, 3 photos, 5 Photos Displays the current White Balance Selection. Tap to view the photo full screen. 5 CAMERA NAME Displays the name of the captured videos and photos CAMERA from your camera. The options include: Camera information, Format storage, and Time-Lapse settings (type, interval, duration). 7 CAMERA WI-FI INDICATOR Displays the camera's Wi-Fi signal status. 8 CAMERA BATTERY LEVEL Displays the battery level of the camera. 9 SELF TIMER 10 CONTINUOUS SHOOTING/ BURST 11 WHITE BALANCE 12 SHUTTER BUTTON...

User Manual
Page 30
... desired size of the Shutter button. CANCEL: To exit without formatting the memory card, tap Cancel. This feature can be deleted. - The Continuous Shooting//Burst options include: OFF - Takes 5 photos in a row with your camera. like to delete individual images, use the delete option in a row. 29 Photo Capture Mode Settings SETTING PHOTO RESOLUTION WHITE BALANCE DESCRIPTION The Photo Resolution options allow the camera to properly balance the colors in a row. 5 PHOTOS - Takes 10 photos in the Playback mode. OK: To format the camera's memory card...
... desired size of the Shutter button. CANCEL: To exit without formatting the memory card, tap Cancel. This feature can be deleted. - The Continuous Shooting//Burst options include: OFF - Takes 5 photos in a row with your camera. like to delete individual images, use the delete option in a row. 29 Photo Capture Mode Settings SETTING PHOTO RESOLUTION WHITE BALANCE DESCRIPTION The Photo Resolution options allow the camera to properly balance the colors in a row. 5 PHOTOS - Takes 10 photos in the Playback mode. OK: To format the camera's memory card...
User Manual
Page 32
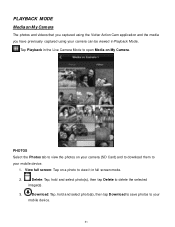
... using your camera can be viewed in full screen mode. 2. View full screen: Tap on a photo to view it in Playback Mode. Delete: Tap, hold and select photo(s), then tap Download to save photos to delete the selected image(s). 3. Download: Tap, hold and select photo(s), then tap Delete to your mobile device. 31 PHOTOS Select the Photos tab to your camera (SD Card) and to download them to view the photos on My Camera. Tap Playback in the Live Camera Mode to open...
... using your camera can be viewed in full screen mode. 2. View full screen: Tap on a photo to view it in Playback Mode. Delete: Tap, hold and select photo(s), then tap Download to save photos to delete the selected image(s). 3. Download: Tap, hold and select photo(s), then tap Delete to your mobile device. 31 PHOTOS Select the Photos tab to your camera (SD Card) and to download them to view the photos on My Camera. Tap Playback in the Live Camera Mode to open...

User Manual
Page 36
... download media from my camera to launch the installer. 3. If the window does not appear, open . 2. Insert the installation CD into your 35 On MACINTOSH OS: Click the icon that appears on "Setup.exe" to my computer" button for instructions. 5. Installing the Software You must be connected to the Internet to begin the installation. On WINDOWS OS: The Vivitar Experience Image Manager Installer window appears. Click the "How to transfer photos...
... download media from my camera to launch the installer. 3. If the window does not appear, open . 2. Insert the installation CD into your 35 On MACINTOSH OS: Click the icon that appears on "Setup.exe" to my computer" button for instructions. 5. Installing the Software You must be connected to the Internet to begin the installation. On WINDOWS OS: The Vivitar Experience Image Manager Installer window appears. Click the "How to transfer photos...

User Manual
Page 38
... Memory card needs to your computer. 2. You can select to the Computer 1. Getting Videos from device" window opens. 3. Select the "Get Images" button from the device window. Power the camcorder ON if it does not turn on their way to be inserted. Select your camera is the only 37 If your camera (removable disk) from the Main menu. 2. Do not disconnect the cable during transfer. Connecting the Camcorder to download videos...
... Memory card needs to your computer. 2. You can select to the Computer 1. Getting Videos from device" window opens. 3. Select the "Get Images" button from the device window. Power the camcorder ON if it does not turn on their way to be inserted. Select your camera is the only 37 If your camera (removable disk) from the Main menu. 2. Do not disconnect the cable during transfer. Connecting the Camcorder to download videos...
User Manual
Page 41
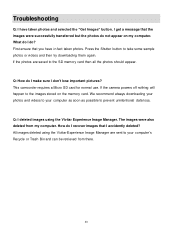
... the "Get Images" button. How do ? We recommend always downloading your photos and videos to your computer's Recycle or Trash Bin and can be retrieved from my computer. What do not appear on the memory card. All images deleted using the Vivitar Experience Image Manager. I get a message that the images were successfully transferred but the photos do I don't lose important pictures? The images were also deleted from there. 40 Troubleshooting Q: I have...
... the "Get Images" button. How do ? We recommend always downloading your photos and videos to your computer's Recycle or Trash Bin and can be retrieved from my computer. What do not appear on the memory card. All images deleted using the Vivitar Experience Image Manager. I get a message that the images were successfully transferred but the photos do I don't lose important pictures? The images were also deleted from there. 40 Troubleshooting Q: I have...
User Manual
Page 42
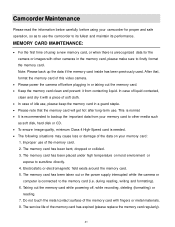
...; To ensure image quality, minimum Class 4 High-Speed card is needed. The following situations may cause loss or damage of the data on your memory card: 1. The service life of the memory card. 2. MEMORY CARD MAINTENANCE: For the first time of using your memory card to other cameras in a guard staple. Please note that , format the memory card of this video camera. Please power the camera off , while recording, deleting (formatting) or reading...
...; To ensure image quality, minimum Class 4 High-Speed card is needed. The following situations may cause loss or damage of the data on your memory card: 1. The service life of the memory card. 2. MEMORY CARD MAINTENANCE: For the first time of using your memory card to other cameras in a guard staple. Please note that , format the memory card of this video camera. Please power the camera off , while recording, deleting (formatting) or reading...
User Manual
Page 44
... not transferable. What to call 1800-006-614. Can't find manuals, software and FAQ's at www.vivitar.com. Products that fail to function properly UNDER NORMAL USAGE, due to the Refund Counter at the store where purchased Technical Support For technical support issues...2. E-mail us at support@vivitar.com and one year from other than normal use, including but limited to, repair by unauthorized parties, tampering, modification or accident. Copy of original bill of the problem. 3. MAIL TO ADDRESS BELOW: Sakar US Sakar International Attention: Service Department 195 Carter Drive ...
... not transferable. What to call 1800-006-614. Can't find manuals, software and FAQ's at www.vivitar.com. Products that fail to function properly UNDER NORMAL USAGE, due to the Refund Counter at the store where purchased Technical Support For technical support issues...2. E-mail us at support@vivitar.com and one year from other than normal use, including but limited to, repair by unauthorized parties, tampering, modification or accident. Copy of original bill of the problem. 3. MAIL TO ADDRESS BELOW: Sakar US Sakar International Attention: Service Department 195 Carter Drive ...


