Camera Manual
Page 4
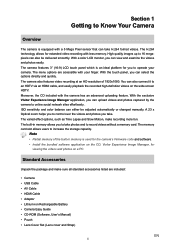
... package and make recording more fun. Section 1 Getting to Know Your Camera Overview The camera is equipped with a 5 Mega Pixel sensor that can take photos and to record videos without a memory card. The menu options are included: • Camera • USB Cable • AV Cable • HDMI Cable • Adaptor • Lithium-ion Rechargeable Battery • Camera Easy Guide • CD-ROM (Software, User's Manual) • Pouch • Lens Cover Set (Lens cover and...
... package and make recording more fun. Section 1 Getting to Know Your Camera Overview The camera is equipped with a 5 Mega Pixel sensor that can take photos and to record videos without a memory card. The menu options are included: • Camera • USB Cable • AV Cable • HDMI Cable • Adaptor • Lithium-ion Rechargeable Battery • Camera Easy Guide • CD-ROM (Software, User's Manual) • Pouch • Lens Cover Set (Lens cover and...

Camera Manual
Page 5
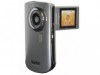
Front View Microphone Flash Lens Tele/Wide Button Photo Button LCD Touch Panel Self-timer LED Rear View Playback LED Indicator TV Port HDMI Port Mini USB 2.0 Port Record LED Indicator Video Button EN 5
Front View Microphone Flash Lens Tele/Wide Button Photo Button LCD Touch Panel Self-timer LED Rear View Playback LED Indicator TV Port HDMI Port Mini USB 2.0 Port Record LED Indicator Video Button EN 5

Camera Manual
Page 7
... AC charging Mode, the light will turn itself off automatically after the charging is fitted, videos/photos are saved to the correct polarity marks ( + or -). 2. The blinking light confirms the camera is currently charging, and the light becomes constant after 3~5 minutes . Section 2 Getting Started Loading the Battery Before using an optional SD memory card. 1. Recommended memory capacity: 1GB or above. The camera must use the supplied AC charger or the USB cable. Make...
... AC charging Mode, the light will turn itself off automatically after the charging is fitted, videos/photos are saved to the correct polarity marks ( + or -). 2. The blinking light confirms the camera is currently charging, and the light becomes constant after 3~5 minutes . Section 2 Getting Started Loading the Battery Before using an optional SD memory card. 1. Recommended memory capacity: 1GB or above. The camera must use the supplied AC charger or the USB cable. Make...

Camera Manual
Page 8
.... Focusing Frame: White Focusing Frame: Green • To view stored videos and photos: Press [Playback Button] or touch the Playback mode. on the screen to switch to Turning the Camera Off • To turn off the camera: You can either press [Power Button] for approximately one second, or you to validate the setting. 4. EN 8 Touch the [OK] icon to setup date and time: Operation 1. Display Screen Getting Started • To record video: Press [Video Button] to set. 2. Flip out the LCD...
.... Focusing Frame: White Focusing Frame: Green • To view stored videos and photos: Press [Playback Button] or touch the Playback mode. on the screen to switch to Turning the Camera Off • To turn off the camera: You can either press [Power Button] for approximately one second, or you to validate the setting. 4. EN 8 Touch the [OK] icon to setup date and time: Operation 1. Display Screen Getting Started • To record video: Press [Video Button] to set. 2. Flip out the LCD...

Camera Manual
Page 9
Photo Button: 1. Zoom In. For quick review, press it again. To continue the recording, press it after recording. Press to take photo. 2. Press to pause the recording. 2. Wide Button 1. Press down for one second to capture the image. Pause Button: 1. Digital Light Button: Digital Light On/Off. When recording video, press to turn on or turn off the camera. Tele Button: 1. Zoom out. EN 9 Power Button: 1. Press to take video. 2. Section 3 Enjoying the Record Mode Button Function Video Button: 1. To stop recording, press it again. Playback Button: 1. ...
Photo Button: 1. Zoom In. For quick review, press it again. To continue the recording, press it after recording. Press to take photo. 2. Press to pause the recording. 2. Wide Button 1. Press down for one second to capture the image. Pause Button: 1. Digital Light Button: Digital Light On/Off. When recording video, press to turn on or turn off the camera. Tele Button: 1. Zoom out. EN 9 Power Button: 1. Press to take video. 2. Section 3 Enjoying the Record Mode Button Function Video Button: 1. To stop recording, press it again. Playback Button: 1. ...

Camera Manual
Page 10
LCD Monitor Information The indicators shown below may display on LCD when videos and photos are recorded: Video Resolution (1) Photo Resolution (2) (3) (4) Full HD (1080p 30 fps) HD (720p 60 fps) HD (720p 30 fps) VGA (640X480) Slow Motion (Record video at 432x240(QVGA) resolution.) 16MP 5MP 3MP Recording time of the video that can still be taken at current resolution Number of images that can still be taken at current resolution Self-timer enabled Dual Record Playback Mode On (5) Menu On (6) Information bar On (7) SD Card Inserted EN 10
LCD Monitor Information The indicators shown below may display on LCD when videos and photos are recorded: Video Resolution (1) Photo Resolution (2) (3) (4) Full HD (1080p 30 fps) HD (720p 60 fps) HD (720p 30 fps) VGA (640X480) Slow Motion (Record video at 432x240(QVGA) resolution.) 16MP 5MP 3MP Recording time of the video that can still be taken at current resolution Number of images that can still be taken at current resolution Self-timer enabled Dual Record Playback Mode On (5) Menu On (6) Information bar On (7) SD Card Inserted EN 10

Camera Manual
Page 12
... photo. • Press [Playback Button] or touch on the screen to pause recording ( press it fully down until the focusing frame turns from 1X~2700X (23X Optical zoom) EN 12 Note • Stabilization, Time Lapse, and Slow Motion functions can not be used simultaneously. • Stabilization and Night Mode functions can not be used simultaneously. • Pre-Record, Motion Detect, Slow Motion, and Time Lapse functions can not be used when capturing image during movies recording. Video Recording • Press [Video Button...
... photo. • Press [Playback Button] or touch on the screen to pause recording ( press it fully down until the focusing frame turns from 1X~2700X (23X Optical zoom) EN 12 Note • Stabilization, Time Lapse, and Slow Motion functions can not be used simultaneously. • Stabilization and Night Mode functions can not be used simultaneously. • Pre-Record, Motion Detect, Slow Motion, and Time Lapse functions can not be used when capturing image during movies recording. Video Recording • Press [Video Button...
Camera Manual
Page 13
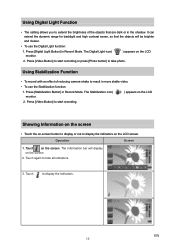
... more stable video. • To use the Digital Light function: 1. Press [Video Button] to start recording. The Stabilization icon( monitor. ) appears on the screen. 2. EN 13 Operation Screen 1. The information bar will be brighter and clearer. • To use the Stabilization function: 1. Touch to display the indicators. Using Digital Light Function • The setting allows you to extend the brightness of reducing camera shake to result in Record Mode. Press [Digital Light Button] in the...
... more stable video. • To use the Digital Light function: 1. Press [Video Button] to start recording. The Stabilization icon( monitor. ) appears on the screen. 2. EN 13 Operation Screen 1. The information bar will be brighter and clearer. • To use the Stabilization function: 1. Touch to display the indicators. Using Digital Light Function • The setting allows you to extend the brightness of reducing camera shake to result in Record Mode. Press [Digital Light Button] in the...

Camera Manual
Page 14
...; Sound • WB(White Balance) • TV • Macro Mode • Language • Face Tracking • Time Setting • Date Printing • Format • Default Setting * Please refer to exit. Touch the option icons on the screen. 4. The options are Video, Photo, Effect, and Setting. 3. The option submenus will pop up on the screen lightly with your finger. The menu will be highlighted.) 5. Touch on the screen. Operations for Record Mode Operation...
...; Sound • WB(White Balance) • TV • Macro Mode • Language • Face Tracking • Time Setting • Date Printing • Format • Default Setting * Please refer to exit. Touch the option icons on the screen. 4. The options are Video, Photo, Effect, and Setting. 3. The option submenus will pop up on the screen lightly with your finger. The menu will be highlighted.) 5. Touch on the screen. Operations for Record Mode Operation...

Camera Manual
Page 16
.... Operation 1. The camera will be used when Slow Motion function is activated. When the video is activated. Touch the Exit icon ( ) to exit. 4. In the Video menu, touch the [Time Lapse] icon on the screen. 2. In the Video menu, touch the [Motion Detect] icon on the screen. 2. Touch the Exit icon ( ) to exit. Display Screen Note • Pause function can set and play them as one video file. • Off: Disable Time Lapse. • 1 Second.: Record...
.... Operation 1. The camera will be used when Slow Motion function is activated. When the video is activated. Touch the Exit icon ( ) to exit. 4. In the Video menu, touch the [Time Lapse] icon on the screen. 2. In the Video menu, touch the [Motion Detect] icon on the screen. 2. Touch the Exit icon ( ) to exit. Display Screen Note • Pause function can set and play them as one video file. • Off: Disable Time Lapse. • 1 Second.: Record...

Camera Manual
Page 17
... low ( ). Touch the [Photo] icon on the screen. 3. Use this mode for you to select the desired option. 3. EN 17 Operation 1. Touch the Exit icon ( ) to light conditions. Resolution, Flash, Self-Timer, Smile Detect, and ISO. -- Use this mode when taking photo in Record Mode. Touch to reduce the red-eye effect. • Flash Off: The flash will be disabled automatically when the battery power is distant (beyond...
... low ( ). Touch the [Photo] icon on the screen. 3. Use this mode for you to select the desired option. 3. EN 17 Operation 1. Touch the Exit icon ( ) to light conditions. Resolution, Flash, Self-Timer, Smile Detect, and ISO. -- Use this mode when taking photo in Record Mode. Touch to reduce the red-eye effect. • Flash Off: The flash will be disabled automatically when the battery power is distant (beyond...
Camera Manual
Page 20
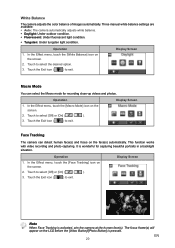
... screen. 2. Three manual white balance settings are available: • Auto: The camera automatically adjusts white balance. • Daylight: Under outdoor condition. • Fluorescent: Under fluorescent light condition. • Tungsten: Under tungsten light condition. The focus frame(s) will appear on the LCD before the [Video Button]/[Photo Button] is activated, aim the camera at the human face(s). White Balance The camera adjusts the color balance of images automatically. Operation 1. Touch to select [Off] or [On] ( ). 3. EN 20 Display Screen Macro Mode...
... screen. 2. Three manual white balance settings are available: • Auto: The camera automatically adjusts white balance. • Daylight: Under outdoor condition. • Fluorescent: Under fluorescent light condition. • Tungsten: Under tungsten light condition. The focus frame(s) will appear on the LCD before the [Video Button]/[Photo Button] is activated, aim the camera at the human face(s). White Balance The camera adjusts the color balance of images automatically. Operation 1. Touch to select [Off] or [On] ( ). 3. EN 20 Display Screen Macro Mode...
Camera Manual
Page 26
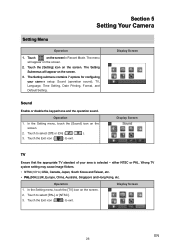
... of your camera setup: Sound (operation sound), TV, Language, Time Setting, Date Printing, Format, and Default Setting. Operation 1. Display Screen EN 26 Display Screen Sound Enable or disable the keypad tone and the operation sound. The Setting submenu contains 7 options for configuring your area is selected - Touch the Exit icon ( ) to exit. Touch the Exit icon ( ) to exit. Touch to select [PAL] or [NTSC]. 3. Wrong TV system setting may cause image flickers. • NTSC(60Hz...
... of your camera setup: Sound (operation sound), TV, Language, Time Setting, Date Printing, Format, and Default Setting. Operation 1. Display Screen EN 26 Display Screen Sound Enable or disable the keypad tone and the operation sound. The Setting submenu contains 7 options for configuring your area is selected - Touch the Exit icon ( ) to exit. Touch the Exit icon ( ) to exit. Touch to select [PAL] or [NTSC]. 3. Wrong TV system setting may cause image flickers. • NTSC(60Hz...
Camera Manual
Page 27
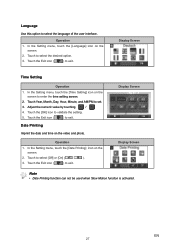
... the Setting menu, touch the [Time Setting] icon on the screen. 2. In the Setting menu, touch the [Date Printing] icon on the video and photo. EN 27 Touch the [OK] icon to enter the time setting screen. 2. Operation 1. Display Screen Display Screen Note • Date Printing function can not be used when Slow Motion function is activated. Operation 1. In the Setting menu, touch the [Language] icon on the screen to validate the setting. 5. Language Use this option to select the language of the user...
... the Setting menu, touch the [Time Setting] icon on the screen. 2. In the Setting menu, touch the [Date Printing] icon on the video and photo. EN 27 Touch the [OK] icon to enter the time setting screen. 2. Operation 1. Display Screen Display Screen Note • Date Printing function can not be used when Slow Motion function is activated. Operation 1. In the Setting menu, touch the [Language] icon on the screen to validate the setting. 5. Language Use this option to select the language of the user...

Camera Manual
Page 29
The following table indicates the camera's default settings Resolution Setting Stabilization Motion Detection Slow Motion Time Lapse Self-Timer Smile Detection ISO Scene White Balance Face Tracking Flash Sound TV Language Date Printing Volume Default Factory Setting FHD (1080p 30) for Video 5MP for Photo Off Off Off Off Off Off Auto Auto Auto Off Off On Depends on shipping area Depends on shipping area Off Level 6 EN 29
The following table indicates the camera's default settings Resolution Setting Stabilization Motion Detection Slow Motion Time Lapse Self-Timer Smile Detection ISO Scene White Balance Face Tracking Flash Sound TV Language Date Printing Volume Default Factory Setting FHD (1080p 30) for Video 5MP for Photo Off Off Off Off Off Off Auto Auto Auto Off Off On Depends on shipping area Depends on shipping area Off Level 6 EN 29
Camera Manual
Page 31
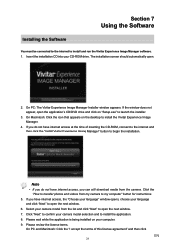
... to transfer photos and videos from my camera to install the Vivitar Experience Image Manager. 4. Click "Next" to confirm your camera model from the camera. If the window does not appear, open . 2. Note • If you do not have internet access, the "Choose your language" window opens, choose your language and click "Next" to open the next window. 6. The installation screen should automatically open the application's CD/DVD drive and click on "Setup.exe" to install...
... to transfer photos and videos from my camera to install the Vivitar Experience Image Manager. 4. Click "Next" to confirm your camera model from the camera. If the window does not appear, open . 2. Note • If you do not have internet access, the "Choose your language" window opens, choose your language and click "Next" to open the next window. 6. The installation screen should automatically open the application's CD/DVD drive and click on "Setup.exe" to install...

Camera Manual
Page 33
... your use the Vivitar Experience Image Manager open the Help file or click the "Take the Tour" button on their way to remove the media files from the device window. Doing so will be selected automatically. 5. Select to your computer. 9. A media download progress bar appears on the bottom left showing the number of any files on the application`s Home page. A message appears when the download is the only USB device connected...
... your use the Vivitar Experience Image Manager open the Help file or click the "Take the Tour" button on their way to remove the media files from the device window. Doing so will be selected automatically. 5. Select to your computer. 9. A media download progress bar appears on the bottom left showing the number of any files on the application`s Home page. A message appears when the download is the only USB device connected...

Camera Manual
Page 34
... 8 Transferring Media Transferring Videos and Photos: Using Windows To transfer media from your camera to your computer manually using Windows: 1. Select the files and drag them into your computer. Doing so will cancel the transfer of any files on the device icon and open the DCIM folder and the folder inside to view the media files. 5. It is recommended that you copy the images into the Pictures/My Pictures folder and the videos into the Movies folder...
... 8 Transferring Media Transferring Videos and Photos: Using Windows To transfer media from your camera to your computer manually using Windows: 1. Select the files and drag them into your computer. Doing so will cancel the transfer of any files on the device icon and open the DCIM folder and the folder inside to view the media files. 5. It is recommended that you copy the images into the Pictures/My Pictures folder and the videos into the Movies folder...

Camera Manual
Page 36
... selectable, HDMI Battery Lithium-ion rechargeable battery Dimension 126mm (L) x 57mm (H) x 60mm (W) Weight 340g ( without battery) EN 36 Section 11 Specifications and System Requirements Specification Image sensor 5 Mega pixel CMOS sensor Operation modes Video record, Photo record Lens Auto Focus Lens (F3.5) Focus range Macro Mode:1cm~120cm Normal Mode: 1 cm ~ infinite Zoom 1X~2700X (23X Optical zoom and 120X Digital zoom) Shutter Electronic LCD monitor 3" touch LCD (16:9) Storage media Built-in 128MB memory (partial memory is used for firmware code and software);
... selectable, HDMI Battery Lithium-ion rechargeable battery Dimension 126mm (L) x 57mm (H) x 60mm (W) Weight 340g ( without battery) EN 36 Section 11 Specifications and System Requirements Specification Image sensor 5 Mega pixel CMOS sensor Operation modes Video record, Photo record Lens Auto Focus Lens (F3.5) Focus range Macro Mode:1cm~120cm Normal Mode: 1 cm ~ infinite Zoom 1X~2700X (23X Optical zoom and 120X Digital zoom) Shutter Electronic LCD monitor 3" touch LCD (16:9) Storage media Built-in 128MB memory (partial memory is used for firmware code and software);
Camera Manual
Page 38
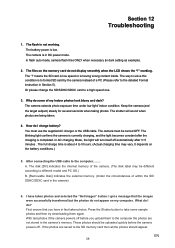
.... After connecting the USB cable to 5 hours. (Actual charging time may be different according to different model and PC OS.) B. [Removable Disk] indicates the external memory. (Under the circumstances of my indoor photos look blurry and dark? A. The disk [DV] indicates the internal memory of the camera. (The disk label may vary. I get a message that you upload them again. These photos should appear. The flash is low. In flash auto mode, camera flash fires ONLY...
.... After connecting the USB cable to 5 hours. (Actual charging time may be different according to different model and PC OS.) B. [Removable Disk] indicates the external memory. (Under the circumstances of my indoor photos look blurry and dark? A. The disk [DV] indicates the internal memory of the camera. (The disk label may vary. I get a message that you upload them again. These photos should appear. The flash is low. In flash auto mode, camera flash fires ONLY...


