
User Manual
Page 2
...22 SETTINGS ...25 Camera Technical Specifications 27 Troubleshooting...28 Technical Support...30 Sakar Warranty Card...30 1 ANDROID AND IOS SYSTEM REQUIREMENTS...7 VIVITAR CAPTURECAM2 APP INSTALL...7 Connecting Your IP Camera with the Vivitar CaptureCam2 Mobile Application 8 INTRODUCTION ...8 INITIAL SETUP: CONNECTING YOUR CAMERA TO THE APP ...9 Using CaptureCam2 ...13 HOME SCREEN ...13 LIVE CAMERA VIEW - TABLE OF CONTENTS Introduction ...2 Features ...2 What's Included...3 Parts of the Camera ...4 Initial Camera Setup...5 INSTALLING THE MEMORY CARD ...5 TURNING ON AND USING THE CAPTURE CAM...
...22 SETTINGS ...25 Camera Technical Specifications 27 Troubleshooting...28 Technical Support...30 Sakar Warranty Card...30 1 ANDROID AND IOS SYSTEM REQUIREMENTS...7 VIVITAR CAPTURECAM2 APP INSTALL...7 Connecting Your IP Camera with the Vivitar CaptureCam2 Mobile Application 8 INTRODUCTION ...8 INITIAL SETUP: CONNECTING YOUR CAMERA TO THE APP ...9 Using CaptureCam2 ...13 HOME SCREEN ...13 LIVE CAMERA VIEW - TABLE OF CONTENTS Introduction ...2 Features ...2 What's Included...3 Parts of the Camera ...4 Initial Camera Setup...5 INSTALLING THE MEMORY CARD ...5 TURNING ON AND USING THE CAPTURE CAM...
User Manual
Page 3
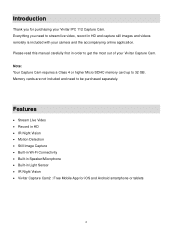
...; Stream Live Video Record in HD IR Night Vision Motion Detection Still Image Capture Built-in Wi-Fi Connectivity Built-in Speaker/Microphone Built-in order to get the most out of your Vivitar IPC 112 Capture Cam. Please read this manual carefully first in Light Sensor IR Night Vision Vivitar Capture Cam2 : Free Mobile App for purchasing your Vivitar Capture Cam. Everything...
...; Stream Live Video Record in HD IR Night Vision Motion Detection Still Image Capture Built-in Wi-Fi Connectivity Built-in Speaker/Microphone Built-in order to get the most out of your Vivitar IPC 112 Capture Cam. Please read this manual carefully first in Light Sensor IR Night Vision Vivitar Capture Cam2 : Free Mobile App for purchasing your Vivitar Capture Cam. Everything...
User Manual
Page 6
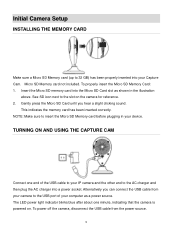
... hear a slight clicking sound. TURNING ON AND USING THE CAPTURE CAM Connect one minute, indicating that the camera is powered on the camera for reference. 2. The LED power light indicator blinks blue after about one end of your computer as shown in your Capture Cam. To properly insert the Micro SD Memory Card: 1. Micro SD Memory card not included. Initial Camera Setup INSTALLING THE MEMORY CARD Make sure a Micro...
... hear a slight clicking sound. TURNING ON AND USING THE CAPTURE CAM Connect one minute, indicating that the camera is powered on the camera for reference. 2. The LED power light indicator blinks blue after about one end of your computer as shown in your Capture Cam. To properly insert the Micro SD Memory Card: 1. Micro SD Memory card not included. Initial Camera Setup INSTALLING THE MEMORY CARD Make sure a Micro...
User Manual
Page 7
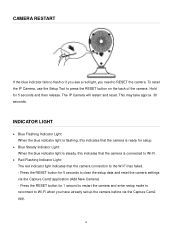
... the camera is connected to Wi-Fi. Red Flashing Indicator Light: The red indicator light indicates that the camera connection to clear the setup data and reset the camera settings via the Capture Cam2 app. 6 Hold for 1 second to restart the camera and enter setup mode to reconnect to Wi-Fi when you need to RESET the camera. Press the RESET button for setup. Blue Steady Indicator Light: When...
... the camera is connected to Wi-Fi. Red Flashing Indicator Light: The red indicator light indicates that the camera connection to clear the setup data and reset the camera settings via the Capture Cam2 app. 6 Hold for 1 second to restart the camera and enter setup mode to reconnect to Wi-Fi when you need to RESET the camera. Press the RESET button for setup. Blue Steady Indicator Light: When...
User Manual
Page 9
...; Record videos automatically, as soon as the camera is connected. Record videos automatically based on motion sensing technology. Take pictures and record videos remotely. Remotely view recorded videos and download the videos from your camera's SD card to your computer. View your captured photos that are saved directly to your iOS and Android devices. Adjust camera settings from your app. Allow other people to access your camera. Use the audio microphone and...
...; Record videos automatically, as soon as the camera is connected. Record videos automatically based on motion sensing technology. Take pictures and record videos remotely. Remotely view recorded videos and download the videos from your camera's SD card to your computer. View your captured photos that are saved directly to your iOS and Android devices. Adjust camera settings from your app. Allow other people to access your camera. Use the audio microphone and...
User Manual
Page 11
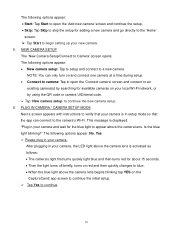
PLUG IN CAMERA / CAMERA SETUP MODE Next a screen appears with instructions to verify that the app can only turn on and connect one camera at a time during setup. Connect to camera: Tap to open the 'Add new camera' screen and continue the setup. Skip: Tap Skip to skip the setup for adding a new camera and go directly to the 'Home' screen. Tap Start to begin setting up your local Wi-Fi network, or...
PLUG IN CAMERA / CAMERA SETUP MODE Next a screen appears with instructions to verify that the app can only turn on and connect one camera at a time during setup. Connect to camera: Tap to open the 'Add new camera' screen and continue the setup. Skip: Tap Skip to skip the setup for adding a new camera and go directly to the 'Home' screen. Tap Start to begin setting up your local Wi-Fi network, or...

User Manual
Page 12
... Wi-Fi password if a password is not blinking pleases follow the instructions on the app to continue initial setup. 9. CAMERA WI-FI SET UP PROGRESS The camera Wi-Fi Setup screen appears displaying the setup progress bar. RESET THE CAMERA: If the blue light is required to access the network, then tap DONE. NOTE: If the incorrect Wi-Fi password is flashing quickly. NOTE: If the connection to the camera failed a screen appears...
... Wi-Fi password if a password is not blinking pleases follow the instructions on the app to continue initial setup. 9. CAMERA WI-FI SET UP PROGRESS The camera Wi-Fi Setup screen appears displaying the setup progress bar. RESET THE CAMERA: If the blue light is required to access the network, then tap DONE. NOTE: If the incorrect Wi-Fi password is flashing quickly. NOTE: If the connection to the camera failed a screen appears...
User Manual
Page 15
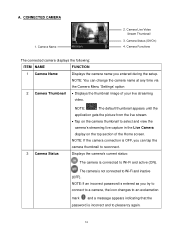
... again. 14 Camera Functions The connected camera displays the following: ITEM NAME FUNCTION 1 Camera Name Displays the camera name you can change the camera name at any time via the Camera Menu 'Settings' option 2 Camera Thumbnail Displays the thumbnail image of your live streaming video. 3 Camera Status NOTE: The default thumbnail appears until the application gets the picture from the live capture in the Live Camera display on the top section of the Home screen. NOTE...
... again. 14 Camera Functions The connected camera displays the following: ITEM NAME FUNCTION 1 Camera Name Displays the camera name you can change the camera name at any time via the Camera Menu 'Settings' option 2 Camera Thumbnail Displays the thumbnail image of your live streaming video. 3 Camera Status NOTE: The default thumbnail appears until the application gets the picture from the live capture in the Live Camera display on the top section of the Home screen. NOTE...
User Manual
Page 17
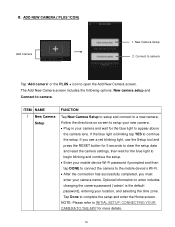
... blinking light, use the Setup tool and press the RESET button for 5 seconds to clear the setup data and reset the camera settings, then wait for the blue light to begin blinking and continue the setup. Enter your camera name. Optional information to complete the setup and enter the Home screen. Tap Done to enter includes changing the camera password ('admin' is blinking tap YES to continue the setup. ADD NEW CAMERA ('PLUS' ICON) Add Camera 1. Connect...
... blinking light, use the Setup tool and press the RESET button for 5 seconds to clear the setup data and reset the camera settings, then wait for the blue light to begin blinking and continue the setup. Enter your camera name. Optional information to complete the setup and enter the Home screen. Tap Done to enter includes changing the camera password ('admin' is blinking tap YES to continue the setup. ADD NEW CAMERA ('PLUS' ICON) Add Camera 1. Connect...
User Manual
Page 18
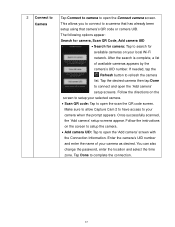
Once successfully scanned, the 'Add camera' setup screens appear. If needed, tap the Refresh button to complete the connection. 17 Follow the instructions on the screen to setup your camera as desired. Tap Done to refresh the camera list. Make sure to allow Capture Cam 2 to have access to a camera that has already been setup using that camera's QR code or camera UID. After the search is complete, a list of your...
Once successfully scanned, the 'Add camera' setup screens appear. If needed, tap the Refresh button to complete the connection. 17 Follow the instructions on the screen to setup your camera as desired. Tap Done to refresh the camera list. Make sure to allow Capture Cam 2 to have access to a camera that has already been setup using that camera's QR code or camera UID. After the search is complete, a list of your...
User Manual
Page 19
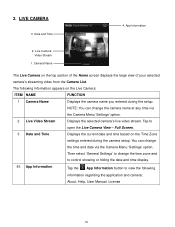
... and time display. 45 App Information Tap the App Information button to open the Live Camera View - Full Screen. 3 Date and Time Displays the current date and time based on the top section of the Home screen displays the large view of your selected camera's streaming video from the Camera List. The following information regarding the application and camera: About, Help, User Manual, License 18 NOTE: You can change the camera name at any time via the Camera Menu 'Settings' option...
... and time display. 45 App Information Tap the App Information button to open the Live Camera View - Full Screen. 3 Date and Time Displays the current date and time based on the top section of the Home screen displays the large view of your selected camera's streaming video from the Camera List. The following information regarding the application and camera: About, Help, User Manual, License 18 NOTE: You can change the camera name at any time via the Camera Menu 'Settings' option...

User Manual
Page 20
NOTE: Tap on the Live Camera Video Stream from the Home screen to the Live Camera view Full screen with display of the app controls. LIVE CAMERA VIEW - Portrait View Landscape View 19 Tap the screen to return to open the Live Camera Video Stream in Full Screen. FULL SCREEN Tap on the Live Camera View while in the Landscape view in Portrait and Landscape views. You can rotate your mobile device to see the live streaming video in both in full screen without the display of the app controls.
NOTE: Tap on the Live Camera Video Stream from the Home screen to the Live Camera view Full screen with display of the app controls. LIVE CAMERA VIEW - Portrait View Landscape View 19 Tap the screen to return to open the Live Camera Video Stream in Full Screen. FULL SCREEN Tap on the Live Camera View while in the Landscape view in Portrait and Landscape views. You can rotate your mobile device to see the live streaming video in both in full screen without the display of the app controls.
User Manual
Page 21
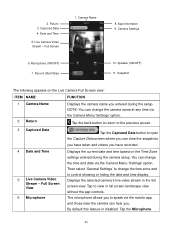
... can change the time zone and to view in full screen landscape view without the app controls. Captured Data 4. NOTE: You can change the time and date via the Camera Menu 'Settings' option. 2. Camera Settings 6. Full Screen View 6 Microphone Displays the current date and time based on the Live Camera Full Screen view: ITEM NAME FUNCTION 1 Camera Name 2 Return Displays the camera name you entered during the camera setup. By default this feature in the full screen view. Date and Time 5. Live Camera Video Stream - Displays the selected camera's live video stream...
... can change the time zone and to view in full screen landscape view without the app controls. Captured Data 4. NOTE: You can change the time and date via the Camera Menu 'Settings' option. 2. Camera Settings 6. Full Screen View 6 Microphone Displays the current date and time based on the Live Camera Full Screen view: ITEM NAME FUNCTION 1 Camera Name 2 Return Displays the camera name you entered during the camera setup. By default this feature in the full screen view. Date and Time 5. Live Camera Video Stream - Displays the selected camera's live video stream...
User Manual
Page 22
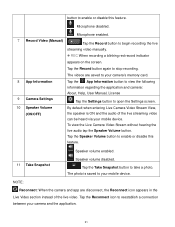
...your camera's memory card. 8 App Information 9 Camera Settings Tap the App Information button to view the following information regarding the application and camera: About, Help, User Manual, License Tap the Settings button to your camera and the application. 21 Tap the Take Snapshot button to begin recording the live audio tap the Speaker Volume button. Microphone enabled. 7 Record Video (Manual) Tap the Record button to take a photo. To view the Live Camera Video Stream without hearing the live streaming video manually. REC When recording a blinking red record indicator...
...your camera's memory card. 8 App Information 9 Camera Settings Tap the App Information button to view the following information regarding the application and camera: About, Help, User Manual, License Tap the Settings button to your camera and the application. 21 Tap the Take Snapshot button to begin recording the live audio tap the Speaker Volume button. Microphone enabled. 7 Record Video (Manual) Tap the Record button to take a photo. To view the Live Camera Video Stream without hearing the live streaming video manually. REC When recording a blinking red record indicator...

User Manual
Page 24
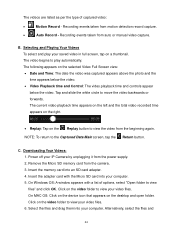
... next photos. VIDEOS TAB Captured Data Main Screen with Video tab selected Selected Video Full Screen View A. button 23 NOTE: To view videos saved on previous dates, tap the Load Next Date located on your Time Zone settings) appears above the photo. Next and Previous: Tap the Previous and Next buttons to scroll between your camera's micro SD memory card. Accessing the Videos Tap on...
... next photos. VIDEOS TAB Captured Data Main Screen with Video tab selected Selected Video Full Screen View A. button 23 NOTE: To view videos saved on previous dates, tap the Load Next Date located on your Time Zone settings) appears above the photo. Next and Previous: Tap the Previous and Next buttons to scroll between your camera's micro SD memory card. Accessing the Videos Tap on...
User Manual
Page 25
... video playback time and controls appear below the video. Select the files and drag them into an SD card adapter. 4. Recording events taken from the power supply. 2. The following appears on the desktop and open folder. NOTE: To return to move the video backwards or forwards. On Windows OS: A window appears with the Micro SD card into your IP Camera by unplugging it from motion detection record capture. Auto Record - Power...
... video playback time and controls appear below the video. Select the files and drag them into an SD card adapter. 4. Recording events taken from the power supply. 2. The following appears on the desktop and open folder. NOTE: To return to move the video backwards or forwards. On Windows OS: A window appears with the Micro SD card into your IP Camera by unplugging it from motion detection record capture. Auto Record - Power...
User Manual
Page 26
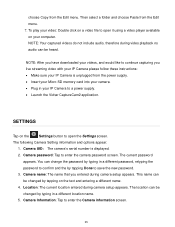
... camera password screen. choose Copy from the power supply. Insert your Micro SD memory card into your camera. Plug in your IP Camera to a power supply. Launch the Vivitar CaptureCam2 application. NOTE: After you have downloaded your IP Camera is displayed. 2. The following Camera Setting information and options appear: 1. Camera name: The name that you live streaming video with your IP Camera please follow these instructions: Make sure your videos...
... camera password screen. choose Copy from the power supply. Insert your Micro SD memory card into your camera. Plug in your IP Camera to a power supply. Launch the Vivitar CaptureCam2 application. NOTE: After you have downloaded your IP Camera is displayed. 2. The following Camera Setting information and options appear: 1. Camera name: The name that you live streaming video with your IP Camera please follow these instructions: Make sure your videos...

User Manual
Page 27
... viewed in this setting or tap Stop on the Live Camera screen. - Outdoor Auto record mode: Allows you to your environment. Motion Detection: Video will be recorded only when motion is flipped upside down and mirrored. Environment mode: Record your video according to format your camera version. Tap to motion detection. Tap to enter the General settings screen. Mirror: The video is automatically displayed on the camera's SD memory card. Format Storage: Allows you to set...
... viewed in this setting or tap Stop on the Live Camera screen. - Outdoor Auto record mode: Allows you to your environment. Motion Detection: Video will be recorded only when motion is flipped upside down and mirrored. Environment mode: Record your video according to format your camera version. Tap to motion detection. Tap to enter the General settings screen. Mirror: The video is automatically displayed on the camera's SD memory card. Format Storage: Allows you to set...
User Manual
Page 29
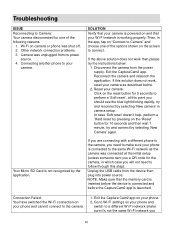
... blue light blinking rapidly, try and connect by selecting 'New camera' in camera setup. Reset your camera as the camera was connected at this solution does not work then please try the instructions below . 2. Unplug the USB cable from the power supply. NOTE: Make sure that your phone is working properly. Connection Failed: You have switched the Wi-Fi connection on camera or phone was unplugged from its power source. 4. Other network connection problems. 3. Disconnect the camera...
... blue light blinking rapidly, try and connect by selecting 'New camera' in camera setup. Reset your camera as the camera was connected at this solution does not work then please try the instructions below . 2. Unplug the USB cable from the power supply. NOTE: Make sure that your phone is working properly. Connection Failed: You have switched the Wi-Fi connection on camera or phone was unplugged from its power source. 4. Other network connection problems. 3. Disconnect the camera...
User Manual
Page 30
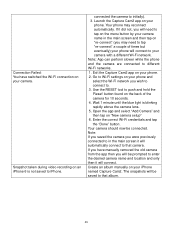
... settings on an iPhone 6 is blinking rapidly above the camera lens. 5. Use the RESET tool to push and hold the 'Reset' button found on "New camera setup" 6. Wait 1 minute until the blue light is not saved to your phone and select the Wi-Fi network you will connect to iPhone. connected the camera to . 3. Enter the correct Wi-Fi credentials and tap the "Done" button. Open the app and select "Add Camera...
... settings on an iPhone 6 is blinking rapidly above the camera lens. 5. Use the RESET tool to push and hold the 'Reset' button found on "New camera setup" 6. Wait 1 minute until the blue light is not saved to your phone and select the Wi-Fi network you will connect to iPhone. connected the camera to . 3. Enter the correct Wi-Fi credentials and tap the "Done" button. Open the app and select "Add Camera...


