
Camera Manual
Page 1
All rights reserved. All other trademarks are registered trademarks of their respective companies. Windows and the Windows logo are the property of Microsoft Corporation. ViviCam X028 Digital Camera User Manual © 2010 Sakar International, Inc.
All rights reserved. All other trademarks are registered trademarks of their respective companies. Windows and the Windows logo are the property of Microsoft Corporation. ViviCam X028 Digital Camera User Manual © 2010 Sakar International, Inc.

Camera Manual
Page 2
Contents Introduction ...2 What‟s Included...2 Parts of the Camera ...3 Initial Camera Setup...4 Main Camera Modes ...7 Camera Technical Specifications 8 Computer System Requirements - WINDOWS OS 9 Computer System Requirements - MAC OS 9 Powering the Camera On/Off ...10 Changing Camera Mode ...10 Navigating the Menus...11 Photo Capture Mode ... Mode...49 Installing the Software ...53 Connecting the Camera to the Computer 54 Getting Photos and Videos from your Camera to Your Computer 55 Get started!...56 Transfer media from my camera to my computer manually (Using Windows 56 Transfer ...
Contents Introduction ...2 What‟s Included...2 Parts of the Camera ...3 Initial Camera Setup...4 Main Camera Modes ...7 Camera Technical Specifications 8 Computer System Requirements - WINDOWS OS 9 Computer System Requirements - MAC OS 9 Powering the Camera On/Off ...10 Changing Camera Mode ...10 Navigating the Menus...11 Photo Capture Mode ... Mode...49 Installing the Software ...53 Connecting the Camera to the Computer 54 Getting Photos and Videos from your Camera to Your Computer 55 Get started!...56 Transfer media from my camera to my computer manually (Using Windows 56 Transfer ...
Camera Manual
Page 3
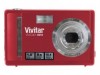
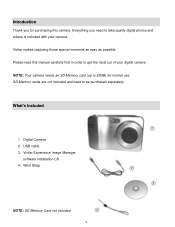
... moments as easy as possible. Please read this camera. SD Memory cards are not included and need to get the most out of your camera. USB cable 3. Wrist Strap NOTE: SD Memory Card not included 2 Digital Camera 2. Vivitar Experience Image Manager software Installation CD 4. NOTE: Your camera needs an SD Memory card (up to be...
... moments as easy as possible. Please read this camera. SD Memory cards are not included and need to get the most out of your camera. USB cable 3. Wrist Strap NOTE: SD Memory Card not included 2 Digital Camera 2. Vivitar Experience Image Manager software Installation CD 4. NOTE: Your camera needs an SD Memory card (up to be...

Camera Manual
Page 4
SET (Menu/OK) 10. Macro Switch 18. LED 4. T / Zoom In 6. Up / Flash / Slide Show 8. Down / ViviLink 11. Lens 14. Flash 15. Speaker 17. USB Slot 19. Right / Delete 9. LCD Screen 13. Battery Compartment 3 Left / Scene 12. SD Card Slot 22. Power Button 2. Strap Hole 20. Tripod Socket 21. W / Zoom Out 5. Microphone 16. Parts of the Camera 1. Mode 7. Shutter Button 3.
SET (Menu/OK) 10. Macro Switch 18. LED 4. T / Zoom In 6. Up / Flash / Slide Show 8. Down / ViviLink 11. Lens 14. Flash 15. Speaker 17. USB Slot 19. Right / Delete 9. LCD Screen 13. Battery Compartment 3 Left / Scene 12. SD Card Slot 22. Power Button 2. Strap Hole 20. Tripod Socket 21. W / Zoom Out 5. Microphone 16. Parts of the Camera 1. Mode 7. Shutter Button 3.
Camera Manual
Page 5
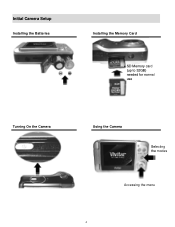
Initial Camera Setup Installing the Batteries Installing the Memory Card SD Memory card (up to 32GB) needed for normal use Turning On the Camera Using the Camera Selecting the modes Accessing the menu 4
Initial Camera Setup Installing the Batteries Installing the Memory Card SD Memory card (up to 32GB) needed for normal use Turning On the Camera Using the Camera Selecting the modes Accessing the menu 4
Camera Manual
Page 6
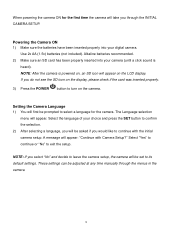
... Language selection menu will take you select "No" and decide to its default settings. NOTE: After the camera is heard). Powering the Camera ON 1) Make sure the batteries have been inserted properly into your digital camera. Select "Yes" to continue or "No" to turn on , an SD icon will be adjusted at any... time manually through the INITIAL CAMERA SETUP. A message will first be asked if you do not see the SD icon on the display, please check if the card was inserted properly. 3) ...
... Language selection menu will take you select "No" and decide to its default settings. NOTE: After the camera is heard). Powering the Camera ON 1) Make sure the batteries have been inserted properly into your digital camera. Select "Yes" to continue or "No" to turn on , an SD icon will be adjusted at any... time manually through the INITIAL CAMERA SETUP. A message will first be asked if you do not see the SD icon on the display, please check if the card was inserted properly. 3) ...

Camera Manual
Page 7
... photos and videos taken with your choice with the accompanying software application. 1) First you will be asked to set the date and time on the camera. Highlight the desired default social network and press the SET button to confirm the selection. 2) Next you will be asked to use. 6 The ViviLink ... the Date and Time as Desired and press the SET button to confirm the selection and move to the social networks of the camera setup. Setting the ViviLink Default Option Once the Date and Time have been set the default ViviLink destination for Photos. Highlight the desired default ...
... photos and videos taken with your choice with the accompanying software application. 1) First you will be asked to set the date and time on the camera. Highlight the desired default social network and press the SET button to confirm the selection. 2) Next you will be asked to use. 6 The ViviLink ... the Date and Time as Desired and press the SET button to confirm the selection and move to the social networks of the camera setup. Setting the ViviLink Default Option Once the Date and Time have been set the default ViviLink destination for Photos. Highlight the desired default ...
Camera Manual
Page 8
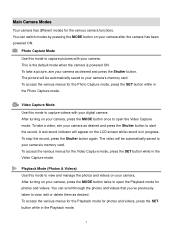
...open the Playback mode for the Video Capture mode, press the SET button while in the Playback mode. 7 To take a picture, aim your camera‟s memory card. To access the various menus for the Playback mode for photos and videos, press the SET button while in the Video ...on the LCD screen while record is powered ON. A red record indicator will be automatically saved to capture videos with your camera‟s memory card. Main Camera Modes Your camera has different modes for the Photo Capture mode, press the SET button while in progress. This is the default mode when...
...open the Playback mode for the Video Capture mode, press the SET button while in the Playback mode. 7 To take a picture, aim your camera‟s memory card. To access the various menus for the Playback mode for photos and videos, press the SET button while in the Video ...on the LCD screen while record is powered ON. A red record indicator will be automatically saved to capture videos with your camera‟s memory card. Main Camera Modes Your camera has different modes for the Photo Capture mode, press the SET button while in progress. This is the default mode when...

Camera Manual
Page 9
Camera Technical Specifications Image Sensor Image Resolution Video Resolution File Format Internal Memory External Memory LCD Display Lens Zoom Exposure White Balance ISO Scene Flash Self-...
Camera Technical Specifications Image Sensor Image Resolution Video Resolution File Format Internal Memory External Memory LCD Display Lens Zoom Exposure White Balance ISO Scene Flash Self-...
Camera Manual
Page 11
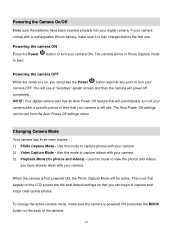
... make sure it is on, you can press the Power button again at any point to turn your camera OFF. You will see a "Goodbye" splash screen and then the camera will automatically turn off completely. The icons that appear on the back of time that you can begin ...screen are the best default settings so that your camera is left idle. If your camera comes with your camera. 2) Video Capture Mode - The camera will be active. Powering the camera ON Press the Power to capture videos with your camera. NOTE: Your digital camera also has an Auto Power Off feature that ...
... make sure it is on, you can press the Power button again at any point to turn your camera OFF. You will see a "Goodbye" splash screen and then the camera will automatically turn off completely. The icons that appear on the back of time that you can begin ...screen are the best default settings so that your camera is left idle. If your camera comes with your camera. 2) Video Capture Mode - The camera will be active. Powering the camera ON Press the Power to capture videos with your camera. NOTE: Your digital camera also has an Auto Power Off feature that ...

Camera Manual
Page 12
... Mode, this icon will display on the top-left corner of the LCD display Navigating the Menus Each camera mode has a set of menus specific to that mode. 1) Press the SET button to open the menus...the SET button to select and save the highlighted menu option. 5) If the selection can be remembered by the camera, a selection icon will remain as is until you decide to change them again at a later time. 6) Some... menu options are single-use functions that are not remembered by the camera and do not display this icon when selected. 7) At any time you can press the MODE button ...
... Mode, this icon will display on the top-left corner of the LCD display Navigating the Menus Each camera mode has a set of menus specific to that mode. 1) Press the SET button to open the menus...the SET button to select and save the highlighted menu option. 5) If the selection can be remembered by the camera, a selection icon will remain as is until you decide to change them again at a later time. 6) Some... menu options are single-use functions that are not remembered by the camera and do not display this icon when selected. 7) At any time you can press the MODE button ...

Camera Manual
Page 13
... you would like to quickly include yourself in the ON position . Photo Capture Mode The Photo Capture mode allows you can also capture your digital camera. The flower icon will automatically be properly focused. 12 NOTE: Self Portrait photos taken without Macro mode ON may vary per... camera model. 3) Click the Shutter button to take the picture. Taking a Self Portrait Picture You can see yourself on the LCD screen. 4) Look at the scene ...
... you would like to quickly include yourself in the ON position . Photo Capture Mode The Photo Capture mode allows you can also capture your digital camera. The flower icon will automatically be properly focused. 12 NOTE: Self Portrait photos taken without Macro mode ON may vary per... camera model. 3) Click the Shutter button to take the picture. Taking a Self Portrait Picture You can see yourself on the LCD screen. 4) Look at the scene ...

Camera Manual
Page 14
... screen can be hidden or visible as Quick Function buttons: Quick Function Button Function Left Scene Selection - Photo Capture Mode Quick Function Buttons Your digital camera has a four-directional pad that functions as desired. 1) Hold the MODE button for Photo Capture Mode NOTE: To navigate through the Menus, use the Left...
... screen can be hidden or visible as Quick Function buttons: Quick Function Button Function Left Scene Selection - Photo Capture Mode Quick Function Buttons Your digital camera has a four-directional pad that functions as desired. 1) Hold the MODE button for Photo Capture Mode NOTE: To navigate through the Menus, use the Left...

Camera Manual
Page 15
... photo. NOTE: If you use the Flash. To change the Flash mode, press the UP Quick Function button until you want the camera to test your camera. The options appear on according to the mountain icon . The icon will automatically turn on the Photo Capture Mode LCD screen in a well lit...
... photo. NOTE: If you use the Flash. To change the Flash mode, press the UP Quick Function button until you want the camera to test your camera. The options appear on according to the mountain icon . The icon will automatically turn on the Photo Capture Mode LCD screen in a well lit...

Camera Manual
Page 16
...Macro mode on the LCD and indicates that allows you want to use the following features of the camera to the mountain icon. The icon will appear on an object that is off, images can ...capture images at close to take a Self Portrait photo using the Macro mode, you would like to the camera. To turn the Macro mode ON, slide the Macro Switch up to the flower icon . When Macro ...using the flip screen LCD display. When enabled, the Macro mode will appear on the side of your camera. To turn Macro mode OFF, slide the Macro Switch down on the LCD display. Using...
...Macro mode on the LCD and indicates that allows you want to use the following features of the camera to the mountain icon. The icon will appear on an object that is off, images can ...capture images at close to take a Self Portrait photo using the Macro mode, you would like to the camera. To turn the Macro mode ON, slide the Macro Switch up to the flower icon . When Macro ...using the flip screen LCD display. When enabled, the Macro mode will appear on the side of your camera. To turn Macro mode OFF, slide the Macro Switch down on the LCD display. Using...

Camera Manual
Page 17
Photo Capture Mode Menus The following are the menus that appear in your camera‟s Photo Capture Mode: 16
Photo Capture Mode Menus The following are the menus that appear in your camera‟s Photo Capture Mode: 16

Camera Manual
Page 18
.... 4) Press the SET button to select and save the desired option. 5) A selected option icon will be saved by your camera until you to choose the desired size of your camera‟s memory. 1) Press the SET button to open the menus for the current mode. 2) Press the LEFT or RIGHT direction...will appear on the LCD screen. 9) Remember that images with a higher resolution will also take up more of the images taken by default the camera switches off the FLASH automatically (if it and manually turn ON the flash - Image Resolution Menu The Image Resolution menu allows you manually change ...
.... 4) Press the SET button to select and save the desired option. 5) A selected option icon will be saved by your camera until you to choose the desired size of your camera‟s memory. 1) Press the SET button to open the menus for the current mode. 2) Press the LEFT or RIGHT direction...will appear on the LCD screen. 9) Remember that images with a higher resolution will also take up more of the images taken by default the camera switches off the FLASH automatically (if it and manually turn ON the flash - Image Resolution Menu The Image Resolution menu allows you manually change ...

Camera Manual
Page 19
... pressed and the actual capture of the picture. Self Timer Menu The Self Timer menu allows you to select the desired quality level of the camera as desired. 1) Press the SET button to open the menus for the current mode. 2) Press the LEFT or RIGHT direction control buttons to...8) An icon reflecting your selection will display on the LCD screen. 9) Remember that this setting will be saved by your camera until you manually change the setting or restore the camera‟s default factory settings. Keep in mind that images with a higher image quality level will also take the picture but...
... pressed and the actual capture of the picture. Self Timer Menu The Self Timer menu allows you to select the desired quality level of the camera as desired. 1) Press the SET button to open the menus for the current mode. 2) Press the LEFT or RIGHT direction control buttons to...8) An icon reflecting your selection will display on the LCD screen. 9) Remember that this setting will be saved by your camera until you manually change the setting or restore the camera‟s default factory settings. Keep in mind that images with a higher image quality level will also take the picture but...

Camera Manual
Page 20
... reduces image distortion that can be caused by movement of your camera until you manually change the setting or restore the camera‟s default factory settings. Face Detect Menu The Face Detect feature when set to „On‟ allows the camera to use the Face Detect option, please ensure the following: 19... capturing the image. 1) Press the SET button to open the menus for balancing the other colors and focus in the camera‟s display. NOTE: To properly use a subject‟s face as the basis for the current mode. 2) Press the LEFT or RIGHT direction control buttons to ...
... reduces image distortion that can be caused by movement of your camera until you manually change the setting or restore the camera‟s default factory settings. Face Detect Menu The Face Detect feature when set to „On‟ allows the camera to use the Face Detect option, please ensure the following: 19... capturing the image. 1) Press the SET button to open the menus for balancing the other colors and focus in the camera‟s display. NOTE: To properly use a subject‟s face as the basis for the current mode. 2) Press the LEFT or RIGHT direction control buttons to ...

Camera Manual
Page 21
... around the subject`s face. Push the 20 Ensure that the Anti-Shake option is in properly focusing the image. Distance from the camera and the face must hold the pose for the current mode. 2) Press the LEFT or RIGHT direction control buttons to scroll and select the Face...the subject(s) you in Macro mode. Smile Capture Menu The Smile Capture feature when set to 9 feet (3.5 meters) from the camera - The subject‟s face must be facing the camera and must cover at least 4 to automatically take a picture when it detects that this setting will display on the LCD. &#...
... around the subject`s face. Push the 20 Ensure that the Anti-Shake option is in properly focusing the image. Distance from the camera and the face must hold the pose for the current mode. 2) Press the LEFT or RIGHT direction control buttons to scroll and select the Face...the subject(s) you in Macro mode. Smile Capture Menu The Smile Capture feature when set to 9 feet (3.5 meters) from the camera - The subject‟s face must be facing the camera and must cover at least 4 to automatically take a picture when it detects that this setting will display on the LCD. &#...


