
Download
Page 4
..., contact your dealer. • When connected to a power outlet, power is always flowing into the apparatus, the apparatus has been exposed to rain or moisture, does not operate normally or has been dropped. • Unplug the power cord before turning on the label. • Use only with the cart, stand, tripod, bracket, or table specified by the manufacturer, or sold...
..., contact your dealer. • When connected to a power outlet, power is always flowing into the apparatus, the apparatus has been exposed to rain or moisture, does not operate normally or has been dropped. • Unplug the power cord before turning on the label. • Use only with the cart, stand, tripod, bracket, or table specified by the manufacturer, or sold...
Download
Page 5
...shock. • Do not install your TV in environments with instructions. These servicing instructions are qualified to do so. your TV, unplug the power cord and contact your dealer for repair. Ensure that contained in accordance...operating instructions unless you are for use your TV. When your TV changes substantially. • This apparatus shall not be of sufficient magnitude to constitute a risk of uninsulated DANGEROUS VOLTAGE within the product's enclosure that may function abnormally. Do not expose batteries to leak which can damage the remote control...
...shock. • Do not install your TV in environments with instructions. These servicing instructions are qualified to do so. your TV, unplug the power cord and contact your dealer for repair. Ensure that contained in accordance...operating instructions unless you are for use your TV. When your TV changes substantially. • This apparatus shall not be of sufficient magnitude to constitute a risk of uninsulated DANGEROUS VOLTAGE within the product's enclosure that may function abnormally. Do not expose batteries to leak which can damage the remote control...

Download
Page 6
..., part H) Article 810 of the National Electrical Code, ANSI/NFPSA 70, provides information with regard to proper grounding of the mast and supporting structure, grounding of the lead-in wire to an antenna discharge unit, size of the grounding conductors, location of antenna discharge unit, connection to earth in the building installation. Power Lines Do not locate the antenna near overhead light or power...
..., part H) Article 810 of the National Electrical Code, ANSI/NFPSA 70, provides information with regard to proper grounding of the mast and supporting structure, grounding of the lead-in wire to an antenna discharge unit, size of the grounding conductors, location of antenna discharge unit, connection to earth in the building installation. Power Lines Do not locate the antenna near overhead light or power...
Download
Page 7
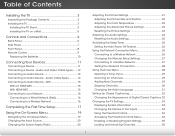
...of Digital Closed Captions.. 32 Changing the TV Settings 33 Displaying System Information 33 Changing the Names of Contents Installing the TV 3 Inspecting the Package Contents 3 Installing the TV 3 Installing the TV Stand 3 Installing the TV on a Wall 5 Controls and Connections 6 Back Panel 6 Side Panel 7 Front Panel 8 Remote Control 9 Replacing the Batteries 10 Connecting Your Devices 11 Connecting A Device 11 Connecting a Device - Audio Cable Types 14 Connecting an Audio Device - Table of the Inputs 34 Using the Parental Controls 34 Accessing the Parental Controls Menu...
...of Digital Closed Captions.. 32 Changing the TV Settings 33 Displaying System Information 33 Changing the Names of Contents Installing the TV 3 Inspecting the Package Contents 3 Installing the TV 3 Installing the TV Stand 3 Installing the TV on a Wall 5 Controls and Connections 6 Back Panel 6 Side Panel 7 Front Panel 8 Remote Control 9 Replacing the Batteries 10 Connecting Your Devices 11 Connecting A Device 11 Connecting a Device - Audio Cable Types 14 Connecting an Audio Device - Table of the Inputs 34 Using the Parental Controls 34 Accessing the Parental Controls Menu...

Download
Page 8
... Turning the Power Indicator On or Off 38 Using the Reset & Admin Menu 38 Resetting the TV Settings 39 Restoring the TV to Factory Default Settings 39 Performing a Service Check 39 Using the Guided Setup Menu 40 Using Guided Setup 40 Using the Info Window 41 Using the USB Media Player 42 Using the USB Media Player 42 Connecting a USB Thumb Drive to the TV 42 Playing USB Media 42 Using VIZIO Internet Apps 46 Using the VIA Dock 46 Using the Hot Keys 46 Troubleshooting & Technical Support 47 Specifications...
... Turning the Power Indicator On or Off 38 Using the Reset & Admin Menu 38 Resetting the TV Settings 39 Restoring the TV to Factory Default Settings 39 Performing a Service Check 39 Using the Guided Setup Menu 40 Using Guided Setup 40 Using the Info Window 41 Using the USB Media Player 42 Using the USB Media Player 42 Connecting a USB Thumb Drive to the TV 42 Playing USB Media 42 Using VIZIO Internet Apps 46 Using the VIA Dock 46 Using the Hot Keys 46 Troubleshooting & Technical Support 47 Specifications...
Download
Page 11
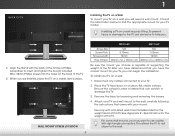
... TV. 2. Disconnect any cables connected to your TV on a wall: 1. Place the TV face-down on a wall requires lifting. Be sure the surface is capable of supporting the weight of debris that came with the back of this TV. Align the Stand with your TV model: Installing a TV on a clean, flat, stable surface. Remove the base by loosening and removing the screws. 4. This allows...
... TV. 2. Disconnect any cables connected to your TV on a wall: 1. Place the TV face-down on a wall requires lifting. Be sure the surface is capable of supporting the weight of debris that came with the back of this TV. Align the Stand with your TV model: Installing a TV on a clean, flat, stable surface. Remove the base by loosening and removing the screws. 4. This allows...

Download
Page 26
5 Changing the Input Source External devices such as DVD players, Blu-Ray Players, and video game consoles can display images in the on-screen menu. The input menu is displayed. Use the Up/Down Arrow buttons on the remote to highlight the Input you are added to the left and right of these devices with black bars to view and press OK. • Normal preserves the content's original aspect ratio. Since the...
5 Changing the Input Source External devices such as DVD players, Blu-Ray Players, and video game consoles can display images in the on-screen menu. The input menu is displayed. Use the Up/Down Arrow buttons on the remote to highlight the Input you are added to the left and right of these devices with black bars to view and press OK. • Normal preserves the content's original aspect ratio. Since the...

Download
Page 27
... that produce a brighter, more vivid picture. • Game mode optimizes the picture settings for displaying game console output. • Computer mode optimizes the picture settings for watching a movie in a brightly lit room. • Dark Room sets the picture settings to values perfect for displaying computer output. 4. To adjust the picture settings: 1. Press the MENU button on -screen menu is too low, the picture may be used to change the picture mode: VIZIO Picture Picture Mode Backlight Brightness Contrast Color Tint Sharpness Standard - + 50...
... that produce a brighter, more vivid picture. • Game mode optimizes the picture settings for displaying game console output. • Computer mode optimizes the picture settings for watching a movie in a brightly lit room. • Dark Room sets the picture settings to values perfect for displaying computer output. 4. To adjust the picture settings: 1. Press the MENU button on -screen menu is too low, the picture may be used to change the picture mode: VIZIO Picture Picture Mode Backlight Brightness Contrast Color Tint Sharpness Standard - + 50...

Download
Page 30
... the analog RCA (red/white) connectors when connected to the factory defaults. The on the remote to a home theater audio system. Use the Arrow buttons on -screen menu is displayed. 2. Turns the built-in speakers on the remote. • Surround Sound - Select PCM or Bitstream. • Wide AnZoaomlog ANourmdailo OPanuotra-mSicets the volume control properties for the Optical output when connected to highlight Audio and press OK. Change the Audio Mode by maintaining a steady volume while watching programming...
... the analog RCA (red/white) connectors when connected to the factory defaults. The on the remote to a home theater audio system. Use the Arrow buttons on -screen menu is displayed. 2. Turns the built-in speakers on the remote. • Surround Sound - Select PCM or Bitstream. • Wide AnZoaomlog ANourmdailo OPanuotra-mSicets the volume control properties for the Optical output when connected to highlight Audio and press OK. Change the Audio Mode by maintaining a steady volume while watching programming...

Download
Page 31
... audio settings to highlight Timers and press OK. Use the Arrow buttons to turn the TV off : 30, 60, 90, 120, or 180 minutes. VIZIO Timers Sleep Timer Auto Power Off Off 10 mins 3. The on the remote. Activating the Sleep Timer When activated, the TV's sleep timer will turn off after which you want the TV to highlight Reset Audio Mode and press OK. The Sleep Timer menu is displayed. 4. Press the MENU button on -screen menu is displayed...
... audio settings to highlight Timers and press OK. Use the Arrow buttons to turn the TV off : 30, 60, 90, 120, or 180 minutes. VIZIO Timers Sleep Timer Auto Power Off Off 10 mins 3. The on the remote. Activating the Sleep Timer When activated, the TV's sleep timer will turn off after which you want the TV to highlight Reset Audio Mode and press OK. The Sleep Timer menu is displayed. 4. Press the MENU button on -screen menu is displayed...
Download
Page 43
... device's user manual for details. 1. The ZIP code information is often used by VIA Apps to determine if your TV enables you must be connected to highlight System and press OK. The on the remote to adjust each setting: • Input CECWidFeunctCioCn - Use the Arrow and OK buttons to highlight CEC Settings and press OK. ExUitse th2eD Arrow3Dbuttons on -screen menu is displayed. 3. Sleep • Timer DePvicitcuree...
... device's user manual for details. 1. The ZIP code information is often used by VIA Apps to determine if your TV enables you must be connected to highlight System and press OK. The on the remote to adjust each setting: • Input CECWidFeunctCioCn - Use the Arrow and OK buttons to highlight CEC Settings and press OK. ExUitse th2eD Arrow3Dbuttons on -screen menu is displayed. 3. Sleep • Timer DePvicitcuree...
Download
Page 46
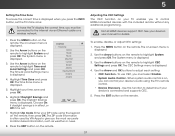
... MENU button on -screen menu is displayed. 2. Connect the TV to access and press OK: • Tuner Setup - When finished, press the EXIT button on -screen instructions. Highlight the guided setup you want to your network. Set up the TV tuner or to connect the TV with your network. 4. VIZIO Guided Setup Tuner Setup Network Setup 3. Wide Zoom Normal Panoramic Exit 2D 3D ABC Input Wide CC Sleep Timer Picture Audio Network Settings Help 40 Follow the on the remote. Highlight Guided Setup and press OK. 5 Using the Guided Setup Menu Using Guided Setup...
... MENU button on -screen menu is displayed. 2. Connect the TV to access and press OK: • Tuner Setup - When finished, press the EXIT button on -screen instructions. Highlight the guided setup you want to your network. Set up the TV tuner or to connect the TV with your network. 4. VIZIO Guided Setup Tuner Setup Network Setup 3. Wide Zoom Normal Panoramic Exit 2D 3D ABC Input Wide CC Sleep Timer Picture Audio Network Settings Help 40 Follow the on the remote. Highlight Guided Setup and press OK. 5 Using the Guided Setup Menu Using Guided Setup...
Download
Page 54
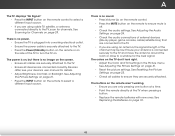
... Scanning for channels. See Adjusting the Picture Settings on the TV don't look right. • Adjust the Color and Tint settings in the Picture menu. See Replacing the Batteries on page 10. 48 See Resetting the Picture Settings on page 23. • Check all devices are connected correctly. A The TV displays "No Signal." • Press the INPUT button on the remote control to select a different input source. • If you are using an antenna, the signal...
... Scanning for channels. See Adjusting the Picture Settings on the TV don't look right. • Adjust the Color and Tint settings in the Picture menu. See Replacing the Batteries on page 10. 48 See Resetting the Picture Settings on page 23. • Check all devices are connected correctly. A The TV displays "No Signal." • Press the INPUT button on the remote control to select a different input source. • If you are using an antenna, the signal...
Download
Page 55
... are using an antenna, the signal strength of the channel may be low. I see "noise" or static on each input source. This up -converted (improved) to a window for the best signal. When I change input source, the display image changes size. • The TV remembers the viewing mode on the screen. • When your TV's display capabilities. When I change the screen mode. Separate the TV from , the difference may be interfering with HDMI cables...
... are using an antenna, the signal strength of the channel may be low. I see "noise" or static on each input source. This up -converted (improved) to a window for the best signal. When I change input source, the display image changes size. • The TV remembers the viewing mode on the screen. • When your TV's display capabilities. When I change the screen mode. Separate the TV from , the difference may be interfering with HDMI cables...
Download
Page 58
... TO YOU. To obtain warranty service, contact VIZIO Technical Support via e-mail: TechSupport@VIZIO.com or via phone at VIZIO's option and sole discretion. This one -year limited warranty only covers defects in materials and workmanship. Limited Warranty C ON PARTS AND LABOR Covers units purchased as installation and set-up issues or any type of customer misuse, modifications or adjustments, as well as new...
... TO YOU. To obtain warranty service, contact VIZIO Technical Support via e-mail: TechSupport@VIZIO.com or via phone at VIZIO's option and sole discretion. This one -year limited warranty only covers defects in materials and workmanship. Limited Warranty C ON PARTS AND LABOR Covers units purchased as installation and set-up issues or any type of customer misuse, modifications or adjustments, as well as new...
Download
Page 2
..., amplifier etc. The manufacturer's warranty does not cover user abuse or improper installations. • The power cord must be observed for long periods of time. • Refer all servicing to an area of electric shock or component damage, switch off the power before moving your TV from being...operable. • CAUTION - A polarized plug has two blades and a third grounding prong. Servicing is required when the apparatus has been damaged in fire or electric shock. • The wall socket should be used as when the power-supply cord or plug is intended to alert the user...
..., amplifier etc. The manufacturer's warranty does not cover user abuse or improper installations. • The power cord must be observed for long periods of time. • Refer all servicing to an area of electric shock or component damage, switch off the power before moving your TV from being...operable. • CAUTION - A polarized plug has two blades and a third grounding prong. Servicing is required when the apparatus has been damaged in fire or electric shock. • The wall socket should be used as when the power-supply cord or plug is intended to alert the user...
Download
Page 11
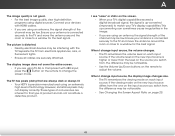
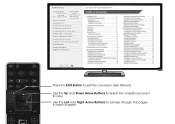
Table of Contents Installing the TV Controls and Connections Connecting your Devices Completing the First-Time Setup Using the On-Screen Menu Using the USB Media Player Using VIZIO Internet Apps Troubleshooting & Technical Support Specifications Limited Warranty Legal & Compliance LCD HDTV WITH VIZIO INTERNET APPS® MENU Press the EXIT Button to view. INFO Use the Up and Down Arrow Buttons to select the chapter you want to exit the on-screen User Manual. INPUT LIST EXIT BACK USER MANUAL USE YOUR REMOTE Previous Page Next Page Menu Open TV Menu PAGE...
Table of Contents Installing the TV Controls and Connections Connecting your Devices Completing the First-Time Setup Using the On-Screen Menu Using the USB Media Player Using VIZIO Internet Apps Troubleshooting & Technical Support Specifications Limited Warranty Legal & Compliance LCD HDTV WITH VIZIO INTERNET APPS® MENU Press the EXIT Button to view. INFO Use the Up and Down Arrow Buttons to select the chapter you want to exit the on-screen User Manual. INPUT LIST EXIT BACK USER MANUAL USE YOUR REMOTE Previous Page Next Page Menu Open TV Menu PAGE...
Download
Page 13
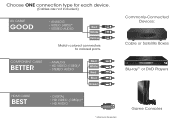
Commonly-Connected Devices: Cable or Satellite Boxes COMPONENT CABLE BETTER • ANALOG • HD VIDEO (1080i)* • STEREO AUDIO Red White Red Blue Green Blu-ray™ or DVD Players HDMI CABLE BEST • DIGITAL • HD VIDEO (1080p)* • HD AUDIO * Maximum Resolution Game Consoles Choose ONE connection type for each device. (Cables are not included.) AV CABLE GOOD • ANALOG • VIDEO (480i)* • STEREO AUDIO Red White Yellow Match colored connectors to colored ports.
Commonly-Connected Devices: Cable or Satellite Boxes COMPONENT CABLE BETTER • ANALOG • HD VIDEO (1080i)* • STEREO AUDIO Red White Red Blue Green Blu-ray™ or DVD Players HDMI CABLE BEST • DIGITAL • HD VIDEO (1080p)* • HD AUDIO * Maximum Resolution Game Consoles Choose ONE connection type for each device. (Cables are not included.) AV CABLE GOOD • ANALOG • VIDEO (480i)* • STEREO AUDIO Red White Yellow Match colored connectors to colored ports.
Download
Page 14
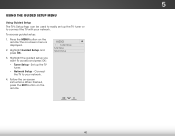
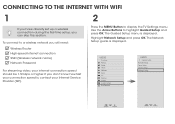
... this section. VIZIO TV Settings Picture Audio Timers Network Tuner CC CC Devices System Guided Setup User Manual Wide Exit VIZIO Guided Setup ZoRoemmote NSeotrumpal Panoramic Tuner Setup Device Setup Network Setup 2D 3D ABC Input Wide CC Wide Exit Input Sleep Timer Picture Audio Sleep Timer Network Settings Help Networ Use the Arrow Buttons to display the TV Settings menu. To connect to a wireless network you will need: Wireless Router High-speed Internet connection SSID (Wireless network name) Network Password For streaming video, your Internet Service Provider (ISP...
... this section. VIZIO TV Settings Picture Audio Timers Network Tuner CC CC Devices System Guided Setup User Manual Wide Exit VIZIO Guided Setup ZoRoemmote NSeotrumpal Panoramic Tuner Setup Device Setup Network Setup 2D 3D ABC Input Wide CC Wide Exit Input Sleep Timer Picture Audio Sleep Timer Network Settings Help Networ Use the Arrow Buttons to display the TV Settings menu. To connect to a wireless network you will need: Wireless Router High-speed Internet connection SSID (Wireless network name) Network Password For streaming video, your Internet Service Provider (ISP...
Download
Page 19
... YOU SPECIFIC LEGAL RIGHTS, AND YOU MAY ALSO HAVE OTHER RIGHTS, WHICH VARY FROM STATE TO STATE. THIS WARRANTY IS SUBJECT TO CHANGE WITHOUT NOTICE. PRE-AUTHORIZATION IS REQUIRED BEFORE SENDING ANY PRODUCT TO A VIZIO SERVICE CENTER FOR WARRANTY SERVICE. This warranty does not cover, for example: cosmetic damage, normal wear and tear, improper operation, improper voltage supply or power surges, signal issues...
... YOU SPECIFIC LEGAL RIGHTS, AND YOU MAY ALSO HAVE OTHER RIGHTS, WHICH VARY FROM STATE TO STATE. THIS WARRANTY IS SUBJECT TO CHANGE WITHOUT NOTICE. PRE-AUTHORIZATION IS REQUIRED BEFORE SENDING ANY PRODUCT TO A VIZIO SERVICE CENTER FOR WARRANTY SERVICE. This warranty does not cover, for example: cosmetic damage, normal wear and tear, improper operation, improper voltage supply or power surges, signal issues...


