

Brochure
Page 1
... one-cable setup means you can wall mount or place the TV on a stand. UPGRADE YOUR TV WITH THEATER-LIKE SOUND Perfect for TV's 32" and larger, the VIZIO 2.1 Sound Bar with Subwoofer delivers home theater audio in a sleek soundbar design perfect for 32" HDTVs and larger. round sound in SRS WOW technology enhances audio performance, improving bass and producing more natural, expanded sound. VSB211 BRING HOME THE MOVIE THEATER EXPERIENCE HOME THEATER SOUND BAR WITH SUBWOOFER VIZIO's 2.1 Home Theater Soundbar with Wireless Subwoofer...
... one-cable setup means you can wall mount or place the TV on a stand. UPGRADE YOUR TV WITH THEATER-LIKE SOUND Perfect for TV's 32" and larger, the VIZIO 2.1 Sound Bar with Subwoofer delivers home theater audio in a sleek soundbar design perfect for 32" HDTVs and larger. round sound in SRS WOW technology enhances audio performance, improving bass and producing more natural, expanded sound. VSB211 BRING HOME THE MOVIE THEATER EXPERIENCE HOME THEATER SOUND BAR WITH SUBWOOFER VIZIO's 2.1 Home Theater Soundbar with Wireless Subwoofer...

Brochure
Page 2
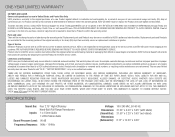
...; 2012 vizio inc. rev 10262010 all rights reserved. HOME THEATER SOUND BAR WITH SUBWOOFER DIMENSIONS (WxHxD) Sound Bar Dimensions Subwoofer Dimensions Shipping Dimensions 31.5" x 4" x 3.1" 11.2" x 13" x 11.9" 42.6" x 16.5" x 11.3" SPECIFICATIONS Sound Bar Speakers Sound Bar Size Sound Pressure Level Sound Frequency Sound Enhancement Technology Left and right channels (each) 2- 2.75" mid-range drivers 32" 90 dB 90 hZ - 19.5khZ SRS WOW HD™ INPUTS Stereo Audio In (RCA) 1 Stereo Audio In (3.5mm) 1 WARRANTY 1 year VSB211 Trademarksshownarethepropertyoftheirrespectiveowners...
...; 2012 vizio inc. rev 10262010 all rights reserved. HOME THEATER SOUND BAR WITH SUBWOOFER DIMENSIONS (WxHxD) Sound Bar Dimensions Subwoofer Dimensions Shipping Dimensions 31.5" x 4" x 3.1" 11.2" x 13" x 11.9" 42.6" x 16.5" x 11.3" SPECIFICATIONS Sound Bar Speakers Sound Bar Size Sound Pressure Level Sound Frequency Sound Enhancement Technology Left and right channels (each) 2- 2.75" mid-range drivers 32" 90 dB 90 hZ - 19.5khZ SRS WOW HD™ INPUTS Stereo Audio In (RCA) 1 Stereo Audio In (3.5mm) 1 WARRANTY 1 year VSB211 Trademarksshownarethepropertyoftheirrespectiveowners...

Quick Start Guide
Page 2
... user to the presence of un-isolated, dangerous voltage within your Sound Bar that the power cord and any other components to your Sound Bar. • When moving your Sound Bar from being damaged, the following safety instructions before connecting other cables are equipped with a three-pronged grounded plug (a plug with instructions. The performance of your Sound Bar changes substantially • Keep your Sound Bar to rain or moisture. Do not use...
... user to the presence of un-isolated, dangerous voltage within your Sound Bar that the power cord and any other components to your Sound Bar. • When moving your Sound Bar from being damaged, the following safety instructions before connecting other cables are equipped with a three-pronged grounded plug (a plug with instructions. The performance of your Sound Bar changes substantially • Keep your Sound Bar to rain or moisture. Do not use...

Quick Start Guide
Page 3
PACKAGE CONTENTS 32" Home Theater Sound Bar Power Adapter Subwoofer Cable Stereo RCA to 3.5mm Audio Cable This Quick Start Guide Subwoofer Remote Control with Battery Included cables may vary slightly in appearance from those shown.
PACKAGE CONTENTS 32" Home Theater Sound Bar Power Adapter Subwoofer Cable Stereo RCA to 3.5mm Audio Cable This Quick Start Guide Subwoofer Remote Control with Battery Included cables may vary slightly in appearance from those shown.
Quick Start Guide
Page 4
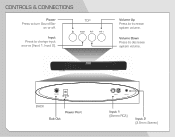
Volume Down Press to change input source (Input 1, Input 2). Input Press to decrease system volume. CONTROLS & CONNECTIONS Power Press to increase system volume. Sub Out BACK Sub Out Power Port Input 1 Input 2 Input 1 (Stereo RCA) Input 2 (3.5mm Stereo) Vol + Volume Up Press to turn Sound Bar on or off. TOP Input Vol -
Volume Down Press to change input source (Input 1, Input 2). Input Press to decrease system volume. CONTROLS & CONNECTIONS Power Press to increase system volume. Sub Out BACK Sub Out Power Port Input 1 Input 2 Input 1 (Stereo RCA) Input 2 (3.5mm Stereo) Vol + Volume Up Press to turn Sound Bar on or off. TOP Input Vol -

Quick Start Guide
Page 5
To connect the Sound Bar directly to ONE TV audio output as shown. CHOOSE ONE AUDIO OUT AUDIO OUT BACK OF YOUR TV* *Not all TVs have the audio outputs shown above. FIRST-TIME SETUP 1 Sub Out BACK OF SOUND BAR Input 1 Input 2 Connect the included Stereo RCA to 3.5mm Cable to your other devices (Blu-ray player, game system, etc) see your device's user manual.
To connect the Sound Bar directly to ONE TV audio output as shown. CHOOSE ONE AUDIO OUT AUDIO OUT BACK OF YOUR TV* *Not all TVs have the audio outputs shown above. FIRST-TIME SETUP 1 Sub Out BACK OF SOUND BAR Input 1 Input 2 Connect the included Stereo RCA to 3.5mm Cable to your other devices (Blu-ray player, game system, etc) see your device's user manual.
Quick Start Guide
Page 6
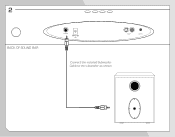
2 BACK OF SOUND BAR Sub Out Input 1 Input 2 Connect the included Subwoofer Cable to the subwoofer as shown.
2 BACK OF SOUND BAR Sub Out Input 1 Input 2 Connect the included Subwoofer Cable to the subwoofer as shown.
Quick Start Guide
Page 8
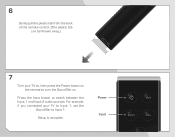
Press the Input button to turn the Sound Bar on the remote to switch between the Input 1 and Input 2 audio sources. Setup is complete. 6 Gently pull the plastic tab from the back of the remote control. (The plastic tab can be thrown away.) 7 Turn your TV to Input 1, set the Sound Bar to Input 1. For example, if you connected your TV on, then press the Power button on . Power Input
Press the Input button to turn the Sound Bar on the remote to switch between the Input 1 and Input 2 audio sources. Setup is complete. 6 Gently pull the plastic tab from the back of the remote control. (The plastic tab can be thrown away.) 7 Turn your TV to Input 1, set the Sound Bar to Input 1. For example, if you connected your TV on, then press the Power button on . Power Input

Quick Start Guide
Page 9
PLACING THE SUBWOOFER For the best sound, place the Subwoofer in a corner of the room.
PLACING THE SUBWOOFER For the best sound, place the Subwoofer in a corner of the room.
Quick Start Guide
Page 10
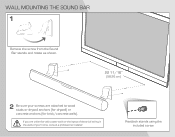
WALL MOUNTING THE SOUND BAR 1 Remove the screw from the Sound Bar stands and rotate as shown. 22 11/16" (58.26 cm) 2 Be sure your screws are unfamiliar with power tools or the layout of electrical wiring in the walls of your home, consult a professional installer. If you are attached to wood studs or drywall anchors (for drywall) or concrete anchors (for brick/concrete walls). Reattach stands using the included screw.
WALL MOUNTING THE SOUND BAR 1 Remove the screw from the Sound Bar stands and rotate as shown. 22 11/16" (58.26 cm) 2 Be sure your screws are unfamiliar with power tools or the layout of electrical wiring in the walls of your home, consult a professional installer. If you are attached to wood studs or drywall anchors (for drywall) or concrete anchors (for brick/concrete walls). Reattach stands using the included screw.

Quick Start Guide
Page 11
... decrease subwoofer volume. SUB + Press to change input source. The sensor is facing up. Input Press to increase subwoofer volume. Be sure that the + sign on . When SRS WOW HD is activated, the orange light on the front of the Sound Bar. Mute Press to replace the battery. If your remote stops responding, you may need to mute/unmute. To replace the battery, open the battery compartment as shown, then replace the old battery with...
... decrease subwoofer volume. SUB + Press to change input source. The sensor is facing up. Input Press to increase subwoofer volume. Be sure that the + sign on . When SRS WOW HD is activated, the orange light on the front of the Sound Bar. Mute Press to replace the battery. If your remote stops responding, you may need to mute/unmute. To replace the battery, open the battery compartment as shown, then replace the old battery with...

Quick Start Guide
Page 12
.... • Connect your Sound Bar. • Ensure the power cord is securely connected. • Ensure the light on the power adapter is glowing green. • Plug a different device into the electrical outlet to verify that the outlet is working correctly. There is connected to an audio OUTPUT and not audio INPUT. There is no bass. • Ensure the subwoofer cable is securely connected to the Subwoofer and to the Sound Bar. Some TVs use 3.5mm audio INPUT for...
.... • Connect your Sound Bar. • Ensure the power cord is securely connected. • Ensure the light on the power adapter is glowing green. • Plug a different device into the electrical outlet to verify that the outlet is working correctly. There is connected to an audio OUTPUT and not audio INPUT. There is no bass. • Ensure the subwoofer cable is securely connected to the Subwoofer and to the Sound Bar. Some TVs use 3.5mm audio INPUT for...

Quick Start Guide
Page 13
LET US HELP! YOUR PRODUCT INCLUDES FREE LIFETIME TECH SUPPORT The VIZIO support team is highly trained and is based in the United States. Sunday: 8 AM TO 4 PM (PST) We speak English • Se habla Español • Nous parlons Français We can help with: • Product Setup • Technical Problems • Warranty Questions • And More Phone: (877) 878-4946 (TOLL-FREE) Email: techsupport@VIZIO.com Web: www.VIZIO.com/support Hours of operation: Monday - Friday: 5 AM TO 9 PM (PST) Saturday -
LET US HELP! YOUR PRODUCT INCLUDES FREE LIFETIME TECH SUPPORT The VIZIO support team is highly trained and is based in the United States. Sunday: 8 AM TO 4 PM (PST) We speak English • Se habla Español • Nous parlons Français We can help with: • Product Setup • Technical Problems • Warranty Questions • And More Phone: (877) 878-4946 (TOLL-FREE) Email: techsupport@VIZIO.com Web: www.VIZIO.com/support Hours of operation: Monday - Friday: 5 AM TO 9 PM (PST) Saturday -
Quick Start Guide
Page 14
... a VIZIO service center to the VIZIO service center. Replacement parts and Products are not covered. VIZIO is greater. ONE-YEAR LIMITED WARRANTY ON PARTS AND LABOR Covers units purchased as installation and set-up issues or any type of protection. This warranty does not cover, for example: cosmetic damage, normal wear and tear, improper operation, improper voltage supply or power surges, signal issues, damages from warranty service or replacement...
... a VIZIO service center to the VIZIO service center. Replacement parts and Products are not covered. VIZIO is greater. ONE-YEAR LIMITED WARRANTY ON PARTS AND LABOR Covers units purchased as installation and set-up issues or any type of protection. This warranty does not cover, for example: cosmetic damage, normal wear and tear, improper operation, improper voltage supply or power surges, signal issues, damages from warranty service or replacement...

Quick Start Guide
Page 15
... a Class B digital device, pursuant to radio frequency (RF) energy set forth for an uncontrolled environment. The manufacturer is subject to which can radiate radio frequency energy, and if not installed and used in a particular installation. This device is connected. 4. Government. IC Statement Operation is no guarantee that to the following two conditions: 1. This Class B digital apparatus complies with the instructions, may...
... a Class B digital device, pursuant to radio frequency (RF) energy set forth for an uncontrolled environment. The manufacturer is subject to which can radiate radio frequency energy, and if not installed and used in a particular installation. This device is connected. 4. Government. IC Statement Operation is no guarantee that to the following two conditions: 1. This Class B digital apparatus complies with the instructions, may...


