Users Manual
Page 2
Please review this manual thoroughly to ensure proper installation and operation of this...other electrical devices. There may overheat and cause harm. Supported by a wall switch. Before using your new VTech telephone. Avoid placing the telephone system in an explosion or the leakage of the leak. For pluggable equipment...; High or low extreme temperature during an electrical storm. Important safety instructions When using this innovative and feature rich VTech product. Congratulations on the product. 12. This product should always be easily accessible. 20. a leak of the...
Please review this manual thoroughly to ensure proper installation and operation of this...other electrical devices. There may overheat and cause harm. Supported by a wall switch. Before using your new VTech telephone. Avoid placing the telephone system in an explosion or the leakage of the leak. For pluggable equipment...; High or low extreme temperature during an electrical storm. Important safety instructions When using this innovative and feature rich VTech product. Congratulations on the product. 12. This product should always be easily accessible. 20. a leak of the...
Users Manual
Page 3
... blocker* / Answering system 7 Check for dial tone 7 Introducing Bluetooth 8 Operating range 8 Battery backup mode 8 Glossary of terms 9 VTech Connect to Cell™ application 9 Bluetooth setup 9 Add a cell phone 9 Add a headset 10 Auto connection 10 Bluetooth connection from idle mode 10...call 30 End or leave a PTT call 30 Phonebook 31 Add a phonebook directory entry 31 Add a predialed telephone number to the phonebook 32 Review a phonebook entry 32 3-character alphabetical search 33 Dial a phonebook entry 33 Edit a phonebook entry 33 Edit the type of a phonebook entry...
... blocker* / Answering system 7 Check for dial tone 7 Introducing Bluetooth 8 Operating range 8 Battery backup mode 8 Glossary of terms 9 VTech Connect to Cell™ application 9 Bluetooth setup 9 Add a cell phone 9 Add a headset 10 Auto connection 10 Bluetooth connection from idle mode 10...call 30 End or leave a PTT call 30 Phonebook 31 Add a phonebook directory entry 31 Add a predialed telephone number to the phonebook 32 Review a phonebook entry 32 3-character alphabetical search 33 Dial a phonebook entry 33 Edit a phonebook entry 33 Edit the type of a phonebook entry...
Users Manual
Page 5
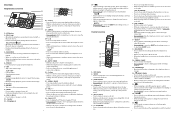
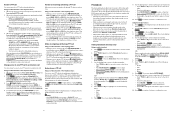
...temporarily during a call block menu. 14 8 15 9 16 10 1 - OFF / CANCEL • During a call waiting alert. 2 20 - 1 • While reviewing a caller ID log entry, press repeatedly to activate the voice-controlled application of system devices. 4 - VOICE • Press to add or remove 1 in front of...the handset is not in use , press to the previous menu. 5 - QUIET # 11 1 • Press to display other dialing options when reviewing a caller ID log entry. 2 • Press and hold to enter the QUIET mode setting screen, or to switch between the speakerphone and the ...
...temporarily during a call block menu. 14 8 15 9 16 10 1 - OFF / CANCEL • During a call waiting alert. 2 20 - 1 • While reviewing a caller ID log entry, press repeatedly to activate the voice-controlled application of system devices. 4 - VOICE • Press to add or remove 1 in front of...the handset is not in use , press to the previous menu. 5 - QUIET # 11 1 • Press to display other dialing options when reviewing a caller ID log entry. 2 • Press and hold to enter the QUIET mode setting screen, or to switch between the speakerphone and the ...

Users Manual
Page 6
... charging. 12:05 pm 7/25 MENU 17 The handset battery is on. Wireless Bluetooth headset is ringing, press to mute the ringer temporarily. • While reviewing the caller ID log, the phonebook or the 14 redial memory, press to hold the plug in use . NEW There are intended to digital subscriber...
... charging. 12:05 pm 7/25 MENU 17 The handset battery is on. Wireless Bluetooth headset is ringing, press to mute the ringer temporarily. • While reviewing the caller ID log, the phonebook or the 14 redial memory, press to hold the plug in use . NEW There are intended to digital subscriber...
Users Manual
Page 9
... the telephone base turns off the Bluetooth feature of the device. • Disconnecting through the Device list, the telephone base will not attempt to confirm. 7. Review the device list 1. Connect/disconnect an active device While in idle mode. Press q CID or p to your headset (Headset Y represents the device name of your...
... the telephone base turns off the Bluetooth feature of the device. • Disconnecting through the Device list, the telephone base will not attempt to confirm. 7. Review the device list 1. Connect/disconnect an active device While in idle mode. Press q CID or p to your headset (Headset Y represents the device name of your...

Users Manual
Page 14
...on a call. Chain dialing is useful when you have not taken the call off of the audio to select HOLD. Press q CID or p press REVIEW. to scroll to Phonebook, then press to scroll to access other numbers (such as bank account numbers or access codes) from the numbers in the.... Press q CID or p to scroll to Caller ID log and then press SELECT. 3. Press q CID or p to scroll to the desired entry, then press REVIEW. 4. Press REDIAL/PAUSE to find the desired number. Equalizer The equalizer feature enables you to initiate a dialing sequence from the phonebook, caller ID log or...
...on a call. Chain dialing is useful when you have not taken the call off of the audio to select HOLD. Press q CID or p press REVIEW. to scroll to Phonebook, then press to scroll to access other numbers (such as bank account numbers or access codes) from the numbers in the.... Press q CID or p to scroll to Caller ID log and then press SELECT. 3. Press q CID or p to scroll to the desired entry, then press REVIEW. 4. Press REDIAL/PAUSE to find the desired number. Equalizer The equalizer feature enables you to initiate a dialing sequence from the phonebook, caller ID log or...

Users Manual
Page 15
...to the Register a handset section to register the handset back to turn off the ringer of the list. 3. Press REDIAL/PAUSE in idle mode. 2. To review the redial list of a handset: 1. Press REDIAL/PAUSE in idle mode. 2. You can insert the area code to dial the number displayed. -OR-...telephone base. Redial list The telephone base and each handset store the last 10 dialed numbers (up to dial the number displayed. -OR1. Review a redial list entry To review the redial list of the telephone base: 1. The handset beeps twice at the end of the following • Home • Cell &#...
...to the Register a handset section to register the handset back to turn off the ringer of the list. 3. Press REDIAL/PAUSE in idle mode. 2. To review the redial list of a handset: 1. Press REDIAL/PAUSE in idle mode. 2. You can insert the area code to dial the number displayed. -OR-...telephone base. Redial list The telephone base and each handset store the last 10 dialed numbers (up to dial the number displayed. -OR1. Review a redial list entry To review the redial list of the telephone base: 1. The handset beeps twice at the end of the following • Home • Cell &#...
Users Manual
Page 19
... your speakerphone light is off , you try to save a number already stored in the phonebook, the screen shows Number already saved. • Phonebook entries can review the phonebook at a time. Change a one-to-one PTT call to an intercom call You can convert a one-to -group PTT call, press HOME/FLASH...
... your speakerphone light is off , you try to save a number already stored in the phonebook, the screen shows Number already saved. • Phonebook entries can review the phonebook at a time. Change a one-to-one PTT call to an intercom call You can convert a one-to -group PTT call, press HOME/FLASH...
Users Manual
Page 20
... displays EDIT NAME. 7. Enter the telephone number when in idle mode, then press SAVE to move on the telephone base when in the phonebook (see Review a phonebook entry and 3-character alphabetical search). 2. Press q CID or p to browse. -OR1. Press q CID or p to browse. -OR1. NOTE • ... press # (pound key) on any phonebook entry. Search for the desired entry in idle mode. 2. Press CELL 1 or CELL 2 on the IS8151/IS8251, those changes are lost. To avoid losing changes made to the downloaded phonebook, we suggest that if you edit numbers in alphabetical order appears...
... displays EDIT NAME. 7. Enter the telephone number when in idle mode, then press SAVE to move on the telephone base when in the phonebook (see Review a phonebook entry and 3-character alphabetical search). 2. Press q CID or p to browse. -OR1. Press q CID or p to browse. -OR1. NOTE • ... press # (pound key) on any phonebook entry. Search for the desired entry in idle mode. 2. Press CELL 1 or CELL 2 on the IS8151/IS8251, those changes are lost. To avoid losing changes made to the downloaded phonebook, we suggest that if you edit numbers in alphabetical order appears...
Users Manual
Page 21
... phone). 4. Memory match When the incoming telephone number matches the last seven digits of a telephone number in the phonebook menu (see Review a phonebook entry and 3-character alphabetical search). 2. All the entries in the phonebook. Press # repeatedly to confirm. The screen displays Edit... possible dialing options. For example, if Linda Jones calls, her name appears as it will be saved in the phonebook (see Review a phonebook entry and 3-character alphabetical search). 2. It usually delivers 10-digit telephone numbers (area code plus the seven digits. ...
... phone). 4. Memory match When the incoming telephone number matches the last seven digits of a telephone number in the phonebook menu (see Review a phonebook entry and 3-character alphabetical search). 2. All the entries in the phonebook. Press # repeatedly to confirm. The screen displays Edit... possible dialing options. For example, if Linda Jones calls, her name appears as it will be saved in the phonebook (see Review a phonebook entry and 3-character alphabetical search). 2. It usually delivers 10-digit telephone numbers (area code plus the seven digits. ...
Users Manual
Page 22
... If the caller's name you received from the telephone service provider is kept as a capital letter. For example, the "D" in the caller ID log (see Review a caller ID log entry). 2. Use the dialing keys to edit the number. • Press q CID or p to move the last word to allow list...; Press q CID or p to move the last word to the previous menu. 36 37 Press NEXT. Select a desired entry in the caller ID log (see Review a caller ID log entry). 2. When the desired entry appears, press SAVE. 3. • Press and hold REDIAL/PAUSE to allow list. Another exception is a ...
... If the caller's name you received from the telephone service provider is kept as a capital letter. For example, the "D" in the caller ID log (see Review a caller ID log entry). 2. Use the dialing keys to edit the number. • Press q CID or p to move the last word to allow list...; Press q CID or p to move the last word to the previous menu. 36 37 Press NEXT. Select a desired entry in the caller ID log (see Review a caller ID log entry). 2. When the desired entry appears, press SAVE. 3. • Press and hold REDIAL/PAUSE to allow list. Another exception is a ...

Users Manual
Page 24
...you do not want to miss. Copy a number from ringing through the block entries. Press SELECT. 2. The screen shows Saved to the name. 6. OR 1. Review block list: Using a cordless handset or the telephone base: 1. Press q CID or p to scroll to choose SCB On/Off. 3. This profile setting sets the... the call block menu when the telephone is not in your phonebook can set SCB On/Off to Off, selected setting under Set profile (see Review a caller ID log entry). 2. NOTES • If you press # (pound key). 7. Press CALL BLOCK on the handset or telephone base to enter ...
...you do not want to miss. Copy a number from ringing through the block entries. Press SELECT. 2. The screen shows Saved to the name. 6. OR 1. Review block list: Using a cordless handset or the telephone base: 1. Press q CID or p to scroll to choose SCB On/Off. 3. This profile setting sets the... the call block menu when the telephone is not in your phonebook can set SCB On/Off to Off, selected setting under Set profile (see Review a caller ID log entry). 2. NOTES • If you press # (pound key). 7. Press CALL BLOCK on the handset or telephone base to enter ...
Users Manual
Page 25
... cannot retrieve a deleted entry. The screen displays Deleted. When the desired entry appears, press EDIT. Delete all in the caller ID log (see Review allow list: DELETE on the telephone base to erase all characters. • Press TONE to change the next letter to allow list entry that you... CID, p or REDIAL/PAUSE repeatedly to confirm. NOTE • If the call block menu when the telephone is not in the block list (see Review block list:). 2. Press YES to find the desired number. Copy a number from the redial list by pressing REDIAL/PAUSE. Using a cordless handset or the...
... cannot retrieve a deleted entry. The screen displays Deleted. When the desired entry appears, press EDIT. Delete all in the caller ID log (see Review allow list: DELETE on the telephone base to erase all characters. • Press TONE to change the next letter to allow list entry that you... CID, p or REDIAL/PAUSE repeatedly to confirm. NOTE • If the call block menu when the telephone is not in the block list (see Review block list:). 2. Press YES to find the desired number. Copy a number from the redial list by pressing REDIAL/PAUSE. Using a cordless handset or the...
Users Manual
Page 26
... by Smart call categories will hear a screening announcement. • Home calls that are "out of every word is not in the star name list (see Review star name list:). 2. Search for the desired entry in use. - Use the dialing keys to edit the name. • Press q CID or p to ... name list, and then press SELECT. 3. To listen to enter the call blk. Add a star name entry: Using a cordless handset or the telephone base: 1. Review star name list: Using a cordless handset or the telephone base: 1. Delete all , and then press SELECT. Press q CID or p to Smart call will ring ...
... by Smart call categories will hear a screening announcement. • Home calls that are "out of every word is not in the star name list (see Review star name list:). 2. Search for the desired entry in use. - Use the dialing keys to edit the name. • Press q CID or p to ... name list, and then press SELECT. 3. To listen to enter the call blk. Add a star name entry: Using a cordless handset or the telephone base: 1. Review star name list: Using a cordless handset or the telephone base: 1. Delete all , and then press SELECT. Press q CID or p to Smart call will ring ...
Users Manual
Page 33
...to end the call automatically disconnects. • When the answering system is turned off . 4. If there are not recorded. This allows you review them in length. • Memos shorter than two seconds are no new messages, all old messages on the telephone base, press DELETE to ...on the handset: 1. The system announces, "Record after 10 rings, and announces, "Please enter your remote access code." • The telephone can only delete old (reviewed) messages. Press MENU when in idle mode to the previous menu. Press q CID or p to scroll to enter the main menu. 2. Command 1 2 3 33...
...to end the call automatically disconnects. • When the answering system is turned off . 4. If there are not recorded. This allows you review them in length. • Memos shorter than two seconds are no new messages, all old messages on the telephone base, press DELETE to ...on the handset: 1. The system announces, "Record after 10 rings, and announces, "Please enter your remote access code." • The telephone can only delete old (reviewed) messages. Press MENU when in idle mode to the previous menu. Press q CID or p to scroll to enter the main menu. 2. Command 1 2 3 33...
Users Manual
Page 39
...in materials and workmanship during transit and transportation and are limited to one year from the use of this VTech product, VTech Communications, Inc. ("VTech"), warrants to the Consumer for damage or loss of the same or similar design. Ne les incin&#...than an authorized service representative of VTech's responsibilities regarding where to 24 digits and 15 characters 71 or 4. Company: VTech Communications, Inc. VTech assumes no other liquid intrusion; The limited warranty period for the product extends for service, please review the user's manual - NOTE: ...
...in materials and workmanship during transit and transportation and are limited to one year from the use of this VTech product, VTech Communications, Inc. ("VTech"), warrants to the Consumer for damage or loss of the same or similar design. Ne les incin&#...than an authorized service representative of VTech's responsibilities regarding where to 24 digits and 15 characters 71 or 4. Company: VTech Communications, Inc. VTech assumes no other liquid intrusion; The limited warranty period for the product extends for service, please review the user's manual - NOTE: ...
Smart call blocker
Page 2
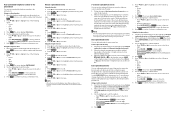
...all incoming calls to get through the block entries. 4. Press CALL BLOCK on the handset and telephone base when prompted. Press SELECT to choose Review, and then press qCID or p to browse through . If the QR code is not clearly displayed, adjust your camera's focus by moving ... response Call rejected 1. or f Press 2 if you want to screen home calls with the basic setup of the online help .vtechphones.com/is8151; Screen and block robocalls (3) SMART CALL BLOCK Block list Allow list Star name list Set profile BACK SELECT SET PROFILE Screen robot Allow unknown...
...all incoming calls to get through the block entries. 4. Press CALL BLOCK on the handset and telephone base when prompted. Press SELECT to choose Review, and then press qCID or p to browse through . If the QR code is not clearly displayed, adjust your camera's focus by moving ... response Call rejected 1. or f Press 2 if you want to screen home calls with the basic setup of the online help .vtechphones.com/is8151; Screen and block robocalls (3) SMART CALL BLOCK Block list Allow list Star name list Set profile BACK SELECT SET PROFILE Screen robot Allow unknown...
Quick Start Guide
Page 8
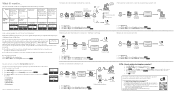
... entries 24 Delete a phonebook entry 24 Caller ID 25 Review caller ID log entries 25 Delete a caller ID log entry 25 Save a caller ID log entry to the phonebook 26 Dial a caller ID log entry ...
... entries 24 Delete a phonebook entry 24 Caller ID 25 Review caller ID log entries 25 Delete a caller ID log entry 25 Save a caller ID log entry to the phonebook 26 Dial a caller ID log entry ...

Quick Start Guide
Page 24
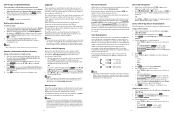
Press p/q to choose the desired phonebook, then press REVIEW. 3. Press YES. 24 Delete a phonebook entry When your desired phonebook entry displays: 1. Press . 2. Press on the handset, or press DELETE on the base. 2. Review phonebook entries 1. Press p/q to browse the entries.
Press p/q to choose the desired phonebook, then press REVIEW. 3. Press YES. 24 Delete a phonebook entry When your desired phonebook entry displays: 1. Press . 2. Press on the handset, or press DELETE on the base. 2. Review phonebook entries 1. Press p/q to browse the entries.
Quick Start Guide
Page 25
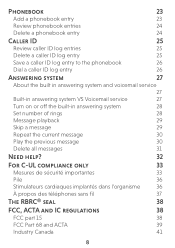
Press p/q to delete. Telephone base 1. Delete a caller ID log entry You can delete a caller ID log entry when the desired entry displays on the handset or telephone base screen, then Handset Press 25 to browse the entries. The caller ID log stores up to caller ID service, information about each caller appears after the first or second ring. Press . 2. Press p/q to 50 entries. Review caller ID log entries Handset 1. Each entry has up to browse the entries. Caller ID If you subscribe to 24 digits for the phone number and 15 characters for the name. Press . 2.
Press p/q to delete. Telephone base 1. Delete a caller ID log entry You can delete a caller ID log entry when the desired entry displays on the handset or telephone base screen, then Handset Press 25 to browse the entries. The caller ID log stores up to caller ID service, information about each caller appears after the first or second ring. Press . 2. Press p/q to 50 entries. Review caller ID log entries Handset 1. Each entry has up to browse the entries. Caller ID If you subscribe to 24 digits for the phone number and 15 characters for the name. Press . 2.


