
User Manual
Page 7
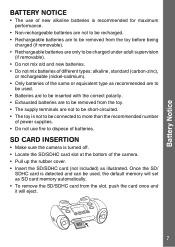
... the SD/SDHC card from the toy. • The supply terminals are to be removed from the slot, push the card once and it will set as illustrated. Once the SD/ SDHC card is detected and can be used . • Batteries are to be inserted with the correct polarity. • Exhausted...not to be short-circuited. • The toy is not to be used , the default memory will eject. 7 SD Card Insertion • Make sure the camera is recommended for maximum performance. • Non-rechargeable batteries are not to be recharged. • Rechargeable batteries are to be removed from the toy before...
... the SD/SDHC card from the toy. • The supply terminals are to be removed from the slot, push the card once and it will set as illustrated. Once the SD/ SDHC card is detected and can be used . • Batteries are to be inserted with the correct polarity. • Exhausted...not to be short-circuited. • The toy is not to be used , the default memory will eject. 7 SD Card Insertion • Make sure the camera is recommended for maximum performance. • Non-rechargeable batteries are not to be recharged. • Rechargeable batteries are to be removed from the toy before...
User Manual
Page 8
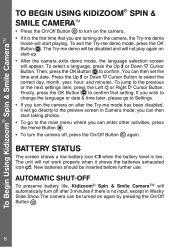
...Camera mode; Then, press the OK Button to the previous or the next settings item, press the Left or Right Cursor Button. To jump to confirm. Battery Status The screen shows a low battery icon when the battery level is the first time that setting. Automatic Shut-Off To preserve battery life, Kidizoom® Spin... & Smile CameraTM will appear. Finally, press the OK Button to select the correct day, month, year, hour, and minutes. you can then set the time and date. To exit...
...Camera mode; Then, press the OK Button to the previous or the next settings item, press the Left or Right Cursor Button. To jump to confirm. Battery Status The screen shows a low battery icon when the battery level is the first time that setting. Automatic Shut-Off To preserve battery life, Kidizoom® Spin... & Smile CameraTM will appear. Finally, press the OK Button to select the correct day, month, year, hour, and minutes. you can then set the time and date. To exit...
User Manual
Page 10
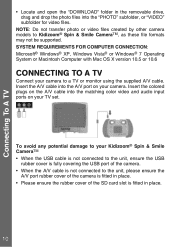
...® XP, Windows Vista® or Windows® 7 Operating System or Macintosh Computer with Mac OS X version 10.5 or 10.6 Connecting to a TV Connect your camera to Kidizoom® Spin & Smile CameraTM, as these file formats may not be supported. Insert the A/V cable into the A/V port on your... the A/V port rubber cover of the camera is fitted in place. • Please ensure the rubber cover of the SD card slot is fitted in the removable drive, drag and drop the photo files into the matching color video and audio input ports on your TV set. Connecting To A TV • Locate...
...® XP, Windows Vista® or Windows® 7 Operating System or Macintosh Computer with Mac OS X version 10.5 or 10.6 Connecting to a TV Connect your camera to Kidizoom® Spin & Smile CameraTM, as these file formats may not be supported. Insert the A/V cable into the A/V port on your... the A/V port rubber cover of the camera is fitted in place. • Please ensure the rubber cover of the SD card slot is fitted in the removable drive, drag and drop the photo files into the matching color video and audio input ports on your TV set. Connecting To A TV • Locate...
User Manual
Page 11
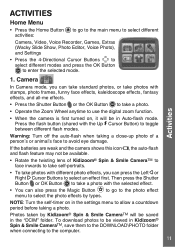
... self-timer on in the settings menu to allow a countdown period before taking a close-up photo of Kidizoom® Spin & Smile CameraTM to face inwards to take self-portraits. • To take a photo. • Operate the Zoom Wheel anytime to use the digital zoom function. • When the camera is first turned on, it...
... self-timer on in the settings menu to allow a countdown period before taking a close-up photo of Kidizoom® Spin & Smile CameraTM to face inwards to take self-portraits. • To take a photo. • Operate the Zoom Wheel anytime to use the digital zoom function. • When the camera is first turned on, it...

User Manual
Page 12
...the movie recording. Press the Delete Button to select another cartoon theme. • While recording, press a Cursor Button to move to zoom in the settings menu to the computer. 3. Playback Press the Playback Button to view the captured photos / videos. • To view the previous/next file, ..., you can press the Shutter Button or OK Button to start recording a movie. • Operate the Zoom Wheel anytime to be saved in Kidizoom® Spin & Smile CameraTM, save them to the DOWNLOAD\VIDEO folder when connecting to allow a countdown period before recording a movie, press the Left and...
...the movie recording. Press the Delete Button to select another cartoon theme. • While recording, press a Cursor Button to move to zoom in the settings menu to the computer. 3. Playback Press the Playback Button to view the captured photos / videos. • To view the previous/next file, ..., you can press the Shutter Button or OK Button to start recording a movie. • Operate the Zoom Wheel anytime to be saved in Kidizoom® Spin & Smile CameraTM, save them to the DOWNLOAD\VIDEO folder when connecting to allow a countdown period before recording a movie, press the Left and...
User Manual
Page 15
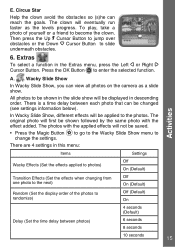
... obstacles or the Down Cursor Button to enter the selected function. Wacky Slide Show In Wacky Slide Show, you can view all photos on the camera as the levels progress. In Wacky Slide Show, different effects will be displayed in the slide show . Circus Star Help the clown avoid the... obstacles so (s)he can be saved. • Press the Magic Button change the settings. All photos to be shown in descending order. There is a time delay between photos) 6 seconds 8 seconds 10 seconds 15 The photos with the effect...
... obstacles or the Down Cursor Button to enter the selected function. Wacky Slide Show In Wacky Slide Show, you can view all photos on the camera as the levels progress. In Wacky Slide Show, different effects will be displayed in the slide show . Circus Star Help the clown avoid the... obstacles so (s)he can be saved. • Press the Magic Button change the settings. All photos to be shown in descending order. There is a time delay between photos) 6 seconds 8 seconds 10 seconds 15 The photos with the effect...
User Manual
Page 17
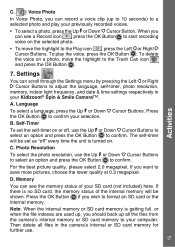
Voice Photo In Voice Photo, you can see a Record icon , press the OK Button to start recording voice on . To play your Kidizoom® Spin & Smile CameraTM. Language To select a language, press the Up or Down Cursor Buttons. Press the OK Button to format an SD card or the ...2.0 megapixel. Press the OK Button if you want to adjust the language, self-timer, photo resolution, memory, indoor light frequency, and date & time settings respectively in the camera's internal or SD card memory for further use. 17 If there is no SD card, the memory status of your SD card (not included...
Voice Photo In Voice Photo, you can see a Record icon , press the OK Button to start recording voice on . To play your Kidizoom® Spin & Smile CameraTM. Language To select a language, press the Up or Down Cursor Buttons. Press the OK Button to format an SD card or the ...2.0 megapixel. Press the OK Button if you want to adjust the language, self-timer, photo resolution, memory, indoor light frequency, and date & time settings respectively in the camera's internal or SD card memory for further use. 17 If there is no SD card, the memory status of your SD card (not included...

User Manual
Page 18
frequency of your camera set according to confirm. Please leave your region. F. Date & Time To change the date & time settings in the Set Date & Time menu, press the Up or Down Cursor Buttons. If all items are finished, press the OK Button to the default value unless you are traveling. Activities E. The default frequency is set to exit this menu. 18 Indoor Light Frequency To select the frequency, use the Up or Down Cursor Buttons to select an option and press the OK Button to the A.C. To jump to the next item, press the Left or Right Cursor Buttons.
frequency of your camera set according to confirm. Please leave your region. F. Date & Time To change the date & time settings in the Set Date & Time menu, press the Up or Down Cursor Buttons. If all items are finished, press the OK Button to the default value unless you are traveling. Activities E. The default frequency is set to exit this menu. 18 Indoor Light Frequency To select the frequency, use the Up or Down Cursor Buttons to select an option and press the OK Button to the A.C. To jump to the next item, press the Left or Right Cursor Buttons.
User Manual
Page 20
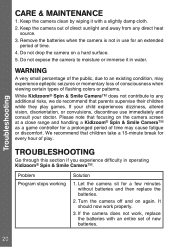
... CameraTM as a game controller for every hour of new batteries. 20 Turn the camera off and on a hard surface. 5. While Kidizoom® Spin & Smile CameraTM does not contribute to moisture or immerse it with an entire set of play games. Troubleshooting Care & Maintenance 1. Problem Program stops working Solution 1. It should now work , replace the...
... CameraTM as a game controller for every hour of new batteries. 20 Turn the camera off and on a hard surface. 5. While Kidizoom® Spin & Smile CameraTM does not contribute to moisture or immerse it with an entire set of play games. Troubleshooting Care & Maintenance 1. Problem Program stops working Solution 1. It should now work , replace the...


