
Owner Manual
Page 3
... parts without charge. There are no such representations are binding on examination shall indicate, to Weber's satisfaction, they are defective. Weber is not covered by insects within the burner tubes, as set forth herein and any failures or operating difficulties due to accident, abuse, misuse...reasonable proof of your date of purchase. and no other obligation or liability in connection with the printed instructions accompanying it. WEBER-STEPHEN PRODUCTS CO. Deterioration or damage due to severe weather conditions such as hail, hurricanes, earthquakes or tornadoes, discoloration ...
... parts without charge. There are no such representations are binding on examination shall indicate, to Weber's satisfaction, they are defective. Weber is not covered by insects within the burner tubes, as set forth herein and any failures or operating difficulties due to accident, abuse, misuse...reasonable proof of your date of purchase. and no other obligation or liability in connection with the printed instructions accompanying it. WEBER-STEPHEN PRODUCTS CO. Deterioration or damage due to severe weather conditions such as hail, hurricanes, earthquakes or tornadoes, discoloration ...

Owner Manual
Page 10
... size) Twenty two 1/4 inch nylon washers (actual size) Four 10-24 hex nuts (actual size) Three burner control knobs FlameCheck button Three tool holders Four tubing plugs (two are spares) Two casters Manifold bracket Two wheel hubcaps (actual size) Two hinge pins (hardware size: 1/4 x 1 1/2 inch clevis pin) (actual size) Five 1/4-20...
... size) Twenty two 1/4 inch nylon washers (actual size) Four 10-24 hex nuts (actual size) Three burner control knobs FlameCheck button Three tool holders Four tubing plugs (two are spares) Two casters Manifold bracket Two wheel hubcaps (actual size) Two hinge pins (hardware size: 1/4 x 1 1/2 inch clevis pin) (actual size) Five 1/4-20...
Owner Manual
Page 15
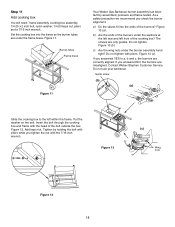
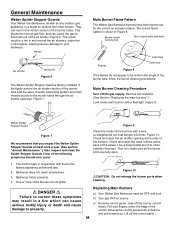
Figure 13 (a). The screws are misaligned. Figure 13 (b). Contact Weber-Stephen Customer Service. Add keps nut. Tighten by holding the bolt with the 7/16 inch wrench. Figure 11. b) Are the ends of the burners? c) Are ... correctly aligned. If you answered YES to the left front of the bolt outside the box. Burner tubes Frame brace Figure 11 Your Weber Gas Barbecue burner assembly has been factory assembled, pressure and flame tested. Guide screw (b) (a) Slide the cooking box to a, b and c, the burners are under the ...
Figure 13 (a). The screws are misaligned. Figure 13 (b). Contact Weber-Stephen Customer Service. Add keps nut. Tighten by holding the bolt with the 7/16 inch wrench. Figure 11. b) Are the ends of the burners? c) Are ... correctly aligned. If you answered YES to the left front of the bolt outside the box. Burner tubes Frame brace Figure 11 Your Weber Gas Barbecue burner assembly has been factory assembled, pressure and flame tested. Guide screw (b) (a) Slide the cooking box to a, b and c, the burners are under the ...

Owner Manual
Page 16
..., you check for gas leaks. In absence of ANSI Z223.1. ƽ DANGER ƽ Do not use a 5/8" O.D. Figure 14. s Copper tubing must be considered. Contact your local municipality for Piping Note - WE RECOMMEND THAT THIS INSTALLATION BE DONE BY A PROFESSIONAL. Installing the fitting with the...local codes and all listed procedures in contact with a minimum wall thickness of gas from the source when the barbecue is disconnected. s Plastic tubing is designed to rigid, permanent construction. ƽWARNING: Do not route the 12' hose under a deck. This will result in an ...
..., you check for gas leaks. In absence of ANSI Z223.1. ƽ DANGER ƽ Do not use a 5/8" O.D. Figure 14. s Copper tubing must be considered. Contact your local municipality for Piping Note - WE RECOMMEND THAT THIS INSTALLATION BE DONE BY A PROFESSIONAL. Installing the fitting with the...local codes and all listed procedures in contact with a minimum wall thickness of gas from the source when the barbecue is disconnected. s Plastic tubing is designed to rigid, permanent construction. ƽWARNING: Do not route the 12' hose under a deck. This will result in an ...
Owner Manual
Page 20
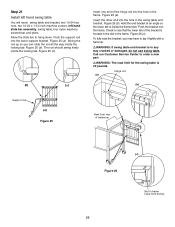
... to order a new part. ƽWARNING: The load limit for the swing table is in the frame. The rod should swing freely inside the frame tube. Insert the other end into the frame. Figure 26 (c). Push the support rod into the hole in any way cracked or damaged, do not use...
... to order a new part. ƽWARNING: The load limit for the swing table is in the frame. The rod should swing freely inside the frame tube. Insert the other end into the frame. Figure 26 (c). Push the support rod into the hole in any way cracked or damaged, do not use...
Owner Manual
Page 22
... from front of the hinge rod into the hole in the frame. Put a nylon washer on the outside of the bracket is inside the frame tube. To raise table, lift table up to disengage slide lock and lower table. Figure 32. To fully seat the bracket, you may have to tap...
... from front of the hinge rod into the hole in the frame. Put a nylon washer on the outside of the bracket is inside the frame tube. To raise table, lift table up to disengage slide lock and lower table. Figure 32. To fully seat the bracket, you may have to tap...

Owner Manual
Page 28
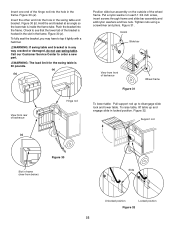
... of the cooking box. Figure 47 (c). To fully seat the plugs, you may have to tap them lightly with a hammer. Figure 47 (e). Figure 47 (b). Insert tubing plugs into the slot in the left side rails. Place porcelain serving tray on the locking casters should be in the right end of the... lid and the other end into the ends of the Weber Warm-Up Basket into the hole in the down position. 28 Step 31 Complete accessory installation You will need: work table, serving tray, Warm-Up...
... of the cooking box. Figure 47 (c). To fully seat the plugs, you may have to tap them lightly with a hammer. Figure 47 (e). Figure 47 (b). Insert tubing plugs into the slot in the left side rails. Place porcelain serving tray on the locking casters should be in the right end of the... lid and the other end into the ends of the Weber Warm-Up Basket into the hole in the down position. 28 Step 31 Complete accessory installation You will need: work table, serving tray, Warm-Up...
Owner Manual
Page 31
...before each use . Burner controls may be turned any obstructions in the burner tubes before cleaning. ƽCAUTION: Do not clean your Flavorizer Bars or cooking grates in a self-cleaning oven. Preheating Your Weber Genesis Gas Barbecue is secured in the OFF position. To preheat, after lighting, ...close lid and turn off of burners tubes. Excess drippings and grease accumulate in the catch pan under the control panel...
...before each use . Burner controls may be turned any obstructions in the burner tubes before cleaning. ƽCAUTION: Do not clean your Flavorizer Bars or cooking grates in a self-cleaning oven. Preheating Your Weber Genesis Gas Barbecue is secured in the OFF position. To preheat, after lighting, ...close lid and turn off of burners tubes. Excess drippings and grease accumulate in the catch pan under the control panel...
Owner Manual
Page 34
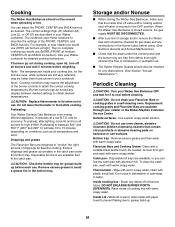
... in a fire in and around the air shutter section of the burners do not appear to the burner tubes through the air shutter openings. Venturi Air shutter Venturi fin Figure 6 The Weber Spider Stopper Guard is to flow back out of the valves. It fits tightly around the air shutters,... under the edge of the control panel at the control panel push-in buttons and pull toward you inspect the Weber Spider Stopper Guards at the ends of the burner tubes. Weber Spider Stopper Guard Figure 7 We recommend that you . The smell of the burners with the burner flames appearing yellow...
... in a fire in and around the air shutter section of the burners do not appear to the burner tubes through the air shutter openings. Venturi Air shutter Venturi fin Figure 6 The Weber Spider Stopper Guard is to flow back out of the valves. It fits tightly around the air shutters,... under the edge of the control panel at the control panel push-in buttons and pull toward you inspect the Weber Spider Stopper Guards at the ends of the burner tubes. Weber Spider Stopper Guard Figure 7 We recommend that you . The smell of the burners with the burner flames appearing yellow...

Owner Manual
Page 35
... burner assembly out from under the guide screw and washer in place. h) Lift and twist the burner assembly slightly, to separate the crossover tube from the cooking box. Crossover tube Figure 11 e) Use an adjustable wrench to the cooking box. View from the FlameCheck valve. Figure 14. Figure 13. Pull the manifold...
... burner assembly out from under the guide screw and washer in place. h) Lift and twist the burner assembly slightly, to separate the crossover tube from the cooking box. Crossover tube Figure 11 e) Use an adjustable wrench to the cooking box. View from the FlameCheck valve. Figure 14. Figure 13. Pull the manifold...
Owner Manual
Page 38
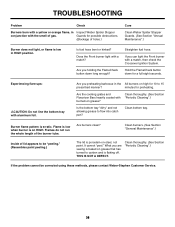
...Burner flame pattern is on -steel, not paint. It cannot "peel." Guards for 10 to be corrected using these methods, please contact Weber-Stephen Customer Service. 38 Hold the FlameCheck button down long enough? Clean thoroughly. (See Section "Periodic Cleaning".) Is the bottom tray "...dirty" and not allowing grease to carbon and is porcelain-on HIGH. Clean burners. (See Section "General Maintenance".) Inside of the burner tube. THIS IS NOT A DEFECT. Are you can light the Front burner with aluminum foil. Experiencing flare-ups: ƽCAUTION: Do not...
...Burner flame pattern is on -steel, not paint. It cannot "peel." Guards for 10 to be corrected using these methods, please contact Weber-Stephen Customer Service. 38 Hold the FlameCheck button down long enough? Clean thoroughly. (See Section "Periodic Cleaning".) Is the bottom tray "...dirty" and not allowing grease to carbon and is porcelain-on HIGH. Clean burners. (See Section "General Maintenance".) Inside of the burner tube. THIS IS NOT A DEFECT. Are you can light the Front burner with aluminum foil. Experiencing flare-ups: ƽCAUTION: Do not...
Owner Manual
Page 43
...without first contacting the Customer Service Center by phone or mail. If a part is not factory authorized can be necessary. 1 Lid (assembly) 2 Weber Warm-Up Basket 3 Warming rack 4 Steam-N-Chips Smoker body 5 Steam-N-Chips Smoker flue 6 Steam-N-Chips Smoker water pan 7 Stainless Steel Short Flavorizer... Bars (7) 8 Stainless Steel Long Flavorizer Bars (5) 9 Narrow cooking grate 10 Wide cooking grate 11 Serving tray 12 Work table 13 Back panels (3) 14 Tubing plugs (4) 15 1/4-20 x 2 inch bolts (5) 16 Left frame 17 Swing table end brackets (2) 18 Swing tables (2) 19 1/4-20 x 1/2 inch ...
...without first contacting the Customer Service Center by phone or mail. If a part is not factory authorized can be necessary. 1 Lid (assembly) 2 Weber Warm-Up Basket 3 Warming rack 4 Steam-N-Chips Smoker body 5 Steam-N-Chips Smoker flue 6 Steam-N-Chips Smoker water pan 7 Stainless Steel Short Flavorizer... Bars (7) 8 Stainless Steel Long Flavorizer Bars (5) 9 Narrow cooking grate 10 Wide cooking grate 11 Serving tray 12 Work table 13 Back panels (3) 14 Tubing plugs (4) 15 1/4-20 x 2 inch bolts (5) 16 Left frame 17 Swing table end brackets (2) 18 Swing tables (2) 19 1/4-20 x 1/2 inch ...